Casio EXILIM EX-S600 Operation
The Casio EX-S600's user interface is straightforward, with only a few external controls and an easily navigable LCD menu system. For standard point-and-shoot operation, the most basic features such as flash, Best Shot scene mode selection, and zoom are all accessible via external controls. Three external buttons control the main operating modes, Playback, Record, and Movie. Three menus are available in Record mode, two in Playback, delineated by subject tabs at the top of the screen. The arrow keys of the Multi-Controller scroll through each selection, and the Set button in the center of the pad confirms any changes. It shouldn't take much more than half an hour to become familiar with the camera setup, even without the manual.
Record Mode Display The
Casio EX-S600 has three Record mode displays, shown at right. The first displays
the image area and a fairly comprehensive information overlay, including resolution
and quality settings, flash mode, camera mode, etc., and the aperture and shutter
speed whenever the Shutter button is halfway pressed. The second mode adds a
small histogram, for double-checking exposure. The third mode shows the image
area only, with just the focus/exposure brackets displayed in the center of
the screen. A Grid option under the Record menu enables a grid display that
divides the image area into thirds, vertically and horizontally, for easier
framing.
The
Casio EX-S600 has three Record mode displays, shown at right. The first displays
the image area and a fairly comprehensive information overlay, including resolution
and quality settings, flash mode, camera mode, etc., and the aperture and shutter
speed whenever the Shutter button is halfway pressed. The second mode adds a
small histogram, for double-checking exposure. The third mode shows the image
area only, with just the focus/exposure brackets displayed in the center of
the screen. A Grid option under the Record menu enables a grid display that
divides the image area into thirds, vertically and horizontally, for easier
framing.
Playback Mode Display In
Playback mode, you can use the EX-S600's zoom control to zoom in or out on an
image, or show an index display or a calendar view of the captured images on
the memory card. Calendar view groups images in the camera's memory according
to the date they were captured on. The Display button controls the level of
information displayed over the image, and accesses a histogram display as well.
In
Playback mode, you can use the EX-S600's zoom control to zoom in or out on an
image, or show an index display or a calendar view of the captured images on
the memory card. Calendar view groups images in the camera's memory according
to the date they were captured on. The Display button controls the level of
information displayed over the image, and accesses a histogram display as well.
Casio EXILIM EX-S600 Modes and Menus
 Record Mode: In Record mode, the camera captures still images, and by
default, exposure remains under automatic control. However, the Best Shot menu
(enabled by pressing the BS button on the back of the camera) offers 34 preset
shooting modes for more difficult situations: Auto, Portrait, Scenery, Portrait
Scenery, Children, Sports, Candlelight Portrait, Party, Pet, Flower, Natural
Green, Autumn Leaves, Soft Flowing Water, Splashing Water, Sundown, Night Scene,
Night Scene Portrait, Fireworks, Food, Text, Collection, Backlight, Anti Shake,
High Sensitivity, Monochrome, Retro, Twilight, Old Photo, Businesscards and
Documents, White Board, etc., Silent, Short Movie, Past Movie, Voice Recording,
and Register User Scene.
Record Mode: In Record mode, the camera captures still images, and by
default, exposure remains under automatic control. However, the Best Shot menu
(enabled by pressing the BS button on the back of the camera) offers 34 preset
shooting modes for more difficult situations: Auto, Portrait, Scenery, Portrait
Scenery, Children, Sports, Candlelight Portrait, Party, Pet, Flower, Natural
Green, Autumn Leaves, Soft Flowing Water, Splashing Water, Sundown, Night Scene,
Night Scene Portrait, Fireworks, Food, Text, Collection, Backlight, Anti Shake,
High Sensitivity, Monochrome, Retro, Twilight, Old Photo, Businesscards and
Documents, White Board, etc., Silent, Short Movie, Past Movie, Voice Recording,
and Register User Scene.
Playback Mode: This mode allows you to review captured images and movies on the memory card, erase them, protect them, set them up for printing, play them back in a slideshow, or set up photo albums.
Record Menu:
 Focus: Sets the focus mode to Autofocus, Macro, Pan Focus,
Infinity Focus, or Manual Focus.
Focus: Sets the focus mode to Autofocus, Macro, Pan Focus,
Infinity Focus, or Manual Focus.
- Continuous: Turns Continuous shooting on or off.
- Self-Timer: Activates the Self-Timer shooting mode, with shutter delays of two or 10 seconds. An "X3" setting records three self-timer images in rapid succession, after a 10-second shutter delay. (Great for avoiding problems with eye-blinks, etc.)
- AF Area: Sets the AF area to Spot or Multi. Spot mode fixes the AF point at the center of the frame, while the Multi setting automatically sets the focus to one of nine points arrayed in the center of the frame.
- AF Assist Light: Activates the Autofocus Assist Light for help in focusing in low light.
- Anti Shake: Activates the Anti-Shake movie setting as
an Auto function or turns it off.
 L/R Key: Sets the left and right arrow keys to control
either Focus, Exposure Compensation ("EV Shift"), White Balance,
ISO, or the Self-Timer. An Off setting renders the keys without function.
L/R Key: Sets the left and right arrow keys to control
either Focus, Exposure Compensation ("EV Shift"), White Balance,
ISO, or the Self-Timer. An Off setting renders the keys without function.
- Quick Shutter: Turns Quick Shutter function on or off. When engaged, Quick Shutter facilitates simple and easy high-speed focusing.
- Audio Snap: Turns Audio Snap on or off. Audio snap lets you attach a voice memo to an image after it's captured.
- Grid: Enables a framing grid that divides the image area into thirds, horizontally and vertically.
- Digital Zoom: Turns the 4x digital zoom on and off.
- Review: Turns the instant image review function off.
If on, the image is displayed post-capture on the LCD screen for a few seconds.
 Icon Help: Turns a help function on or off. If on, the
camera displays short explanations of selected exposure functions on the LCD
monitor.
Icon Help: Turns a help function on or off. If on, the
camera displays short explanations of selected exposure functions on the LCD
monitor.
- Memory: This opens up a separate menu that lets you specify
a handful of camera settings to be remembered whenever the camera is powered
off. Options are Record Mode, Flash, Focus, White Balance, ISO, AF Area, Self-Timer,
Flash Intensity, Digital Zoom, MF Position, and Zoom Position.
Quality Menu:
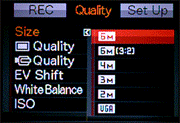 Size: Sets the JPEG resolution to 6M (2,816
x 2,112), 6M 3:2 (2,816 x 1,872), 4M (2,304 x 1,728), 3M (2,048 x 1,536),
2M (1,600 x 1,200), or VGA (640 x 480).
Size: Sets the JPEG resolution to 6M (2,816
x 2,112), 6M 3:2 (2,816 x 1,872), 4M (2,304 x 1,728), 3M (2,048 x 1,536),
2M (1,600 x 1,200), or VGA (640 x 480).
- Quality (Still): Sets the still image quality to Fine, Normal, or Economy.
- Quality (Movie): Sets movie quality to HQ (640 x 480), Normal (640 x 480), or LP (Long Play, 320 x 240).
- EV Shift: Increases or decreases overall exposure from -2 to +2 exposure equivalents (EV) in one-third-step increments.
- White Balance: Adjusts the overall color balance of the scene. Options include Auto, Daylight, Cloudy, Shade, Fluorescent 1 (Day White), Fluorescent 2 (Daylight), Incandescent, and Manual.
- ISO: Adjusts the camera's light sensitivity, options
are Auto, or 50, 100, 200, or 400 ISO equivalents.
 Metering: Selects Multi, Center Weighted or Spot Metering.
- Filter: Enables one of the special effects color filters: B&W, Sepia, Red, Green, Blue, Yellow, Pink, or Purple. There's also an Off setting for standard color.
- Sharpness: Adjusts the in-camera sharpening in five arbitrary steps from -2 to +2.
- Saturation: Controls the vibrancy of color in five arbitrary steps from -2 to +2.
- Contrast: Adjusts the level of contrast in five arbitrary steps from -2 to +2.
- Flash Intensity: Controls the brightness of the camera's flash, in arbitrary units from -2 to +2.
- Flash Assist: Sets the Flash Assist option to Auto or
Off. If enabled, this function automatically brightens flash exposures that
were dark because the subject was out of the flash range.
Set Up Menu:
 Screen: Adjusts screen brightness in three settings:
Auto, Bright, and Normal.
Screen: Adjusts screen brightness in three settings:
Auto, Bright, and Normal.
- Sounds: Controls the camera's operating sounds, including startup, half shutter, shutter, operation, and volume.
- Startup: Sets which image appears on the LCD monitor when the camera starts up. If turned off, no image appears.
- File Numbering: Designates whether the camera continues numbering files from card to card (Continuous option), or resets file numbering with each new memory card (Reset option).
- World Time: Allows you to set the time for another city, so that you can display the time in London, for example, on the LCD monitor. A full list of cities is in the manual.
- Adjust: Sets the camera's internal date and time.
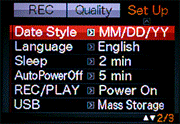 Date Style: Cycles through available date formats.
- Language: Changes the menu language to one of 10 options.
- Sleep: Turns the Sleep function off, or sets the camera to go to sleep after 30 seconds, or one or two minutes.
- Auto Power Off: Turns this feature off, or sets the camera to shut off after two or five minutes of inactivity.
- REC / PLAY: Controls the power functions of the Playback and Record buttons. Options are Power On (both buttons power on the camera, but doesn't turn the camera off), Power On/Off (both buttons can be used to turn the camera on and off), and Disable (neither button has a power function).
- USB: Sets the USB mode to Mass Storage (USB Direct Print)
or PTP (PictBridge).
 Video Out: Sets the Video Out format to NTSC or PAL.
- Format: Formats the SD/MMC card, erasing all files (even protected ones). Also can format the camera's internal memory.
- Reset: Resets all camera settings to their defaults
Playback Menu:
 Slideshow: Activates an automatic slideshow of images on the card.
You can set the image interval time (1-30 seconds), select images to appear
in the slideshow, or designate how long the slideshow plays (1-60 minutes).
You can also select Playback Effects in three different patterns or in a Random
order.
Slideshow: Activates an automatic slideshow of images on the card.
You can set the image interval time (1-30 seconds), select images to appear
in the slideshow, or designate how long the slideshow plays (1-60 minutes).
You can also select Playback Effects in three different patterns or in a Random
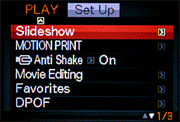
order.- Motion Print: For video clips, a series of nine frames, or just one frame, can be converted to make them suitable for printing.
- Anti Shake: Enables Anti-Shake technology for video playback.
- Movie Editing: Enables basic movie editing for video clips, letting you remove segments of the clip.
- Favorites: Lets you select images to be saved as favorites, as well as edit the favorite list. Images selected as favorites are not shown in the normal playback display, and are copied to the camera's internal memory.
- DPOF: Selects images for printing, or removes the print mark designation.
 Protect: Write-protects individual images or all images on the memory
card, also removes protection.
Protect: Write-protects individual images or all images on the memory
card, also removes protection.- Date/Time: Lets you date and time stamp your image.
- Rotation: Rotates the currently displayed image in 90-degree increments.
- Resize: Changes the size of captured images to 3M, 2M, or VGA (Handy for emailing.) The resized image is saved as a new file on the card, the original image is unchanged.
- Trimming: Allows you to crop captured images and save the cropped version as a new copy.
- Dubbing: Lets you record a short audio clip to accompany a captured image.
- Copy: Copies files between the built-in memory and the SD/MMC card.
 Fujifilm GFX 50S Review
 Fujifilm X-T3 Review
 Olympus E-M5 III Review

Follow Imaging Resource