Back
to Full Fuji FinePix 1300 Review
Back
to Full Fuji FinePix 1300 ReviewGo to Fuji FinePix 1300 Data Sheet
Go to Fuji FinePix 1300 Pictures Page
Up to Imaging Resource Cameras Page
Use your browser's "Back" button to return to the previous page, or the links at the top and bottom of this page to navigate to related information. If you have difficulty fitting the text on this page onto your printer output, simply resize your browser window to a narrower width and print again.
Remember us when it's time to buy!
Dave here: Have our reviews been helpful to you? (Is this article you're reading right now useful?) Preparing this level of information on as many products as we do is incredibly hard work, not to mention expensive. Things on the Internet may look like they're free, but they're not. (As a lot of big dot.com companies are finding out these days.) Somewhere, somebody has to pay to produce worthwhile content. YOU can help us though, by remembering us when it comes time to make your purchase. Would you consider coming back to our site and clicking-through to one of our advertisers to make your purchase? Every dollar you spend with one of our advertisers helps us directly (in affiliate fees) or indirectly (the advertiser will keep renewing their ad contract with us). To make it easy for you to support us, here's a URL you can visit, to see all our current advertisers, with links to click on that will register your visit to them as having come from our site. It's up to you where you buy, but Mike, Mike, Kim, Yazmin, Marti and I would be really grateful if you'd help us out by choosing one of our advertisers to purchase from.
Thank you for your support!
Dave Etchells, Founder & Publisher
Visit our "Buy Now" Page:
https://www.imaging-resource.com/buynow.htm
Back
to Full Fuji FinePix 1300 Review
Go to Fuji FinePix 1300
Data Sheet
Go to Fuji FinePix 1300
Pictures Page
Up to Imaging Resource Cameras
Page
Fuji FinePix 1300Fuji updates their entry-level 1.3 megapixel model, adding USB for fast file downloads Review First Posted: 11/28/2000 |
|
 |
|
1.3 megapixel sensor for 1280x960 pixel images |
|
|
Simple user interface | |
|
|
Enough exposure control for most shooting situations | |
|
|
Compact design |
Executive Overview
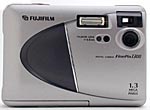
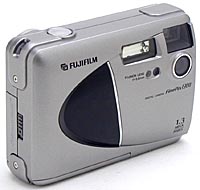
The 1.3 megapixel FinePix 1300 offers compact, portable design with the ease of a traditional point-and-shoot camera. Its small, lightweight body measures approximately 4.3 x 3 x 1.5 inches and fits easily into a pocket or purse. Finger grips on the front and back of the camera provide a secure, comfortable hold. All adjustment buttons and major controls are located on the back panel, except for Macro/Normal lens control, which is set on the left side of the camera near the fixed-focus, wide-angle lens.
The shutter button, SmartMedia slot, battery compartment, and tripod mount are located on the top, sides, and bottom of the camera, respectively; however the tripod mount is shifted slightly off-center due to the large battery compartment. A static, clear plastic cover protects the lens, eliminating the need for a lens cap or mechanical lens cover (though we prefer some kind of lens cover to prevent scratching and smudging). Accompanying the lens on the front of the camera is the viewfinder window, built-in flash, self-timer lamp, and flash control sensor (to determine whether flash is needed in Auto mode).
The FinePix 1300 provides an eye-level optical viewfinder and LCD monitor to assist in image composition. The optical viewfinder features a faint center target and an LED lamp that glows green, orange, or red to indicate camera status. To conserve battery power, the 1.6-inch LCD monitor is not activated in Auto Photography (Record) mode, unless you turn it on. Pressing the Display button above the monitor brings up both the image and camera settings. Pressing it a second time turns the camera settings off, and leaves just the image. In Manual and Macro modes, the monitor automatically turns on when you activate the Record mode. Manual mode displays only the camera settings initially. Pressing the Display button once will show the image area with camera settings, and pressing it a second time will show the image without settings. Macro mode displays an LCD image at all times, because the optical viewfinder isn't accurate up close.
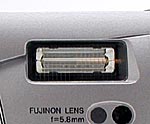
The fixed-focus Fujinon lens has a focal length of 5.8mm, equivalent to a 38mm lens on a 35mm camera. Variable aperture settings of f/4.5 and f/11 are controlled by the camera. Focal range is approximately 2.3 feet (70 cm) to infinity in normal mode, and 3.1 to 5.9 inches (8-15 cm) in Macro mode. A digital telephoto magnifies the image by 2X, but will sacrifice a degree of image quality.
Exposure control is good overall, though fairly basic. Auto mode controls everything except Flash, while Manual mode allows you to alter the White Balance, Exposure Compensation (EV) settings, and Flash modes. By selecting the Self-Timer option in the Record menu, you can set the camera to count down 10 seconds before it fires the shutter (in Auto mode only). Continuous Shooting mode enables you to capture up to nine consecutive frames at approximately two frames per second, for as long as you hold down the shutter button (also in Auto mode only). Continuous Shooting mode automatically sets the image size to 640x480. Both the Macro and Digital Telephoto functions are manually controlled in either Auto or Manual mode.
The Flash mode offers five settings: Auto Flash, Red-Eye Reduction, Forced Flash, Suppressed Flash, and Slow Synchro. White Balance offers seven settings: Automatic Adjustment, Sunny, Cloudy, Daylight Fluorescent, Warm White Fluorescent, Cool White Fluorescent, and Incandescent. Manual exposure compensation can be set to nine different settings, from –0.9 to +1.5 exposure equivalents (EV), in one-third-step increments.
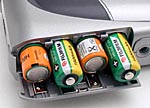
The FinePix 1300 uses four AA batteries (alkaline, NiCd, or NiMH) for power. We strongly suggest that you purchase two sets of rechargeable batteries and a battery charger. The rechargables last longer than alkaline batteries and they'll save you a lot of money in the long run.
Like many digicams on the market, the FinePix 1300 stores images on SmartMedia cards. An 8MB card comes standard with the camera, but is upgradeable to 16, 32, or 64MB. The FinePix 1300 lacks the video-out capability of other Fujifilm digital cameras we've tested, but images can just as easily be viewed on the computer. A USB cable for both Mac and PC computers is supplied with the camera, as is a Fujifilm utilities software CD with USB Driver 2.0, Exif Viewer 1.1, DP Editor 1.0 for Mac and Windows, as well as Adobe ActiveShare, PhotoDeluxe HE 4.0, and Exif Launcher 1.0 for Windows only. (Since PhotoDeluxe and ActiveShare are compatible with Windows systems only, Macintosh users must either purchase a Mac version or be content with the offerings of the Fujifilm package).
The FinePix 1300 is perfect for consumers who want hassle-free digital photography, in a megapixel-plus range, at a modest price. The Auto mode empowers the camera do all the thinking, but if you want to make some exposure decisions, or try some special effects, the Manual mode provides a little extra control.
Design
Similar to its predecessor, the MX-1200 model, the Fujufilm FinePix 1300 has
a compact, rectangular design that affords the portability necessary for active,
memorable vacations, or for spontaneous day trips to the museum or park. Weighing
only 10.6 ounces (300 grams), including batteries and SmartMedia, the FinePix
1300 measures about 4.3 x 3 x 1.3 inches (110 x 77 x 33 mm) without any accessories
or attachments. The sturdy, polycarbonate camera body is metallic silver with
black accents. It has a finger grip cleverly built into the front plate design,
and a series of stylized bumps on the back to act as a thumb grip. The nylon
wrist strap attaches to the top right corner of the camera for easy transportation.
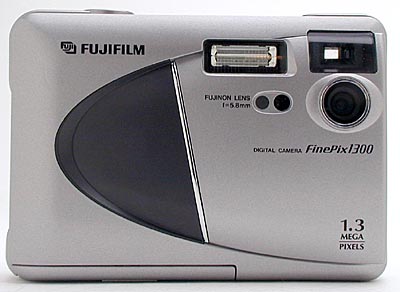
The FinePix 1300's front plate houses an onboard flash, viewfinder window, fixed-focus
lens, flash sensor, and LED self-timer alert. The lens is protected by an immovable,
clear plastic outer cover, eliminating the need for a lens cap or sliding plate
cover. While this lens design frees you from the responsibility of tracking
down the lens cap, it doesn't provide as much protection as a conventional lens
cover. The plastic is just as suceptable to dirt, scratches, or smudges as an
unprotected lens (even more so); but if you're careful with the camera, it should
serve you well.
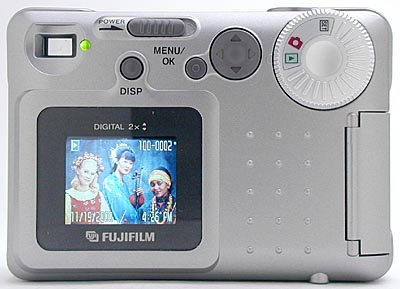
The bulk of the controls are on the back of the camera, including a power switch
and separate mode dial, with a choice of Photography (Record), Playback, and
Set-up modes. A Menu/OK button accesses and sets menu options, while the adjacent
four-way rocker toggle enables you to scroll through menu selections. The absence
of a Cancel/Back button makes it a little more time-consuming to exit menu selections,
but we found we could live without it.
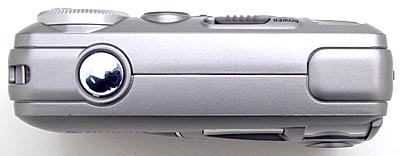
The top of the FinePix 1300 is quite plain, with the shutter button the only
control located there, in the standard position on the right side of the top
panel.
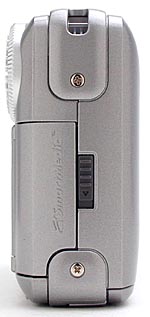
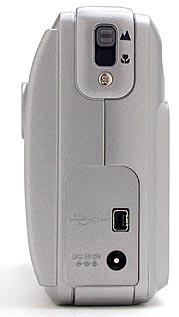
The Macro on/off switch is located on the left side of the camera, along with
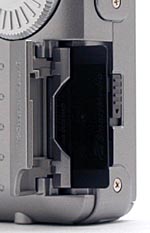
the digital and DC jacks. The SmartMedia slot is on the opposite side, along
with a loop for attaching the wrist strap.
Batteries load into a compartment on the bottom of the camera, next to the plastic tripod mount, which sits just a little off-center.
For the most part, the FinePix 1300's design and button layout allows one-handed operation, though it's a stretch to reach the Power and Display buttons with your right thumb, and of course, the Macro switch is well out of reach.
 Viewfinder
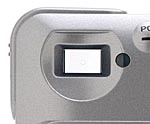
The FinePix 1300 features both an eye-level optical viewfinder and a 1.6-inch color LCD monitor. The optical viewfinder is positioned right over the camera lens, in the upper left corner of the camera. Fujifilm estimates that the viewfinder provides 80 percent frame coverage. In our testing, we found the optical viewfinder to be much less accurate, as our standard measurement lines were completely cut off in the resulting image. This means that the optical viewfinder shows a much larger area than what is recorded in the final image.
A very faint etched circle in the center of the viewfinder aids in composition, but is not designed to take spot meter readings, as the camera averages its light meter readings from 64 zones over the entire viewfinder area. The FinePix 1300 does have an automatic exposure (AE) lock function, which allows you to take a close-up meter reading of your subject, depress the shutter button half way to lock it in, and recompose the image without changing the exposure. However, since the lens is fixed focus, there are no automatic focus lock or spot focus functions to consider.
An LED lamp to the right of the viewfinder glows green, orange, or red, depending on the camera's status. A steady green light indicates that the camera is ready to shoot; if it flashes green, the AE function is in operation or camera shake is a potential problem. A solid orange LED means the image is being recorded to the memory card, while a flashing orange light means that the camera flash is recharging. Finally, if the LED is flashing red, it indicates a SmartMedia warning—the details of which will be reported on the LCD screen (if activated).
As with the MX-1200, the FinePix 1300's optical viewfinder has a few notable problems. Its poorly defined (and slightly fuzzy) edges make it hard to determine exactly where the edges of the frame will be aligned. For eyeglass wearers, this problem is compounded by a rather low "eye point" and no dioptric correction adjustment. (In fairness, you wouldn't expect to find dioptric correction on such an inexpensive camera, but a higher eye point would have been nice.) In our testing, we took a "best guess" of how we thought the average user would compose a scene, and ended up with a fairly inaccurate result, thus emphasizing the importance of crisp, well-defined edges in the viewfinder's field of view.
We found the 1.6-inch, 55,000-pixel D-TFT, color LCD monitor to be much more accurate than the optical viewfinder, showing approximately 96.6 percent of the final image area, which is very close to the optimum 100 percent accuracy. The LCD is not automatically activated when the camera is turned on in Auto mode. You must depress the Display button to bring up the image and information display (which includes the current record mode, frame number, image resolution, macro icon [if activated], and flash setting); a second press of the Display button turns off the information display, leaving only the image; and a third press turns off the display altogether.
In Manual mode, the information display comes into view automatically when you turn on the camera. The on-screen icons reveal the same information as they do in Auto mode, as well as additional details such as the date (which flashes on the bottom of the monitor for only a second), exposure compensation, and white balance setting. Pressing the Display button one time brings up the image along with the information display; pressing it a second time eliminates the information display, and shows only the image; and pressing it a third time returns you to the information-only display. In Macro mode, the LCD image display cannot be turned off, as it is necessary to compose the image.
In Playback mode, the LCD monitor provides reasonably sharp images, and features up to 4X zoom playback, so you can more closely inspect captured images. The Up and Down Arrow buttons on the rocker toggle enable you to zoom in or out of the photo you're viewing. Once you reach the desired zoom level, you can press the Display button to change the operation of the toggle, allowing you to move around within the enlarged photo. Pressing the Display button once again cancels this mode and returns the toggle control to its normal Playback operation.
The LCD monitor also provides an index display for viewing up to nine images at a time. This function is activated by pressing the Display button twice quickly. Once in the index display, the arrows of the rocker toggle move the "cursor" highlight to the desired frame. Pressing the Display button then enlarges the selected image to full-screen size.
Optics
The FinePix 1300 comes equipped with a built-in, fixed-focus Fujinon lens. The focal length is 5.8mm, which is equivalent to a 38mm (wide-angle) lens on a 35mm camera. When set on Macro mode, the focus range is 3.1 to 5.9 inches (8.0 to 15.0cm), and in normal mode, it's about 2.3 feet (70cm) to infinity.
The camera's two aperture settings, f/4.5 and f/11, are automatically selected by the camera, even when shooting in Manual mode. Because the lens is fixed-focus, there's no autofocus function, so you have to be aware of the camera's focus limitations. Don't try to photograph a subject closer than 2.3 feet, or your image will be out of focus. Low-light situations will also challenge the camera's focal range, because the larger f/stop (aperture opening) will reduce depth of field.
If you want to photograph something close-up, you can use the Macro mode, controlled by a sliding switch on the left side of the camera. This Normal/Macro lens selector is marked with the universal flower symbol on the macro setting and a mountain symbol on the normal setting. When switched to Macro mode, the flower icon appears on the LCD monitor, and you can photograph subjects from 3.1 to 5.9 inches away. (Note: Macro mode automatically turns on the LCD monitor, which is necessary to frame the image. The relatively low resolution of the LCD monitor means it's hard to use it to judge focus though, so you'll need to pay particular attention to focusing distance when shooting in macro mode.)
In Macro mode, Auto or Red-Eye Reduction Flash settings will automatically change to Suppressed Flash until the Macro mode is canceled. Forced Flash and Slow Synchro flash modes will remain unchanged.
The FinePix 1300 does not provide an optical zoom function with its lens; however, it does provide 2X digital zoom. The zoom function is available only at 640 x 480-pixel resolution, and is activated by pressing the Up Arrow button on the rocker toggle. (Note: the LCD monitor and image display must be turned on to use this function.) When activated, the 2X digital zoom designation appears in the upper left corner of the LCD monitor.
Like most digicams, the FinePix 1300 digital zoom works by cropping in on the central area of the CCD array. As a result, the same number of pixels must be used to fill a larger portion of the frame, effectively reducing your resolution by half. So while the digital telephoto might be useful for Web applications (where you only need 72 ppi resolution), it will not take the place of a true optical zoom lens.
Optical distortion on the FinePix 1300 is moderate, with approximately 0.65 percent barrel distortion. Chromatic aberration is also moderate, showing about two or three pixels of coloration on each side of the black target lines. (This distortion is visible as a very slight colored fringe around objects at the edges of the resolution target.)
Exposure
Basic operation of the FinePix 1300 is pretty standard in Auto mode. You compose the picture, press the shutter button halfway to set the exposure (if you're using the LCD monitor, the word 'Standby' will appear), then fully depress the shutter button to complete the exposure. If the LCD monitor is turned on, the captured image will appear briefly for review. This process is fully automatic. The camera selects the shutter speed, f/stop, white balance, and (if it is set on Auto) whether or not to use a flash.
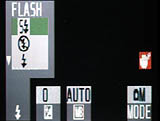
The CCD's light sensitivity is fixed at ISO 125. The camera makes its exposure decisions by examining 64 different zones in the viewfinder, then determining the appropriate exposure from the averaged reading. The only exposure-related adjustment you can make in Auto mode is to select one of five flash settings from the Photography (Record) menu: Auto Flash, Red-Eye Reduction, Forced Flash, Suppressed Flash, and Slow Synchro.
The FinePix 1300 does, however, provide an Automatic Exposure (AE) Lock function. This feature allows you to select the area you want metered, depress the shutter button halfway (so the camera can take a reading), and reframe the image before fully depressing the shutter button. The exposure will be locked onto the object you chose to take your original reading. AE Lock is handy for photographing subjects in challenging lighting situations, such as heavy backlighting or bright sunlight. By filling the frame with the object you want metered, and keeping the shutter button halfway depressed when you reframe the shot, the AE Lock function can perform much like a spot meter in more advanced cameras.
Manual capture mode offers a few more exposure options. In addition to five Flash modes, the Photography (Record) menu gives you the option to adjust White Balance settings and Exposure Compensation. There are seven White Balance settings: Automatic, Sunny, Cloudy, Daylight Fluorescent, Warm White Fluorescent, Cool White Fluorescent, and Incandescent. (White balance settings are virtually ineffective when you use the flash, especially in a dark environment, so we suggest that you set the flash to Suppressed mode before choosing a White Balance setting.)
Exposure Compensation is also adjustable in Manual mode. The Record menu offers nine Exposure Values (EV), from –0.9 to +1.5, in one-third-step increments. Like the White Balance setting, the EV settings will be ineffective when the Flash is in Auto or Red-Eye Reduction modes. The manual provides details on what EV you should use for various lighting conditions, such as backlit scenes, snowy landscapes, or areas of low reflectivity, like heavy foliage.
The Self-Timer is accessible through the Record menu in Auto mode only. You simply press the Menu/OK button next to the rocker toggle, scroll to the Self-Timer menu with the arrow keys, and select On. Once the shot is composed and the exposure is set, depress the shutter button fully to start the timer. The camera will count down 10 seconds before it releases the shutter. The red LED light next to the camera lens will glow steadily for the first five seconds, then blink on and off for the remaining five. A Self-Timer countdown is also displayed on the LCD monitor. You can cancel the countdown by pressing the Down Arrow button at any time before the shutter fires.
Many digital cameras combine the Macro and Self-Timer functions on a single control button, preventing theiruse together. Because the Macro function on the 1300 is operated via a separate switch on the side of the camera, you can use the Macro and Self-Timer functions at the same time. This is handy, since camera movement can be a problem in close-up photography. When used with an appropriate tripod or copy stand, the Self-Timer function allows time for the camera vibrations to die down before releasing the shutter.
 Flash
Flash
Flash settings are controlled through the Photography (Record) menu. The FinePix 1300 provides five Flash modes: Auto Flash, Red-Eye Reduction, Forced Flash, Suppressed Flash, and Slow Synchro. Auto Flash, which is not available when using the lens in Macro mode, allows the camera to choose whether or not to fire the flash. Red-Eye Reduction emits a preflash before firing the real flash, to minimize the occurrence of red-eye effect in people pictures (this is also not avaialble in Macro mode).
Forced Flash sets the flash to always fire, regardless of the light conditions. This mode is very useful for providing "fill" illumination outdoors when your subjects have their backs to the sun. Suppressed Flash prevents the flash from firing under any light conditions. Finally, Slow Synchro fires the flash with a slow shutter speed (about 1/4 second) to record more background light in low-light situations, and better balance the background light with the illumination on the subject.
A tripod is recommended for Suppressed Flash and Slow Synchro modes. Both of these modes automatically trigger the "shaking camera" icon that appears in the LCD monitor. Fujifilm's specifications list the flash range to be approximately 2.3 to 9.8 feet (0.7 to 3.0 meters). In our testing, we found the FinePix 1300's flash to be effective as far away as 14 feet, although the intensity decreases a little with each foot of distance after 10 feet.
Continuous Shooting Mode
One feature that the FinePix 1300 has over its predecessor, the MX-1200, is the Continuous Shooting function. Available only in Auto exposure mode, Continuous Shooting is accessed through the Photography (Record) menu; and once activated, captures up to nine consecutive shots for as long as you hold down the shutter button. The frame rate is two frames per second, however the actual cycle times and the number of successive shots will vary, depending on the amount of SmartMedia space available and the amount of information to be recorded with each image.
File size is automatically fixed at 640 x 480 pixels in Continuous Shooting mode, and the flash set to Suppressed mode (the rapid shot-to-shot cycle time leaves no time to charge the flash between shots). Exposure Compensation and White Balance settings are fixed with the first shot and remain constant throughout the rest of the series. When used with the Self-Timer, the camera automatically captures nine consecutive exposures. Digital zoom is also available in Continuous Shooting mode.
Shutter Lag/Cycle Times
When you press the shutter release on a camera, there's usually a lag time before
the shutter actually fires. This time allows the autoexposure mechanism time
to do its work, and can amount to a fairly long delay in some situations. Since
this number is almost never reported by manufacturers or reviewers, and it can
significantly affect the picture taking experience, we routinely measure it
with our own proprietary test system.
|
|
||
|
|
|
|
| Power On -> First shot |
|
Quite fast. Time is delay until first shot captured.
|
| Shutdown |
|
(No lens to retract, so shutdown is effectively instantaneous)
|
| Play to Record, first shot |
|
Quite fast. Time is delay until first shot captured.
|
| Record to play (max/min res) |
|
Slower for full res images.
|
| Shutter lag, full autoexposure |
|
Quite fast - fixed focus lens means no delay for autofocus.
|
| Shutter lag, exposure preset |
|
Quite fast - even with no delay for autofocus, presetting exposure with a half-press of the shutter button still saves time.
|
| Cycle time (max/min res) |
|
A bit slow at full res, pretty fast at low res. No buffer memory means must save file to card before next shot. |
| Cycle time, continuous mode |
(1.82 fps) |
Fast for a low-end camera. Resolution is set to 640x480 though.
|
Overall, the FinePix 1300 revealed itself to be a surprisingly fast camera, particularly in light of its low-end price point. Because it uses a fixed-focus lens, shutter lag is lower than most cameras, since there's no delay required for lens focusing. Startup and shutdown times are also very good. Shot to shot cycle times are slow for full-resolution images though, since there's no buffer memory, meaning you have to wait for the camera to finish writing each image to the card before you can take the next shot.


Rocker Toggle Button: This four-way rocker button is located to the left of the Mode Dial on the camera's back panel. It features Up, Down, Left, and Right Arrows that allow you to navigate through various menus and to activate the Digital Telephoto in Auto or Manual capture modes.
In Playback mode, the Left and Right Arrows scroll through captured images, while the Up and Down arrows control the Playback Zoom. Once a captured image is enlarged, the rocker toggle allows you to navigate to different areas within the image.
In Self-Timer mode, the Down Arrow cancels the 10-second countdown.

Menu/OK Button: Located beside the rocker toggle button, the Menu/OK button is used in both Record and Playback modes to access menu settings for each. The OK button selects menu items and confirms changes. Holding down the Menu/OK button as you power up the camera disables the camera's two-minute automatic shut-off function.

Display Button: Located just above the LCD monitor, this button turns the LCD display on and off. In Auto mode, one press turns on the image and information displays, a second press turns off the information display, and a third press turns off the image display.
In Playback Mode, turning the camera on automatically activates the information and image display. Pressing the Display button once removes the information icons and leaves only the image; pressing it again brings up the multi-frame index display.
If you hold down the Display button for two seconds in Auto, Manual, Self-Timer, and Playback modes, you can adjust the brightness of the LCD monitor by pressing the Left and Right Arrow buttons.

Macro Switch: Located on the left side of the camera, this switch is used to select between Macro and Normal lens focusing.
Camera Modes and Menus
Set-up Mode: Indicated on the Mode Dial by the word "Set," this mode provides access to a menu of basic camera settings:
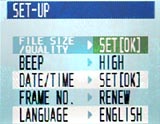 File Size/Quality: Select one of two image file sizes: 1,280 x 960 or 640 x 480 pixels. The 1,280 x 960 file size offers three Quality settings: Fine, Normal, and Basic (Normal is the default); the 640 x 480 size only offers the Normal quality setting.
Photography (Record) Mode: Indicated on the Mode Dial by the traditional red camera symbol, this mode allows you to capture images in either Auto or Manual exposure modes. (See Below)
Auto Mode: In this mode, the camera controls all exposure settings, including shutter speed, f/stop, and white balance. You control the Flash mode, Macro/Normal lens setting, Digital Telephoto, Self-Timer, and Continuous Shooting functions. Depressing the Menu/OK button in Auto mode brings up the following menu options:
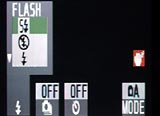 Flash: Choose between Auto Flash, Red-Eye Reduction, Forced Flash, Suppressed Flash, and Slow Synchro modes.
Manual Mode: In this mode, the photographer is given control over two additional exposure settings: White Balance and Exposure Compensation (EV). It is also possible to access the Macro and Digital Telephoto functions in this mode, but not the Self-Timer or Continuous Shooting functions. Depressing the Menu/OK button in Manual mode brings up the following menu options:
 Flash: Choose between Auto Flash, Red-Eye Reduction, Forced Flash, Suppressed Flash, and Slow Synchro modes.
Playback Mode: Indicated by the standard green arrow symbol on the Mode Dial, Playback mode enables you to view recorded images frame-by-frame or in multi-frame index format. With Playback Digital Zoom, you can enlarge an image with the Up Arrow key, press the Display button, and scroll through the enlarged image with all four arrow keys to examine specific details. Press the Menu/OK button to return the image to normal size.
The Playback mode menu also allows you to Erase and Protect images, or to set them up for printing on a Digital Print Option Format (DPOF) device. Depressing the Menu/OK button in Playback mode brings up the following menu options:
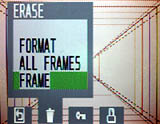 Back: Allows you to exit out of the menu.
Note: You cannot delete files with DPOF settings. To delete these images, the DPOF settings must first be removed.
 Image
Storage and Interface
Image
Storage and Interface
The FinePix 1300 uses SmartMedia memory cards for image capture and storage.
An 8MB card is supplied with the camera, but 16, 32, and 64MB cards are also available.
Remember to use only 3.3V (or 3V) SmartMedia cards and steer clear of the 5V version.
The table below shows image capacities, based on an 8MB card, and the approximate
JPEG compression ratios for the various image size/quality combinations the camera
provides.
|
Resolution/Quality |
Resolution |
Resolution |
|
| Fine Quality | Images | 12 | 5 |
| Approx. Compression |
4:1 | 4:1 | |
| Normal Quality | Images | 24 | 89 |
| Approx. Compression |
8:1 | 8:1 | |
| Economy Quality | Images | 47 | N/A |
| Approx. Compression |
16:1 | N/A | |
To avoid damaging the media, SmartMedia cards should never be removed while the camera is on, and the camera should never be turned off while it is performing storage operations. If the SmartMedia slot cover is opened while the camera is on, the camera will automatically shut off. Always load the SmartMedia card with the gold electrodes facing the front of the camera, and entering the card slot first (the card will not fully slide into the slot if inserted incorrectly).
You can write-protect SmartMedia by placing a write-protect sticker over the designated area. Write-protection stickers can only be used once and must be clean to be effective. You can protect individual images or all of the images in the Playback menu. Protecting the images prevents them from being accidentally erased, or manipulated in any way; however, they cannot be protected from erasure if you format the card.
Image frames are assigned file numbers from 0001 to 9999, with a preceding directory number. Once 9999 is reached, the directory number goes up by one. The Set-up mode allows you to alter the frame numbering sequence by selecting Renew or Continue. Use Renew to start images at 0001 each time a new SmartMedia card is inserted. The Continue option stores images beginning from the highest file number recorded on the last SmartMedia used. This ensures that images are not overwritten when duplicate name files are downloaded to a computer. Images are saved in DCF compliant (Exif Version 2.1 JPEG compliant) format with Digital Print Order Format (DPOF) compatibility.
You can erase images while in Playback mode, with the option of erasing a single frame, all frames, or formatting the card. Formatting erases all images on the card, including protected images, and re-initializes the SmartMedia.
A USB cable accompanies the camera for transfer of images to a computer. A software CD provides a complete Fujifilm interface package, plus some basic image editing software. We didn't measure the data transfer rate of the FinePix 1300, but most USB-equipped cameras transfer data at around 300 KBytes per second, or about 20-30 seconds to empty an 8 megabyte memory card.
Power
 The FinePix 1300
uses four AA alkaline primary batteries, or NiMH or NiCd rechargeable batteries.
Fujifilm recommends that you avoid manganese or lithium batteries because of
the potential damage from heat generation. Alkaline batteries are expected to
record approximately 260 frames, NiCd about 180 frames, and Ni-MH as many as
300 frames (all estimates are made with the assumption that the LCD monitor
is on).
The FinePix 1300
uses four AA alkaline primary batteries, or NiMH or NiCd rechargeable batteries.
Fujifilm recommends that you avoid manganese or lithium batteries because of
the potential damage from heat generation. Alkaline batteries are expected to
record approximately 260 frames, NiCd about 180 frames, and Ni-MH as many as
300 frames (all estimates are made with the assumption that the LCD monitor
is on).
If you plan to use your digital camera with any frequency, don't even consider
using alkaline batteries. Buy a couple of sets of good-quality NiMH batteries
and a good recharger. You'll recover the cost of the batteries and charger in
the first week's use, and the battery/charger set will probably last as long
as you own the camera!
An automatic power off function shuts down the camera if it is left unattended
for two minutes. You can cancel this function by holding down the Menu/OK button
as you turn the camera on. The setting is reinstated by turning the camera off
and back on again.
As always, we measured the FinePix 1300's power consumption directly at the
power jack on the side of the camera. The results are tabulated below.
|
|
|
| Capture Mode, w/LCD |
|
| Capture Mode, no LCD |
|
| Half-pressed shutter w/LCD |
|
| Half-pressed w/o LCD |
|
| Memory Write (transient) |
|
| Flash Recharge (transient) |
|
| Image Playback |
|
Our power measurements seem to support Fuji's battery life claims: The FinePix 1300 is quite conservative in its power consumption, particularly if you leave the LCD off while shooting. Even with the LCD on though, power drain is fairly modest, and power consumption in playback mode is much lower than usual. We still recommend buying two sets of NiMH AA cells and a good charger, but high-capacity NiMH batteries could easily power the camera for two to two and a half hours, even with the LCD on.
Included Software
Packaged with the FinePix 1300 is a software CD loaded with a USB driver, Exif Viewer, DP Editor, and Adobe ActiveShare and PhotoDeluxe image editing software. It also includes a couple of other drivers and launchers necessary for Windows. A USB cable provides direct connection to a PC or Mac. All software is compatible with Windows and Macintosh platforms, except for Adobe PhotoDeluxe and ActiveShare, which work with Windows only. The Exif Viewer software enables you to list the images on the camera or computer, print indexes of images, as well as view and print individual images. The DP Editor package works with the DPOF (Digital Print Order Format) setup to print images on DPOF compliant printers. Adobe ActiveShare software sets up images for Web sharing, and Adobe PhotoDeluxe allows you to be creative with your images by using a variety of filters and image manipulation tools. You can also correct minor defects and work with templates to create greeting cards, calendars, and brochures.
<<FinePix 1300 Sample Images | Additional Resources and Other Links>>
Reader Comments!
Questions, comments or controversy on this product? Click
this link to see what other Imaging Resource readers have had to say about
the Fuji FinePix 1300, or add comments of your own!