Minolta Dimage F300A compact, stylish camera with a full five-megapixel sensor and clever autofocus system.<<Shutter Lag & Cycle Time Tests :(Previous) | (Next): Camera Modes & Menus>> Page 8:Operation & User InterfaceReview First Posted: 05/22/2003 |
Operation and User Interface
Although all the combinations of Record modes, drive modes, and exposure modes may seem complicated at first, the F300's user interface makes sense and is pretty easy to navigate once you get used to it. Most exposure options are controlled externally, by way of the Mode dial, Digital Subject Program button, Exposure Compensation button, and Quick View / Erase button. You can also control the flash mode externally, as well as the shutter speed and aperture when in any of the manual modes. The availability of the QuickView button makes double-checking images a snap without having to change over to Playback mode. Special exposure features are all adjustable through the LCD menu system, which is fairly extensive but uncomplicated. Menu screens are set up as subject tabs, which you can quickly navigate across with the Four-Way Arrow pad. The top status display panel is also a plus, reporting a lot of camera settings, so you can actually operate the camera with the LCD monitor disabled. (This saves a lot of battery power, see my discussion of that topic under the "Power" section later in this review.) You'll spend some time flipping through the instruction manual to understand the camera settings, but I doubt it will take too long to get the hang of it, no more than an hour or so for the average user.
Control Enumeration
Shutter Button: Centered in the Mode dial, this metallic gray button sets
focus and exposure when halfway pressed. When fully pressed, it fires the shutter.
If the camera is in Quick View mode, halfway pressing the Shutter button returns
it to Record mode.
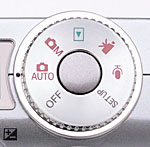
Mode Dial: This notched dial is on top of the camera, on the right side. Turning the dial selects the camera's operating mode, with the following options available:
- Off: Turns the camera off.
- Auto: Puts the camera in Auto Record mode, in which it makes all of the exposure decisions, including shutter speed and aperture settings. The Digital Subject Program scenes are also available in this mode.
- Manual: Provides more control over the exposure, with available exposure modes of Program AE, Aperture Priority, Shutter Priority, and Manual.
- Playback: Reviews captured images and movies on the memory card. Also lets you delete images, set them up for printing, or copy them.
- Movie: Records short movies with sound, for as long as 20 minutes (3 minutes at high resolution), depending on the resolution and available memory card space.
- Audio: Records as much as 180 minutes of continuous audio, with no image.
- Setup: Activates the Setup menu, which appears on the LCD monitor upon entering the mode.

Flash Mode / Information Button: Located at the top of the back panel, and
slightly angled down from the top, this button controls the flash function in
any record mode (except for Movie), cycling between Auto, Fill, Flash Cancel,
and Redeye Reduction Auto.
In Playback mode, this button controls the image information and histogram displays.

Exposure Compensation Button: Directly to the right of the Flash Mode /
Information button, this button activates the Exposure Compensation feature
in any image Record mode (except Manual exposure mode). Exposure Compensation
is then adjusted using the right and left arrow keys. In Manual exposure mode,
pressing this button switches the arrow pad's left and right keys control between
the aperture and shutter speed settings.
![]()
Digital Subject Program Button: The top one of a series of buttons lining
the right side of the LCD monitor, this button controls the Digital Subject
Program mode of the camera in Auto Record mode. Pressing it repeatedly cycles
through the following modes:
- Automatic Digital Selection: Sets the camera to automatically pick one of the following "scene" modes (except for Macro), depending on the exposure conditions.
- Macro: Adjusts the focus range for smaller, close-up subjects.
- Portrait: Uses a larger aperture setting to produce sharply-focused subjects in front of slightly blurred backgrounds.
- Sports Action: Employs faster shutter speeds to "freeze" moving subjects, and works well with the telephoto lens setting.
- Landscape: Employs a smaller aperture for a much larger depth of field, keeping both foreground and background in focus.
- Sunset: Optimizes the camera to capture rich colors during sunsets and uses slower shutter speeds for the best exposure.
- Night Portrait: Also uses slower shutter speeds, but can be used for portraits or general night shots. For actual night portraits, the flash must be set to Fill.
In Manual mode, this button access Macro and Night Portrait modes only.
![]()
Menu Button: Next in line beneath the Digital Subject Program button, the
Menu button activates the settings menu in any camera mode (except for Audio
and Setup). Pressing this button also dismisses the menu screen.
![]()
Quick View / Erase Button: Just below the Menu button, this control activates
the Quick View image review mode when pressed in any image Record mode.
In Playback mode, this button erases the current image (with an option to cancel).
![]()
Display Button: The final button in the series on the right side of the
LCD monitor, this one controls the image and information display in Auto and
Manual Record modes as well as in Playback mode. In Record mode, pressing the
button once removes the information display, while a second press shuts off
the LCD monitor entirely. A third press activates the LCD monitor with the information
display.
In Playback mode, this button also turns the information display on and off.
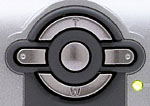
Four Way Arrow Pad: Located in the top right corner of the back panel, this
keypad features four arrow buttons (one pointing in each cardinal direction)
and a single button in the center. In any settings menu, these arrows navigate
through menu options and screens. Pressing the center of the button confirms
menu selections.
In Auto, Manual, and Movie record modes, the up and down arrows (marked T and W) control the optical and digital zoom. When manual focus is activated, the up and down arrows can control either the focus or the zoom. (Pressing the center button alternates between the optical zoom and manual focus options.) In Manual, Shutter Priority, and Aperture Priority exposure modes, the right and left buttons control exposure settings. Pressing and holding the center of the pad activates the AF Area Selection screen, letting you choose the autofocus area using the arrow keys. When you first enter Auto Exposure Bracketing mode, the left and right buttons control the EV step size that each shot will vary by.
In Playback mode, the right and left arrows scroll through captured images. When an image has been enlarged, all four arrows allow you to navigate the enlarged image.

Follow Imaging Resource: