Back
to Full Sony MVC-FD95 Review
Back
to Full Sony MVC-FD95 ReviewGo to Sony MVC-FD95 Data Sheet
Go to Sony MVC-FD95 Pictures Page
Up to Imaging Resource Cameras Page
Use your browser's "Back" button to return to the previous page, or the links at the top and bottom of this page to navigate to related information. If you have difficulty fitting the text on this page onto your printer output, simply resize your browser window to a narrower width and print again.
Remember us when it's time to buy!
Dave here: Have our reviews been helpful to you? (Is this article you're reading right now useful?) Preparing this level of information on as many products as we do is incredibly hard work, not to mention expensive. Things on the Internet may look like they're free, but they're not. (As a lot of big dot.com companies are finding out these days.) Somewhere, somebody has to pay to produce worthwhile content. YOU can help us though, by remembering us when it comes time to make your purchase. Would you consider coming back to our site and clicking-through to one of our advertisers to make your purchase? Every dollar you spend with one of our advertisers helps us directly (in affiliate fees) or indirectly (the advertiser will keep renewing their ad contract with us). To make it easy for you to support us, here's a URL you can visit, to see all our current advertisers, with links to click on that will register your visit to them as having come from our site. It's up to you where you buy, but Mike, Mike, Kim, Yazmin, Marti and I would be really grateful if you'd help us out by choosing one of our advertisers to purchase from.
Thank you for your support!
Dave Etchells, Founder & Publisher
Visit our "Buy Now" Page:
https://www.imaging-resource.com/buynow.htm
Back
to Full Sony MVC-FD95 Review
Go to Sony MVC-FD95
Data Sheet
Go to Sony MVC-FD95
Pictures Page
Up to Imaging Resource Cameras
Page
Sony MVC-FD95Sony takes the Mavica line to 2.1 megapixels, and 12-bit digitization! Review First Posted: 7/13/2000 |
|
 |
|
2.1 megapixel CCD, up to 1600x1200
images |
|
|
10x optical , 2x digital
zoom | |
|
|
Records movies with
sound | |
|
|
JPEG, GIF, TIFF, and MPEG file
formats | |
| * | Floppy or Mem Stick w/adapter for easy computer interface | |
Design
As the most recent addition to Sony's
Mavica series, the FD95 reflects the line's tendency toward larger body styles,
dictated by the physical dimensions of the included floppy drive. Despite
first-guess estimates based on its hefty size, the camera feels lighter than
you'd think. Weighing in at 34 ounces (970 g), including the battery pack, the
FD95 is just one ounce heavier than the previous top-of-the-line FD91 model.
Although that's a great deal more weight than many smaller digicams carry, it's
still lighter than what your first assumption might be, mostly due to the tough
plastic body. The camera's overall size is 5 x 5 x 7.25 inches (126 x 124 x 184
mm). While the FD95 won't easily slip into your coat pocket, (the size must
accommodate the required floppy disks and the very long-ratio zoom lens), the
accompanying neck strap makes it easy to tote.
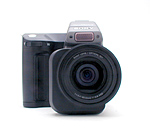
The top of the FD95 is fairly plain, holding the shutter button,
pop-up flash, external flash mount and external flash sync connection. You can
also see the ridged manual focusing ring on the front of the lens in this
view.
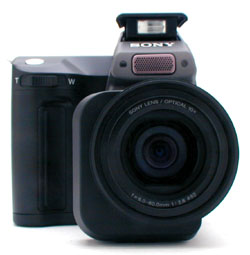
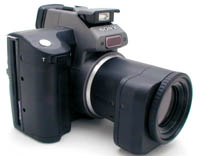
The rather large lens dominates the front of the camera, with a
squared off rest to keep the lens from banging when the camera is set down.
(This "rest" also houses the Steady-Shot system.) Also on the front of the
camera is the zoom control lever and microphone.
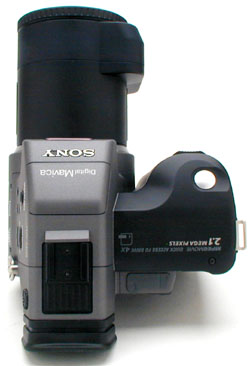
We liked the bulky hand grip on the side of the camera, which gives
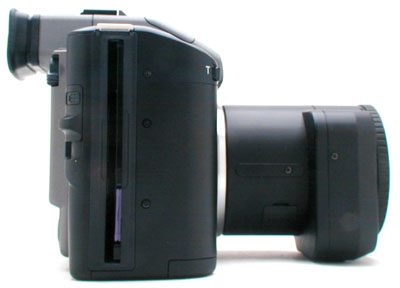
you a nice, solid hold. Conveniently, the floppy disk slot is also on this side,
making it simple to change disks in and out when the camera is mounted on a
tripod.
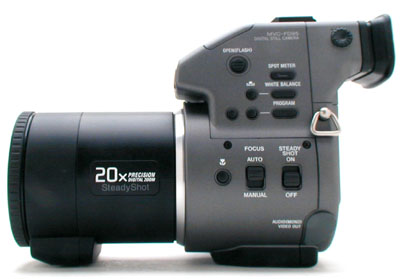
The majority of the camera's controls are on the left side of the
camera (when viewed from the back), which we're more accustomed to after working
with other Mavica models. Zoom, focus, Steady Shot, white balance, Program AE,
spot metering and macro options are all controlled from this side. An
audio/video out terminal also resides on this side of the camera (at the
bottom), which is protected by a flexible rubber flap that conveniently slides
out of the way when opened. There's also a dioptric adjustment dial on the side
of the optical viewfinder, to accommodate near and farsighted users.
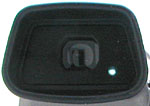
Some controls do remain on the back panel though, namely power,
capture mode, flash, volume, the menu button, LCD on/off button and the display
button. The optical viewfinder and LCD panel also live back here (this time the
LCD display is stationary, unlike some Mavica models where the LCD panel
actually flips upward or has swiveling capability). We liked the idea of having
an information display in the optical viewfinder, but ultimately still found it
a little awkward navigating through menus with our face pressed against the back
of the camera.
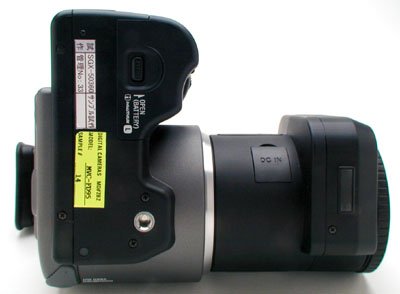
We greatly appreciated the placement of the tripod mount and the
battery compartment. They're just barely far enough away from each other to
allow battery changes while mounted. The metal threads of the tripod mount also
gave us a bit more security that we wouldn't strip them when we tightened down
the tripod screw. Our only complaint with the tripod mount was that the socket
doesn't have a lot of flat area around it, particularly toward the front of the
camera. This made it more prone to front-to-back rocking when mounted on the
tripod.
Viewfinder
 The MVC-FD95 offers both a rear LCD panel and optical
viewfinder (which seems to be a smaller version of the LCD). The "optical" viewfinder
actually uses a tiny (and lower-power) LCD screen to show you what the camera's
seeing. Sort of an "electronic SLR" (single-lens reflex), similar to the design
of the MVC-FD91 model. What makes the optical viewfinder interesting is the
internal information display, which is identical to that of the LCD monitor
(complete with navigable menus). The idea of being able to see the exposure
settings in the viewfinder is a good one, but navigating the menus through the
optical viewfinder is a bit of a trick (one we weren't able to easily do). We
found it much easier to simply switch on the LCD monitor when we needed to change
menu options. The optical viewfinder does feature a dioptric adjustment dial
for eyeglass wearers, which is always a nice bonus. The 2.5 inch LCD monitor
is turned on and off by the LCD On/Off button directly to its left, and the
information display is controlled by the Display button just beneath the monitor.
The MVC-FD95 offers both a rear LCD panel and optical
viewfinder (which seems to be a smaller version of the LCD). The "optical" viewfinder
actually uses a tiny (and lower-power) LCD screen to show you what the camera's
seeing. Sort of an "electronic SLR" (single-lens reflex), similar to the design
of the MVC-FD91 model. What makes the optical viewfinder interesting is the
internal information display, which is identical to that of the LCD monitor
(complete with navigable menus). The idea of being able to see the exposure
settings in the viewfinder is a good one, but navigating the menus through the
optical viewfinder is a bit of a trick (one we weren't able to easily do). We
found it much easier to simply switch on the LCD monitor when we needed to change
menu options. The optical viewfinder does feature a dioptric adjustment dial
for eyeglass wearers, which is always a nice bonus. The 2.5 inch LCD monitor
is turned on and off by the LCD On/Off button directly to its left, and the
information display is controlled by the Display button just beneath the monitor.
The advantage of an eye-level viewfinder, as provided by the "optical" viewfinder
is that it both promotes a more secure camera grip (arms clamped to your sides,
camera body braced against your face) that helps with long telephoto and low-light
shots. It also provides a more natural "look & shoot" operation than when
you're forced to rely on a rear-panel LCD display. The downside of having the
"optical" viewfinder be electronically drive though, is that you're left with
no usable viewfinder option when the light levels get really low: The FD95 has
excellent low-light capability, and in fact can shoot in conditions about as
dark as you're likely to be able to see in. The electronic viewfinder system
needs much more light to operate though, meaning that you'll have to either
look at the finished shot and readjust the framing as needed, or just shoot
at a wider-angle setting than otherwise, and hope to get all of the subject
in the frame. We'd really like to see at least some option for
optical alignment of the camera, even if only a "gunsight" sort of device that
could attach to the accessory shoe. (Are any of you third-party manufacturers
out there listening? - This could be a nifty add-on gadget for FD-95 owners!)
As you'd expect, the "optical" and LCD viewfinders on the FD95 are in exact
agreement with each other, no surprise given that they both display the same
image. We found about 92 percent accuracy in both the wide angle and telephoto
modes.
Optics
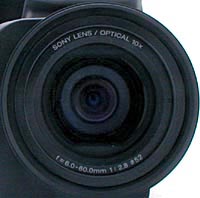 The MVC-FD95 is equipped with a 10x, 6 to 60 mm lens (equivalent to
a 39 to 390mm lens on a 35mm camera). The FD95 also boasts the surprisingly
effective "Steady Shot" anti-vibration system, which increases your chances
of being able to hand-hold exposures with such a long telephoto. (The rule of
thumb in the film-camera world has always been that you should use a shutter
speed of one divided by the focal length of your lens in millimeters, to avoid
blur from camera shake. Thus, for a 400 mm lens, you should use a shutter speed
of at least 1/400 of a second.) As we discovered with the FD91, the Steady Shot
system does an excellent job of steadying the image in the viewfinder when working
at the maximum telephoto setting. While we don't have any objective way to measure
how effective the Steady Shot system is, our distinct impression was that the
FD95's Steady Shot system is significantly improved over that of the earlier
FD91: It really does provide an amazing reduction in the amount of camera shake
that makes it through to the CCD!
The MVC-FD95 is equipped with a 10x, 6 to 60 mm lens (equivalent to
a 39 to 390mm lens on a 35mm camera). The FD95 also boasts the surprisingly
effective "Steady Shot" anti-vibration system, which increases your chances
of being able to hand-hold exposures with such a long telephoto. (The rule of
thumb in the film-camera world has always been that you should use a shutter
speed of one divided by the focal length of your lens in millimeters, to avoid
blur from camera shake. Thus, for a 400 mm lens, you should use a shutter speed
of at least 1/400 of a second.) As we discovered with the FD91, the Steady Shot
system does an excellent job of steadying the image in the viewfinder when working
at the maximum telephoto setting. While we don't have any objective way to measure
how effective the Steady Shot system is, our distinct impression was that the
FD95's Steady Shot system is significantly improved over that of the earlier
FD91: It really does provide an amazing reduction in the amount of camera shake
that makes it through to the CCD!
With a maximum aperture of f/2.8, the FD95's lens is quite "fast," great for
sports and other action shots (the larger aperture letting in more light, and
permitting a shorter shutter speed), as well as providing an option for isolating
your subjects with shallower depth of field. The lens has 52mm filter threads,
which allows you to attach specialty filters and auxiliary lenses. The 2x digital
telephoto can be turned on and off through the record menu, and effectively
extends the camera's zoom range to 20x. However, quality is always an issue
with digital telephoto, as the camera is simply enlarging the center portion
of the image and thereby decreasing the image quality (which shows up as higher
noise levels or softer resolution). Focus ranges from 9.8 inches (25 cm) to
infinity in normal mode and from 0.8 to 9.8 inches (2.0 to 25 cm) in macro mode.
Macro mode is controlled by the Macro button on the left side of the camera
(when looking at the back). The MVC-FD95 does an excellent job in the macro
category, capturing a minimum area of 1.42 x 1.06 inches (35.96 x 26.97mm) at
its closest setting (there appears to be a "sweet spot," where the lens lets
you zoom in just a little in Macro mode).
Focus can be manually or automatically controlled, simply by sliding the Focus
switch on the same side of the camera (next to the Macro button). Once in manual
focus, you control focus by turning the ridged focus ring at the end of the
lens. When you do so, the LCD viewfinder immediately switches to a 2x enlarged
view, which helps you determine whether you've achieved proper focus or not.
When in autofocus mode, the camera continuously sets the focus. The camera lets
you know when images are in focus and when the exposure is locked through indicators
on the display. When the green circle is solid, the camera is ready to snap
the picture.
In the time between our first testing of the FD95 and writing this review, we've
heard from a number of early purchasers of the camera. A complaint many have
voiced is the cameras tendency to "freeze" the viewfinder display whenever the
shutter button is pressed, or when the manual focus bezel is moved. This is
in fact a significant issue when shooting action subjects, as a lot can happen
while the display is either frozen or transitioning between modes. Without special
handling, this makes the camera of decidedly less value in shooting sports action
and other fast-changing subjects. We did find a bit of a workaround to this
problem though: It turns out if you just hold the shutter button half-pressed
in manual focus mode, the display will revert to normal size, yet you can continue
to operate the focus ring manually to follow the action. The on-screen distance
display continues to show the distance in real-time, which can help you get
the right focus in spite of the smaller screen display. This is still a trifle
inconvenient (you have to keep your finger gently pressing the shutter button),
but it does seem workable. In a note to the Sony engineers, it'd be nice to
have a setup menu option to disable the jump to 2x size when you twiddle the
manual focus adjustment. Likewise, why must the display freeze when you
push the shutter button? - It sure would be nice if it could stay "live"...
The camera's Aperture Priority mode allows you to manually select the lens aperture
from f/2.8 to f/11 in 1/2-stop increments, while the camera selects the appropriate
corresponding shutter speed. Two quick focus modes, Landscape and Panfocus,
allow you to preset specific focal distances for fast shooting situations. Landscape
sets focus at infinity for far away subjects and Panfocus allows you to change
focus quickly from close-up to far away subjects. We can see how these modes
would be helpful at kids' soccer games and other sporting events, when the fast
paced action doesn't give you much time to fool with focus.
In our testing, we found optical distortion a little high at the wide angle
end of the lens range, as we measured about 0.9 percent barrel distortion. However,
we found virtually no pincushion distortion at the telephoto end (at least none
that we could effectively measure). Chromatic aberration was moderate, showing
about two pixels of coloration on each side of the black resolution target corner
elements. (This distortion is visible as a very slight colored fringe around
the objects at the edges of the field of view on the resolution target). There
is also some lens flare in the corners of the image in telephoto mode. Overall,
a very good performance for a lens with such a wide zoom ratio.
Exposure
 Flash
FlashShutter Lag / Cycle Times
When you press the shutter release on a camera, there's usually
a lag time before the shutter actually fires. This time is to allow the autofocus
and autoexposure mechanisms time to do their work, and can amount to a fairly
long delay in some situations. Since this number is almost never reported on,
and can significantly affect the picture taking experience, we now routinely
measure it with an electronic test setup. Likewise, we measure and report on
how quickly the camera can take sequential exposures in various capture modes.
The table below summarizes our measurements of the FD95:
|
| ||
|
|
|
|
| Power On -> First shot |
|
Time is delay until first shot captured.
(Camera needs to check floppy first, to see if there's space
available.) |
| Shutdown |
|
No lens retraction to wait for, meaning zero
shutdown normally. Max time is time until floppy may be removed if
Text-mode image is being processed. |
| Play to Record, first shot |
|
Time is delay until first shot captured.
Shorter time is with manual focus, longer is for autofocus.
|
| Record to play (max/min res) |
|
Shortest time is for image already processed
to floppy. Longer is for high res JPEG image just captured. Longest is for
text-mode image just captured. |
| Shutter lag, full autofocus |
|
Typical to slightly slower than
average. |
| Shutter lag, manual focus |
|
About average. |
| Shutter lag, prefocus |
|
Fairly typical for cameras we've tested.
(Prefocus means half-pressed shutter before shot.)
|
Overall, the FD95 is fairly typical of digicams we've tested, slightly slower
than average in its shutter lag timing in full autofocus mode (0.9 vs roughly
0.8 on average), and about average when prefocused or manually focused. As noted
in the "Exposure" section earlier, the FD95 does have an annoying characteristic
in that the viewfinder display freezes momentarily whenever the shutter button
is half-pressed. We did find though, that holding the shutter half-pressed (possibly
in conjunction with manual focus operation) provided a potential workaround.
From shot to shot, the FD95 is slower than some digicams, but surprisingly quick,
given that it depends on a floppy drive to store its data. The drive in the
FD95 is no ordinary floppy though, as it reads and writes four times faster
than the drive in your computer. The net result is a slow but manageable 8 second
cycle time for maximum-resolution images saved to floppy. Minimum-resolution
images can be captured as fast as every 5.5 seconds. We were surprised though,
to find that the Memory Stick/Floppy Adapter storage combination actually took
nearly twice as long to save images as did floppies. With this memory device,
cycle time for maximum-resolution images was a leisurely 15.4 seconds, rather
slow by current digicam standards.
|
| |||
|
|
(secs) |
(frames/sec) |
|
| Maximum resolution |
|
Shorter time is with floppy disk, longer time with Memory Stick & adapter. | |
| Minimum Resolution |
|
Shorter time is with floppy disk, longer time
with Memory Stick & adapter. | |
| Movie Mode |
|
Frame rate for MPEG movies is 15 fps.
| |


![]()
Program AE +/- Buttons: Located to the left of the
Program AE button, these buttons adjust exposure settings such as the aperture
and shutter speed, depending on the exposure mode selected.
Macro Button: Located on the
lens barrel side of the camera, this button places the camera in Macro mode.
Focus Switch: Located to the
right of the Macro button, this switch shifts between Auto and Manual focus
modes.
Steady Shot Switch: Located just beside the Focus
Switch, this switch turns the Steady Shot function on and off.
Play/Still/Movie Switch:
Located at the top right of the back panel, this switch selects between
Playback, Still and Movie capture modes.
LCD On/Off Button: Located on the left side of the LCD
panel, this button turns both the LCD monitor and optical viewfinder display on
and off.
Volume
Buttons
: Also located on the left side of the LCD panel, these buttons
control the camera's volume level.
![]()
Flash Button: Located in the bottom left corner of the
back panel, this button controls the flash mode:

Power Switch: Located on the
back panel of the camera (directly beneath the LCD monitor), this sliding switch
turns the camera on and off. The small green pushbutton in the center of the
power switch is a safety interlock that insures the switch will only actuate
when your finger is on it.
Display Button: Located to the left of the power
switch, this button turns the information display on the LCD monitor on or
off.
Rocker Toggle Control: Located below the LCD monitor,
this control has four arrows that navigate through menu screens in both playback
and capture modes. Pressing the center of the button confirms menu
selections.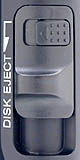
Disk
Eject Lever: Located in the center of the right side of the back panel, this
sliding lever ejects the diskette or memory stick floppy disk adapter.
Open Batt Switch: Located on
the bottom of the camera (on the battery compartment cover), this switch unlocks
and opens the battery compartment.
 Effect:
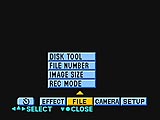 File:
File:
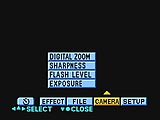 Camera:
 Setup:
Playback Mode Menu: Activating the Playback menu pulls up the
following submenus:
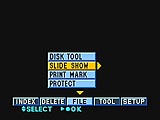 File:
File:
 Tool:
Tool:
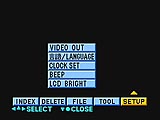 Setup:
Image Storage and Interface
 The MVC-FD95
records still images and movies to a 3.5 inch, 2HD, DOS formatted diskette.
This eliminates a good deal of the hassle of downloading files from the camera
to your computer, and is a primary reason for the huge popularity the Mavica
line has enjoyed in the marketplace. Instead of messing around with cables and
driver software, you just take the disk from the camera and put it in your computer.
A small disk icon on the camera's LCD display lets you know how much of the
disk is full and how many images have been shot. In addition to the standard
write protection of the entire diskette (simply slide the lock button on the
diskette itself), the MVC-FD95 allows you to protect individual images on the
disk from accidental erasure or alteration. All the standard rules for floppy
usage apply here, such as keeping diskettes away from heavy magnetic fields
and not getting them wet. This type of image storage is perfect for PC users,
who should have a floppy drive readily available on their machine. Newer Mac
users, however, will need to utilize an external floppy drive since the camera
doesn't have any digital connection jacks and the latest Macs don't come with
floppy drives.
The MVC-FD95
records still images and movies to a 3.5 inch, 2HD, DOS formatted diskette.
This eliminates a good deal of the hassle of downloading files from the camera
to your computer, and is a primary reason for the huge popularity the Mavica
line has enjoyed in the marketplace. Instead of messing around with cables and
driver software, you just take the disk from the camera and put it in your computer.
A small disk icon on the camera's LCD display lets you know how much of the
disk is full and how many images have been shot. In addition to the standard
write protection of the entire diskette (simply slide the lock button on the
diskette itself), the MVC-FD95 allows you to protect individual images on the
disk from accidental erasure or alteration. All the standard rules for floppy
usage apply here, such as keeping diskettes away from heavy magnetic fields
and not getting them wet. This type of image storage is perfect for PC users,
who should have a floppy drive readily available on their machine. Newer Mac
users, however, will need to utilize an external floppy drive since the camera
doesn't have any digital connection jacks and the latest Macs don't come with
floppy drives.
The downside of floppy storage though, is the limited capacity offered by the
medium: 1.44 megabytes was a lot of space a few years ago, when digicams with
0.3 megapixel sensors were considered high tech, but with the 2.1 megapixel
sensor of the FD95, things are definitely a bit cramped, and only 4 high-resolution
images can fit on a diskette at a time. This also means that the images stored
with a higher level of image compression than is common on other high end digital
cameras, resulting in higher levels of compression artifacts in the images.
Still, users of earlier Mavicas will find the image quality of the FD95 a dramatic
step up from the models they've used in the past.
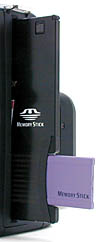
As a solution to the space limitations of floppies, the MVC-FD95 can also store
images on Sony MemorySticks, via an accessory floppy disk adapter. This adapter
is the same size and shape of a standard floppy, but has a slot in the side
to accept a memory stick. The net result is a "floppy disk" with up to 64 megabytes
of capacity, enough for even an extended outing. We felt that this solution
worked quite well, but were disappointed to find that the FD95 can only read
or write to the Memory Stick/Adapter combination about half as fast as it can
to floppies. The adapter also requires driver software to be installed on your
PC to interface with it, eliminating some of the elegant simplicity of the floppy
disk solution.
You get a nice selection of image sizes with the MVC-FD95, from 1600 x 1200
to 1024 x 768 to 640 x 480. There's also a 1600 3:2 aspect image size which
crops the top and bottom of the image slightly and a higher-compression/lower
quality1600 ECM image option. ("ECM" apparently stands for "Economy")
Below is the approximate amount of images and compression ratios for a standard
1.44MB diskette:
| Resolution/Quality vs Image Capacity |
|
|
| |||
|
|
|
|
|
|
| |
| Normal Quality |
|
|
|
|
|
|
| ECM Mode |
|
|
|
|
|
|
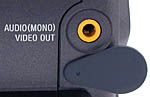 An
audio/video output jack on the lens side of the camera allows you to connect the
camera to a television set. Through the capture menu, you can select NTSC or PAL
formats, depending on where you live. US and Japanese models come with the
necessary NTSC cables, while European models come with PAL connectors. All the
same image playback capabilities are available when connected to the TV, and you
have the added ability to record images to video tape. Unlike most digicams, the
FD95 can record still images, movies, and sound. Thus, the signal output jack
actually accommodates an "A/V" cable, with both video and audio connectors on
the other end.
An
audio/video output jack on the lens side of the camera allows you to connect the
camera to a television set. Through the capture menu, you can select NTSC or PAL
formats, depending on where you live. US and Japanese models come with the
necessary NTSC cables, while European models come with PAL connectors. All the
same image playback capabilities are available when connected to the TV, and you
have the added ability to record images to video tape. Unlike most digicams, the
FD95 can record still images, movies, and sound. Thus, the signal output jack
actually accommodates an "A/V" cable, with both video and audio connectors on
the other end.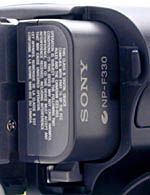 The MVC-FD95 comes
with a Sony InfoLITHIUM, NP-F330 rechargeable battery. (It can also use the
higher-capacity NP-F530 and NP-F550 batteries.) InfoLITHIUM technology means
that the battery communicates with the camera to let you know how much power is
left (displayed on the LCD panel in minutes remaining as well as via a battery
icon). If you need to run the camera for longer periods than the battery pack
will allow, the supplied AC adapter should do the trick. There's also an auto
power-off function which shuts down the camera after three minutes of
inactivity. The AC adapter also acts as the battery charger. You simply leave
the battery in the camera and plug in the AC adapter. If the camera is switched
off, the "Charge" LED will light up (located directly over the power
switch).
The MVC-FD95 comes
with a Sony InfoLITHIUM, NP-F330 rechargeable battery. (It can also use the
higher-capacity NP-F530 and NP-F550 batteries.) InfoLITHIUM technology means
that the battery communicates with the camera to let you know how much power is
left (displayed on the LCD panel in minutes remaining as well as via a battery
icon). If you need to run the camera for longer periods than the battery pack
will allow, the supplied AC adapter should do the trick. There's also an auto
power-off function which shuts down the camera after three minutes of
inactivity. The AC adapter also acts as the battery charger. You simply leave
the battery in the camera and plug in the AC adapter. If the camera is switched
off, the "Charge" LED will light up (located directly over the power
switch).Test Results
In keeping with our standard
policy, our comments here are rather condensed, summarizing our key findings.
For a full commentary on each of the test images, see the MVC-FD95's "pictures" page.
As with all Imaging
Resource camera tests, we encourage you to let your own eyes be the judge of how
well the devices performed. Explore the images on the pictures page, to see how well the FD95 performed, and
how its images compare to other cameras you may be considering
buying.
Overall, the FD95 produced very good images, with excellent color
and good detail. Color accuracy was very nice throughout our testing, although
the large cyan and yellow blocks on our Davebox target appeared slightly weak in
their saturation level. The camera's white balance system seemed to handle most
lighting situations well, with the manual (One-Push) adjustment option providing
the most accurate results the majority of the time. Still, we were very
impressed with the color results.
In the resolution department, the FD95
performed about in the middle of the pack among 2 megapixel cameras we've
tested. We "called" the visual resolution at about 800 lines horizontally, 650
vertically. We saw more color moire patterns and artifacts in the vertical axis,
but they weren't too severe in either direction. Sharpness is just a bit off the
top of the current 2 megapixel pack of cameras though, due largely to the higher
levels of JPEG compression the FD95 has to use to fit even four high-resolution
images onto a floppy disk. Overall, a good performance though, likely a very
welcome upgrade to fans of the earlier 800K pixel FD91. (If you liked the Mavica
line before, you should really love the FD95, as it provides a pretty dramatic
increase in resolution and picture-taking flexibility.)
Optical
distortion on the MVC-FD95 is a little high at the wide angle end, showing
approximately 0.9 percent barrel distortion. However, we found virtually no
pincushion distortion at the telephoto end (at least none that we could
effectively measure). Chromatic aberration was moderate, showing about two
pixels of coloration on each side of the black resolution target corner
elements. (This distortion is visible as a very slight colored fringe around the
objects at the edges of the field of view on the resolution target). There is
also some lens flare in the corners of the image in telephoto mode. Taken as a
whole though, lens performance is very good, particularly in light of the
exceptional 10x zoom range. (Long-ratio zooms are very tough to design so as to
avoid distortion. Sony's optical engineers seem to have done a fine
job.)
The FD95 offers good exposure control, with a variety of Program AE
modes that include Shutter Priority, Aperture Priority, Twilight, Twilight Plus,
Landscape, Panfocus and Automatic exposure modes (although there's no full
manual mode, which is something we like to see on a higher end camera like this
one). There's also a choice between spot and matrix metering. We found excellent
highlight detail in many of our tests, particularly noticeable in the white
cheesecloth section of the Davebox target and the strong highlights of the
model's shirt in our outdoor portrait test.
One of the most obvious
limitations of the original Mavicas was their low-light performance: You just
couldn't take pictures in very dark surroundings. We were therefore surprised to
see the excellent results we obtained with the FD95 even in very dark
conditions: The FD95 is comfortably in the current (June, 2000) first rank in
the low-light arena! In straight Automatic Exposure mode, the MVC-FD95's low
light capabilities weren't too impressive (only going down as far as 1
foot-candle, or 11 lux), but in Shutter Priority exposure mode exposure times as
long as 8 seconds produced a surprisingly good (although noisy) image at 1/16 of
a foot-candle (0.7 lux). (!) We'd rate the FD95 as producing very good images
down to light levels of 0.5 foot-candles (5.5 lux), and usable ones to levels of
1/4 of a foot-candle (2.6 lux) and below. (For reference, a city night scene
under typical street lighting corresponds to an illumination level of 1
foot-candle.)
We found the MVC-FD95's LCD monitor to be just a little tight, showing about 92 percent of the final image area at both wide angle and telephoto settings. We assume that the optical viewfinder has the same accuracy level, since it's basically a smaller version of the rear LCD panel. Although we generally like to see LCD monitors as close to 100 percent accuracy as possible, the MVC-FD95 is more accurate than most. We generally like to see LCD monitors as close to 100 percent accuracy as possible, so the FD95 falls just a little short in that category. (Although 92% is more accurate than most cameras we've tested.)
The MVC-FD95 performs superbly in the macro category, capturing a minimum area of 2.12 x 1.59 inches (53.95 x 40.46 mm) at the furthest wide angle setting. The lens does seem to have a bit of a "sweet spot" in macro mode, allowing you to partially zoom in and capture an even smaller minimum area of only 1.42 x 1.06 inches (35.96 x 26.97mm). Macro lighting with it is a little tricky though, because the large lens and close working distance blocks some of the light and forces a very shallow lighting angle. Ultra-macro optics usually show some optical imperfections this close, and the FD-95's lens is no exception. Still, the level of distortion seems to be less than we've come to expect, with some barrel distortion, curvature of field and lens flare in the corners all present, but not as severe as we've seen in some other ultra-macro lenses.
Overall, the MVC-FD95 performed very well in our testing, with very good
color accuracy, low light and macro results. It's clearly a substantial step
forward for the Mavica line in terms of image quality and shooting
flexibility.
Conclusion
Despite its
somewhat bulky dimensions, we really liked what the MVC-FD95 had to offer, and
found it an enjoyable camera to work with. Besides the floppy-disk image storage
(somewhat of a mixed blessing, in our judgment, due to the image compression
levels it demands), the MVC-FD95's standout feature is clearly its 10x optical
zoom lens. Our earlier review of the 14x-equipped 0.8 megapixel FD91 Mavica was
subtitled "resolution isn't everything," pointing out how many more pixels that
camera could deliver on-subject than even 2 megapixel competitors with typical
3x optical zooms. With its 10x zoom, the 2.1 megapixel FD95 clearly takes the
cake for the ultimate telephoto workhorse, at least at the current time in the
digicam marketplace (June, 2000). The lens' optical stabilization system is also
remarkably effective for hand-holding those super-telephoto shots, producing
crisp images at shutter speeds way slower than you'd expect to be usable.
With upgraded 12-bit digitization, great tonal range and color reproduction, and
excellent low-light performance, the FD95 is a flexible photographic tool that's
also easy for novices to master in full-auto mode. We expect large numbers of
prior Mavica owners will find the FD95 an excellent upgrade to bring them into
the 2.1 megapixel arena, and many more will be sold to new owners as
well.
<<MVC-FD95 Sample Images | Additional Resources and Other Links>>
Reader Comments!
Questions, comments or controversy on this product? Click
this link to see what other Imaging Resource readers have had to say about
the Sony MVC-FD95, or add comments of your own!