The Imaging Resource
Quick Review
Panasonic Lumix DMC-FZ4 Digital Camera
|
|||||||||||||||||||
Introduction - The Panasonic FZ4
|
|||||||||
By Shawn Barnett
With the price of digital SLRs finally within reach, should you stick with the All-in-one digicam or move up to an SLR? Why buy a high-end digicam when digital SLRs are so close in price? Do digicams still have a purpose? What are the pros and cons? An avid photographer, I spent some time thinking about that myself. Come see what I discovered about digital SLRs versus all-in-one digicams.
Panasonic is a company that started a little slow in the digital camera market, but have really come on strong in the last year or two. The four megapixel Panasonic FZ4 is largely based on the three megapixel FZ3 model we reviewed in 2004, which at the time was one of the best deals on the market for a camera with anti-shake technology in the long-zoom category. Relative to the FZ3, the Panasonic FZ4 increases image resolution, though not as much does its "big brother," the Panasonic FZ5. The camera keeps the same size LCD as its predecessor and slightly refines the body design. Like its predecessor, the Panasonic Lumix FZ4 offers a 12x Leica zoom lens, incorporating Panasonic's own "Mega OIS" Optical Image Stabilization technology. As I've said about other cameras offering image stabilization, it's hard to overstate the benefit of this technology on long-zoom digicams: It makes an incredible difference in the usability of long telephoto focal lengths, and the Panasonic FZ4's 12x lens with Mega OIS is no exception. The long-zoom category is becoming crowded, but the Panasonic FZ4 has the features and image quality to compete strongly there. Read on for the details, but if you're in the market for a relatively affordable long-zoom digicam with optical image stabilization, the Panasonic Lumix FZ4 could be the camera for you.
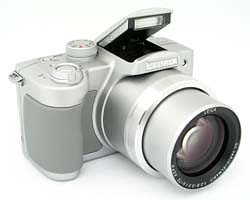
With the confident stance of a traditional 35mm SLR (though quite a bit smaller), the Panasonic Lumix DMC-FZ4 offers both style and substance, with an impressive Leica 12x optical zoom lens and 4.0-megapixel CCD. Measuring 4.3 x 2.7 x 3.3 inches (108 x 68 x 85 millimeters), the Panasonic Lumix FZ4 weighs approximately 11.32 ounces (321 grams) with the battery and storage card installed. While it definitely won't fit into your shirt pocket, an accompanying neck strap makes it easy to tote, but I'd also recommend picking up at least a small camera bag to protect that Leica lens.
The Panasonic FZ4 features both an eye-level electronic optical viewfinder (EVF) and a 1.5-inch LCD monitor on the back panel for image composition (114,000 pixels). The EVF is essentially a miniaturized version of the larger LCD monitor, complete with all of the image and information displays, though it has slightly lower resolution of 110,000 pixels. A button on the rear panel switches the view between the two monitors. A dioptric adjustment tucked on the left side of the eyepiece adapts the viewfinder optics to your vision, with a diopter range from -4 to +4 (an unusually wide range). The eyepiece has a high "eyepoint," making it well-suited to eyeglass wearers. I could just about see the full frame without touching my eyeglass lenses to the viewfinder eyepiece. The Display button controls the image and information displays, accessing five display modes in Record mode, and three modes in Review mode.
The Panasonic Lumix FZ4 boasts a high quality 12x, 6-72mm telescoping Leica zoom lens (equivalent to a 35-420mm lens on a 35mm camera). A removable, plastic lens cap protects the lens surface and tethers to the camera body. When the camera is powered on, the lens telescopes out an additional three-quarters of an inch from the camera body, and retracts again when the camera is shut off. Panasonic includes a lens hood with the DMC-FZ4, and a hood adapter for attaching auxiliary lenses. Focus remains under automatic control, with a range of 0.98 feet (30 centimeters) to infinity in normal mode. Macro mode gets as close as two inches (5 centimeters) in wide-angle mode and 3.94 feet (120 centimeters) in telephoto mode. Aperture ranges from f/2.8 to f/8.0, and is manually or automatically adjustable. The camera employs nine active autofocus (AF) areas, but you can also limit the active area to three or one AF points through the Record menu. There's also a Spot AF mode, which employs a smaller central focus area, and a Continuous AF mode for moving subjects. New to the FZ4 is high-speed focusing, available only for the 3-area or single-area AF modes.
If dim subject lighting requires it, a bright orange LED autofocus assist light on the front of the camera automatically illuminates whenever autofocus is active. (The AF-assist light can be turned off via a menu option.) With the AF assist beam enabled, it can focus in total darkness, so long as your subject is within the range of the beam. Because of the Panasonic FZ4's long lens, Panasonic included a dual-mode Image Stabilization technology to reduce blurring from camera movement, which is more noticeable at the full telephoto setting. An in-depth look at the image stabilization of the previous DMC-FZ3 model compared to that of the Konica Minolta DiMAGE Z3 can be found in our DMC-FZ3 review; the feature should be very similar to that in the FZ4. In addition to the 12x optical zoom, the DMC-FZ4 also offers 4x Digital Zoom. I always warn readers that digital zoom only enlarges the center portion of the CCD image, and compromises the image quality by reducing resolution and enlarging noise patterns.
The Panasonic Lumix DMC-FZ4 offers excellent exposure control, with Program AE (P), Shutter Speed Priority AE (S), Aperture Priority AE (A), Manual (M), and Scene (SCN) exposure modes. A number of preset "scene" exposure modes are available through the SCN option, and include Portrait, Sports, Scenery, Night Scenery, Night Portrait, Panning, Fireworks, Party, and Snow modes. These modes preset a variety of camera options, helping novice photographers capture good-looking pictures in challenging situations without requiring a full knowledge of the camera.
Exposure compensation can be adjusted from -2 to +2 exposure values (EV), in one-third-step increments. The camera's metering system offers three operating modes, which include Multiple, Center-Weighted, and Spot, selectable through the Record menu. Six White Balance modes are available, including Auto, Daylight, Cloudy, Incandescent, Flash, and White Set (manual). The White Set mode allows you to manually set the white balance by holding a white card in front of the camera to set the value in the setup mode. You can fine-tune the camera's white balance by adding more red or blue to the color balance in all of the modes except Auto, Simple, and Scene, using the WB Adjust feature (accessed by pressing the up arrow of the Multicontroller until WB Adjust appears on the LCD monitor).
ISO film speed equivalents on the Panasonic FZ4 include Auto, 64, 100, 200, and 400. The DMC-FZ4 does feature long-exposure Noise Reduction, which uses dark frame subtraction to reduce the amount of image noise in longer exposures. The Panasonic Lumix FZ4's built-in, pop-up flash operates in one of six modes: Auto, Red-Eye Reduction (Auto), Forced, Red-Eye Reduction (Forced), Slow-Sync (with Red-Eye Reduction), and Flash Off (the flash goes off when the pop-up flash is pushed closed). The flash exposure can be adjusted from -2 to +2 EV in one-third-step increments.
The Panasonic FZ4 also offers a Color Effect setting with Cool, Warm, Black and White, and Sepia color options. A Picture Adjustment menu option features an additional adjustment tool, with options somewhat deceptively labeled as "Natural," "Standard," and "Vivid." Also available are Auto Exposure Bracketing, three Burst shooting modes (Low Speed, High Speed, and Infinity), and a Self-Timer option.
The Panasonic DMC-FZ4 also offers a Movie mode, which records at 320 x 240 pixels, at either 30 or 10 frames per second. Recording times are limited by frame rate and memory card capacity. A Flip Animation mode lets you connect a string of images together to make a 20-second movie that resembles a flip animation. You can record as many as 100 consecutive images to create the animation.
The Panasonic Lumix FZ4 is powered by an internal Panasonic CGA-S002A rechargeable lithium-ion battery pack. The camera ships with one battery pack and a charger. An AC Adapter Kit is sold separately, with a power adapter, DC coupler, and power cord.
The Panasonic FZ4 comes with a very nice complement of software on the included CD. Compatible with Windows and Macintosh operating systems, ArcSoft PhotoImpression, Panorama Maker, and PhotoBase applications provide a well-rounded offering of image organization and editing tools. The CD also features USB drivers for both Macintosh and Windows computers.
Basic Features
- 4.0-megapixel CCD delivering up to 2,304 x 1,728-pixel resolution images.
- Electronic optical viewfinder.
- 1.5-inch, color LCD monitor.
- 12x Leica zoom lens, 6-72mm (equivalent to a 35-420mm lens on a 35mm camera) with auto and manual focus, and available nine-point focus area.
- As much as 4x digital telephoto.
- Program AE, Shutter Priority, Aperture Priority, and Manual exposure modes, as well as nine preset "Scene" exposure modes.
- USB cable for high-speed connection to a computer.
- Lens hood and hood adapter included.
- ArcSoft PhotoImpression, Panorama Maker, and PhotoBase software on accompanying CD ( for both Mac and Windows)
- Powered by Panasonic rechargeable lithium-ion battery pack, with optional AC adapter.
Special Features
- Manually adjustable aperture settings from f/2.8 to f/8.0, depending on zoom setting.
- Manually adjustable shutter speed settings from 1/2000 to 8 seconds. (1/1300 and above only at smaller lens apertures)
- ISO sensitivity equivalents: Auto, 64, 100, 200, and 400.
- Three metering modes: Multiple, Center-Weighted, and Spot metering.
- White balance setting with six modes, including a manual setting.
- Built-in pop-up flash with six operating modes and flash exposure compensation.
- JPEG and TIFF still image file formats, movies saved as Motion JPEGs.
- Images saved to SD/MMC memory cards, 16 MB card included.
- Movie mode without sound (sound is available on the FZ5).
- Flip Animation mode, plus three Burst continuous shooting modes and Auto Exposure Bracketing.
- Color Effects option, plus sharpness adjustment with three settings.
- DPOF (Digital Print Order Format) compatibility.
User Recommendation
Thanks to the significantly improved shutter lag times (with the provisos mentioned above), I found myself a lot happier with the Panasonic FZ4 than I'd been with the FZ3. (And the FZ3 was quite a nice camera in its own right.) The added resolution will allow for larger prints or more cropping of images - definitely a bonus compared to the FZ3's rather limited resolution. All in all, the Panasonic FZ4 was a camera I grew to find myself really rather liking, albeit still with a couple of small quirks. (Read on for all the details.)
 With the confident looks of a traditional 35mm SLR, the Panasonic Lumix DMC-FZ4 offers both style and substance, with an impressive Leica 12x optical zoom lens that lends a professional air. Measuring 4.3 x 2.7 x 3.3 inches (108 x 68 x 85 millimeters), the Panasonic Lumix FZ4 weighs approximately 11.32 ounces (321 grams) with the battery and storage card installed. The DMC-FZ4's all-plastic, matte-black body helps keep the camera's weight down, somewhat compensating for the heft of the rather large lens, but does tend to give the initial reaction that it feels somewhat "cheap." This is rather a difficult thing to explain, since there's no real creak or flex to any of the body panels, but was definitely a common thread from several people who had occasion to handle the camera during the review process. While it definitely won't fit into your shirt pocket, an accompanying neck strap makes it easy to tote, but I'd also recommend picking up at least a small camera bag to protect that Leica lens.
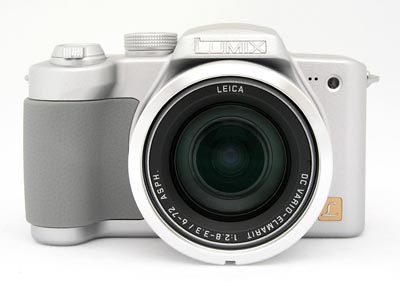
The front of the camera includes the telescoping 12x Leica zoom lens, optical viewfinder window, and a bright orange LED light emitter that serves double duty as the autofocus assist and the self-timer countdown indicator. There are also two small holes next to the light emitter that serve as a grille for the built-in microphone on the FZ5, but here they do nothing because the FZ4 has no mic. The built-in, pop-up flash is just above the large lens, and is mechanically released by a button on the rear panel. A modest-sized handgrip on the right side is covered by a redesigned rubbery, textured wrap that clings to fingers. With my rather large hands, the handgrip felt a little small, but my middle finger tended to wrap around the provided indent on the grip and then run vertically down the inside edge of the grip, providing a fairly secure hold.
The right side of the camera (as viewed from the back) features only an eyelet for one end of the neck strap. The rubber textured wrap from the front of the camera follows around to this side of the camera, and extends much farther back than it did on the FZ3.
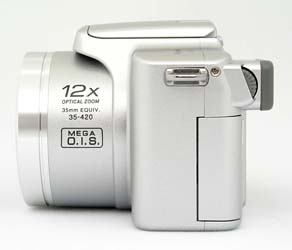
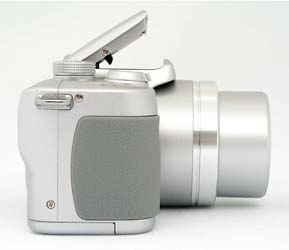
The opposite side of the camera features the other neck strap eyelet, as well as the diopter adjustment dial on the side of the optical viewfinder. Also on this side of the camera, beneath a hinged, plastic door, is the connector compartment, which houses the Video/Digital Out and DC In connector terminals. The compartment door opens from the rear panel, and features a pressure hinge that snaps it securely in place when opened or closed.
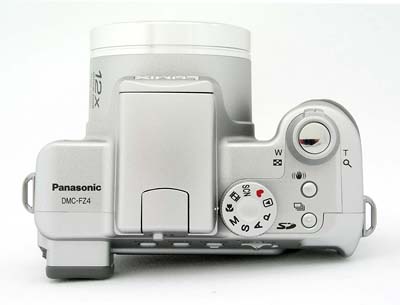
The Panasonic FZ4's top panel features a Mode dial on the right, along with the Shutter button, Zoom lever, Optical Image Stabilizer button, and Burst Mode button. The Shutter button and Zoom lever have been moved closer to the front of the camera, and are much easier to reach. Also on the top panel is the pop-up flash (mechanically released by a button on the rear panel).
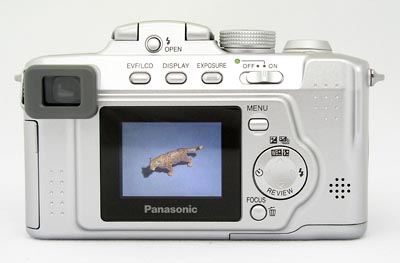
The majority of the exposure controls are located on the camera's rear panel, along with the electronic optical viewfinder (EVF) and LCD monitor. Lining the top of the panel are the EVF / LCD, Display, Exposure, and Power controls, with the Flash Open button just above them. The Menu and Focus/Delete buttons line up with the top and bottom right corners of the LCD monitor respectively, with a Four-Way Multicontroller at center. True to its name, the Multicontroller accesses a variety of camera settings and features four arrows for navigating through camera menus and reviewing images. A small speaker rests in the lower right corner of the rear panel (for status beeps), and a textured thumb grip reinforces the modest handgrip on the camera's right side. The only really significant change from the FZ3 on this panel is the small ridge on the Exposure button that helps differentiate it from the other buttons without your having to remove your eye from the electronic viewfinder.
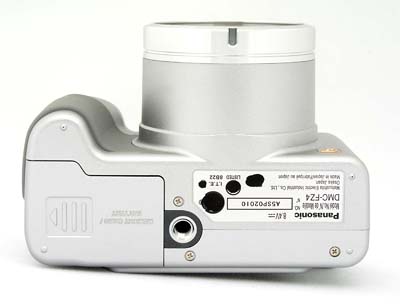
The DMC-FZ4's bottom panel is reasonably flat, with a sliding door to access the combined SD/MMC and battery compartment, and a threaded metal tripod mount on its right. The metal tripod mount is positioned off-center from the lens, and is too close to the compartment for quick battery and memory card changes (something I'm probably more sensitive to than most users, given the amount of on-tripod shooting I do)
The Lumix DMC-FZ4's user interface is straightforward and should present a relatively short learning curve if you read through the included manual. (Although there are a lot of features here, so I'd imagine that novice users could easily spend a couple of hours learning them all. Experienced digicam users should be able to come up to speed on the major functions in under an hour though.) I generally prefer to see external access to as many exposure controls as possible, and the DMC-FZ4 does provide a fair amount of control without resorting to the LCD menu system. The camera's Multicontroller controls a wide variety of functions independently of the LCD menu, though the menu itself is straightforward. As noted earlier, I also found the FZ4's menu system unusually fast to navigate.
Record-Mode Display
 In record mode, the main display shows the image area, center AF brackets, camera modes and settings, battery level, image resolution and quality, and the remaining image capacity of the memory card. Pressing the Display button enables the same display but with the addition of a small histogram. A third press enables the "Out of Frame" display, which puts the image area into the top left corner, and displays the camera stats in the right and bottom borders (useful if you're having trouble framing with the information overlay, but still need to refer to it). The remaining two displays are a framing guideline (which divides the image area into thirds horizontally and vertically) - useful both for ensuring a level horizon, and placing objects in the relevant areas of your photograph to follow the "rule of thirds" - and the image by itself (with just the central AF brackets).
Playback-Mode Display
 In Review mode, the LCD monitor provides a full-frame display of captured images, which you can view individually by scrolling left or right with the arrow buttons on the Multicontroller. Pressing the Zoom lever toward the wide position brings up a thumbnail index display of nine images at a time, which you can also scroll through with the arrow buttons. The telephoto side of the Zoom lever doubles as a Digital Enlargement button (marked by a magnifying glass), which allows you to enlarge an image up to 16x its normal size on the screen. This degree of enlargement is very handy, as it's sufficient to check focus accuracy and depth of field, something that's difficult to do on cameras with lower playback magnification. The arrow keys permit you to move around the enlarged image and check fine details and framing.
By default, the LCD screen displays basic information about the captured images, including the file name, date and time it was recorded, compression, resolution, what number it is in the sequence of images stored on the memory card, and the battery level. Depressing the Display button once brings up a more detailed information such as the shooting mode, aperture, f/stop, exposure compensation, and metering mode. In addition, the screen shows a small histogram to indicate the distribution of tonal values. If activated through the Setup menu, the Highlight Display will blink any blown-out highlights in the image from white to black and back again, letting you see exactly where detail has been lost. (Note that the blinking highlight display is only available in Review mode, accessed via the four-way controller, not in normal Playback mode.) A third display mode shows only the image, without any information.
External Controls

Shutter Button: Located on the right side of the camera's top panel and surrounded by the Zoom lever, the Shutter button sets focus and exposure when halfway pressed, and when fully depressed, it trips the shutter release. In Self-Timer mode, fully depressing the Shutter button triggers a two- or 10-second countdown before the shutter is released.
Zoom Lever (see image above): Surrounding the Shutter button, this lever controls the optical and digital zoom in any Record mode.
In Review mode, pushing the lever toward the "W" end activates a nine-image index display mode. Pushing the lever to the "T" end digitally enlarges a captured image as much as 16x. When playback zoom is active, pushing the lever back toward the "W" zooms back out.

Mode Dial: To the left of the Shutter button, this notched dial is used to select the camera's shooting modes as follows:
 Program AE (P): Places the camera in control of shutter speed and lens aperture, while you maintain control over everything else (i.e., white balance, ISO, metering, exposure compensation, flash, etc.).
 Aperture Priority (A): Allows you to set the lens aperture from f/2.8 to f/8.0 (depending on the zoom setting), while the camera controls the shutter speed. In this mode, you maintain control over all other exposure variables.
 Shutter Speed Priority (S): Allows you to control the shutter speed settings from 1/2,000 to eight seconds, while the camera controls the aperture. All other exposure settings are available. (As mentioned earlier, note that shutter speeds above 1/1,000 second are only available when smaller lens apertures are selected.)
 Manual (M): Provides complete control over all exposure settings, including shutter speed and lens aperture.
 Macro: Places the camera into Macro mode, letting you focus on smaller objects at a closer range.
 Movie: Records moving images with sound, at either 30 or 10 frames per second. Recording times are limited by memory card capacity and frame rate.
 SCN: Accesses one of nine preset scene modes. (Through the setup menu, you can opt for the last used scene mode to be automatically selected when entering this mode, or you can set the camera to automatically present you with a menu listing all available modes when scene mode is entered.)

 Simple Mode: This would be the "green" or "Auto" mode on other cameras, Panasonic calls it the "Simple" mode. In this mode, most user options are removed, allowing control only over image resolution (with options of "Enlarge," "4x6," or "E-Mail), Auto Review mode (on/off), Beep (off/low/high), and Clock Set. Continuous-mode options are reduced to a single choice, and instead of exposure compensation adjustments, the up arrow on the four-way controller simply toggles a Backlight option. Flash options are reduced to just Off (flash head stowed), Auto, and Auto with Red-Eye Reduction. The self-timer function is available as normal, but the image stabilizer is not.
 Playback: Lets you review captured images and movie files.

Optical Image Stabilizer Button: Directly behind the Shutter button / Zoom lever combo on the top panel, this button accesses the camera's image stabilizer function, which attempts to reduce image blurring caused by camera shake. The stabilizer can be disabled altogether, or can be set to Modes 1 or 2. In Mode 1 the stabilizer functions continuously whenever the shutter button is half-pressed. Mode 2 operates the stabilizer only during the actual image capture, which conserves power and potentially provides a slightly better chance of capturing a blur-free image (when in Mode 1, the stabilizer may already have used much of its available range to correct shake that occurred before the shutter was released, and hence may not have as much latitude to correct the shake during the actual exposure).

Burst Mode Button: Directly behind the Optical Image Stabilizer button, this button accesses the three Burst modes (High, Low, or Infinity), or returns to the single-shot mode.
![]()
Flash Release Button: Located on the rear panel, just below the pop-up flash compartment, this spring-loaded button mechanically releases the pop-up flash from its closed position.
Diopter Adjustment Dial: Hidden away on the left side of the optical viewfinder eyepiece, this dial corrects the viewfinder optics for eyeglass wearers, with a range from +4 to -4. (An unusually wide range.)

EVF/LCD Button: The first button in a series lining the top of the rear panel, this button switches the viewfinder display between the EVF and LCD monitors.

Display Button: To the right of the EVF/LCD button, this button controls the image and information displays in Record and Playback modes. In Record mode, pressing the button cycles between the five display modes, which include the image with information, image with information and live histogram, "Out of Frame" display, alignment grid, and image with no information modes.
In Playback mode, pressing the button cycles between the image with information, expanded information and histogram, and no information displays.

Exposure Button: On the right side of the Display button, this button lets you shift the exposure in Program AE mode. In Aperture Priority, Shutter Priority, and Manual exposure modes, pressing this button lets you adjust the aperture and/or shutter speed by pressing the button and then using the arrow keys to adjust the selected variable. (As noted in my User Notes above, I felt that this setup was a little awkward to use.) The Program Shift function that let you bias Program-mode exposures toward a faster shutter speed or smaller aperture (as found in the DMC-FZ3 camera) has been removed, which is rather a shame.
Power Switch: To the right of the Exposure button, this sliding switch turns the camera on or off. Powering the camera on with the Mode dial set to a record mode triggers the lens to extend. (Likewise, turning the camera off causes the lens to retract.)

Menu Button: Next to the upper right corner of the LCD monitor is the Menu button, which calls up the settings menus on the LCD display in all camera modes. A second press of the Menu button cancels the menu display.
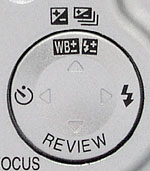
Four-Way Multicontroller: Located directly to the right of the LCD, the Multicontroller is a four way rocker disk that accesses a variety of camera settings. The arrow keys navigate through menu options and adjust camera settings. In most record modes, the up arrow accesses the Exposure Compensation, Auto Exposure Bracketing, Flash Exposure Compensation, and White Balance Adjustment tools. The right arrow cycles through the available flash modes, while the left arrow cycles through the Self-Timer modes. The down arrow activates a quick review of the most recently captured image.
In Playback mode, the right and left arrow keys navigate through captured images and movie files. When an image has been digitally enlarged, the four arrow keys pan around within the image.

Focus/Delete Button: Adjacent to the lower right corner of the LCD monitor, this button pulls up the delete menu in Playback and Review modes. When the AF trigger option is set through the Record menu, this button is used to trigger the camera's autofocus system, rather than the more usual half-press of the shutter button doing so.
Camera Modes & Menus
Record Menu: The following options are available by pressing the Menu button in any record mode, though some menu options aren't available in all modes:
 White Balance: Sets the white balance to Auto, Daylight, Cloudy, Halogen, Flash, Manual, or White Set modes. (White Set isn't a separate white balance mode, it's just the option for manually setting the white point that's selected by the Manual option.)
- Motion Rate: (Movie mode only.) Sets the frame rate to 30 or 10 frames per second for movie files.
- Sensitivity: Adjusts the camera's sensitivity setting. Choices are Auto, 64, 100, 200, or 400 ISO equivalents.
- Picture Size: Sets image resolution to 2,304 x 1,728; 1,600 x 1,200; 1,280 x 960; or 640 x 480 pixels, plus an "HDTV" setting (1,920 x 1,080 pixels).
- Quality: Sets the image compression to Fine or Standard, or to uncompressed TIFF.
- Metering Mode: Designates the camera's metering mode as Multiple, Center-Weighted, or Spot.
 AF Mode: Sets the AF area mode to Nine-Area, Three-Area High Speed, One-Area High Speed, One-Area, or Spot.
- Continuous AF: Turns the Continuous AF mode on or off.
- AF Trigger: Selects whether autofocusing should be achieved with the shutter button, or via a separate Focus button. When enabled, focus is set whenever you press the Focus button on the rear of the camera, and isn't changed until you snap the shutter or press the Focus button again. When disabled, a half-press of the shutter button sets focus.
- AF Assist Lamp: Activates the autofocus assist beam, which automatically turns on whenever the camera is autofocusing in dim lighting to help the camera focus on poorly lit subjects.
- Digital Zoom: Enables or disables the digital zoom option.
 Color Effect: Selects a color effect, with options of Cool, Warm, Black and White, or Sepia.
- Picture Adjust: Offers three settings - Natural, Standard or Vivid. The natural setting gives a softer, less color-saturated image, while the Vivid setting increases both color intensity and sharpness, as compared to the default Standard setting.
- Flip Animation: Enables Flip Animation mode. "Image Capture" lets you capture the series of images (as many as 100). During capture, you're told how many images in the series have already been captured, how many are remaining, and can browse the captured images and delete specific images as you desire. "Create Motion Image" puts them together as a motion file with a choice of 5 or 10 frames per second playback speed. The "Delete Still Images" option erases the series of still images, but not the motion file.
Scene Menu: If designated through the Setup menu, this menu automatically appears whenever the camera is switched to the Scene mode. If turned off, pressing the Menu button when in Scene mode calls up this page. For each Scene mode option, you can press the left arrow button to receive a brief description of the mode. (No screenshots here, these screens just have a little icon and text name for each mode.)
 Portrait: Utilizes a larger aperture to decrease the depth of field, and emphasizes flesh tones, resulting in a sharply focused subject in front of a slightly blurred background.
 - Sports: Employs a faster shutter speed to "freeze" fast-moving action.
- Scenery: This mode fixes focus at infinity, and is best for capturing wide vistas and landscapes.
- Night Scenery: In this mode, the camera slows the shutter speed to as long as 8 seconds, capturing more ambient light and preserving color in darker exposures. (The flash is disabled.)
- Night Portrait: As with the mode above, the camera uses a slower shutter speed for better color in night shots. However, the flash is set to Slow-Sync with Red-Eye Reduction mode.
- Panning: This mode is for panning the camera to photograph a moving subject, such as a runner or cyclist. You hold down the Shutter button and pan the camera with the subject, so that the subject is in focus but the background is blurry.
- Fireworks: Here, the camera uses a slower shutter speed and enhances color slightly to capture the full pattern and color of fireworks.
- Party: Best for taking pictures under dim indoor lighting with a flash, you can select between Forced Red-Eye Reduction and Slow-Sync Red-Eye Reduction modes. Biases white balance for indoor lighting.
- Snow: This mode adjusts the white balance and exposure to counter the bright snowy areas of the scene, preventing the camera being fooled into underexposing the shot.
Play Menu: This menu is only available in the Review mode. It lets you scroll through captured images; erase, protect, and rotate them; or set them up in a slide show or for printing on a DPOF compatible device. The Play menu offers the following selections:
 Rotate Display: Selects whether images that were tagged as rotated by the camera's orientation sensor, or using the next menu option, should be shown rotated on the LCD display.
- Rotate: Rotates captured images 90 degrees clockwise or counterclockwise.
- Protect: Write protects the currently displayed image, protecting it from accidental deletion, except by card formatting. There's also an option for protecting multiple images at once.
- DPOF Print: Marks individual or multiple images for printing on a DPOF compatible printer, or cancels marking of images.
- Slide Show: Automatically plays all images or only DPOF selected files in a slide show format. You can designate the display interval for images from one to five seconds, and audio can be enabled or disabled.
 Resize: Lets you resize an image to a smaller resolution and save a separate copy.
- Trimming: Sort of like a cropping function, this option lets you "trim" an image and save it as a separate file. To trim the image, you use the Playback zoom and pan functions to select the area of the image that you want to retain on the display, and then press the shutter button to save the cropped image.
- Format: Formats the SD/MMC card, erasing all files.
Setup Menu: The Setup menu provides universal camera control options that remain the same in both Shooting and Review modes. This menu is accessed by depressing the Menu button once and scrolling to the right with the Multicontroller. Following are the available settings:
 Monitor: Adjusts the brightness level of the LCD monitor in seven steps.
- Auto Review: Disables the automatic image review, or sets the review time to one or three seconds. A Zoom option displays the captured image for one second, then zooms it 4x for one second.
- Play on LCD: If enabled, this function automatically displays captured images in the LCD monitor whenever the down arrow button is pressed in record mode to preview the most recent image. If disabled, the camera will display the image in the electronic viewfinder if it was in use for image capture
- Power Save: Lets you enable or disable the camera's auto power off feature, and change the time before the LCD display "sleeps" to 1, 2, 5, or 10 minutes.
- Beep: Turns the camera's beep sound on or off, with low and high volume settings.
 Shutter: Turns the shutter noise on or off, with low and high volume settings.
- Clock Set: Sets the camera's internal clock and calendar.
- No. Reset: Resets file numbering with each new SD/MMC card (Yes setting), or continues file numbering from card to card (No setting). (Continuous file numbering is very handy to avoid accidentally overwriting images you've previously copied to your computer's hard drive.)
- Reset: Resets all record-menu settings to their factory defaults.
- USB Mode: Sets the USB mode to PC or PictBridge (PTP).
 Highlight: Turns the blinking highlight display on or off in Playback mode.
- Video Out: Sets the video output timing to NTSC or PAL. (NTSC for the US and Japan, PAL for most of Europe.)
- Scene Menu: Options are Off or Auto. If Off, the camera automatically reverts the previously used Scene selection when the Mode dial is turned to SCN. If set to Auto, the Scene menu automatically appears when the mode dial is rotated to the SCN position.
- Language: Changes the menu language to one of seven languages. (English, German, French, Spanish, Italian, Chinese Traditional, or Japanese.)
Recommended Software: Rescue your images!
Just as important as an extra memory card is a tool to rescue your images when one of your cards fails at some point in the future. I get a lot of email from readers who've lost photos due to a corrupted memory card. Memory card corruption can happen with any card type and any camera manufacturer, nobody's immune. A surprising number of "lost" images can be recovered with an inexpensive, easy to use piece of software though. Given the amount of email I've gotten on the topic, I now include this paragraph in all my digital camera reviews. The program you need is called PhotoRescue, by DataRescue SA. Read our review of it if you'd like, but download the program now, so you'll have it. It doesn't cost a penny until you need it, and even then it's only $29, with a money back guarantee. So download PhotoRescue for Windows or PhotoRescue for Mac while you're thinking of it. (While you're at it, download the PDF manual and quickstart guide as well.) Stash the file in a safe place and it'll be there when you need it. Trust me, needing this is not a matter of if, but when... PhotoRescue is about the best and easiest tool for recovering digital photos I've seen. (Disclosure: IR gets a small commission from sales of the product, but I'd highly recommend the program even if we didn't.) OK, now back to our regularly scheduled review...
See the specifications sheet here.
Cycle times, shutter lag, battery life, etc. can be found here.
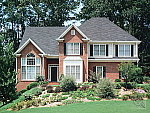
"Gallery" Photos
Readers interested in seeing a sample of more pictorial images shot with the DMC-FZ4 can visit our Panasonic DMC-FZ4 Photo Gallery.
See my test images and detailed analysis here. The thumbnails below show a subset of my test images. Click on a thumbnail to see the full-size photo.

|

|

|
|
|
|
|
|
|
|
|
|
|
|
|
|
|
|
|
|
|
|
|


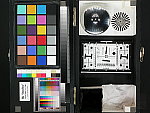

Test Results
In keeping with my standard test policy, the comments given here summarize only my key findings. For full details on each of the test images, see the Panasonic Lumix DMC-FZ4's "pictures" page.
For a look at some more pictorial photos from this camera, check out our Panasonic DMC-FZ4 Photo Gallery.
Not sure which camera to buy? Let your eyes be the ultimate judge! Visit our Comparometer(tm) to compare images from the Panasonic Lumix DMC-FZ4 with those from other cameras you may be considering. The proof is in the pictures, so let your own eyes decide which you like best!
- Color: Generally very good color and saturation, though a tendency toward warm color casts. Auto white balance had a hard time with incandescent lighting, but manual white balance did very well. The Panasonic FZ4 produced good overall color, though often with a very slight cool, magenta cast. I typically chose the Manual white balance setting, as the Auto setting tended toward a warmer color balance. Saturation was usually pleasing and natural, although strong additive primary colors (red, green, blue) were more oversaturated than I normally encounter with the consumer cameras I test. Skin tones looked OK, but the darker midtones (in slight shadows on Marti's face, for instance) turned very pink, unnaturally so. Overall, good color, but not as good to my eye as that of the FZ4's "big brother," the Panasonic FZ5.
- Exposure: Generally accurate exposure, but high contrast in some cases. The Panasonic FZ4 performed well in terms of exposure, but its high native contrast led it to lose highlight detail under the deliberately harsh lighting of my "Sunlit Portrait" and Far-Field test shots, and shadow detail was limited on the Sunlit Portrait and DaveBox shots. Midtone detail was generally pretty good though, the midtones didn't get overly light or dark even under the harsh lighting. Indoors, the camera required about average positive exposure compensation, and the standard flash exposure was fairly bright. Overall, good results, but higher contrast than I'd prefer.
- Resolution/Sharpness: Fair resolution, 1,100 lines of "strong detail", but subject to artifacts in parallel lines. The Panasonic FZ4 performed a bit below average on the "laboratory" resolution test chart relative to other 4-megapixel cameras we've tested. It didn't start showing artifacts in the test patterns until resolutions as low as 800 lines per picture height vertically and horizontally. I found "strong detail" out to about 1,100 lines, but there were a lot of artifacts in the test patterns where the parallel lines came together. (Here again, the Panasonic FZ5 performed markedly better.) "Extinction" of the target patterns didn't occur until about 1,600 lines.
- Image Noise: Moderately high to high image noise, particularly at the higher sensitivities and lower light levels. The FZ4 produces some image noise even at its lowest sensitivity setting, increasing to very high levels at ISO 400. Shots at ISO 200 can be used to make good-looking 8x10 inch prints, but those captured at ISO 400 are really only usable to 5x7. (This isn't all that unusual relative to competing models though.)
- Closeups: A very small macro area with good detail, though moderate blurring in the corners. Flash is blocked by the lens at such close range. The FZ4 captured a small macro area, measuring 1.54 x 1.15 inches (39 x 29 millimeters). Resolution was high, with strong detail. The corners were softer than what I consider average, though many digital cameras produce soft corners in their macro images. The FZ4's flash was blocked by the lens at this very close shooting range, and created a shadow over most of the frame. - Plan on using external lighting for your closest macro shots.
- Night Shots: Good low-light performance, with good color, but image noise is fairly high. The Panasonic FZ4 does well at low-light shooting, exposing properly down to half the light level of typical city night scenes, even at its lowest ISO setting, and much darker at higher ISO values. Its autofocus system works well down to 1/8 the typical brightness of city night scenes, a very good performance. The biggest drawbacks of the FZ4 for after-dark shooting is its relatively high noise levels, particularly at ISO 400, and unimpressive flash range at lower ISO settings. Also, its LCD/EVF doesn't "gain up" so it's really only usable down to about 1/4 foot-candle. (About a quarter the brightness of typical city scenes at night.) Bottom line though, the FZ4 should work just fine for typical city night scenes, so should meet the needs of most consumers in this area.
- Viewfinder Accuracy: An accurate EVF and LCD monitor. The Panasonic FZ4's electronic optical viewfinder (EVF) was about 99 percent accurate at both wide angle and telephoto lens settings. The LCD monitor fared about the same, since it's essentially the same view on a larger screen.
- Optical Distortion: Average barrel distortion at wide angle, and low pincushion at telephoto. Moderate to high chromatic aberration, significant softening in the corners at telephoto. I measured approximately 0.8 percent barrel distortion at the wide angle end, and about 0.1 percent pincushion at telephoto. Chromatic aberration was moderate at wide angle, high at telephoto. (This distortion is visible as a very slight colored fringe around the objects at the edges of the field of view on the resolution target.) The most noticeable distortion I noticed was the significant blurring in the corners of the frame at telephoto.
- Shutter Lag and Cycle Times: A little slow on startup, but excellent shutter response, excellent cycle times. The Panasonic FZ5 is a little slow off the mark, taking a few seconds to get its lens deployed when you first turn it on, but after that it's quite speedy indeed. Shutter response is very good with a full-autofocus lag time of 0.51 - 0.56 second. Its shot to shot cycle times are exceptionally good, at 1.23 seconds for large/fine JPEGs, regardless of how many shots you take in rapid succession. (That is, there's no arbitrary buffer limit.) Continuous mode speed is also good, ranging from 2.14 frames/second in "unlimited" mode (run lengths limited only by card capacity) to 3.0 frames/second in high-speed continuous mode for up to four large/fine images in rapid succession. Very impressive overall!
- Battery Life: Very good battery life. With a worst-case run time of 140 minutes in capture mode with the rear-panel LCD selected, the Panasonic FZ4's battery life is very good. Despite this good battery life, I still recommend that heavy shooters planning long-term outings purchase a spare right along with the camera.
- Print Quality: Good-looking images at 11x14 inch print size. ISO 400 shots rough at 8x10, fine at 5x7. Generally more accurate saturation levels produce less-bright prints. Testing hundreds of digital cameras, we've found that you can only tell just so much about a camera's image quality by viewing its images on-screen. Ultimately, there's no substitute for printing a lot of images and examining them closely. For this reason, we now routinely print sample images from the cameras we test on our Canon i9900 studio printer, and on the Canon iP5000 here in the office. (See the Canon i9900 review for details on that model.) In the case of the Panasonic FZ4, we found that it had enough resolution to make good-looking 11x14 prints, easily suitable for viewing on a wall. Looking at its high-ISO shots, images captured at ISO 400 looked pretty rough when printed at 8x10 inches, a bit worse than we're accustomed to seeing in prints from 4-megapixel cameras. Shrunk to 5x7 inches though, most consumers should find the ISO 400 shots usable. Color-wise, the FZ4's images were bright and pleasing, though some greens in foliage looked slightly dull. A nice "look" overall though.
| Pro: | Con: |
|---|---|
|
|
| Free Photo Lessons | |
|


Follow Imaging Resource: