Panasonic Lumix DMC-FZ50 Operation
The Panasonic FZ50's user interface is straightforward and should present a
short learning curve if you read through the included manual. (Although there
are a lot of features here, so I'd imagine that novice users could spend a couple
of hours learning them. Experienced digicam users should be able to come up
to speed on the major functions in under an hour though.) I generally prefer
to see external access to as many exposure controls as possible, and the DMC-FZ50
does provide a fair amount of control without resorting to the LCD menu system.
The camera's Four-Way Arrow pad controls a wide variety of functions independently
of the LCD menu, though the menu itself is straightforward. As noted earlier,
I also found the Lumix FZ50's menu system unusually fast to navigate.
 Record Mode Display: In any record mode, the LCD display shows either the image area with information, image with information and live histogram, Out of Frame display, alignment grid, and image with no information modes. Pressing the Display button cycles through the available displays. When the information display is active, it reports battery life, resolution, and image quality settings, the number of available images, the specific Record mode, orientation, and a handful of exposure settings (including the predicted aperture and shutter speed). In Out of Frame display mode, the image is shrunk slightly and slid toward the upper left corner, with the information display arranged in an area to the right and bottom sides.
 Playback Mode Display: Playback mode also offers three display modes,
including the image only, the image with information, and the image with expanded
information and a histogram. A Highlight option is available through the Setup
menu, which flashes any overexposed areas of the frame (often more useful than
a histogram). You can also display nine, 16, or 25 thumbnail images at a time
with the Panasonic Lumix DMC-FZ50's index display mode, or zoom in by up to
8x on captured images to check fine details, focus, or framing.
Playback Mode Display: Playback mode also offers three display modes,
including the image only, the image with information, and the image with expanded
information and a histogram. A Highlight option is available through the Setup
menu, which flashes any overexposed areas of the frame (often more useful than
a histogram). You can also display nine, 16, or 25 thumbnail images at a time
with the Panasonic Lumix DMC-FZ50's index display mode, or zoom in by up to
8x on captured images to check fine details, focus, or framing.
Panasonic Lumix DMC-FZ50 Modes and Menus
Auto Record Mode: Marked with a red camera icon and an "A" on the Mode dial, this mode puts the camera in control of all exposure decisions, leaving the user in charge of zoom, resolution, and flash.
Playback Mode: The traditional triangle within a rectangle marks this mode on the Mode dial. Here, you can review captured images and movie files.
Program AE: The letter "P" denotes this option on the Mode dial. Program mode places the camera in control of shutter speed and lens aperture, while you maintain control over everything else (i.e., white balance, ISO, metering, exposure compensation, flash, etc.).
Aperture Priority: Following Program AE mode on the Mode dial, Aperture Priority mode allows you to set the lens aperture from f/2.8 to f/11 (depending on the zoom setting), while the camera controls the shutter speed. In this mode, you maintain control over all other exposure variables.
Shutter Speed Priority: The letter "S" marks this mode on the Mode dial. Here, you control the shutter speed settings from 1/2,000 to eight seconds, while the camera controls the aperture. All other exposure settings are available.
Manual: Manual exposure mode provides complete control over all exposure settings, including shutter speed and lens aperture. The maximum shutter time is extended to 60 seconds, and a capital "M" indicates this mode on the Mode dial.
Custom: In this position on the Mode dial, you select your own custom settings to suit the picture-taking conditions from among the registered patterns you have saved as custom settings ahead of time. You can register as many as three custom presets.
Movie: A film strip icon indicates this mode on the Mode dial. In Movie mode, you can record moving images with sound, at either 30 or 10 frames per second, at 640 x 480 or 320 x 240 pixels. Recording times are limited by memory card capacity and frame rate.
SCN: The final position on the Mode dial, Scene mode accesses 16 preset scene modes, which include: Portrait, Soft Skin, Scenery, Sports, Night Portrait, Night Scenery, Panning, Food, Party, Candle Light, Fireworks, Starry Sky, Baby 1, Baby 2, Snow, and High Sensitivity.
Record Menu: In just about any Record mode, the Menu button accesses the following exposure options (some options are not available in all modes):
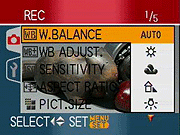 White Balance: Sets the white balance to Auto, Daylight, Cloudy,
Shade, Halogen, Flash, Manual 1, Manual 2, or White Set modes.
White Balance: Sets the white balance to Auto, Daylight, Cloudy,
Shade, Halogen, Flash, Manual 1, Manual 2, or White Set modes. - WB Adjust.: Lets you fine tune the white balance by adding more green, amber, blue, or magenta to the color balance.
- Sensitivity: Adjusts the camera's sensitivity setting. Choices are Auto, Intelligent ISO Control (I. ISO), 100, 200, 400, 800 or 1,600 ISO equivalents. (The ISO 3,200 setting is only available in the High Sensitivity scene mode.)
- Aspect Ratio: Sets the aspect ration to 4:3, 3:2, or 16:9.
- Picture Size/Mode: In still Record modes, options for the 4:3 aspect ratio are 10M (3,648 x 2,736), 8M (3,264 x 2,448), 5M (2,560 x 1,920), 3M (2,048 x 1,536), and 2M (1,600 x 1,200); in 3:2, they are 8.5M (3,600 x 2,400), 7M (3,248 x 2,160), 4.5M (2,560 x 1,712), and 2.5M (2,048 x 1,360); and in 16:9, they are 7M (3,584 x 2,016), 5.5M (3,072 x 1,728), and 2M (1,920 x 1,080). In Movie mode, 4:3 options are 10 or 30 fps in either VGA (640 x 480) or QVGA (320 x 240) size; 16:9 options are 10 or 30 fps, at 848 x 480.
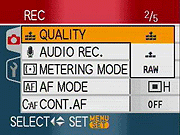 Quality: Determines the compression and file format used to record
the image. Options include RAW (uncompressed), Fine (low compression to maintain
image quality), and Standard (high compression to optimize the number of pictures
you can store on the card).
Quality: Determines the compression and file format used to record
the image. Options include RAW (uncompressed), Fine (low compression to maintain
image quality), and Standard (high compression to optimize the number of pictures
you can store on the card). - Audio Recording: When enabled, allows the camera to record five seconds of audio with each still photo. (Audio recording isn't available when shooting auto bracket, burst mode or when quality is set to RAW.)
- Metering Mode: Selects between the default Multiple (which reads the whole screen), Center-weighted (which gives priority to readings from the center of the screen), and Spot (which bases exposure on the reading of the spot target in the center of the screen) metering modes.
- AF Mode: Sets the Autofocus mode to Nine-Area Focusing, Three-Area Focusing (High Speed), One-Area Focusing (High Speed), One-Area Focusing, or Spot Focusing.
- Continuous AF: When enabled, the camera continually focuses on the scene, helping you to compose the image. If the AF mode is set to One-Area focusing or Spot focusing, half-pressing the shutter button will more quickly set focus.
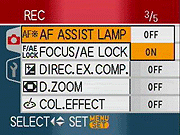 AF Assist Lamp: When enabled, the AF assist lamp will turn on under
low light conditions to help find focus.
AF Assist Lamp: When enabled, the AF assist lamp will turn on under
low light conditions to help find focus. - AF/AE Lock: Controls the function of the AF/AE Lock button, offering either AF lock only, AE lock only, or AF and AE lock.
- Direc. Ex Comp.: For rapid exposure composition, this enables you to use the front or rear dials to quickly change settings.
- Digital Zoom: Enables or disables the digital zoom option, with choices between 2x and 4x digital enlargement.
- Color Effect: Selects a color effect, with options of Cool, Warm, Black and White, or Sepia.
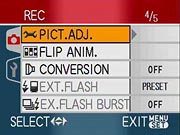 Picture Adjust: Accesses the Contrast, Sharpness, Saturation, and
Noise Reduction adjustments, all of which offer High, Standard or Low.
Picture Adjust: Accesses the Contrast, Sharpness, Saturation, and
Noise Reduction adjustments, all of which offer High, Standard or Low. - Flip Animation: Creates 5 or 10 fps motion picture files of 320 x 240 pixels up to 20 seconds long without sound.
- Conversion: Tells the camera that a conversion lens is in use. Options are Off, Wide, or Tele.
- External Flash: Sets the mode for an external flash unit, if attached. Options are Forced Flash On, or Forced Off.
- External Flash Burst: Controls how an external flash fires in burst mode. If enabled, the external flash will fire with each exposure in Burst mode.
- Clock Set: Sets the camera's clock and calendar for display.
Scene Menu: If designated through the Setup menu, this set of five menus automatically appears whenever the Panasonic Lumix DMC-FZ50 is switched to the SCN mode. If turned off, pressing the Menu button when in either scene mode calls up this page. For each Scene mode option, you can press the left arrow button to receive a brief description of the mode.
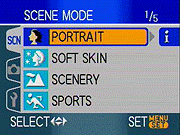 Portrait: Utilizes a larger aperture to decrease the depth of field,
and emphasizes flesh tones, resulting in a sharply focused subject in front
of a slightly blurred background.
Portrait: Utilizes a larger aperture to decrease the depth of field,
and emphasizes flesh tones, resulting in a sharply focused subject in front
of a slightly blurred background. - Soft Skin: Suitable for outdoor daytime shooting, the ISO is set lower.
- Scenery: This mode fixes focus at infinity, and is best for capturing wide vistas and landscapes.
- Sports: Employs a faster shutter speed to "freeze" fast-moving action.
- Night Portrait: The camera uses a slower shutter speed for better color in night shots. However, the flash is set to Slow-Sync with Red-Eye Reduction mode.
- Night Scenery: In this mode, the camera slows the shutter speed to as long as eight seconds, capturing more ambient light and preserving color in darker exposures. (The flash is disabled.)
- Panning: Use this mode when your subject is moving and you are panning the camera with it, such as a person passing on a bicycle.
- Food: Enhances certain colors to make food look more appealing.
- Party: Best for taking pictures under dim indoor lighting with a flash, you can select between Forced Red-Eye Reduction and Slow-Sync Red-Eye Reduction modes. Biases white balance for indoor lighting.
- Candle Light: Allows yellow cast from candlelit scenes to stay yellow to keep the mood, rather than making the light white.
- Fireworks: Here, the camera uses a slower shutter speed and enhances color slightly to capture the full pattern and color of fireworks.
- Starry Sky: For long exposures of the night sky. Be sure to use a tripod with this mode.
- Baby 1: Options include With Age, Without Age, and Birthday Set.
- Baby 2: This mode allows you to set the birthday of a second baby.
- Snow: This mode adjusts the white balance and exposure to counter the bright snowy areas of the scene, preventing the camera being fooled into underexposing the shot.
- High Sensitivity: ISO goes as high as 3,200 to reduce blurry images of moving subjects especially when shooting indoors. Beware of high noise in shots taken in this mode.
Playback Menu: This three-page menu is only available in the Review mode. It lets you erase, protect, and rotate captured images or movies; or set up images for printing on a DPOF compatible device. The Play menu offers the following selections:
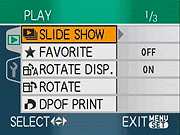 Slide Show: Automatically plays all images or only DPOF selected
files in a slide show format. You can designate the display interval for images
from one to five seconds, and audio can be enabled or disabled.
Slide Show: Automatically plays all images or only DPOF selected
files in a slide show format. You can designate the display interval for images
from one to five seconds, and audio can be enabled or disabled. - Favorite: When enabled, adds photos to a Favorites list, from which you can run a slideshow including only the Favorites. This does not protect them from deletion.
- Rotate Display: Selects whether images that were tagged as rotated by the camera's orientation sensor, or using the next menu option, should be shown rotated on the LCD display.
- Rotate: Rotates captured images 90 degrees clockwise or counterclockwise
- DPOF Print: Marks individual or multiple images for printing on a DPOF compatible printer, or cancels marking of images.
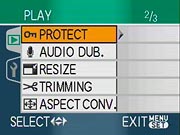 Protect: Write protects the currently displayed image, protecting
it from accidental deletion, except by card formatting. There's also an option
for protecting multiple images at once, or to cancel protection of images.
Protect: Write protects the currently displayed image, protecting
it from accidental deletion, except by card formatting. There's also an option
for protecting multiple images at once, or to cancel protection of images.
- Audio Dub.: Lets you record a brief audio clip to attach to the currently reviewed image.
- Resize: Lets you resize an image to a smaller resolution and save a separate copy.
- Trimming: A cropping function, this option lets you "trim" an image and save it as a separate file. To trim the image, you use the Playback zoom and pan functions to select the area of the image that you want to retain on the display, and then press the shutter button to save the cropped image.
- Aspect Conversion: Converts the current image to either a 3:2 or 4:3 aspect ratio.
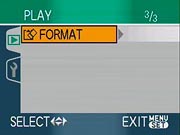 Format: Formats the SDHC/SD/MMC card or internal memory, erasing all files (including those that were protected using the Protect menu option).
Setup Menu: The four-page Setup menu provides universal camera control options that remain the same in both Shooting and Review modes. This menu is accessed by depressing the Panasonic Lumix DMC-FZ50's Menu button once and scrolling to the right with the Multicontroller. Following are the available settings:
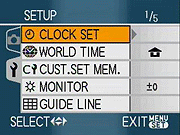 Clock Set: Adjusts the camera's internal clock and calendar, with
an adjustment for the display format.
Clock Set: Adjusts the camera's internal clock and calendar, with
an adjustment for the display format. - World Time: Lets you set the Home time and Destination time, so that you can track time in two cities when traveling.
- Cust. Set Mem.: For creating personal setting in the Custom mode.
- Monitor: Controls the brightness of the LCD display.
- Guide Line: Accesses display options for the Record Info, Histogram, and Grid Pattern. You can disable or enable any of these.
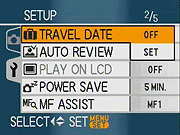 Travel Date: Lets you record the date an image was taken when on
vacation. In addition to the time, the date display will also include "First
Day" or "Second Day" to differentiate what day of the trip
the image was captured on.
Travel Date: Lets you record the date an image was taken when on
vacation. In addition to the time, the date display will also include "First
Day" or "Second Day" to differentiate what day of the trip
the image was captured on. - Auto Review: Enables an automatic playback of captured images, with display times of one or three seconds, or a review screen with a zoom function. You can also turn the review off.
- Play on LCD: If this function is enabled, the camera automatically switches the image display from the electronic viewfinder to the LCD monitor whenever you play back images or movies.
- Power Save: Disables the camera's power save option, or sets the camera to turn itself off after one, five, or 10 minutes of inactivity.
- MF Assist: Enables a focus assist page, options are Off, MF1, or MF2. In MF1, the center of the screen is enlarged only, while MF2 mode enlarges the entire image.
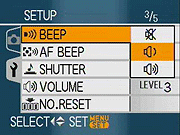 Beep: Turns the camera's beep sounds off, or sets the volume to low
or high.
Beep: Turns the camera's beep sounds off, or sets the volume to low
or high. - AF Beep: Turns the AF beep sound off, or sets the volume to low or high.
- Shutter: Disables the shutter sound, or sets the volume to low or high.
- Volume: Controls the camera's playback volume.
- Number Reset: Resets file numbering, with an option to cancel.
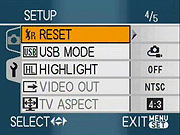 Reset: Resets all camera settings to their defaults, with an option
to cancel.
Reset: Resets all camera settings to their defaults, with an option
to cancel. - USB Mode: Sets the USB mode to PC, PictBridge (PTP), or offers an option to Select on Connection.
- Highlight: Turns on a blinking highlight display in review mode.
- Video Out: Sets the video out signal to NTSC or PAL.
- TV Aspect: Sets the playback aspect ratio to 16:9 or 4:3, depending on your television set. (For use with video playback of images.)
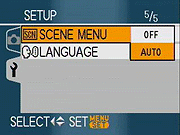 Scene Menu: Designates whether the Scene menu automatically appears
on entering the mode, or by pressing the Menu/Set button.
Scene Menu: Designates whether the Scene menu automatically appears
on entering the mode, or by pressing the Menu/Set button. - Language: Sets the menu language to English, German, French, Spanish, Italian, Simplified Chinese, or Traditional Chinese.
 Fujifilm GFX 50S Review
 Fujifilm X-T3 Review
 Olympus E-M5 III Review

Follow Imaging Resource