 Back
to Full Canon PowerShot G1 Review
Back
to Full Canon PowerShot G1 ReviewGo to Canon PowerShot G1 Data Sheet
Go to Canon PowerShot G1 Pictures Page
Up to Imaging Resource Cameras Page
Use your browser's "Back" button to return to the previous page, or the links at the top and bottom of this page to navigate to related information. If you have difficulty fitting the text on this page onto your printer output, simply resize your browser window to a narrower width and print again.
Remember us when it's time to buy!
Dave here: Have our reviews been helpful to you? (Is this article you're reading right now useful?) Preparing this level of information on as many products as we do is incredibly hard work, not to mention expensive. Things on the Internet may look like they're free, but they're not. (As a lot of big dot.com companies are finding out these days.) Somewhere, somebody has to pay to produce worthwhile content. YOU can help us though, by remembering us when it comes time to make your purchase. Would you consider coming back to our site and clicking-through to one of our advertisers to make your purchase? Every dollar you spend with one of our advertisers helps us directly (in affiliate fees) or indirectly (the advertiser will keep renewing their ad contract with us). To make it easy for you to support us, here's a URL you can visit, to see all our current advertisers, with links to click on that will register your visit to them as having come from our site. It's up to you where you buy, but Mike, Mike, Kim, Yazmin, Marti and I would be really grateful if you'd help us out by choosing one of our advertisers to purchase from.
Thank you for your support!
Dave Etchells, Founder & Publisher
Visit our "Buy Now" Page:
https://www.imaging-resource.com/buynow.htm
Back
to Full Canon PowerShot G1 Review
Go to Canon PowerShot G1
Data Sheet
Go to Canon PowerShot G1
Pictures Page
Up to Imaging Resource Cameras
Page
Canon PowerShot G1Canon combines dead-easy auto shooting, full manual control, and excellent image quality in a killer3 megapixel! Review First Posted: 10/28/2000 |
|
 |
|
3.34 megapixel CCD delivering up to 2,048 x 1536 images |
|
|
Auto, Scene Program, Program, and Manual exposure modes | |
|
|
Unique tilt/swivel LCD panel | |
|
|
Accepts Type II CF cards (MicroDrive compatible) | |
|
|
Beautiful pictures! |
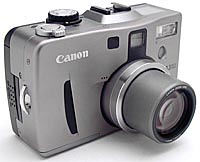
Design
With dimensions similar to many
film-based, point-and-shoot 35mm cameras, the Canon PowerShot G1 is relatively
compact and portable. It measures 4.7 x 3.0 x 2.5 inches (119.7 x 76.8 x 63.8mm)
and weighs approximately 14.8 ounces (420 grams) without batteries, making it
just slightly larger and heavier than the small- to mid-size point-and-shoots.
It fits easily into a large coat pocket or purse, and the half-inch neck strap
makes toting it around much more convenient.

The front of the camera includes the lens, optical viewfinder window,
built-in flash, autofocus assist light, microphone, and remote control sensor.
The 3X zoom lens telescopes out from the camera body when the G1 is powered on,
and retracts when the camera is powered off. The lens is protected by a small
plastic lens cap, tethered to the camera body with an attached cord. The
microphone, barely visible next to the camera lens, records sound to accompany
in-camera movies. A small, rubber finger grip on the front of the camera is
positioned to counterbalance a curved, molded thumb grip on the back. Both are
critical, as they are the only built-in design features provided to help you
hold onto the camera body.

On the right side of the camera (as viewed from the back) is the
single eyelet for attaching the neck strap, and a sliding chamber door to access
the CompactFlash slot, which accommodates both Type I and II CompactFlash cards.
The opposite side of the camera has a manual focus button, speaker, and an A/V
Out jack in clear view, with the USB and DC-In jacks covered by a soft rubber
flap that pulls outward from the camera and then slides out of the
way.

The G1's top panel features a small status display window; an
external flash hot shoe; a Main (lower) dial with a Shooting (or record)
position, Off setting, Replay (or playback) position, and PC Connection mode; a
Mode (upper) dial, with shooting and exposure options; a zoom control; a shutter
button; and a Continuos Drive/Self-Timer/Wireless Controller button. The status
display panel is always appreciated, as it reports camera settings and other
miscellaneous information, without the need for powering up the LCD monitor.
Positioning the exposure mode dial on top of the power switch, is a
configuration we have been seeing more of lately. We are accustomed to the power
control as a function of the mode dial, but this configuration works as well.
The only troublesome thing we noticed is that the power switch is a little hard
to control when turning the camera off. It seemed that we always wound up
pushing the dial too far - all the way to the Replay mode setting - and had to
switch it back the other way. We eventually discovered that a two-finger
approach was necessary to control the dial's movement.

The majority of the exposure controls are located on the camera's
back panel, along with the optical viewfinder and LCD monitor. The G1's
eye-level optical viewfinder features a diopter adjustment switch and two LEDs
that report camera status. We were intrigued by the camera�s LCD panel, which
pops out of the camera back and folds forward to face the front of the camera.
It also swivels around 270 degrees, to accommodate several shooting angles, and
the monitor screen can be turned around and popped back into the panel
face-down, protecting it from accidental scratches and fingerprints. A raised
thumb grip, just to the left of the Omni selector arrow pad, provides counter
support to the rubber finger grip on the front of the camera, affording a
reasonably secure hold.
Other camera controls on the back panel include
the Menu, Set, and Display buttons; an Auto Exposure (AE) and Flash Exposure
(FE) lock; dual-function buttons for Spot Metering/Enlarge, Macro mode/Jump, and
Flash mode/Index Control; and a four-function button for controlling Exposure
Compensation/White Balance/Auto Exposure Bracketing/and Flash Exposure
compensation. This last control is by far the most complicated of the group;
however, each of its functions is related to exposure, and therefore uses the -2
to +2 EV bar to make its adjustments (with the exception of the white balance
bar, which gives you a choice of seven light-quality options). The first
function, exposure compensation, is activated with one press of the button; the
white balance is activated by pressing the button twice, and so on. And like
many digicam models, the dual-function buttons perform their first functions in
capture mode and their second functions in playback mode.

The G1's bottom panel is reasonably flat, with a sliding door to the
battery compartment and a threaded metal tripod mount. The tripod mount is
positioned off-center (to the left of the lens), presumably to compensate for
the extra weight of the battery compartment. Because the battery door and tripod
mount are so close to one another, it would be difficult to make quick battery
changes while working with a tripod.

Accompanying the camera is a small infrared remote control with a
working range of up to 16.4 feet (5 meters). By activating the
Continuous/Self-Timer/Wireless Controller button in Shooting mode, you can use
the remote to fire the shutter, adjust the optical zoom, or scroll through the
LCD display screens without coming in contact with the camera body. This works
well with the rotating LCD monitor, because you can mount the camera on a tripod
and compose the subject while standing in front of the camera. The remote also
offers several playback functions which are useful when viewing images on a
television screen. The Index display and Replay zoom buttons on the bottom of
the remote enable you to view up to nine thumbnail images at a time, or enlarge
one captured image on the LCD monitor. The four arrow buttons on the remote give
you the same capabilities as the Omni selector arrow pad on the back of the
camera, permitting you to scroll through stored images or maneuver within a
larger one. Depressing the remote's shutter button while in Replay mode lets you
play movie files on the camera's monitor or television. We were glad to see the
inclusion of this simple gadget as a standard feature, especially with the G1's
video capabilities, which allow the camera to be used as a presentation
tool.
 Viewfinder
The G1 features both an eye-level optical
viewfinder and a repositionable LCD monitor on the back of the camera for image
composition. The real-image optical viewfinder zooms along with the lens (except
in Digital Telephoto mode, which requires the LCD monitor), and displays a set
of target crosshairs in the center of its screen. A diopter adjustment control
on the left of the eyepiece adjusts the viewfinder focus for eyeglass wearers,
and two LED lights report the camera�s status during certain operations. For
example, when you depress the shutter button halfway, a steady green light (on
top) indicates that the camera is ready to record and/or the flash is charge is
complete; a flashing green light indicates that an image is either being written
to, read from, or erased from the CompactFlash card; a steady orange light (on
top) indicates that the camera is ready to record and/or the flash is adequately
charged; and a flashing orange light indicates a camera-shake warning (i.e. the
shutter speed is too slow to handhold), or the battery is charging. The lower
LED light glows yellow when the camera is set in Macro or Manual focus
modes.

Measuring 1.8-inches diagonally, Canon's low-temperature,
polycrystalline silicon, TFT, color LCD monitor features a smart, swiveling
design for nearly unlimited viewing options. The monitor's plastic casing
actually pops out of the back of the camera and swings around to face forward
(the same direction as the lens). From that position, the monitor can be rotated
forward 180 degrees or backward 90 degrees, allowing you to hold the camera in
practically any position and still see what's going on in the viewfinder. It's a
real boon to photographers who frequently have to shoot over people's heads in a
crowd! The best
part of the LCD�s swiveling monitor design is that it can be flipped around to
face the back panel and then closed, keeping the screen safe from scratches and
fingerprints. The Display button controls the LCD monitor�s image and
information display. Pressed once, it activates the LCD monitor. The second
press turns on the information display, which reports exposure mode, digital
zoom, single or continuous shooting, manual focus, and flash mode (depending
upon the shooting mode you are using). At the bottom of the screen are the
shutter speed and aperture settings, which are always a bonus when analyzing a
shot. The third press of the Display button cancels both displays.
The best
part of the LCD�s swiveling monitor design is that it can be flipped around to
face the back panel and then closed, keeping the screen safe from scratches and
fingerprints. The Display button controls the LCD monitor�s image and
information display. Pressed once, it activates the LCD monitor. The second
press turns on the information display, which reports exposure mode, digital
zoom, single or continuous shooting, manual focus, and flash mode (depending
upon the shooting mode you are using). At the bottom of the screen are the
shutter speed and aperture settings, which are always a bonus when analyzing a
shot. The third press of the Display button cancels both displays. In
Replay mode, the LCD monitor provides a full-frame display of captured images,
which you can view individually by scrolling left or right with the arrow
buttons on the Omni selector arrow pad. Depressing the Flash/Index button brings
up a thumbnail index display of nine images at a time, which you can also scroll
through with the arrow buttons. A Digital Enlargement button (marked by a
magnifying glass) allows you to enlarge an image 2.5X and 5X its normal size in
the screen. The arrow keys permit you to move around the image and check the
fine details.
In
Replay mode, the LCD monitor provides a full-frame display of captured images,
which you can view individually by scrolling left or right with the arrow
buttons on the Omni selector arrow pad. Depressing the Flash/Index button brings
up a thumbnail index display of nine images at a time, which you can also scroll
through with the arrow buttons. A Digital Enlargement button (marked by a
magnifying glass) allows you to enlarge an image 2.5X and 5X its normal size in
the screen. The arrow keys permit you to move around the image and check the
fine details. Depressing the Display button one time in Replay mode pulls up
detailed information about the captured image, including the file name, date and
time it was recorded, compression, resolution, and what number it is in the
sequence of captured images. Depressing the Display button twice adds exposure
information such as the Image Zone (portrait, landscape, etc.), shutter speed,
f/stop, exposure compensation, and white balance. A third press turns off the
information display.
Depressing the Display button one time in Replay mode pulls up
detailed information about the captured image, including the file name, date and
time it was recorded, compression, resolution, and what number it is in the
sequence of captured images. Depressing the Display button twice adds exposure
information such as the Image Zone (portrait, landscape, etc.), shutter speed,
f/stop, exposure compensation, and white balance. A third press turns off the
information display. The LCD viewfinder is also involved in setting a number
of exposure parameters, controlled by a four-function pushbutton. Successful
preses of this button cycle you through screens for setting exposure
compensation, white balance, auto bracketing, and flash exposure
compensation.
The LCD viewfinder is also involved in setting a number
of exposure parameters, controlled by a four-function pushbutton. Successful
preses of this button cycle you through screens for setting exposure
compensation, white balance, auto bracketing, and flash exposure
compensation.
We found the G1's optical viewfinder to be quite
tight, showing about 85 percent accuracy at wide angle, and about 82.6 percent
accuracy at the telephoto setting. The LCD monitor was much more accurate,
showing approximately 96.5 percent of the final image area at wide angle, and
about 97 percent at telephoto. (We actually found that the measurements for the
LCD monitor differed slightly with the image resolution at the telephoto
setting. Measurements indicated 97 percent at 2,048 pixels, 96.9 percent at
1,024 pixels, and 96.8 percent at 640 pixels.) Since we generally like to see
LCD monitors as close to 100 percent accuracy as possible, the G1 performed well
in this respect.
Optics
The G1 features a built-in, 3X, 7-21mm
zoom lens (equivalent to a 34-102mm lens on a 35mm camera). When the camera is
powered on, the lens telescopes out from the camera body into its operating
position, then retracts again when the camera is shut off. A plastic lens cap
protects the lens when not in use, and features a small tether to attach it to
the camera body. Focus can be automatically or manually controlled, with a range
of 2.3 feet (70cm) to infinity in normal mode. Macro mode features a focus range
of 2.4 inches to 2.4 feet (6 to 70cm). The aperture adjusts automatically or
manually, with an f/2.0-f/8.0 range, depending on the zoom setting. Manual focus is activated
by depressing the Manual Focus button on the left side of the camera. As it's
held down, a distance indicator appears on the LCD monitor, providing a
reference scale for focusing. The up and down arrows of the Omni selector are
used to focus on the subject in the monitor (the top of the scale represents
infinity). Although the LCD scale is not marked numerically, the Canon G1
Camera User Guide provides an approximate scale in feet and meters on page
74 for reference.
Manual focus is activated
by depressing the Manual Focus button on the left side of the camera. As it's
held down, a distance indicator appears on the LCD monitor, providing a
reference scale for focusing. The up and down arrows of the Omni selector are
used to focus on the subject in the monitor (the top of the scale represents
infinity). Although the LCD scale is not marked numerically, the Canon G1
Camera User Guide provides an approximate scale in feet and meters on page
74 for reference.
When shooting in Autofocus mode, the G1
offers both Continuous and Single Autofocus functions. In Continuous mode, the
camera is constantly adjusting focus, even when the shutter button is not
depressed halfway. In Single mode, the camera focuses only when the shutter
button is depressed halfway, which helps to conserve battery power. A Pan focus
mode is also provided as a preset exposure on the Mode dial. It fixes the lens
at the widest possible angle, allowing you to photograph at any distance (25.6
inches/65cm to infinity), without having to refocus on close-up or far-away
subjects. This mode is great for fast-paced action, when subjects are in
constant movement.


Digital zoom is controlled within the camera�s Record menu, with
options for 2X or 4X enlargement. Digital Telephoto is not available when
shooting with the G1�s Continuous Shooting or Movie modes, or when using the RAW
file format. It�s important to note that the digital zoom simply enlarges the
center of the CCD image, ultimately resulting in some image degradation. (Loss
of image quality often shows up as increased noise or reduced image sharpness.)
The good news is that the G1 accommodates several optional lens converters with
a lens adaptor kit. Options include a wide-angle WC-DC58 conversion lens, which
augments the lens focal length by a factor of 0.8; a tele-converter TC-DC58,
which increases the lens' focal length by a factor of 1.5; and a close-up lens
250D, which brings the camera's focusing range down to 4.7-7.9 inches (12-20cm)
in Macro mode.
Optical distortion on the G1 is moderately high at the
wide-angle end, as we measured approximately 0.5 percent barrel distortion. The
telephoto end fared much better, showing only about two pixels of pincushion
distortion. Chromatic aberration is also relatively low, with about one or two
pixels of coloration on each side of the black target lines. (This distortion is
visible as a very slight colored fringe around the objects at the edges of the
field of view on the resolution target.) All distortion figures are lower than
average among digicams we've tested.
 Flash
Flash In addition to its built-in flash, the G1 features a hot
shoe for mounting more powerful external flash units. Canon recommends using its
own Speedlight 220EX, 380EX, 420EX, or 550EX models, but other manufacturers'
models should work as well. The instruction manual notes that when using another
manufacturer's flash unit with the G1, the maximum shutter speed for flash
synchronization is 1/125 second. (The onboard flash syncs to a maximum shutter
speed of 1/250 second.)
In addition to its built-in flash, the G1 features a hot
shoe for mounting more powerful external flash units. Canon recommends using its
own Speedlight 220EX, 380EX, 420EX, or 550EX models, but other manufacturers'
models should work as well. The instruction manual notes that when using another
manufacturer's flash unit with the G1, the maximum shutter speed for flash
synchronization is 1/125 second. (The onboard flash syncs to a maximum shutter
speed of 1/250 second.)Shutter Lag/Cycle Times
When you press the
shutter release on a digital camera, there's usually a lag time before the
shutter actually fires. This time allows the autofocus and autoexposure
mechanisms to do their work and can amount to a significant delay in some
situations. Since this number is rarely reported by manufacturers or reviewers,
and can significantly affect the picture-taking experience, Imaging
Resource now measures shutter lag and cycle times using a prorietory
electronic test setup.
|
| ||
|
|
|
|
| Power On -> First shot |
|
Time to first shot (A bit slow, lens
extension takes a little while.) |
| Shutdown |
|
Time until lens retracts and camera shuts
down. (No processing pending.) |
| Play to Record, first shot |
|
Pretty fast |
| Record to play (max/min res) |
|
Average to a bit faster than
average |
| Shutter lag, full autofocus |
|
A bit faster than average |
| Shutter lag, manual focus |
|
Average |
| Shutter lag, prefocus |
|
Very fast (Not as fast as the Canon spec though.) |
| Cycle time, max/min res |
|
Very fast (for four shots in high-res mode, 64 in lowest res), then about 5 seconds to next shot |
| Shutter lag, prefocus |
|
Very fast (Not as fast as Canon claims
though.) |
In our testing of the G1, it proved to be a a little slow "getting out of bed", but then very fast once it was operating. The full autofocus shutter lag is a little faster than average, at 0.75 seconds in our measurements, but this number drops to a mere 0.12 seconds when the camera is prefocused by half-pressing the shutter button before the exposure itself. Canon's data sheet claimed a prefocus shutter lag of only 0.075 seconds, but our testing didn't support that (extremely fast) number. Still, at 0.12 seconds, the G1 is twice as fast in this parameter as the average camera we've tested. - Good for action photography, if you're in a situation that would permit prefocusing. The shot to shot cycle time is also very fast, at just 1.12 seconds between frames in large/fine resolution mode, for the first four frames shot in series, and then only 5 seconds until the next shot can be taken. In small/coarse mode, this time drops to only 0.7 seconds between frames, and the camera captured 64 (!) frames without a pause.
Operation and User Interface
Though its
combination of control buttons and dials may seem a little complicated at first
glance, the G1's user interface is actually very straightforward. We generally
prefer to change as many exposure settings as possible without resorting to the
LCD menu, and the G1 provides a fair amount of such external control. The camera
controls are somewhat spread out, but you could conceivably operate the camera
one-handed and still access the majority of the buttons. We appreciated the
small status display panel on top of the camera, which allows you to check
current camera settings without having to activate the LCD monitor (a battery
conservation feature). We also enjoyed shooting with the rotating LCD screen,
which made composing shots from odd angles a little easier to manage. The
ability to flip the monitor all the way around to face the back panel was great
for keeping fingerprint smudges off of the screen when handling the
camera.
Though we missed the security of a bulky hand-grip, it made sense
to keep this already substantial camera down in size, and the small finger grips
on the front and back of the camera provide a reasonably firm hold. The only
control feature we had a hard time operating was the power dial, which is
difficult to turn with just one finger or thumb (especially one-handed). We
found the force required to turn the dial from the Shooting mode to the Off
position actually pushed it beyond the target setting and on to the Replay mode.
A two-finger approach worked a little better; gripping the front and back of the
dial with a thumb and index finger provided just enough control to do the job
right. Take note that when using the Mode dial, the settings align with a very
small and inconspicuous marker jutting from the base of the flash hot shoe
mount; it's easy to miss if you're not paying attention.
Control Enumeration
Zoom Toggle: Encircling the shutter button on top
of the camera is toggle switch that controls the optical zoom in any record
mode. Pushing it to the left gives you wide-angle and pushing it to the right
zooms into telephoto.
Shutter Button: In the center of the zoom
toggle switch is the shutter button. When halfway depressed, it sets focus and
exposure; when fully depressed, it trips the shutter release. In the
Self-Timer/Wireless mode (see below), fully depressing the shutter button
triggers a 12-second countdown before the shutter is released. Holding the
shutter button down after an exposure displays the captured image on the
LCD monitor for as long as you hold it down. You can also program the camera to
provide an automatic 2- or 10-second display of the captured image by setting
the Review value in the Record menu.![]()
Contiuous/Self-Timer/Wireless Controller Button:
Located just behind the shutter button and zoom toggle switch, this button
cycles between the Continuous Shooting, Self-Timer/Wireless Control, and Single
frame recording modes.
Mode Dial: To the left of the Continous/Self-Timer button,
and sitting on top of the camera's power control, this notched dial is used to
select the camera's shooting modes. Olympus divides these functions into two
categories: Image Zone and Creative Zone. Their options are as follows:
Creative Zone
Image Zone
![]()
Main/Power
Dial: Located directly beneath the Mode dial, this larger notched dial
controls the camera's operating mode. The following options are available:

Omni
Selector Arrow Pad: Positioned in the top right corner of the back panel,
this rocker pad features four arrows, one in each cardinal direction. In any
settings menu, these arrows navigate through menu options. In shooting modes,
the left and right arrows work in conjunction with several exposure controls to
adjust settings. When manual focus is enabled, the up and down arrows manually
adjust focus. In manual exposure mode, the left and right arrows set the shutter
speed, while the up and down arrows set the lens aperture. In aperture and
shutter-speed priority modes, the left and right arrows adjust the designated
exposure variable. When using the four-function exposure compensation button,
the arrows help you select exposure variation in the three exposure conpensation
functions, and it scrolls through white balance settings. In playback mode, the
right and left arrows scroll through captured images. When the Magnifying Images
mode is enabled, all four arrows allow you to move around within the enlarged
image to examine detail.
Menu Button: Just beneath the Omni selector is the Menu
button, which calls up the Record and Setup menus on the LCD display in all
camera modes. A second press of the Menu button cancels the menu
display.![]()
Set
Button: To the left of the Menu button, this button confirms or sets any
on-screen menu selections. While in record mode, you can depress the button
immediately after capture to bring up a review of the recorded image. It will
stay on screen as long as you hold down the button. In playback mode, it sets
menu options and plays back movie files.![]()
* Button: Located to the right of the LCD monitor,
this button serves as the Auto Exposure (AE) lock and Flash Exposure (FE) lock
button in record mode. When Review mode is active, pressing this button pulls up
an erase menu for erasing the image.![]()
Exposure Compensation Button: Immediately below
the * button, this four-function button scrolls through four shooting
adjustments: exposure compensation, white balance, flash exposure compensation,
and auto exposure bracketing. When set on exposure compensation (press the
button one time), you can use the right and left arrow buttons to control the
exposure compensation from -2 to +2 EV in one-third-step increments. The white
balance setting (press two times) lets you choose the white balance value from
Automatic, Daylight, Cloudy, Tungsten, Fluorescent, Flash, and Custom. Flash
exposure compensation (press three times) works similarly to the standard
exposure compensation function, by adjusting the flash intensity from -2 to +2
EV in one-third-step increments. Finally, the auto exposure bracketing mode
allows you to take a series of three images at different exposure
variations.![]()
Display Button: Just beneath the exposure compensation
button, the Display button controls the LCD monitor's display mode. In record
mode, this button turns on the image display with the first press, activates the
information display with the second press, and cancels both with the third
press. In playback mode, the button cycles through the captured image
information displays.![]()
Macro/Jump Button: Located over the top right corner of the
LCD monitor, this button accesses the Macro function when the camera is in
record mode. In playback mode, it pulls up the "jump bar." When the jump bar is
displayed, the right and left arrow buttons jump either nine images forward or
nine images backward.![]()
Metering/Enlarge Button: To the left of the Macro/Jump
button, this control places the camera in either spot or center-weighted average
metering modes when the camera is in record mode. In playback mode, this button
digitally enlarges the captured image on the LCD screen, for close-up viewing of
fine details.![]()
Diopter Adjustment Lever: Hiding on the left side of the
optical viewfinder eyepiece, in a recessed niche, this lever adjusts the optical
viewfinder's focus to accommodate eyeglass wearers.![]()
Flash/Index Display Button:
Positioned in the very top left corner of the back panel, this button cycles
through the automatic, red-eye reduction, auto, red-eye reduction (normal),
flash on, and flash off internal flash modes. In playback mode, this button
displays up to nine images at a time, in a thumbnail index format, on the LCD
screen.
Manual
Focus Button: Located on the speaker side of the camera (closest to the
lens), this button puts the camera into manual focus mode, or returns it to
autofocus, when in record mode.
Battery Cover Lock: This sliding latch is located
on the bottom panel of the camera, next to the battery compartment door. Sliding
the switch locks and unlocks the battery compartment.
Camera Modes and Menus
We explained the G1's
shooting modes in the previous section, in the process of describing the
functions of the Mode Dial settings. Rather than repeat that information in this
section, we'll just show you the menu screens for the major
modes.
Record Menu (Red): With the exception of the Auto exposure
mode, and most of the Image Zone exposure functions, the Record menu provides
virtually the same options for all exposure modes. These menus are accessed by
depressing the Menu button once while in one of the Shooting modes. Following
are the available settings:
 Resolution: Sets the image size to (L) 2,048x1,536,
(M)1,024x768, or (S) 640x480-pixel resolution (still images only).
Resolution: Sets the image size to (L) 2,048x1,536,
(M)1,024x768, or (S) 640x480-pixel resolution (still images only). Review:
Establishes a "quick review" time duration, with options for 2 or 10 seconds.
You can also disable the Review function.
Review:
Establishes a "quick review" time duration, with options for 2 or 10 seconds.
You can also disable the Review function.
Set-up Menu (Yellow): The Set-up menu provides universal camera
control options that remain the same in both Shooting and Replay modes, with the
exception of shutter and speaker volume (see below). This menu is accessed by
depressing the Menu button once and scrolling to the right with the Omni
selector arrow pad. Following are the available settings:
 Beep:
Turns the camera's Beep sound On or Off.
Beep:
Turns the camera's Beep sound On or Off. Language:
Changes the G1's menu language to English, German, French, Spanish, or
Japanese. (Some models offer additional language choices).
Language:
Changes the G1's menu language to English, German, French, Spanish, or
Japanese. (Some models offer additional language choices).
Play Menu (Blue): This menu is only available in the Replay mode.
It allows you to scroll through captured images; erase, protect, and rotate
them; or set them up in a slide show or for printing on a DPOF compatible
device. The Play menu offers the following selections:
 Single
Erase: Erases the currently displayed image from the CompactFlash
card.
Single
Erase: Erases the currently displayed image from the CompactFlash
card.
Transfer Mode: Denoted by the crooked arrow symbol after the
Playback symbol, this mode allows the camera to connect via USB cable to a
computer for image downloading or remote control through the accompanying
software. No menu appears in this mode.
 Image
Storage and Interface
Image
Storage and Interface
The Canon G1 uses CompactFlash memory cards
for image storage, accommodating both Type I and II card sizes. This means that
the camera is also able to store images to an IBM MicroDrive for increased
storage capacity. A 16MB CompactFlash Type I memory card is supplied with the
camera. Entire CompactFlash cards cannot be write-protected, however, the G1's
Play menu allows you to write-protect individual image files, protecting them
from accidental erasure, unless the card is reformatted.
Still images can
be saved at one of three resolutions (2,048x1,536, 1,024x768, or 640 x 480
pixels), while movie images are recorded at 320x240 pixels. Still images also
have three JPEG compression levels available: Superfine, Fine, and Normal, plus
a RAW setting that records the image straight from the CCD, with no further
processing. RAW images require the Canon Zoom Browser software for processing on
a computer. The benefit of the RAW data file format is that it compresses the
image file without any loss in image quality.
A full complement of
interface software comes with the G1, as does a USB cable for speedy connection
to a PC or Macintosh computer. The USB interface makes it feasible to download
images directly from the camera, although it still isn't quite as fast as a good
external card reader. In our tests, the G1 transferred a 2.2 megabyte file in
only 6.1 seconds, a data rate of 369 KBytes/second. This is about average for
USB-connected cameras we've tested.
Following are the approximate
resolution/quality and compression ratios for a 16MB card (compression numbers
are based on our own computations):
| Resolution/Quality vs Image Capacity |
|
|
| |||
|
|
|
|
|
|
| |
| Superfine Quality |
|
|
|
|
|
|
| Fine Quality |
|
|
|
|
|
|
| Normal Quality |
|
|
|
|
|
|
| RAW Format |
|
|
|
|
|
|
Video Out
 The G1 has a video-out
port which supports the NTSC timing format on US and Japanese model televisions
(the PAL standard is supported on European cameras). The video output can be
used for reviewing previously recorded images or running slide shows from the
camera. It also shows all three LCD menu screens, as well as the preview display
from the LCD viewfinder. Combined with the very flexible controls of the wireless
remote transmitter, the live video output display opens up interesting possibilities
for portrait photography, such as using a video monitor as a remote viewfinder.
The G1 has a video-out
port which supports the NTSC timing format on US and Japanese model televisions
(the PAL standard is supported on European cameras). The video output can be
used for reviewing previously recorded images or running slide shows from the
camera. It also shows all three LCD menu screens, as well as the preview display
from the LCD viewfinder. Combined with the very flexible controls of the wireless
remote transmitter, the live video output display opens up interesting possibilities
for portrait photography, such as using a video monitor as a remote viewfinder.
The output cable is a true AV cable, as it fans out into two RCA jacks, one
for video, and one for audio. Plugged into any video monitor (or TV with direct
video and audio inputs), the audio capabilities of the G1, combined with the
wireless remote control, could make it an effective portable presentation device.
Power
 The G1 is powered
by an internal BP-511 rechargeable lithium-ion battery pack. The camera ships
with one battery pack, as well as an AC adapter that doubles as an in-camera
charger. A stand-alone charger is sold separately, as is a car AC adapter that
plugs into any automobile cigarette lighter. A CR2016 lithium battery keeps
the G1's internal clock going, and fits into a small compartment within the
battery chamber.
The G1 is powered
by an internal BP-511 rechargeable lithium-ion battery pack. The camera ships
with one battery pack, as well as an AC adapter that doubles as an in-camera
charger. A stand-alone charger is sold separately, as is a car AC adapter that
plugs into any automobile cigarette lighter. A CR2016 lithium battery keeps
the G1's internal clock going, and fits into a small compartment within the
battery chamber.
Because the G1 relies on its LCD display for viewing and selecting some of its
settings, it can be somewhat of a drain on the power supply. Fortunately, the
camera has an automatic three-minute shutdown mode to help conserve battery
power, and you can control power consumption by reducing the amount of information
displayed on the LCD monitor, and keeping the autofocus mechanism in Single
mode rather than Continuous mode.
|
|
|
| Capture Mode, w/LCD |
|
| Capture Mode, no LCD |
|
| Half-pressed shutter w/LCD |
|
| Half-pressed w/o LCD |
|
| Memory Write (transient) |
|
| Flash Recharge (transient) |
|
| Image Playback |
|
We measured the G1's power consumption at the battery terminals, at the nominal 7.4 volts that it's lithium battery pack produces. That pack is rated at 1100 mAh, for a total power capacity of 9.1 watt-hours. This is almost double the energy capacity of typical high-power NiMH AA cells.With the higher battery voltage, the current drain of the G1 is a bit lower than average. The bottom line should be very good battery life, which we'd estimate at 70 minutes with the LCD on, or a good 6 hours with it off. We still recommend buying a second battery (as we do with all digicams), but the G1's battery life looks to be better than average.
Included Software
|

This last function is the most interesting of Canon's software
offerings. The RemoteCapture software interface displays a preview window with
the same image as that seen on the camera's LCD monitor, along with thumbnail
views of already captured images, the number of shots available, a histogram of
the preview window, a listing of exposure settings, and a set of control buttons
that enable you to release the shutter, rotate the image, view the image, and
delete the capture. There's also a "Comments" feature that allows you to add
short notations to the image file. Unfortunately, you can't change the exposure
settings through the software interface, but you do have access to the
self-timer and an interval shooting mode through the File menu. The Interval
shooting mode is only available through the RemoteCapture software (not on the
camera), and sets the camera to record a series of images at set intervals,
creating the effect of time-lapse photography. Adobe Photoshop LE 5.0 provides
more extensive image correction and enhancement capabilities, including a full
menu of creative filters and image effects.

Like most recent Canon digicams, the G1 also supports a "RAW" file format, in
which the data is taken straight from the CCD with no processing inside the
camera. These RAW files can subsequently be processed on a personal computer
using Canon's ZoomBrowser EX software, which lets you adjust white balance,
brightness, color saturation, and sharpness post-exposure. This has several
benefits. First, the RAW files are completely lossless, in that they contain
all the information captured by the CCD. Relative to the more common uncompressed
TIFF files though, they are quite a bit smaller, at only 2.7 megabytes instead
of 9.0. (!) Finally, any modifications or tweaks you make on these files with
ZoomBrowser begin with the full 10-bit data that the camera captured. This means
that fewer image artifacts will result from your adjustments. Our one complaint
about ZoomBrowserEX though, is how slow it is: It took a couple of minutes
per image to export RAW images to TIFF format on our (admittedly now slightly
elderly) 350 MHz Pentium III Windows machine. - I mean *minutes*? We don't know
what the software could possibly be doing for that long, but we do appreciate
the results you can obtain. It would be much preferable though, if we were able
to set up the adjustment parameters for a number of images separately, then
walk away while the machine converted all of them. The software will convert
multiple images at once, but only one set of adjustment parameters may be applied
to the whole batch.
Test Results
In keeping with our standard
policy, the following comments are condensed, and summarize our key findings.
For a full commentary on each of the test images, see the Canon PowerShot G1's "pictures" page.
As with all
Imaging Resource camera tests, we encourage you to let your own eyes be
the judge of how well the devices performed. Explore the images on the pictures page, to see how well the Canon G1 did, and how
its images compare to other cameras you may be considering
buying.
Overall, the G1 performed very well, with great color balance in
most instances. Automatic and manual white balance settings functioned well,
with good interpretation of most light sources. The indoor tungsten light test
proved a little tricky, however, producing a warm, magenta cast. We also noticed
odd highlights in the indoor portraits. The G1 accurately reproduced the large
color blocks in the Davebox test target with reasonably vibrant color balance,
and tonality was handled very well, as the subtle tonal variations of the Q60
target were completely visible up to the "B" range. The G1's color saturation
adjustments did a great job of controlling color intensity, without
"over-adjusting." Other than the slight casts and odd highlights, the G1 did an
excellent job overall in terms of color.
The results of our resolution
test supported our conclusions from the other test shots we took with the G1:
The camera captures an exceptional amount of detail, easily the equal of any
other 3 megapixel camera we've tested, but its images are just slightly soft,
compared to the sharpest 3 megapixel cameras we've seen. (Easily corrected
post-exposure in an imaging program though.) Numerically, we'd "call" the G1's
resolution as about 800 lines per picture height in both vertical and horizontal
directions, but there's significant detail visible well beyond that point. At
very high spatial frequencies (1100 lines per picture height and above),
moderate color artifacts appears, particularly in the horizontal direction.
Overall, an excellent performance but, contrary to our usual chiding of
manufacturers for using too much sharpening, we'd like to have seen a little
more in the G1's images.
The G1 provides excellent exposure control, with
automatic, program AE, shutter priority, Aperture priority, and manual exposure
modes, as well as several presets for special shooting situations. The user can
also control automatic or manual focus; image sharpness, contrast, and
saturation; spot or center-weighted averaged metering; ISO settings; exposure
compensation (for flash and normal exposures); white balance; and flash
mode.
The G1 performed very well in low-light tests, producing bright,
useable images in 1/16 foot candle (0.67 lux) light readings. (That's really
dark!) At these low levels, and with the resultant long exposure times,
there is only moderate noise present in the images, most notably at the 200 and
400 ISO settings. The 50 and 100 ISO settings showed a very minor noise level.
(We direct readers to Mike Chaney's excellent Qimage Pro program, for a tool
with an amazing ability to remove image noise without significantly affecting
detail.) Detail looks good in each of the low-light images, but color balance is
slightly warm. To put the G1's low-light performance into perspective, an
average city night scene, lit by modern street lamps, has a light level of about
one foot candle. Bottom line, the G1 can probably see better in the dark than
you can!
We found the G1's optical viewfinder to be quite tight, showing
about 85 percent of the final image area at wide angle, and about 82.6 percent
at the telephoto setting. The LCD monitor was much more accurate, showing
approximately 96.5 percent at wide angle, and about 97 percent at telephoto. (We
actually found that, at the telephoto setting, measurements for the LCD monitor
differed just slightly with the image size. It showed 97.0 percent of the image
at 2,048 pixels, 96.9 percent at 1,024 pixels, and 96.8 percent at 640 pixels.)
We like to see LCD monitors perform as close to 100 percent accuracy as
possible, and the G1 comes very close to the mark.
The G1 also performed
well in the macro category, capturing a minimum area of just 3.21 x 2.41 inches
(81.64 x 61.23mm). Color balance is a little cool, but detail and resolution
both look great. The G1's built-in flash does a good job of throttling down for
the macro area, tricked ever so slightly by the shiny coin. Color balance
appears a little blue with the flash exposure, and the large silver coin shows a
few magenta highlights.
Despite some difficulties with color and white
balance under incandescent lighting, the G1 turned in an impressive performance.
Throughout our testing, the camera's exposure controls and features proved
excellent for fine-tuning exposures to achieve optimum results. It also did a
great job in both the macro and low-light categories. Overall, a very solid,
performance with excellent control.
Conclusion
Its compact size, excellent exposure
controls, and unique rotating LCD monitor, make the Canon PowerShot G1 a great
option for novice consumers who want a camera with room to grow, and the RAW
data file format and RemoteCapture computer-control capabilities should also
entice more advanced digicam consumers. Overall, the G1 produces excellent image
quality, good color balance, and is accompanied by a robust software package.
All things considered, we think the G1 is a great solution for anyone who wants
the utility of a fully manual digicam, with the ease of automated control.
Clearly, one of the strongest performers in the three megapixel arena: Canon's
going to sell a lot of these!
<<PowerShot G1 Sample Images | Additional Resources and Other Links>>
Reader Comments!
Questions, comments or controversy on this product? Click
this link to see what other Imaging Resource readers have had to say about
the Canon PowerShot G1, or add comments of your own!
