Sony H2 Design
Similar in style and design to the original Sony DSC-H1 digital camera, the Sony DSC-H2 is compact, stylish, and ready to go anywhere, with a somewhat chunky body style similar to other long zoom digital cameras on the market. Its silvery metal body is big enough for easy control with either one hand or two. Measuring 4.5 x 3.38 x 3.75 inches (113 x 83 x 94 millimeters) and weighing 18.9 ounces (537 grams) with the batteries and memory card installed, the Sony H2 is not exactly pocketable, but it fits into larger coat pockets and small packs with ease. When not in use, the telescoping zoom lens retracts neatly inside the body, and a substantial lens cap is provided for very secure protection. (Like the H1, this cap is arguably one of the most substantial out in the market, with a mechanism that controls four spring-loaded retractable cap retention cams. The heft of the cap reminds me more of a manhole cover than a lens cap.) Despite the Sony H2's heft, it is well-balanced and easy to hold, though its protrusions are likely to snag a bit in a coat pocket, so I recommend a camera bag to give this camera the protection it deserves.
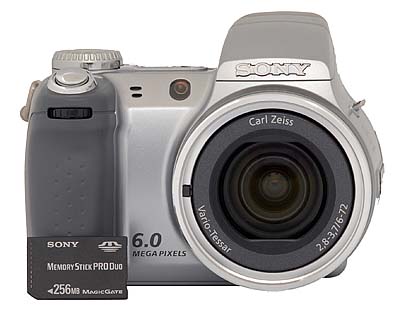
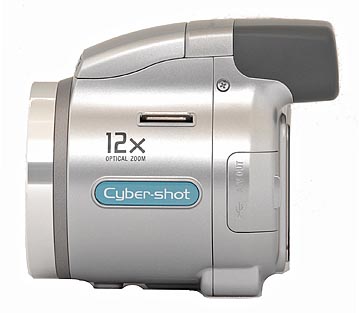
The Sony DSC-H2 has a good grip up front and a reasonably clear area for your thumb on the back. The 12x, 6-72mm zoom lens (equivalent to a 36-432mm zoom on a 35mm camera) dominates the camera's left side (when held from the back), with a small and very bright orange lamp on the upper right of it, to help with focusing in low-light conditions. (This lamp also blinks less brightly when the self-timer is in use, flashing faster to let you know when the camera is about to snap the picture.) Left of the orange lamp are two holes for the microphone. The flash is above the lens, concealed in a pop-up assembly. The Jog dial is located under the Shutter button on the handgrip.
The right side of the camera (as viewed from the rear) has a small plastic door that opens to reveal a small opening into the battery compartment to accommodate the AC adapter cord. Above that is one of the neckstrap eyelets. You can also see the edge of the battery compartment door at the bottom of the panel.
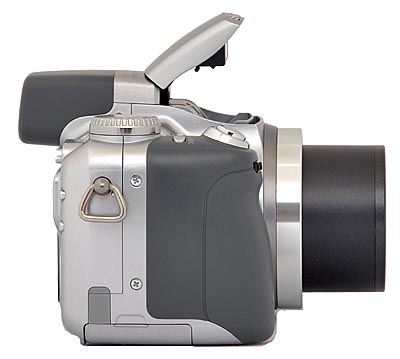
The left side has a large plastic door that flips out toward the front and reveals the A/V and USB jacks. A second neckstrap eyelet is located above the curve of the lens barrel.
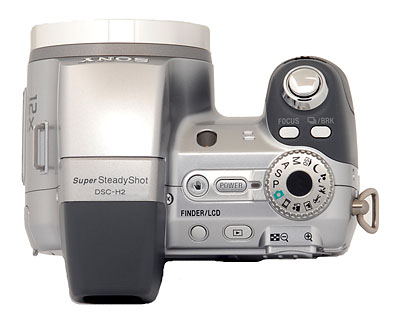
The camera's top panel includes a smattering of controls, including the Shutter button, Focus and Continuous/Bracketing buttons, and the Mode dial. To the left of the Mode dial are the Power and Steady Shot buttons, with the Finder/LCD and Playback buttons behind these, angled down toward the rear panel.
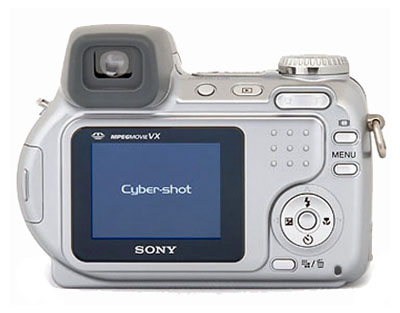
The Sony DSC-H2's rear panel holds the remaining camera controls and function buttons, along with a 2.0-inch color LCD monitor for previewing and playing back images, and the electronic viewfinder (EVF) window. The LCD display reports a variety of camera and exposure settings, including the aperture and shutter speed settings (a nice bonus for those interested in how the camera will expose the image) and a three-stage battery gauge. The EVF is located above the LCD monitor, with the Finder Adjustment Lever beneath the eyepiece for dioptric adjustment. The camera's Zoom control is in the upper right corner, and the Display and Menu buttons are down and right of it. In the lower right corner is a Five-way Arrow pad, with small arrows pointing in four directions (Up, Down, Left, and Right) and a set button in the middle. Each serves multiple functions, navigating onscreen menus scrolling between captured images in playback mode, or activating different camera functions (Flash, Exposure Compensation, Self-Timer, and Macro). Below and left of the Arrow pad is the Image Resolution/Erase button, and in the very bottom right corner is a tiny LED that lights whenever the camera is accessing the memory.
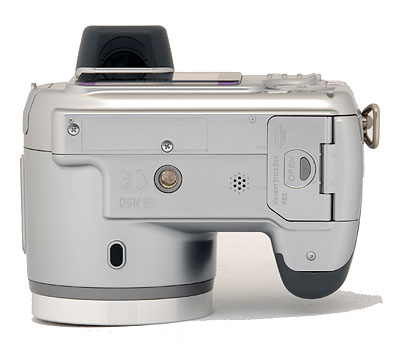
Finally, the Sony H2's flat bottom holds the threaded (metal, kudos for that) tripod screw mount, a speaker for audio playback, and the shared Memory Stick/battery compartment with a clever door arrangement. While most users of the H2 probably won't care, it is possible to change the batteries while the camera is mounted on most tripods.
The Sony DSC-H2 has two items that are not commonly included: an Accessory extension tube for attaching accessory lenses, and a lens hood that attaches to the extension tube. Unfortunately, the lens hood blocks the flash when shooting at wide angle, but it could still be useful at longer portrait distances, helping eliminate glare and lens flare.
Sony H2 External Controls

Shutter Button: Placed at an angle out on the grip's leading edge, this button sets focus and exposure when halfway pressed, and fires the shutter when fully pressed.
![]()
Front Jog Dial: This ridged dial on the very front of the handgrip controls aperture and shutter speed settings in Aperture and Shutter Priority exposure modes. In Manual mode, turning the dial highlights either the aperture or shutter speed setting, while pressing the dial selects the setting for adjustment (by turning the dial again). This dial also works in conjunction with the Exposure Compensation adjustment.
Focus Button: Behind and to the left of the Shutter button, this button selects the focus method, choosing among Multi point AF, Center AF, Flexible Spot AF, and Manual Focus.
Continuous/Bracket Button: Selects among Burst, Exposure Bracketing, and Multi Burst modes. Multi Burst fires 16 frames and saves them as a matrix of 16 images in one frame.
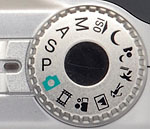
Mode Dial: Perched high on the right side of the camera's top, this ribbed dial sets the camera's operating mode, offering Auto, Program, Shutter Priority, Aperture Priority, Manual, High Sensitivity, Twilight, Twilight portrait, Beach, High-speed shutter, Landscape, Portrait, and Movie modes. (See menus and descriptions below.)
![]()
Power Button: Located just left of the Mode dial on the camera's top panel, this well-recessed button turns the camera on and off.

Steady Shot Button: To the left of the Power button, this button cancels and re-activates Super SteadyShot mode.

Finder/LCD Button: Angled down toward the rear panel, this button switches the display between the 2.0-inch LCD and the electronic viewfinder.
![]()
Playback Button: To the right of the Finder/LCD button, this button puts the camera into Playback mode.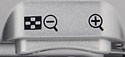
Zoom Control: Positioned in the top right corner of the rear panel, this two-way rocker button controls optical zoom and, when enabled via the Setup menu, Sony's "Smart Zoom" or Precision Zoom options.
In Playback mode, this button controls the digital enlargement of a captured image, which can go as high as 5x. (Very handy for checking focus or the expressions on people's faces in group shots.) Also in Playback mode, the wide-angle end of the button activates the Index Display mode, which displays either nine or 16 thumbnail images on the screen at one time. (Pressing the "W" end once pulls up the nine-image display, and a second press pulls up the 16-image display.)

Display / LCD On/Off Button: Below right of the Zoom control, this button controls the LCD display, cycling through the image with information display, the image with information and live histogram display, the image with limited information display (in all Record modes). In Playback mode, it cycles through the same series.

Menu Button: Below the Display button, this button activates the settings menu in any camera mode. The Menu button also turns off the menu display.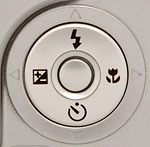
Five-Way Arrow Pad: Located in the lower right corner of the rear panel, this four-way rocker button features four arrow buttons, each pointing in a different direction (up, down, left, and right), with a Set or OK button in the middle. In all settings menus, these arrow keys navigate through menu options. Pressing the center button confirms selections.
In any record mode, the Up button controls the Flash mode, cycling through Auto, Forced, Slow-Sync, and Suppressed modes. The Right arrow turns the Macro (close-up) mode on and off, and the Left arrow accesses the Exposure Compensation adjustment. The Down arrow accesses the Self-Timer mode.
In Playback mode, the Right and Left arrows scroll through captured images. When Playback zoom is enabled, all four arrows scroll around within the enlarged view, while pressing the center button returns to the normal, 1x display. In Manual mode, the four arrows can control aperture and shutter speed after the middle button is pressed.![]()
Image Resolution / Erase Button: Lower left of the Five-way Arrow pad, this button displays the available resolutions in any record mode. Choices are 6M (2,816 x 2,112), 3:2 (2,816 x 1,872), 3M (2,048 x 1,536), 2M (1,632 x 1,224), VGA (640 x 480), and 16:9 (1,920 x 1,080). Movie resolutions are MPEG VX Fine 640 x 480 at 30fps (requires Memory Stick Pro), MPEG VX Standard 640 x 480 at 17fps, and 160 x 112 at 8fps.
In Playback mode, this button lets you erase the currently displayed image or movie.
 Fujifilm GFX 50S Review
 Fujifilm X-T3 Review
 Olympus E-M5 III Review

Follow Imaging Resource