Konica Minolta Maxxum 5DQuickly on the heels of its first dSLR, Konica Minolta shrinks the form factor and the price without losing in-camera image stabilization.<<Viewfinder :(Previous) | (Next): Exposure, Drive Modes & Flash>> Page 5:OpticsReview First Posted: 10/31/2005 |
Optics
| Free Photo Lessons | |
|
 The 5D features a standard Konica Minolta A-type bayonet lens mount, which accommodates a wide range of Konica Minolta lenses. (According to the manual, essentially all Konica Minolta AF lenses can be used, though MD and MC series manual focus lenses are not compatible. Additionally, the AF Macro 3x - 1x f/1.7-2.8 lens cannot be used with Anti-Shake, nor does Anti-Shake work with any lens with a macro release.)
A small button on the front of the camera releases the lens from its mount, so it can be turned and removed. The 5D's CCD is smaller than a 35mm frame, so the angle of view at any given focal length will not be the same as on a 35mm camera. To find the approximate 35mm equivalent focal length, multiply the focal length of the lens by 1.5. (Thus, a 100mm lens will provide about the same view as a 150mm lens on a 35mm camera.)
The 5D provides both manual and automatic focus control modes, set by the Focus Mode switch on the left side of the camera. You can select between Auto and Manual focus modes. But the Function button provides access to additional Auto Focus Area and Auto Focus Mode options.
Auto Focus Area has three options: Wide Focus Area, Spot AF Area, and Focus Area Selection. The default option is a nine-point Wide Focus area, indicated by an array of dashes inset within four widely-spaced brackets in the viewfinder image. By pressing and holding down the Spot AF / OK button in the center of the Multi-controller, you can switch between Wide Area and Spot Point autofocusing modes (the latter indicated by a target box in the center of the viewfinder). Wide Area AF bases its focus on the most prominent subject detail in the portion of the image that falls within the AF brackets. Spot Focus bases its focus on the very center of the frame, where the square target resides. The Focus Area Selection lets you manually set the main AF point by using the Multi-controller to highlight one of the nine AF points. The active AF area is briefly illuminated in the viewfinder. Interestingly, though the Multi-controller appears to be a four-way, it is effectively used as an eight-way controller in order to reach all eight outer AF sensors. Pressing between the up and right arrows actuates both the up and right controls, indicating that you want to go (diagonally) to the upper right sensor. The reason we know it's not an actual eight-way control is that if you press up and then right, you go to the right sensor, not the upper right sensor. Rather, pressing and holding the up button and then pressing the right button takes you to the upper right sensor. Once you've set the AF area, sliding the switch to the Focus Area Lock position locks the AF point.
Auto Focus Mode offers four options: Single Shot AF, Automatic AF, Continuous AF, and Direct Manual Focus. Single Shot AF is a general purpose autofocusing mode that sets focus when you half press the shutter button. Automatic AF automatically switches between single and continuous AF depending on the subject's motion. Continuous AF is designed for subjects in motion, continuously focusing on the subject even when the shutter button is half-pressed. Direct Manual Focus operates like Automatic AF, but after focus is automatically found, it can be adjusted manually. The focus signal in the viewfinder tells you when you can manually adjust focus.
In shooting with the camera, its autofocus generally worked very well: We didn't find as much of the "hunting" that the Maxxum 7D seemed to do. On the other hand though, the 5D's AF system only worked down to a light level a little darker than 1/4 foot-candle without its AF assist light, about a full stop brighter than what the 7D could manage. (Note though, that this is still less than 1/4 as bright as typical city street lighting at night, a pretty good performance.)
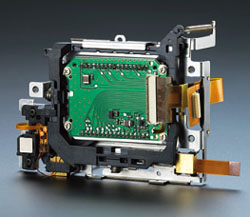 The Maxxum 5D also employs Konica Minolta's Anti-Shake technology, which uses a highly sensitive angular rotation sensor and Smooth Impact Drive Mechanism (SIDM) to move the CCD assembly itself to counteract camera movement, rather than the more common approach of moving an optical element inside the lens. (The shot above shows a rear view of the anti-shake module, removed from the camera.) This has the huge benefit of offering Anti-Shake with essentially any lens that works on the camera (subject to the few restrictions mentioned earlier). When Anti-Shake is activated, the Anti-Shake scale on the right side of the viewfinder display indicates the degree of stabilization. A downside to Minolta's body-based Anti-Shake approach though, is that while you can see the results of stabilization on competing lens-based designs, you have only this scale to tell you how the 5D's Anti-Shake mechanism is doing. Anti-Shake minimizes the effect of blurring caused by slight camera movement, which is more noticeable at long focal lengths.
 Testing such shake-compensating mechanisms presents several problems, and each manufacturer's method seems to work better in some conditions than in others. But we do an informal test by lashing two competing models together and averaging the results of each camera under different conditions. (See my comments in our review of the Panasonic FZ15 for a more complete description of our approach.) I call it informal because the variables are such that we can't accurately set a benchmark. Every photographer shakes a little more or less, and the differing focal lengths of the various cameras combined with the shutter lag and AF factors make only an informal test practical. Developing a shake table that would adequately simulate the various types of acceleration, rotation, pitch and yaw that a camera experiences in the hands of a human being would be prohibitively expensive. Further, given the various mechanisms used, any kind of structured test could favor one design over another, necessitating costly redesign of the system. So testing will stay informal for now.
In this case, we lashed up a Canon EOS Digital Rebel with a 28-135mm IS (Image Stabilized) lens to the Konica Minolta Maxxum 7D. (We're assuming here that the 5D will work at least as well as the Maxxum 7D did in our testing.) On the 7D, we used a 28-70mm f/2.8 lens for testing at shorter focal lengths and a 100-300mm f/4.5-5.6 lens for testing at 135mm. Both cameras have about the same size sensor (6 megapixels), and we tried to match the focal length of the lenses in our tests as closely as possible. (As it happened, we got them nearly dead on at 135mm, but had the Rebel zoomed in about 7% more at the ~50mm setting). We adjusted the exposure parameters on both cameras manually, so they'd both be set at the same shutter speed (1/15 second for the 50mm shots, 1/25 second for the ones at 135mm). Holding the assembly in our hands, we pressed the two shutter buttons as near to simultaneously as we could manage. It's likely that there was a slight offset between the firing of each camera's shutter, but the two shots in each pair were almost certainly captured within a tenth of a second of each other, so the shake seen by each camera should have been nearly identical.
The results were interesting. As usual, there was a lot of variation from shot to shot, and on any given shot, one camera or the other might have a bit easier time of it, depending on where within their range of travel their anti-shake elements happened to be at the moment the shutter button was pressed. Nevertheless, we ended up with a pretty clear idea of how well the 7D's anti-shake worked relative to that of the Canon 28-135mm IS lens. Bottom line, at the 50mm focal length, the 7D slightly edged the performance of the Canon system, although the amount of difference was fairly slight. At 135mm, the two cameras came out in nearly a dead heat numerically (we scored successive pairs of images between the two cameras, and averaged the results to come up with a relative numerical score). But, we found the results with the Canon system to be more consistent. (That is, there were fewer extremely sharp or extremely blurry images.) At the end of the day, at 50mm and 1/15 second, 8 out of 10 of the 7D's images were what we'd consider usable, vs 7 out of 10 of the Rebel's (with another three of the Rebel's shots being somewhat marginal), while at 135mm 8 out of 10 of the Rebel's images were acceptable (with one marginal), vs 6 out of 10 of the 7D's (with one marginal).
So Konica Minolta's anti-shake system does indeed seem to work pretty well, at least at the 135mm-and-below focal lengths where we did a direct comparison with Canon's lens-based IS system. At longer focal lengths it seemed to become less effective, but still delivered pretty dramatic improvements in sharpness relative to unaided handheld shots.
| Typical Results at 50mm, 1/15 second | |
| With Anti-Shake | Without Anti-Shake |
 |
 |
| Typical Results at 135mm, 1/25 second | |
| With Anti-Shake | Without Anti-Shake |
 |
 |
Amidst the hair-splitting involved in ranking one anti-shake system against another, it's important to step back and look at what the actual impact of the system in question is. To that end, check out the images above. These were captured with the dual-camera lashup described above, with the 7D's anti-shake system turned on, and the IS on the Canon system turned off to provide the samples without anti-shake. Here again, there was a fair bit of variation from shot to shot, but the examples shown are pretty representative of the general run of results. These images show how dramatically the 7D's anti-shake system reduces image blurring due to camera shake at reasonable shutter speeds. There's a rule of thumb that says to use a shutter speed at least the inverse of the focal length you're shooting at (that is, 1/50 second for shots at 50mm, and 1/135 second for shots at 135mm). Some people with very steady hands and good technique can do a lot better than this, others a bit worse, but it's a useful guideline. For my own part, I find that if I'm really careful, I can maybe get about a factor of two better than the guideline, but at those speeds I'm likely to end up with a fair number of blurry shots. The shots above were captured a good two f-stops slower than the recommended shutter speeds, and the results pretty well speak for themselves. Bottom line, it's hard to overstate the value of a good anti-shake system for handheld photography in low light.
Sensor Cleaning!
Everyone understands that lenses sometimes get dust on them and need to be cleaned, and there are a lot of lens-cleaning cloths, solutions and other accessories on the market that work well. BUT, what do you do when your sensor gets dusty? Dust specks on the sensor tend to show up when shooting at very small apertures, appearing as dark blobs on your images. They're distracting at best, a terrible nuisance at worst, if you end up having to retouch every image to rid of them.
Most of us are naturally leery about the idea of poking around inside the delicate innards of our d-SLRs to wrestle with recalcitrant dust specks. Gently blowing the sensor surface (actually, the surface of the anti-aliasing filter) with compressed air gets rid of some dust, but there's invariably a lot that just stays stuck, no matter what. So what do you do?
If you've got dust specks on your sensor (and sooner or later you will), you're going to need to clean it. There are a lot of products out there intended to address this need, but a distressing number of them work poorly (if at all), and many are grossly overpriced. Advertising hype is rampant, with bogus pseudo-scientific jargon and absurd product claims run rampant. And prices - Did I mention prices? How about $100 for a simple synthetic-bristle brush?
So how do you know what product to use?
We don't pretend to have used everything currently on the market, but can tell you about one solution that worked very well for us. The "Copper Hill" cleaning method is straightforward and safe, and in our routine usage here at Imaging Resource, highly effective. Better yet, the products sold by Copper Hill Imaging are very reasonably priced. Best of all, Nicholas R (proprietor of Copper Hill) has put together an amazingly detailed tutorial on sensor cleaning, free for all.
Sensor cleaning is one of the last things people think about when buying a dSLR, but it's vital to capturing the best possible images. Take our advice and order a cleaning kit from Copper Hill right along with your dSLR, so you'll have it close at hand when you need it: You'll be glad you did!
(Other than a few backlinks on their site, we receive no promotional consideration from Copper Hill. We just think their sensor cleaning products are among the best on the market, and like their way of doing business. - We think you will too. Check them out.)

Follow Imaging Resource: