Konica Minolta Maxxum 5DQuickly on the heels of its first dSLR, Konica Minolta shrinks the form factor and the price without losing in-camera image stabilization.<<Shutter Lag/Cycle Times :(Previous) | (Next): Camera Modes and Menus>> Page 8:Operation & User InterfaceReview First Posted: 10/31/2005 |
Operation & User Interface
The Maxxum 5D's user interface is certainly less intimidating that the 7D's comprehensive set of buttons, switches and dials. Spend a little time with the camera and you'll find the controls very intuitive and well-placed. Unlike most of its competitors, the 5D's external dials and buttons access essentially all of the main camera settings, reserving the LCD menu system for less commonly-used functions. The front Control dial with the Exposure Compensation button functioning as a shift key quickly accesses shutter speed and aperture settings, in addition to a wide range of functions when used with other control buttons. Most of the camera adjustments are made by rotating a dial, pressing a button, and turning one of the control dials. External mechanical controls like these much faster to navigate than LCD menu options. With a little practice, the experienced photographer can develop a muscle-memory map of the camera and actuate some controls by feel alone.
As in all d-SLRs, the LCD monitor doesn't act as a viewfinder but does offer a control panel of sorts, showing you the main camera settings and presenting adjustment screens for some of the control buttons. (You can disable the LCD display entirely using the Display button, or activate the full or basic information readouts.) You can also see the main exposure settings through the viewfinder.
While you can quickly feel comfortable using the camera, getting to know everything it can do can take a little time, given the large number of custom settings and setup options -- and the interface itself will take a little getting used to if you hadn't previously used a Maxxum film SLR. However, once you get the hang of it, the control layout and overall feel of the camera are quite natural. Right out of the box, you could probably snap a few images with just a cursory look at the manual, but plan on investing more time to get better acquainted with all of the camera's controls and settings. The manual is extensive and goes in greater depth than most manuals we've seen.
Control Enumeration

Depth of Field Preview Button: Tucked away on the right bottom corner of the lens mount, this button stops down the lens to the selected aperture, so you can get an idea of the depth of field when looking through the viewfinder.

Lens Release Button: On the left side of the lens mount, this button unlocks the lens so that it can be removed from the camera.

Focus Mode Switch: In the bottom right corner of the front panel, this dial controls the main focus mode:
- AF: The AF system operates only when the Shutter button is halfway pressed.
- Manual Focus: Disables the autofocus system, so that you can manually adjust focus via the lens ring.
Front Control Dial: This ridged wheel sits in front of the Shutter button on top of the handgrip, conveniently under your index finger. All of the most commonly used camera settings are adjusted by using this wheel in conjunction with one of the function dials or control buttons on the camera. It also controls aperture and shutter speed in Aperture Priority and Shutter Priority exposure modes and shutter speed in Manual mode.

Shutter Button: Just behind the Front Control dial, this button sets exposure and focus (in autofocus mode) when half-pressed, and trips the shutter when fully pressed.
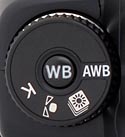
White Balance Dial and Button: This control combination is located on the far right side of the camera's top panel, and controls the white balance settings. The dial offers four main positions:
- AWB: Accesses the Auto white balance setting.
- Preset: Accesses the Preset white balance offerings, which include a range of preset settings for specific light sources (Daylight, Shade, Cloudy, Incandescent, Fluorescent, and Flash).
- Custom White Balance: Lets you set the white balance using a white or gray card. You can save as many as three custom settings. The user need only fill the spot metering area with a white or gray card and press the WB button to register the setting.
- K: Accesses a range of Kelvin temperature settings, using either the Front Control dial or left and right arrow keys.
The central WB button selects white balance settings, and registers the white balance in Custom mode.

ISO Button: Next to the Drive Mode button, this button accesses the camera's sensitivity menu. Using the left and right arrow keys or the Front or Rear Control dials, you can set the ISO equivalent to Auto, 100, 200, 400, 800, 1,600, or 3,200. Lo 80 and Hi 200 Zone Matching options record low-key or high-key images, respectively.

Drive Mode Button: This mode button on the top panel accesses the camera's drive settings, which include Single Frame Advance, Continuous Advance, the 10 and Two-second Self-timer modes, Exposure Bracketing, and White Balance Bracketing.
Exposure Mode Dial: Next to the Drive Mode button, this dial selects the camera's exposure mode. Options are Auto, Program AE, Aperture Priority, Shutter Priority, Manual, and five "Digital Subject Programs" or Scene modes. The Scene modes include Portrait, Sports Action, Landscape, Sunset, and Night Portrait.

Power Switch: Located in the top left corner of the rear panel, this sliding switch turns the camera on or off.

Menu Button: The top button in a series lining the left side of the LCD monitor, this button calls up the menu system. Pressing it a second time returns to the LCD's information screen.

Display Button: Directly below the Menu button, this button controls the LCD information display in Record and Playback modes. Though the LCD monitor does not provide any image preview, it does report the camera's exposure settings. Pressing this button cycles between the full information display, basic display, and no display (disables the LCD entirely). In Playback mode, this button cycles between an information overlay, no information, and the index display.

Delete Button: Right below the Display button, the Delete button prompts the camera to ask if you want to delete a displayed image.

Playback Button: The final button in the series on the left side of the LCD monitor, this button accesses the camera's Playback mode, so that you can review any captured images. Once in Playback mode, a second press of the Playback button returns to Record mode. (You can also press the Shutter button.)
Diopter Control Dial: Practically hidden on the right side of the optical viewfinder, this tiny dial adjusts the viewfinder display to accommodate eyeglass wearers.

Function Button: The first of three buttons at the top right of the back panel, this button sets AF area, focus mode, metering mode, flash compensation, color mode and Digital Effects Control. In Playback mode, it zooms out.

Exposure Compensation Button: The second of three buttons at the top right of the back panel, this button shifts the control dial to set exposure compensation in Auto, P, A and S exposure modes or any Scene mode. In Playback mode, it zooms in.

AE Lock Button: The third of three buttons at the top right of the back panel, this button locks the exposure. When using the flash in Program, Aperture Priority, or Full Auto exposure modes, this button accesses the Slow-Sync flash function. Pressing and holding the button locks the exposure, and the flash output is based on the locked reading.
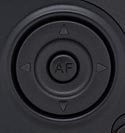
Multi-controller and Spot AF / OK Button: Right of the LCD monitor, this rocker control steps through selections within the LCD menu system and interacts with various status messages or requests for confirmation that appear on the LCD screen. You navigate the menus by pressing one of the four arrows around the control's periphery, and confirm selections by pressing the Spot AF / OK button in the center of the control. When selecting an AF area, the rocker actually moves in eight directions, giving you more flexibility in moving the AF point. In Playback mode, the right and left arrows scroll through captured images on the memory card, while the up arrow activates a histogram display. In Record mode, when the AF Area mode is set to Wide, pressing and holding the center of the control switches the camera to Spot autofocus mode. Once in Spot AF, rocking the control moves the Spot indicator around the frame to the nine available focus points.
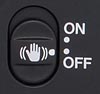
Anti-Shake Switch: In the lower right corner of the rear panel, this switch turns the camera's Anti-Shake System on and off.
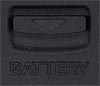
Battery Compartment Latch: Located in the center of the battery compartment door on the bottom of the camera, this latch unlocks and opens the battery compartment cover.

Follow Imaging Resource: