 Back
to Full Konica Minolta DiMAGE A200 Review
Back
to Full Konica Minolta DiMAGE A200 ReviewGo to Konica Minolta DiMAGE A200 Data Sheet
Go to Konica Minolta DiMAGE A200 Pictures Page
Up to Imaging Resource Cameras Page
Use your browser's "Back" button to return to the previous page, or the links at the top and bottom of this page to navigate to related information. If you have difficulty fitting the text on this page onto your printer output, simply resize your browser window to a narrower width and print again.
Remember us when it's time to buy!
Dave here: Have our reviews been helpful to you? (Is this article you're reading right now useful?) Preparing this level of information on as many products as we do is incredibly hard work, not to mention expensive. Things on the Internet may look like they're free, but they're not. (As a lot of big dot.com companies are finding out these days.) Somewhere, somebody has to pay to produce worthwhile content. YOU can help us though, by remembering us when it comes time to make your purchase. Would you consider coming back to our site and clicking-through to one of our advertisers to make your purchase? Every dollar you spend with one of our advertisers helps us directly (in affiliate fees) or indirectly (the advertiser will keep renewing their ad contract with us). To make it easy for you to support us, here's a URL you can visit, to see all our current advertisers, with links to click on that will register your visit to them as having come from our site. It's up to you where you buy, but Mike, Mike, Kim, Yazmin, Marti and I would be really grateful if you'd help us out by choosing one of our advertisers to purchase from.
Thank you for your support!
Dave Etchells, Founder & Publisher
Visit our "Buy Now" Page:
https://www.imaging-resource.com/buynow.htm
Back
to Full Konica Minolta DiMAGE A200 Review
Go to Konica Minolta DiMAGE A200
Data Sheet
Go to Konica Minolta DiMAGE A200
Pictures Page
Up to Imaging Resource Cameras
Page
Konica Minolta DiMAGE A200Konica Minolta trims a little and adds a little relative to their top-end A2 model, delivering a strong contender in the 8-megapixel derby. Review First Posted: 12/22/2004 |
|
 |
|
8.0-megapixel CCD delivers uninterpolated
images as large as 3,264 x 2,448 pixels. |
| |
Sharp 7x optical zoom lens covers a 28-200mm
equivalent focus range. |
|
| * | Integrated anti-shake system greatly extends usefulness of long zoom lens in lower light. | |
| |
Vari-angle LCD monitor swivels
270 degrees to face almost any shooting angle. |
Introduction - The Konica Minolta DiMAGE A200
The Konica Minolta DiMAGE A200 is the latest in a family of DiMAGE electronic SLR-style models that stretches back to the original DiMAGE 7, the first five-megapixel prosumer camera, introduced over three years ago (early 2001). The newest addition to the line is the Konica Minolta A200, which offers many of the same excellent features and exposure options that I enjoyed on the previous DiMAGE A1 and A2 models, though the Konica Minolta A200 is slightly pared down in some respects. Main differences lie in the non-movable EVF (the A2 had a tilting EVF), a new swivel LCD monitor, a 4x interpolated digital zoom option, and a larger maximum movie resolution (800 x 600 pixels), among a long list of other minor changes. The Konica Minolta DiMAGE A200 does feature a high-resolution, 8.0-megapixel (effective) CCD, the same great 7x optical zoom lens, and a compact body style that's comfortable and familiar to 35mm styling, all features that distinguished the A1 and A2 models. The Konica Minolta A200 also offers fine-grained exposure and creative controls (as did the A1 and A2), which really add to the camera's flexibility, making it an interesting option for novices and more experienced users alike. One of the most important features of the Konica Minolta DiMAGE A200 though, is its anti-shake system, which greatly increases the usefulness of its long-ratio zoom lens when faced with dimmer lighting. We're seeing more and more anti-shake technology integrated into long-zoom digital cameras, and the system used on the Konica Minolta A200 has been well-proven in the marketplace for over a year now. Read on for the full details.
Konica Minolta A200 Highlights
Comparison with other DiMAGE cameras
Many of our readers will be familiar with the previous DiMAGE A1 and A2 models, so I put together the following major feature comparison between the DiMAGE A1, A2 and the Konica Minolta A200:
| Feature | DiMAGE A200 | DiMAGE A2 | DiMAGE A1 | ||||||
| Branding | Konica Minolta | Konica Minolta | Minolta | ||||||
| Sensor Type | Interlaced RGBG CCD | Interlaced RGBG CCD | Progressive Scan RGBG CCD | ||||||
| Sensor Resolution (total pixels) | 8.3 megapixel | 8.3 megapixel | 5.3 megapixel | ||||||
| Sensor Resolution (effective) | 8.0 megapixel | 8.0 megapixel | 5.0 megapixel | ||||||
| Maximum Image Size | 3,264 x 2,448 pixels | 3,264 x 2,448 pixels | 2,560 x 1,920 pixels | ||||||
| 3:2 Image Size | 3,264 x 2,176 pixels | 3,264 x 2,176 pixels | None | ||||||
| RAW + JPEG mode | Yes | Yes | No | ||||||
| TIFF Mode | No | Yes | Yes | ||||||
| A/D Conversion | 12-bit | 12-bit | 14-bit | ||||||
| Digital Zoom | 2x, 1-4x interpolated | 2x | 2x | ||||||
| Playback Zoom | Up to 10x | Up to 10.2x | Up to 8.0x | ||||||
| Electronic Viewfinder Resolution |
|
|
|
||||||
| Electronic Viewfinder Refresh Rate | (not specified) |
|
Unknown, slower than DiMAGE A2 | ||||||
| Electronic Viewfinder Diopter Control | �5 ~ +2 m-1 | �3.5 ~ +1.5 m-1 | �5 ~ +2 m-1 |
||||||
| Electronic Viewfinder Eye Relief | (not specified) | 19.5 mm at -1 m-1 | 22 mm at -1 m-1 | ||||||
| Tiltable Electronic Viewfinder? | No | Yes | Yes | ||||||
| Tilt/Swivel rear-panel LCD? | Yes | No | No | ||||||
| Depth of Field Preview | No | Yes | - | ||||||
| Connectivity |
|
|
|
||||||
| ISO Sensitivity | Auto, 50, 100, 200, 400, 800 | Auto, 64, 100, 200, 400, 800 | Auto, 100, 200, 400, 800 | ||||||
| White Balance Options | Auto, Daylight, Tungsten, two Fluorescent settings, Cloudy, Shade, Flash settings), Manual | Auto, Daylight, Tungsten, Fluorescent, Cloudy, Shade, Flash, Manual | Auto, Daylight, Tungsten, Fluorescent, Cloudy, Shade, Manual | ||||||
| Color Modes | Natural
(sRGB), Vivid Color (sRGB), Black & White, Adobe RGB with embedded color profile, Portrait (sRGB) (A slight tossup, losing Adobe RGB w/o profile and Solarization, gain Portrait sRGB. - I count that as a net plus.) |
Natural (sRGB), Vivid Color (sRGB), Black & White, Adobe RGB, Adobe RGB with embedded color profile, Solarization |
Natural (sRGB), Vivid Color (sRGB), Black & White, Adobe RGB, Adobe RGB with embedded color profile, Solarization |
||||||
| Bracketing Options | Exposure, White Balance |
Exposure, White Balance, Contrast, Saturation, Hue (color filter) |
Exposure, White Balance, Contrast, Saturation, Hue (color filter) |
||||||
| Shutter Speed Range
|
|
|
|
||||||
| Exposure Control Range (Program and Aperture Priority AE) |
|
|
|
||||||
| Exposure Control Range (Shutter Priority AE and Manual) |
|
|
|
||||||
| Multi-Segment Metering System | 256 segments (a minor difference) |
300 segments | 300 segments | ||||||
| AE Lock Options | Toggle, Hold |
Toggle, Hold, Toggle (spot meter) Hold (spot meter) |
Toggle, Hold, Toggle (spot meter) Hold (spot meter) |
||||||
| Flash Exposure Control | Auto, Manual | Auto, ADI, Wireless, Manual | Auto, ADI, Wireless, Manual | ||||||
| External Flash Connection | Hot Shoe Only | Hot Shoe, PC sync terminal |
Hot Shoe, PC sync terminal |
||||||
| Subject Tracking AF | No | Yes | No | ||||||
| Autofocus Area Options | Wide Area, Spot (choice of 11 points across the frame), Flex Focus | Wide Area, Flex Focus ("Spot" is a subset of Flex Focus) | Wide Area, Flex Focus ("Spot" is a subset of Flex Focus) | ||||||
| 3D Predictive Autofocus System Speed | Better | Better | Good | ||||||
| Manual Focus assist magnification | 2x | 2x or 8x | 2x or 8x | ||||||
| Movie Resolution |
|
|
320 x 240 pixels | ||||||
| Movie Frame Rate | 15 or 30 frames per second | 15 or 30 frames per second | 24 frames per second | ||||||
| Interval recording, time-lapse movie mode | No | Yes | Yes | ||||||
| Depth of Field Preview | No | Yes, Custom Function | No | ||||||
| Standard Continuous Advance Mode Speed | 2 frames per second (Based on IR tests) |
1.8 frames per second (Based on IR tests) |
1.8 frames per second (Based on IR tests) |
||||||
| High-Speed Continuous Advance Mode Speed | 2.3 frames per second (Based on IR tests) |
3.2 frames per second (Based on IR tests) |
2.9 frames per second (Based on IR tests) |
||||||
| UHS Continuous Advance Mode Speed | 10 frames per second (640 x 480 pixels) | 7 frames per second (640 x 480 pixels) | N/A | ||||||
| Shot to shot speed, JPEGs | 2.53 second | 1.26 second | - | ||||||
| JPEG buffer capacity | 11 | 3 | - | ||||||
| Shot to shot speed, RAW | 5.23 second | 1.14 second | - | ||||||
| RAW buffer capacity | 5 | 3 | - | ||||||
| DPOF Date Printing Option | Yes | Yes | No | ||||||
| PictBridge compliant | Yes | Yes | No | ||||||
| DCF Compliant | Yes, version 2.0 | Yes, version 2.0 | Yes, version 1.0 | ||||||
| EXIF Compliant | Yes, version 2.21 | Yes, version 2.21 | Yes, version 2.2 | ||||||
| Weight (with battery pack and memory card) |
|
|
|
||||||
| Included Memory | None | None | 16MB CF card | ||||||
| Included Lens Shade | DLS-3 | DLS-2 | DLS-1 | ||||||
| Included Wireless Remote | Yes | No | - | ||||||
| Optional Vertical Hand Grip/Battery Holder | No | Yes | Yes | ||||||
| Voice Memo Option | No | Yes | Yes | ||||||
| Other | Gold detail around outside of lens zoom ring, silk-screening
on left of camera reads "DiMAGE A200, 8.0M Anti-Shake"; badge
on front of the camera reads "AS ANTI-SHAKE." Functions controlled by A2 dials on left side of camera largely moved to new "FUNC" menu. |
Gold detail around outside of lens zoom ring; silk-screening on left of camera reads "DiMAGE A2 SUPER FINE EVF"; badge on the front of the camera reads "AS ANTI-SHAKE 8.0M". | Silver detail around front edge of lens zoom ring; silk-screening on left of camera reads "DiMAGE A1 5.0 MEGA PIXELS"; badge on the front of the camera reads "AS ANTI-SHAKE". |
Executive Overview
The DiMAGE line of Konica Minolta digicams is popular and has a reputation for excellent quality, and the higher end models are known for their exceptional features and quality. The previous DiMAGE A1 and A2 digicams were both very impressive, and the newest addition to the line, the Konica Minolta DiMAGE A200, also promises to please. Though the A200 is slightly pared down from the A2, it nonetheless offers excellent exposure control and a wide range of features, and maintains most of the features that made the A2 so popular. Some of the A2's extended custom settings have been removed on the A200, but the camera does offer a few design improvements over its predecessor, such as a swiveling LCD monitor and a less complex control layout. The A200 features the same 8.0-megapixel CCD and 7x optical zoom lens that the A2 had, but now boasts an improved movie mode that offers up to 800 x 600 pixels at 15 frames per second, expanded white balance presets, a Portrait sRGB color space option, a lower base ISO option (50 instead of 64), and a 4x interpolated digital zoom option. Not all of the changes are upgrades though, as the A200's maximum shutter speed has been cut to 1/3,200 (and only at f/8; at all other apertures it's 1/1,600) instead of the A2's 1/4,000 second maximum shutter time (which was likewise limited to smaller aperture settings). Other downgrades include a lower resolution EVF, the removal of support wireless control of external flash units and external PC sync terminal, 256-segment metering as opposed to 300-segment metering, and the deletion of Subject Tracking AF.
At its core though, the Konica Minolta A200 still features
extensive creative controls (including an option to use the Adobe RGB color
space), sophisticated camera functions, and a user-friendly interface that makes
it appealing to advanced users, while its simple to use full "auto"
mode won't intimidate novices. The camera's ergonomic design looks and feels
a lot like a conventional 35mm SLR, with an elongated lens barrel and a lightweight
magnesium alloy body with plastic outer panels hosting slightly fewer (and thus
less daunting) dials, switches, and buttons than the A2. Old-line SLR users
will greatly appreciate the direct-coupled manual zoom control that dramatically
improves responsiveness over the "fly by wire" approach used in most
current digital cameras. As with the A1 and A2 models, Konica Minolta has packed
a lot of functions into a very workable layout, with a range of features normally
found only on more expensive professional-level digital cameras.
A 2/3-inch interlaced primary-color CCD with 8.3 million
pixels (8.0 million effective), provides a maximum resolution of 3,264 x 2,448
pixels. The CCD's light sensitivity ranges from ISO 50 to 800, and may be automatically
controlled by the camera or manually selected by the user. The DiMAGE A200's
color space selections include three sRGB options (Natural, Vivid, and Portrait
color), in addition to an embedded-profile Adobe RGB option for professional
use in a color-managed environment.
The Konica Minolta DiMAGE A200 continues with the same
advanced apochromat 7x zoom GT Lens that was so impressive on previous models
in the line. Comprised of 16 glass elements in 13 groups, the GT lens has two
anomalous dispersion (AD) and two aspheric glass elements for sharp, detailed
images with minimal distortion and glare. The 7.2-50.8mm focal range (equivalent
to a 28-200mm zoom in 35mm format) provides the flexibility for wide-angle interior
and landscape shots, as well as close-up portraits and distant action in sports
photography. As noted, the manual zoom ring is a pleasure to use, with a wide
rubberized grip and smooth, mechanically-coupled lens action. A maximum aperture
that ranges from f/2.8-f/3.5 (depending on the focal length setting) is fairly
"fast," helpful for low-light and action photography. The Macro capability
lets you capture subjects as close as 9.8 inches from the CCD, which translates
to a very small 1.5 x 2.0-inch minimum capture area with the lens at the telephoto
end of its range. A host of focus controls provides a lot of flexibility, and
an on-demand manual focus option lets you tweak the autofocus setting without
switching from auto to manual focus mode.
For composing images, the Konica Minolta DiMAGE A200 offers
an electronic viewfinder (EVF), with a resolution of 235,000 dots that's more
typical of current competitors (the A2 had a much higher resolution of about
922,000 dots, or 640 x 480 pixels, each consisting of three dots). The camera's
1.8-inch LCD monitor features a tilt/swivel design, making it more flexible
for unique or difficult shooting angles. The LCD panel actually lifts off of
the rear panel and flips around forward, so that you can then rotate it 270
degrees. Both displays feature full information displays, a histogram option,
and two alignment display modes (grid and scale).
The Konica Minolta A200's exposure system offers three
metering options: 256-segment Multi-Segment, Center-Weighted, and Spot. The
default Multi-Segment option divides the image into 256 separate areas, placing
emphasis on the main subject, but integrating luminance values, color, and autofocus
information from across the image to accurately calculate exposure. Like similar
AE metering systems on other cameras, the Center-Weighted and Spot metering
options place most of the exposure emphasis either on the central portion of
the frame, or on a small spot at the very center of the frame, respectively.
Exposure modes include Auto, Programmed AE, Aperture Priority, Shutter Priority,
and Manual, plus four Digital Subject Programs specifically set up for Portrait,
Sports, Night Portrait, and Sunset exposures. These presets use not only aperture
and shutter speed settings to best capture the subjects, but also Konica Minolta's
exclusive CxProcess III image processing to optimize color balance and skin
tones.
On top of all these features, the Konica Minolta DiMAGE
A200 also provides Color Saturation, Contrast, and Filter (hue) adjustments,
through the camera's Function menu. The Digital Effects adjustments are particularly
notable for their fine gradations and wide range, allowing you to customize
the camera's color and tonal response to precisely match your personal preferences.
A Color Mode option offers special color effects and a black and white shooting
mode, which can be adjusted via the Filter Effects setting. Exposure Compensation
is adjustable from -2 to +2 EV in one-third-step increments. An Auto Exposure
Bracketing option for taking three bracketed exposures of an image automatically,
features two different values adjustable to either 1/3 or 1/2-stop increments.
In addition to exposure, this feature can also bracket white balance. A customizable
AE Lock button can be set to lock only exposure, or both exposure and focus.
White Balance is adjustable to one of seven preset options (Daylight, Tungsten,
two Fluorescent settings, Cloudy, Shade, and Flash settings), along with Auto
and Manual options. Shutter speeds range from 1/3,200 to 30 seconds (1/1,600
to 30 in Shutter Priority and Manual mode; 1/3,200 is only available at f/8),
with a Bulb setting that permits manual control of exposures as long as 30 seconds.
Maximum lens apertures are f/2.8 at the wide-angle end and f/3.5 at telephoto.
A real-time histogram display mode helps verify exposure before capturing the
image. (There's a histogram display option available in Playback mode as well.)
The Konica Minolta A200's autofocus system can determine
focus in several ways: Wide Focus Area looks at a large area across the middle
of the frame (indicated on the LCD by a set of widely spaced brackets) and chooses
a point of focus that is indicated with a red rectangle (except in Continuous
AF mode); Spot Focus Area reads information from eleven user-selectable rectangular
areas arrayed roughly across the center of the screen, and Flex Focus Point
lets you move a target cross-hair to virtually any position within the central
80% of the viewfinder, so you can focus on off-center subjects without having
to aim, lock focus, and then recompose the shot.
In Manual Focus mode, a rectangular
area is outlined in white. With a press of the Four-way's center button, the
outline turns blue and the rectangle can be moved around the screen with the
arrow pad. When the focus ring is turned (a fly-by-wire-type ring around the
lens body, close to the camera) the display is zoomed in to show only the rectangular
area to make focusing easier. A small map appears on the right of the screen
indicating what is being displayed relative to the rest of the image.
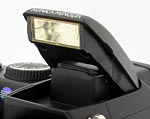
The built-in, pop-up flash operates in Fill-Flash, Fill-Flash
with Red-Eye Reduction, Slow-Sync, and Rear Flash Sync modes, with Flash Compensation
available from -2 to +2 exposure equivalents (EV) in one-third-step increments.
A top-mounted hot shoe lets you attach Konica Minolta external flash units (and
any compatible third-party units). A manual flash mode fires the onboard flash
at full, 1/2, 1/4, 1/8 or 1/16 power. Since manual flash mode doesn't use a
pre-flash, it's perfect for driving studio strobes via conventional slave triggers.
Additional Konica Minolta DiMAGE A200 features include
a Movie (with sound) mode with Night exposure option; Standard, High Speed,
and Ultra-High Speed Continuous Advance modes; 2x standard or 4x interpolated
Digital Zoom; two- or 10-second Self-Timer; and three Sharpness settings. Four
image quality levels include a RAW uncompressed setting, and a choice of Extra
Fine, Fine, or Standard JPEG compression settings. The DiMAGE A200 also allows
both RAW and JPEG files to be recorded simultaneously for each image captured.
Resolution options for still images include 3,264 x 2,448; 3,264 x 2,176; 2,560
x 1,920; 2,080 x 1,560; 1,600 x 1,200; and 640 x 480 pixels. Movie resolution
options include 800 x 600, 640 x 480, and 320 x 240 pixels, with frame rates
of either 15 or 30 frames per second (the 800 x 600 resolution is restricted
to 15 frames per second only), and recording times of up to 15 minutes per video
segment possible, depending on resolution, frame rate, and memory card speed.
Powered by one NP-800 rechargeable lithium-ion battery
pack (an optional AC power adapter is available), the DiMAGE A200 represents
a versatile package for the serious amateur or prosumer photographer. Its manually
operated zoom control is useful, fast, and precise. USB and A/V cables also
accompany the camera, for connection to a computer or television set, as does
a wireless remote control. A selection of software including the latest DiMAGE
Viewer for both Macintosh and Windows-based computers, and Ulead VideoStudio
8 SE for Windows-based computers also accompanies the camera.
When it comes time to print your photos, the Konica Minolta A200 supports the
PictBridge protocol (when its USB interface is set to "PTP" mode),
for printing directly to compatible photo printers, without having to resort
to using a computer. The extent of PictBridge support varies greatly
between cameras, and the A200's support is more robust than many. Provide that
it's connected to a printer that offers an equivalent level of support and control,
you can select paper size, bordered or borderless, print quality, and date imprint
options directly from the camera's menu system. To my mind, PictBridge printing
is one of the most important developments in the digital camera field in the
last year or so, and the A200's implementation of it is better than most.
Design
 The
latest addition to the A series of the DiMAGE line, the Konica Minolta DiMAGE
A200 is a slightly smaller, pared-down version of the A2, though it does feature
a few design improvements over the previous model. The slightly smaller body
of the A200 houses an 8.0-megapixel CCD and the same 7x optical zoom lens, but
in place of a swiveling electronic optical viewfinder, the A200 offers a non-movable
EVF and a 270-degree vari-angle LCD monitor that lifts off of the back panel
and flips forward before swiveling. Other updates include a higher movie resolution
(800 x 600 pixels), an optional interpolated 4x digital zoom setting, and a
new CX Process III image processor, among other slight differences.
The
latest addition to the A series of the DiMAGE line, the Konica Minolta DiMAGE
A200 is a slightly smaller, pared-down version of the A2, though it does feature
a few design improvements over the previous model. The slightly smaller body
of the A200 houses an 8.0-megapixel CCD and the same 7x optical zoom lens, but
in place of a swiveling electronic optical viewfinder, the A200 offers a non-movable
EVF and a 270-degree vari-angle LCD monitor that lifts off of the back panel
and flips forward before swiveling. Other updates include a higher movie resolution
(800 x 600 pixels), an optional interpolated 4x digital zoom setting, and a
new CX Process III image processor, among other slight differences.
The Konica Minolta DiMAGE A200 is similar in design to a traditional 35mm SLR,
with an elongated lens barrel that comprises most of the camera's mass, with
a hand grip on the right. Control layout is a little different from the DiMAGE
A2, but is logical and intuitive (once you get the hang of things). The DiMAGE
A200's slightly bulky body measures 4.5 x 3.1 x 4.5 inches (114 x 80 x 115 millimeters)
with the lens at its shortest position, but the plastic body panels make it
relatively lightweight for its size (approximately 20.3
ounces, or 576 grams with an NP-800 battery and CompactFlash card loaded).
Nonetheless, it's a handful. An accessory camera bag would certainly be the
preferred method of carrying and storing the Konica Minolta A200, but the camera
does come with a neck/shoulder strap.

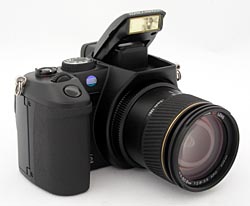
The camera's front panel features the Konica Minolta GT 7x Zoom lens, Self-Timer light, remote control receiver, and the front of the pop-up flash compartment. Encircling the lens are two adjustment rings: a rubberized grip on the front end for actuating the zoom lens, and a ribbed Manual Focus ring at the base of the lens. A set of 49mm filter threads on the inside lip of the zoom lens accommodates filters and conversion kit accessories, but I'd caution readers to be careful how heavy a lens they attach there. Because the threads are on the lens barrel itself, the zoom mechanism must support any weight attached there. (At least the zoom lens is built around a manually-actuated mechanism, which strikes me as being a good bit more rugged than the electronically-actuated designs used on most digicams.) A pair of tabs on the outside edge of the lens serve as a mount for the included lens hood, which slides into the grooves and then turns 90 degrees clockwise to click into place. The Self-Timer light and remote control receiver are behind a red sensor window, just below the Konica Minolta emblem. Also visible from the front of the camera are the Shutter button and Front Control dial, located at the top of the hand grip. A small indentation and ridge combination near the top of the hand grip comfortably cradles your middle finger as it curls around the grip.
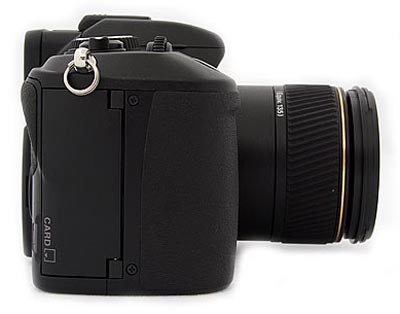
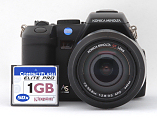
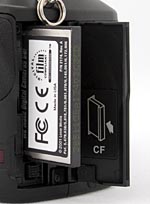
The right side of the camera holds the CompactFlash memory card slot, covered by a hinged plastic door. The Konica Minolta A200 accommodates Type I or II CF memory cards, including MicroDrives. At the very top of the right panel is one of the two neck strap attachment eyelets.
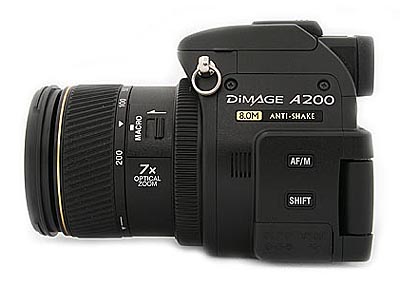
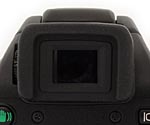
The left side of the camera features only a small number of controls (the previous A2 had a host of knobs and buttons here). The Auto/Manual Focus switch and Shift buttons are centered and just below center on the left side, with a Macro switch tucked on the side of the lens. A small speaker grille is located between the macro switch and AF/M button. The second neck strap attachment eyelet is at the top, almost at the front edge of the pop-up flash. A shared-use A/V Out / USB 2.0 jack and the DC-In port are safely protected by a flexible, rubbery flap just below the Shift button. Also visible on this side, at the edge of the electronic viewfinder eyepiece, is the diopter adjustment dial, which adjusts the viewfinder display to accommodate eyeglass wearers.
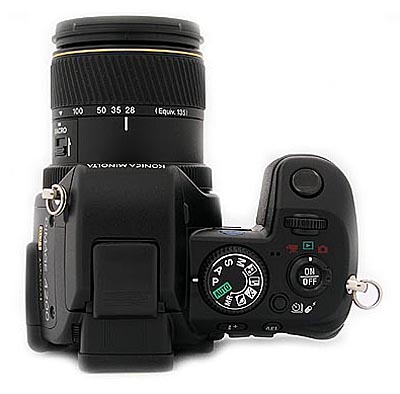
The Konica Minolta A200's top panel accommodates the pop-up flash compartment, with two small tabs on either side to hook a fingernail under to open the flash, and an external flash hot shoe on top, protected by a sliding plastic cover that can be completely removed from the camera body. The hot shoe employs a custom electrode setup and mounting bracket for Konica Minolta accessory flash units, and so isn't compatible with standard hot-shoe flashes. (Although Konica Minolta does sell a hard-to-find adapter that plugs into the hot shoe and provides a standard PC Sync connector.) In addition, there are a number of controls that access various camera functions, including the Exposure Mode Dial, Shutter button, Control dial, Mode dial, Power button, and Drive button. Also on top of the camera is a tiny microphone, nestled between the Exposure Mode and Mode dials.
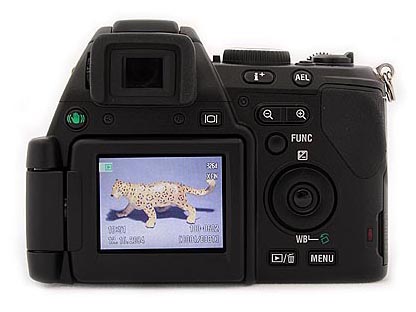
The remaining controls are on the camera's rear panel, along with the electronic viewfinder eyepiece and LCD monitor. The DiMAGE A200's electronic viewfinder (EVF) features a lower resolution TFT LCD than the A2 (235,000 dots instead of 922,000), similar instead to the A1 model. Though the A2's EVF could tilted upward by as much as 90 degrees, the A200's is stationary. The A200 also lacks the A2's eyepiece sensors which automatically turned the EVF on or off, if the camera sensed that your eye was present or not. The 1.8-inch LCD monitor now swivels, and lifts off of the rear panel and flips out so that you can twist it a full 270 degrees. This means that you can turn the LCD monitor around to face the rear panel and then close it, thus protecting it from any dust or minor scratches, or turn it forward for easier self-portrait composition. A sensor on the LCD mechanism senses when the monitor is facing the rear panel, and automatically activates the EVF. Control buttons on the back panel include the Information, AE Lock, Anti-Shake, Display, Magnify/Zoom rocker, Function, Playback / Erase, and Menu buttons, in addition to the Four-way controller and OK button.
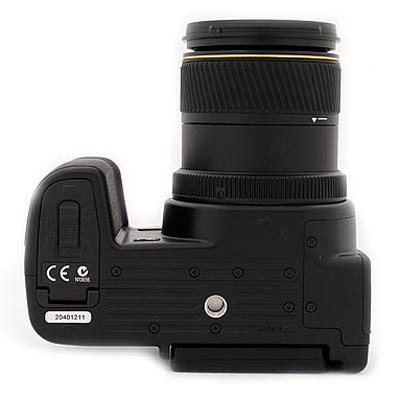
The camera's bottom panel is fairly flat, with a slightly textured grip pad surrounding the metal tripod mount. Also on the bottom panel is the camera's battery compartment, which features a locking, hinged door. Behind this door, the battery is held in place by a sliding lock to keep it from accidentally falling free. The battery compartment is just far enough from the tripod mount to allow quick battery changes while working with a tripod (assuming your tripod uses a small enough mounting plate), something I always look for in a digicam, given the amount of studio shooting I do.
Viewfinder
 The
Konica Minolta A200's electronic optical viewfinder (EVF) features a 0.44-inch
color filter, full color QVGA display, with about 235,000 pixels. (The A2's
EVF offered about 922,000 pixels for a much sharper view.) Whereas the DiMAGE
A2 featured a set of sensors just below the viewfinder to automatically switch
the view between the LCD monitor and EVF, the A200 puts you in charge of the
display location via the Display button on the rear panel. However, the A200
does know if the LCD monitor is stowed and facing the rear panel, as the EVF
is automatically activated whenever the LCD monitor is closed.
The
Konica Minolta A200's electronic optical viewfinder (EVF) features a 0.44-inch
color filter, full color QVGA display, with about 235,000 pixels. (The A2's
EVF offered about 922,000 pixels for a much sharper view.) Whereas the DiMAGE
A2 featured a set of sensors just below the viewfinder to automatically switch
the view between the LCD monitor and EVF, the A200 puts you in charge of the
display location via the Display button on the rear panel. However, the A200
does know if the LCD monitor is stowed and facing the rear panel, as the EVF
is automatically activated whenever the LCD monitor is closed.
 The
EVF shows the same image and information display that appears in the larger
LCD monitor, with a default information overlay that reports basic camera information
such as image resolution and quality settings, camera mode, exposure mode, exposure
information, the number of available images, AF area, and any other exposure
settings (if switched from auto mode). Pressing the Information (i+) button
on the rear panel controls the image and information displays. A single press
adds a histogram to the information overlay, while a second press disables all
information, leaving only the AF area. A fourth press disables the AF target,
and a fifth press returns to the default display.
The
EVF shows the same image and information display that appears in the larger
LCD monitor, with a default information overlay that reports basic camera information
such as image resolution and quality settings, camera mode, exposure mode, exposure
information, the number of available images, AF area, and any other exposure
settings (if switched from auto mode). Pressing the Information (i+) button
on the rear panel controls the image and information displays. A single press
adds a histogram to the information overlay, while a second press disables all
information, leaving only the AF area. A fourth press disables the AF target,
and a fifth press returns to the default display.
A Diopter Control dial adjusts the viewfinder to accommodate eyeglass wearers,
across a range of -5 to +2 diopters. The viewfinder has a fairly high eyepoint,
making it reasonably usable with eyeglasses, but the field of view is slightly
restricted when your eye is further from the eyepiece.
 The
rear-panel, 1.8-inch, TFT color LCD monitor also offers a bright, clear image
display. The LCD monitor lifts off of the rear panel and flips around toward
the front, and can then swivel a total of 270 degrees to face just about any
shooting angle. A bonus with this design is that you can "close" the
LCD monitor and thereby protect it from incidental scratches and dust, by flipping
it around to face the rear panel and then snapping it shut. Like the electronic
viewfinder, the LCD monitor displays a range of exposure and camera information
in both Record and Playback modes, activated by the "i+" button. Pressing
the Shift and Information buttons together accesses the LCD's grid and scale
display modes. The Grid option divides the image area into 20 small squares,
like grid paper, so that you can more easily align subjects. In Scale mode,
an x,y axis divides the image area into fourths, with tiny lines on each axis
to approximate distance.
The
rear-panel, 1.8-inch, TFT color LCD monitor also offers a bright, clear image
display. The LCD monitor lifts off of the rear panel and flips around toward
the front, and can then swivel a total of 270 degrees to face just about any
shooting angle. A bonus with this design is that you can "close" the
LCD monitor and thereby protect it from incidental scratches and dust, by flipping
it around to face the rear panel and then snapping it shut. Like the electronic
viewfinder, the LCD monitor displays a range of exposure and camera information
in both Record and Playback modes, activated by the "i+" button. Pressing
the Shift and Information buttons together accesses the LCD's grid and scale
display modes. The Grid option divides the image area into 20 small squares,
like grid paper, so that you can more easily align subjects. In Scale mode,
an x,y axis divides the image area into fourths, with tiny lines on each axis
to approximate distance.
 In
Playback mode, the Konica Minolta DiMAGE A200 optionally displays a fair amount
of image information, which is again controlled by the i+ button. The
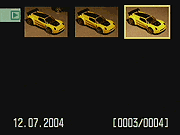
"-" end of the Magnify rocker button pulls up an index display, showing
nine thumbnail images at a time. The Magnify button
also enlarges captured images (JPEG only, not RAW format), so that you can more
closely check on fine details. Through the Playback menu, you can set the amount
of digital enlargement to 2x, 4x, or 10x. A histogram feature is also available
in Playback mode, by pressing the up arrow key.
In
Playback mode, the Konica Minolta DiMAGE A200 optionally displays a fair amount
of image information, which is again controlled by the i+ button. The
"-" end of the Magnify rocker button pulls up an index display, showing
nine thumbnail images at a time. The Magnify button
also enlarges captured images (JPEG only, not RAW format), so that you can more
closely check on fine details. Through the Playback menu, you can set the amount
of digital enlargement to 2x, 4x, or 10x. A histogram feature is also available
in Playback mode, by pressing the up arrow key. 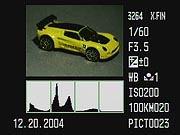 Pressing
the up-arrow of the four-way controller when in playback mode brings up a useful
exposure-information display that includes a large histogram graph and readouts
showing image size/quality setting, shutter speed and aperture, exposure bias,
white balance setting, ISO, date of capture, and the folder and file name for
the image file on the camera's memory card.
Pressing
the up-arrow of the four-way controller when in playback mode brings up a useful
exposure-information display that includes a large histogram graph and readouts
showing image size/quality setting, shutter speed and aperture, exposure bias,
white balance setting, ISO, date of capture, and the folder and file name for
the image file on the camera's memory card.
Optics
| Free Photo Lessons | |
|
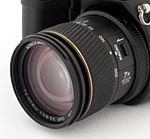 Equipped
with a 7.2-50.8mm glass lens with multiple aspherical elements, the Konica Minolta
DiMAGE A200's lens is equivalent to a 28-200mm lens on a 35mm camera (the lens
barrel proudly reports these equivalency numbers). The 28mm wide angle setting
is particularly welcome, since most digicam lenses don't go that wide without
accessory lens adapters. Likewise, 200mm is a good medium telephoto length,
about as long as most folks can comfortably hand-hold without image stabilization,
although Konica Minolta's Anti-Shake feature should greatly help out here. Unlike
most digital cameras I've worked with, the lens zoom operates by rotating a
collar around the lens barrel, coupled mechanically to the lens elements themselves.
I like the precise control this gives, as opposed to the rocker switch controlled
motor that most digital cameras use to rack the lens in or out. It definitely
requires two hands, but the direct manual control will feel great to photographers
accustomed to film-based SLRs. (I will say though, that while it's nice and
tight (and overall somewhat better-feeling than on earlier A-series models),
the action of the zoom lens feels a little cheap, with more of a plastic-on-plastic
feel, rather than the smooth lubricated-metal feeling I'm accustomed to in higher-end
removable SLR lenses.)
Equipped
with a 7.2-50.8mm glass lens with multiple aspherical elements, the Konica Minolta
DiMAGE A200's lens is equivalent to a 28-200mm lens on a 35mm camera (the lens
barrel proudly reports these equivalency numbers). The 28mm wide angle setting
is particularly welcome, since most digicam lenses don't go that wide without
accessory lens adapters. Likewise, 200mm is a good medium telephoto length,
about as long as most folks can comfortably hand-hold without image stabilization,
although Konica Minolta's Anti-Shake feature should greatly help out here. Unlike
most digital cameras I've worked with, the lens zoom operates by rotating a
collar around the lens barrel, coupled mechanically to the lens elements themselves.
I like the precise control this gives, as opposed to the rocker switch controlled
motor that most digital cameras use to rack the lens in or out. It definitely
requires two hands, but the direct manual control will feel great to photographers
accustomed to film-based SLRs. (I will say though, that while it's nice and
tight (and overall somewhat better-feeling than on earlier A-series models),
the action of the zoom lens feels a little cheap, with more of a plastic-on-plastic
feel, rather than the smooth lubricated-metal feeling I'm accustomed to in higher-end
removable SLR lenses.) The Konica Minolta DiMAGE A200's autofocus system offers both Single-Shot and Continuous AF settings. In Single-Shot AF, the camera only sets the focus once when the Shutter button is halfway depressed. In Continuous AF mode, it adjusts focus at all times, continuously keeping the frame in focus while the shutter button is depressed. The DiMAGE A200 lets you determine the area of the image the camera uses to set the focus from, by selecting one of three autofocus options: Wide Focus Area, Spot Focus Point, and Flex Focus Point. The default option is Wide Focus area, indicated by a set of four widely-spaced brackets in the viewfinder image. By pressing and holding down the center of the Four-way Arrow controller pad, you can switch between Wide Area and Spot Point autofocusing modes (the latter indicated by a target crosshair in the center of the viewfinder). Wide Area AF bases its focus on the most prominent subject detail in the portion of the image that falls within the AF brackets, and in Single-Shot AF mode displays the chosen AF area with a red rectangle. In Continuous Mode AF, the camera is constantly focusing, so no positive AF indication is given before shutter release. In Spot AF a grid of eleven AF points is displayed from which you can select with the four arrow buttons; this AF point remains selected until reset by the user. Spot Focus bases its focus on the very center of the frame, where the target crosshair reside. Press the center "OK" button inside the four-way controller, and the crosshair changes to blue: you've entered Flex Focus (must first be enabled in the Record Menu), which lets you move the focus point to anywhere within about 80% of the frame by manually moving the target crosshair around the image area with the arrow buttons.
Exposure
| Free Photo Lessons | |
|
In straight Auto mode, the camera controls everything about the exposure, except for flash, zoom, and focus. Program AE mode keeps the camera in charge of the exposure, while you have control over all other exposure options. Aperture Priority mode lets you select the lens aperture setting, from f/2.8 to f/11 depending on the zoom setting, while the camera selects the most appropriate corresponding shutter speed from 30 seconds to 1/3,200 (note that 1/3,200 is only available at f/8 or above though, the limit being 1/1,600 with wider apertures). In Shutter Priority mode, the user selects the shutter speed, from 1/1,600 to 30 seconds, while the camera chooses the best corresponding aperture setting. Switching to Manual mode gives you control over both shutter speed and aperture from 30 seconds to 1/1,600, with a Bulb setting available for longer exposures. (For some reason, Manual mode doesn't give you the option for the 1/3,200 shutter speed, even when the aperture is set to f/8 or higher.) Exposure time in Bulb mode is determined by how long you hold down the Shutter button, up to a maximum of 30 seconds. (I strongly recommend use of the optional wired remote in Bulb mode, as the pressure of your finger on the Shutter button is bound to jiggle the camera somewhat, blurring the image.)
As described above, the Konica Minolta DiMAGE A200 also offers four preset
scene modes (referred to as Digital Subject Programs), accessed via the Exposure
Mode dial. Portrait mode produces better-looking people shots by enhancing skin
tones and decreasing the depth of field (to create a slightly blurred background).
Sports mode provides faster shutter speeds to freeze action, and is supposed
to maintain focus on quickly moving subjects better. (I have no way to verify
the enhanced AF performance though.) In Sunset mode, the camera employs slightly
slower shutter speeds to let in more of the ambient light, and lets you record
the warm colors of the scene without compensating for them in the white balance
system. In Night Portrait mode, the camera also uses a slower shutter speed
to allow more ambient light into the image, however it also records true black
values and preserves the bright colors of artificial lighting. The Exposure
Mode dial also features a Memory Recall setting, which lets you save as many
as five registers of settings. Selecting a setting
automatically applies the settings to the camera, which can be recalled by turning
the Exposure Mode dial to another position.
The Konica Minolta A200's default metering mode is a 256-segment evaluative
system, which takes readings throughout the image to determine exposure. Center-Weighted
and Spot metering options are also available. Spot metering is useful for high-contrast
subjects, as it bases the exposure reading on the very center of the image,
letting you set the exposure based on a small portion of your subject. Center-Weighted
metering also bases the exposure on the center of the image, but the camera
takes its readings from a much larger area in the middle of the frame. You can
also hold or lock the exposure reading for a particular part of the image by
pressing the AE Lock button on the back panel. This button
can be programmed to act as either a "hold" or "toggle"
control. "Hold" mode does just that, it holds the current setting
until you release the AE Lock button again. Toggle mode locks and releases the
exposure/focus setting with successive actuations of the AE Lock button.
Halfway pressing the Shutter button also locks exposure and focus, but only
in autofocus mode.
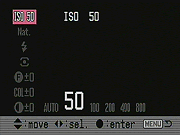
The DiMAGE A200's light sensitivity can be set to Auto, or to ISO equivalents
of 50, 100, 200, 400, or 800. As with other consumer and prosumer digicams that
sport ISO 800 options though, I didn't find the ISO 800 setting to be particularly
useful, because image noise levels were so high. A Noise
Reduction option is available for longer exposures and higher ISO settings,
reducing somewhat the amount of image noise that would otherwise result, but
doesn't have any effect on shorter exposures at high ISO. Exposure compensation
is adjustable from -2 to +2 exposure equivalents (EV) in one-third-step increments,
and an auto-bracketing option can snap three shots in rapid succession, varying
the exposure between each in steps of 0.3 or 0.5 EV units. Exposure
compensation is adjusted by pressing the up arrow on the Four-way Arrow pad,
which displays the Exposure Compensation and Flash Exposure Compensation adjustment
scales. Use the up and down arrows to select an adjustment scale, and either
the left and right arrows or the Control dial to change the setting. The Auto
Exposure Bracketing option is enabled through the Drive button, and you can
set the bracketing parameters once you've selected Bracketing mode. (The A200's
bracketing option is also available for white balance.)
Like the DiMAGE A1 and A2 before it, the Konica Minolta A200 offers very flexible
control over white balance, color rendition, and tonal range. Its white balance
system offers a total of nine options, including Auto, Daylight, Tungsten, Fluorescent
(two settings), Cloudy, Shade, Flash, and Custom, which is the manual setting.
The Custom Set mode determines white balance by snapping a picture of a white
card. The camera then adjusts its color balance to render the white card with
a neutral hue, and saves the setting as the Custom option. Two
Custom settings can be saved, very useful if you need to switch back
and forth between different lighting conditions quickly.
Contrast and Color Saturation controls are adjustable in 11 steps across a fairly
broad range of settings, and are accessed through the Function menu. The DiMAGE
A200 also offers a Filter (hue) setting in the Function menu. Depending on the
color mode selected through the Custom Settings menu, the Filter option adjusts
the overall color cast of the image, again in 11 steps. The color range here
varies from blue to yellow, exactly the color axis that you'd want to adjust
to compensate for different color temperatures in your lighting. Positive adjustments
warm the image, while negative adjustments produce a cooler color balance. In
Black and White mode, the Filter effect tones the image from neutral to red,
green, magenta, blue, and back to neutral (zero position).
The combination of fine steps and wide adjustment ranges in the Digital Effects
controls mean you can really customize the A200 to exactly suit your preferences
for color and tonality. Most cameras offering saturation, white point, and contrast
variations treat them more as special effects, rather than as adjustments for
fine-tuning camera response.
The Color Mode option of the Record menu offers Natural
and Vivid sRGB color modes, as well as Embedded Adobe RGB, Black and White,
and Portrait settings. Adobe RGB color space has a much broader gamut or range
of reproducible colors than does sRGB, the color space used by most digital
cameras and computer monitors. (The Embedded designation simply means that the
color space information is embedded in the image file.) Adobe RGB images will
look rather dull when displayed on monitors tuned to the sRGB standard, but
when used in a color-managed work environment, they can capture and reproduce
a much greater range of colors. The Portrait setting optimizes color for captivating
portraits, using the sRGB color space. The record menu also offers a Sharpness
adjustment, for controlling the amount of in-camera sharpening applied to an
image.
Drive Modes
The Konica Minolta DiMAGE A200 features several Drive mode settings, accessed
by pressing the Drive button and selecting from the Drive menu with the control
dial. Within the Continuous Advance option, you can choose between Standard,
High Speed, and UHS (Ultra High Speed) modes. In standard Continuous Advance,
the DiMAGE A200 captures a maximum of five frames at approximately two frames
per second. High Speed mode captures a maximum of five full-size frames at approximately
2.3 frames per second. (Note that the monitor shuts off during the High Speed
series.) Finally, UHS mode captures 40 640 x 480-pixel images at about 10 frames
per second, regardless of the current image quality setting. Focus is locked
with the first frame, regardless of the focusing mode. (In Standard mode, if
the focus is set to Continuous, the camera will adjust focus for each shot and
thus slow down the frame rate.)
As mentioned above, the Drive
setting also accesses the Self-Timer and Auto Exposure Bracketing modes. The
Self-Timer fires the shutter either two or ten seconds after the shutter button
is pressed. The shorter delay is very handy when you need to prop the camera
on something to take a photo in dim lighting, and don't want the pressure of
your finger on the Shutter button to jiggle the camera. The ten-second delay
is long enough that you can run around to get into the photo yourself. An LED
lamp on the front of the camera blinks and the camera beeps as the self timer
is counting down, the blink and beeps becoming faster in the last few seconds.
Auto Exposure Bracketing mode captures a series of three
images (one at the metered exposure, one underexposed, and one overexposed).
You can set the exposure variation between exposures to 0.3 or 0.5 EV. The A200's
automatic bracketing also lets you bracket white balance, offering two bracketing
modes. WB1 has a smaller bracket size than WB2, but both bracket three images:
one at the normal setting, one cooler, and one warmer.
The Drive setting also offers a Remote Control mode, for use with the included
wireless remote control unit. The DiMAGE A200's remote control can operate the
camera from about 13.1 feet (4 meters) away, and the Remote Control mode simply
tells the camera to respond to the remote unit. The remote unit has a Four-way
Arrow pad that adjusts optical and digital zoom, and has a two-second Self-Timer
button in addition to a shutter release.
Movie Mode
The Konica Minolta A200 has a Movie mode that
records moving images with sound, for as many as 15 minutes per clip (though
the manual notes that low light levels can shorten the maximum recording time).
The amount of recording time appears in the LCD or EVF monitor display, and
varies with the resolution and frame rate of the movie, the available CompactFlash
card space, and the speed of the memory card. Movies are recorded at either
800 x 600; 640 x 480; or 320 x 240-pixel resolutions, with frame rates of approximately
15 or 30 frames per second. (800 x 600-pixel resolutions can only be recorded
at 15 frames per second.) Through the Record menu, you can set the movie mode
to Standard or Night modes. Night mode records black and white movies in low
lighting situations, and is far more effective in dim lighting than the vast
majority of digicam movie options I've seen.
Flash
 The
Konica Minolta DiMAGE A200 features a built-in, pop-up flash, which operates
in either Fill-Flash, Fill-Flash with Red-Eye Reduction, Slow-Sync with Red-Eye
Reduction, or Rear Flash sync. To release the flash from its compartment, pull
on the two small tabs on either side of the casing and lift up the flash head.
Close it again by simply pushing the flash head back down. The Flash mode is
changed through the Function menu. In Fill-Flash mode, the flash fires with
every exposure, regardless of lighting conditions. Fill-Flash with Red-Eye Reduction
fires a series of small pre-flashes before firing the flash at full power for
the exposure itself. This makes your subjects' pupils contract and reduces the
occurrence of the Red-Eye effect. Slow-Sync mode times the flash with a slower
shutter speed, firing the flash at the beginning of the exposure. The Rear Flash
Sync mode fires the flash at the end of the shutter time, rather than the beginning.
If you have moving objects in a relatively brightly lit environment, this will
produce a sharp image of your subject, with a "motion trail" following
behind it. The flash is in the Off position when it's closed.
The
Konica Minolta DiMAGE A200 features a built-in, pop-up flash, which operates
in either Fill-Flash, Fill-Flash with Red-Eye Reduction, Slow-Sync with Red-Eye
Reduction, or Rear Flash sync. To release the flash from its compartment, pull
on the two small tabs on either side of the casing and lift up the flash head.
Close it again by simply pushing the flash head back down. The Flash mode is
changed through the Function menu. In Fill-Flash mode, the flash fires with
every exposure, regardless of lighting conditions. Fill-Flash with Red-Eye Reduction
fires a series of small pre-flashes before firing the flash at full power for
the exposure itself. This makes your subjects' pupils contract and reduces the
occurrence of the Red-Eye effect. Slow-Sync mode times the flash with a slower
shutter speed, firing the flash at the beginning of the exposure. The Rear Flash
Sync mode fires the flash at the end of the shutter time, rather than the beginning.
If you have moving objects in a relatively brightly lit environment, this will
produce a sharp image of your subject, with a "motion trail" following
behind it. The flash is in the Off position when it's closed.
For use with studio strobes and conventional slave triggers,
the DiMAGE A200 also has a manual flash power option. This lets you set the
flash power to Full, 1/2, 1/4, 1/8, or 1/16 power manually. In this mode, the
flash fires only once, at the moment of exposure. The single flash pulse prevents
false triggering when working with conventional slave triggers.
The Konica Minolta A200 also includes a top-mounted hot shoe for attaching an external flash unit. The shoe design and contact arrangement are set up for Konica Minolta's own dedicated flash units, but I imagine that compatible models are available from the major third-party flash manufacturers (Sunpak et. al.). Konica Minolta's own Program Flash models 2500(D), 3600HS(D), and 5600HS(D) work with the DiMAGE A2, and two macro flashes (Macro Twin Flash 2400 and Macro Ring Flash 1200) will work with an accessory macro flash controller. Konica Minolta also makes an adapter (part number PCT-100) that takes the proprietary hot shoe contacts to a standard PC-style sync connector, but from all I've heard, this accessory is virtually impossible to find at retail.
Shutter Lag/Cycle Times
When you press the shutter release on a digital camera, there's usually a delay or lag time before the shutter actually fires. This time allows the autofocus and autoexposure mechanisms to do their work and can amount to a significant delay in some situations. Likewise, the delay from shot to shot can vary greatly, and is also important to the picture-taking experience. Since these numbers are rarely reported by manufacturers or reviewers (and even more rarely, reported with accuracy), I routinely measure both shutter lag and cycle times using an electronic test setup I designed and built for the purpose. (Crystal-controlled timing, with a resolution of 0.001 second.) Here are the numbers I collected for the Konica Minolta DiMAGE A200:
| |
||
| |
(secs) |
|
| Power On -> First shot | |
Fairly fast.
(Lens doesn't have to telescope out.) |
| Shutdown | |
First time is simple shutdown,
second time is worst-case buffer-clearing time. First time is quite fast,
due to no need for lens to retract. Second is rather long, but note that
it corresponds to saving five 8-megapixel RAW images to the memory card
before shutdown. |
| Play to Record, first shot | |
Time until
first shot is captured. Fairly fast. |
| Record to play | |
First time is that required
to display a large/fine file immediately after capture, second time is
that needed to display a large/fine file that has already been processed
and stored on the memory card. First time is somewhat slow, second is
very fast. |
| Shutter lag, full autofocus | |
First time is at full wide-angle, second is full telephoto. Both times are faster than average, particularly for a camera with a long-ratio zoom lens. |
| Shutter lag, continuous autofocus | 0.61 |
As is usually the case, continuous AF mode doesn't help lag time at all, at least with stationary subjects. |
| Shutter lag, manual focus | 0.34 |
Reasonably fast. |
| Shutter lag, prefocus | |
Time to capture, after half-pressing
shutter button. Very fast. |
| Cycle Time, max/min resolution JPEG files | 2.53 / |
First number is for large/fine files, second number is time for "TV" mode (640x480) images. Times are averages. In large/fine mode, shoots 11 frames this fast, then slows to about 4 seconds per shot, and clears the buffer in 15 seconds. In TV mode, shoots this fast indefinitely, clearing the buffer after each shot. Reasonable speed for an 8-megapixel camera, good buffer depth. (A good bit slower than the DiMAGE A2 though.) |
| Cycle Time, RAW | 5.23 | Times are averages. Shoots 5 frames this fast, then slows to 8.74 seconds per shot, and clears the buffer in 24 seconds with a Lexar 80x CF card. Not bad for a RAW mode, but much slower than was the A2 model. (The A200's buffering doesn't seem to make nearly as much of a difference as did the A2's.) Clearing times with slower CF cards would be longer. |
| Cycle Time, RAW + JPEG | 10.40 | Times are averages, measured with a Lexar 80x CF card. (Times with slower memory cards would be longer.) Apparently no buffering at all, each shot takes this long to complete, camera finishes writing to the card ~10-11 seconds after the last shot was taken. Still not the slowest RAW mode I've seen on an 8-megapixel camera, but this is slow enough that it won't be useful for much other than landscapes and still lifes. Because there's no buffering involved here, a slower CF card will directly affect your cycle time in this mode. |
| Cycle Time, continuous High mode, max/min resolution / RAW | 0.43 (2.33 fps) |
Times are averages. Cycle time is 0.51 seconds for five frames, regardless of resolution. Buffer clears in 13 seconds for large/fine images, 8 seconds for lowest resolution files, and 37 seconds for RAW files, all with a Lexar 80x CF card. (Slower cards will clear more slowly.) Good speed, reasonable buffer clearing times. (Note that the viewfinder blanks out while shooting in this mode.) |
| Cycle Time, continuous Low mode, max/min resolution / RAW | 0.51 (1.95 fps) |
Times are averages. Cycle time is 0.51 seconds for five frames, regardless of resolution. Buffer clears in 12 seconds for large/fine images, 7 seconds for lowest resolution files, and 37 seconds for RAW files, all with a Lexar 80x CF card. (Note that the viewfinder remains "live" in this mode.) |
| Cycle Time, Ultra High Speed mode | 0.10 (10 fps) |
Camera captures forty 640 x 480 pixel images at 10 frames/second. Buffer clears in 13 seconds. Very fast, and 640x480 resolution is good. |
Very good shutter lag, average cycle times. With shutter lag that ranged
from 0.61 - 0.63 second in full autofocus mode, and down to 0.097 second when
"prefocused" (by half-pressing and holding down the shutter button
before the shot itself), the Konica Minolta A200 is pretty quick on the draw,
particularly for a long-zoom model. Shot to shot it was only average, at 2.53
seconds between frames for up to 11 large/fine JPEGs. RAW-mode speed is better
than average at 5.23 seconds/frame, but the buffer memory helps only slightly
there. In continuous mode, cycle time is very good, at 0.51 second for up to
five frames, which translates to 1.96 frames/second. The buffer clears in 12-15
seconds when shooting large/fine JPEGS to a Lexar 80x CF card. Times are all
a fair bit slower than on the A2, particularly RAW-mode cycle times. Also as
on the A2 though, shooting in RAW+JPEG mode is completely unbuffered, although
the A200's cycle time of 10.4 seoconds in this mode is quite a bit better than
that of the A2. Overall, a nicely responsive digicam, well-suited for the amateur
sports shooter.
Operation & User Interface
The Konica Minolta DiMAGE A200's user interface is less daunting than that of the A2, though the camera still offers quite a bit of external control. You can control a lot of the essential camera functions without having to resort to the on-screen LCD menu system, although a few are now accessed via the new Function menu (displayed by pressing the Function button). In addition to the Mode switch and Exposure Mode dial, a control dial on top of the camera adjusts settings with just a quick turn. Though you'll likely be able to snap a quick picture or two with the camera right out of the box, plan on spending more time with the manual to get familiar with the settings menus and dual control button functions on this function-rich camera.
Control Enumeration

Shutter Button: Located on the top right-hand side of the camera, this button
sets exposure and focus (in autofocus mode) when half-pressed, and trips the
shutter when fully pressed.
Control Dial: This ridged wheel sits just behind the Shutter button, conveniently
under your index finger. In Aperture Priority and Shutter Priority exposure
modes, this dial controls either the aperture or shutter speed settings. In
Manual mode, the dial controls shutter speed. In any of the Function menu items,
turning this dial sorts through the available options; it also selects the AF
mode in conjunction with the center button on the Four-way controller.
Mode Dial: Directly behind the Control dial on the top panel, this
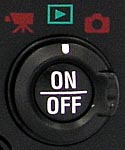
dial sets the camera's main operating mode to Record, Playback, or Movie.
Power Button: Located in the center of the Mode dial,
this button turns the camera on and off.
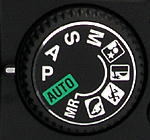
Exposure Mode Dial: Next to the pop-up flash on the camera's top panel,
this dial selects the camera's exposure mode. Options are Manual, Shutter Priority,
Aperture Priority, Program AE, Auto, Memory Recall, Portrait, Sports, Sunset,
and Night Portrait modes.
![]()
Drive Mode Button: Almost hidden between the Exposure Mode and
Mode dials, this small black button accesses the camera's drive mode menu. (The
arrow keys then select the mode setting and any mode options.) Drive modes include
Single, Self-Timer (two or 10 seconds), Remote-Control, Bracketing, and Continuous
Advance.
![]()
Information Button: Angled down from the top panel, closest to the EVF,
this button controls the amount of information displayed on the EVF and LCD
screens while in Record and Playback modes. Holding down
the Shift button while pressing this button accesses the grid and scale LCD
display modes, which help with subject alignment.
![]()
AE Lock Button: To the right of the Information button, this button locks
exposure, and an LCD menu option configures the button
to match your shooting style. The button can be programmed to either toggle
the lock on or off, or only hold the settings while depressed.
![]()
Magnify Rocker Button: Below the Information and AE Lock buttons, this two-way
rocker button controls the digital zoom (either 2x fixed, or 1.1 - 4x interpolated,
depending on the setting in the Record menu). In Playback mode, pressing the
"-" side of the button pulls up an index display of the images on
the memory card, while the "+" side of the button controls playback
enlargement (1.1 to 10x, in fairly small increments).

 Function Button: Directly beneath the Magnify rocker button, this displays
the following Function menu items:
Function Button: Directly beneath the Magnify rocker button, this displays
the following Function menu items:

Four-way Controller and OK Button: To the right of the LCD monitor on the
rear panel, this rocker control steps through selections within the LCD menu
system and interacts with various status messages or requests for confirmation
that appear on the LCD screen. You navigate the menus by pressing one of the
four arrows around the control's periphery, and confirm selections by pressing
the OK button in the center of the control. In Record mode, pressing and holding
the center of the control switches the camera between Wide and Spot autofocus
modes. Once in Spot AF, rocking the control moves the Spot crosshair around
the frame, implementing Konica Minolta's Flex Focus Point mode. The up arrow
accesses the Exposure Compensation and Flash Exposure Compensation settings,
which can be adjusted with the left and right arrows. The down arrow enables
the White Balance menu.
In Playback mode, the right and left arrows scroll through captured images on the memory card, while the up arrow activates a histogram display. The down arrow rotates images in the display.
![]()
QV / Delete Button: Below the Four-way Controller, the QuickView button
lets you quickly switch from Record to a Quick View mode to view just-captured
images. When viewing an image, pressing this button prompts the camera to ask
if you want to delete it.

Menu Button: To the right of the QV / Delete Button, this button calls up
the menu system. Pressing it a second time dismisses it. In Playback, Record,
and Movie modes, pressing this button takes you to the first menu screen for
that mode. However, pressing the Shift and Menu buttons together in any mode
takes you straight to the Setup menu.
![]()
Display Button: Just above the top right corner of the LCD monitor, this
button switches the viewfinder display between the EVF and LCD monitor.

Anti-Shake Button: Above the top left corner of the LCD monitor,
this button toggles the camera's Anti-Shake System on and off.
![]()
Diopter Control Dial: Practically hidden on the left side of the optical
viewfinder, this tiny dial adjusts the viewfinder display to accommodate eyeglass
wearers. It varies the eyepiece diopter setting over a broader-than-average
range.

Focus Button: On the left side of the camera body, this button controls
the focus mode, selecting either Single AF, Continuous AF, or Manual modes.

Shift Button: Directly beneath the
Focus button, this button alters the function of other controls when pressed
in conjunction with a control. In Manual exposure mode, pressing this
button while turning the Control dial lets you adjust the aperture setting.
Pressing this button and the Information button together cycles through the
grid and scale LCD display modes. A combination of the Shift and Menu buttons
takes you straight to the Setup menu, instead of the Record or Playback menu
screens.

Macro Focus Switch: Located on the left side of the lens barrel, this control
engages the macro focusing option. Macro focus may be enabled at either the
wide-angle (28mm equiv.) or at a short range of telephoto focal length settings
of the zoom lens (~175 - 200mm equiv.).
![]()
Manual Focus Ring: Surrounding the base of the lens barrel, this ribbed
ring controls focus when the camera is in Manual focus mode. This is a "fly
by wire" control, in that it isn't directly (mechanically) connected to
the optics, but rather commands an internal motor to move the lens elements.
In "Direct Manual Focus" mode, the camera initially focuses automatically,
then turns control over to the Focus Ring so you can fine-tune the focus manually.
Zoom Control Ring: A rubberized ring around the middle of the lens barrel,
this controls the optical zoom, moving the lens from wide angle to telephoto
positions. Unlike the zoom controls on most digicams I've tested, this collar
on the DiMAGE A200 is directly connected to the lens elements, providing very
fast, precise, sure-footed all-mechanical control.
Battery Compartment Latch: Located in the center of the battery compartment
door on the bottom of the camera, this latch unlocks and opens the battery compartment
cover.
Camera Modes and Menus
Still Capture Mode: Accessed by turning the Mode switch to the red camera
symbol, this is the mode for all still-image capture operations. (Auto, Program
AE, Aperture Priority, Shutter Priority, Manual, Memory Recall, Portrait, Sports,
Sunset, and Night Portrait modes are set through the Exposure Mode dial.)
Playback Mode: Indicated by the green arrow symbol on the Mode switch,
enables playback of previously captured images and movies.
Movie Mode: Accessed by turning the Mode switch to the movie camera icon,
enables capture of movie sequences with sound.
Still Picture Shooting Menu Basic Options
The following three menu screens are available in Record mode by
pressing the Menu button:
 Image
Size: Sets the pixel resolution of captured still images. Choices
are 3,264 x 2,448; 3,264 x 2,176 (3:2); 2,560 x 1,920; 2,080 x 1,560;
1,600 x 1,200; and 640 x 480.
Image
Size: Sets the pixel resolution of captured still images. Choices
are 3,264 x 2,448; 3,264 x 2,176 (3:2); 2,560 x 1,920; 2,080 x 1,560;
1,600 x 1,200; and 640 x 480.
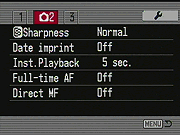 Sharpness:
Selects between varying degrees of in-camera sharpening: Low ("Soft"),
Normal, or High ("Hard").
Sharpness:
Selects between varying degrees of in-camera sharpening: Low ("Soft"),
Normal, or High ("Hard").
 Memory:
Sets up the Memory Recall registers (as many as five), letting you customize
the camera, based on the camera's current settings (you set the camera
how you want it and save the settings here for quick recall later).
Memory:
Sets up the Memory Recall registers (as many as five), letting you customize
the camera, based on the camera's current settings (you set the camera
how you want it and save the settings here for quick recall later).
Movie Shooting Menu Options
 Image
Size: Sets the pixel resolution of captured movies. Choices are 800 x
600; 640 x 480; or 320 x 240 pixels.
Image
Size: Sets the pixel resolution of captured movies. Choices are 800 x
600; 640 x 480; or 320 x 240 pixels.
Playback Menu Options
The Playback menu offers three pages of options, all accessed by pressing
the Menu button.
 Delete:
Lets you delete the current photo, all photos, or only marked photos.
Does not delete photos which have been "locked" with the Lock
option below.
Delete:
Lets you delete the current photo, all photos, or only marked photos.
Does not delete photos which have been "locked" with the Lock
option below.
 Slide
Show: Initiates a slide show of photos on the memory card.
Slide
Show: Initiates a slide show of photos on the memory card.
 Copy: Makes a second copy (at the same resolution size) of images
or movies, with an option to store the copy on another memory card.
Copy: Makes a second copy (at the same resolution size) of images
or movies, with an option to store the copy on another memory card.
Setup Menu Options -
The following menu options are available in any exposure mode, and are accessed
through the Setup tab at the top of any menu screen.
 LCD
Brightness: Adjusts the brightness of the EVF or LCD display, with
eleven steps of brightness adjustment available for each. (This screen
is not available for shooting when the video cable is plugged in. Because
that's how we take these shots, you won't find a screen for it in the
animation to the right.)
LCD
Brightness: Adjusts the brightness of the EVF or LCD display, with
eleven steps of brightness adjustment available for each. (This screen
is not available for shooting when the video cable is plugged in. Because
that's how we take these shots, you won't find a screen for it in the
animation to the right.)
 Shortcut
Help: Displays the available shortcuts associated with external camera
control buttons.
Shortcut
Help: Displays the available shortcuts associated with external camera
control buttons.
 Reset
Default: Resets all menu choices to their factory default values.
(Very handy for getting back to "square one" after making a
number of settings changes.)
Reset
Default: Resets all menu choices to their factory default values.
(Very handy for getting back to "square one" after making a
number of settings changes.)
 Anti-Shake:
Selects whether the Anti-Shake System is activated only during the exposure
itself or any time the Shutter button is halfway pressed. (If you select
"Exposure Only," Konica Minolta cautions to wait a moment after
half-pressing the shutter button before snapping the picture, so the Anti-Shake
system has time to take effect.)
Anti-Shake:
Selects whether the Anti-Shake System is activated only during the exposure
itself or any time the Shutter button is halfway pressed. (If you select
"Exposure Only," Konica Minolta cautions to wait a moment after
half-pressing the shutter button before snapping the picture, so the Anti-Shake
system has time to take effect.)
Image Storage and Interface
 The
DiMAGE A200 uses CompactFlash Type I or Type II memory cards for image storage,
but can also write to SD/MMC cards when the CF1 adapter is used. The camera
ships without a memory card, saving the cost of the essentially useless cards
bundled by most manufacturers with their cameras, which often can only hold
a couple of images at the cameras' maximum resolutions. (Just remember to have
your own CF card on hand when your new camera arrives, to save frustration.)
Third-party CF cards are available separately in memory capacities as high as
six gigabytes, either in the form of conventional Flash Memory, or as a rotating
disc, as in the MicroDrives available from several manufacturers. Thanks to
its support of the FAT32 file system, the camera will be able to fully utilize
these higher-capacity cards. The CompactFlash slot is on the right side of the
camera, covered by a hinged plastic door that opens easily and snaps shut crisply.
The card inserts with the connector edge going in first, and the rear of the
card facing the back of the camera. A small button beside the slot ejects the
card by popping it up slightly, letting you pull the card the rest of the way
out.
The
DiMAGE A200 uses CompactFlash Type I or Type II memory cards for image storage,
but can also write to SD/MMC cards when the CF1 adapter is used. The camera
ships without a memory card, saving the cost of the essentially useless cards
bundled by most manufacturers with their cameras, which often can only hold
a couple of images at the cameras' maximum resolutions. (Just remember to have
your own CF card on hand when your new camera arrives, to save frustration.)
Third-party CF cards are available separately in memory capacities as high as
six gigabytes, either in the form of conventional Flash Memory, or as a rotating
disc, as in the MicroDrives available from several manufacturers. Thanks to
its support of the FAT32 file system, the camera will be able to fully utilize
these higher-capacity cards. The CompactFlash slot is on the right side of the
camera, covered by a hinged plastic door that opens easily and snaps shut crisply.
The card inserts with the connector edge going in first, and the rear of the
card facing the back of the camera. A small button beside the slot ejects the
card by popping it up slightly, letting you pull the card the rest of the way
out.
Although individual CompactFlash cards cannot be write-protected or locked against erasure or manipulation, the DiMAGE A200 lets you lock individual images or groups of images through the Playback menu. Once protected, images cannot be erased or manipulated in any way, except through card formatting. The Playback menu also lets you delete images shown in the LCD display, view an index display, create a custom slide show, set images up for printing on DPOF compliant printers, and copy images via camera memory to a new CF card.
Six image resolution settings are available: 3,264 x 2,448; 3,264 x 2,176 (3:2);
2,560 x 1,920; 2,080 x 1,560; 1,600 x 1,200; and 640 x 480 pixels. Files may
be saved in any one of three JPEG compression levels, as well as a compact RAW
format. (By its nature, the RAW format only saves the full-resolution image
size.) The DiMAGE A200 also allows you to simultaneously save images in both
RAW and JPEG formats, allowing you to have the convenience of JPEG files but
the security of a RAW copy of your images should you desire the maximum quality
later. The number of remaining images that can be stored on the memory card
appears in the lower right corner of the status display panel, in addition to
the selected Resolution and Compression settings.
The table below summarizes the compression ratios and number of images that
can be stored on a 128MB memory card, with each Resolution / Quality (JPEG Compression)
combination. (No card is provided with the camera, but 128MB is a common card
size that's probably about the minimum you should consider for use with the
A200.)
| Resolution/Quality 128 MB Memory Card |
RAW + JPEG | RAW | Fine | Normal | |
|
| 3264 x 2448 | Images (Avg size) |
7 16.5 MB |
10 12.2 MB |
19 6.5 MB |
31 4.1 MB |
62 2.1 MB |
| Approx. Compression |
2:1 | 1.5:1 | 4:1 | 6:1 | 12:1 | |
| 2560 x 1920 | Images (Avg size) |
- | - | 32 4.0 MB |
50 2.5 MB |
97 1.3 MB |
| Approx. Compression |
- | - | 4:1 | 6:1 | 11:1 | |
| 2080 x 1560 | Images (Avg size) |
- | - | 52 2.7 MB |
93 1.7 MB |
162 884 KB |
| Approx. Compression |
- | - | 4:1 | 6:1 | 11:1 | |
| |
Images (Avg size) |
- | - | 79 1.6 MB |
122 1.0 MB |
557 KB |
| Approx. Compression |
- | - | 4:1 | 6:1 | 11:1 | |
| |
Images (Avg size) |
- | - | 391 327 KB |
558 229 KB |
164 KB |
| Approx. Compression |
- | - | 3:1 | 4:1 | |
|
A USB 2.0 "Full Speed" (the slow version of USB 2.0) cable and interface software accompany the DiMAGE A200 for quick connection and image downloading to a PC or Macintosh computer. It appears as a "storage class" USB device, meaning that no driver software is needed for Mac OS versions 8.6 or later or for Windows Me, 2000, and XP. Downloading files to my Sony desktop running Windows XP (Pentium IV, 2.4 GHz), I clocked it at 894 KBytes/second, a good if not exceptional pace. (Cameras with slow USB interfaces run as low as 300 KB/s, cameras with fast v1.1 interfaces run as high as 600 KB/s. Cameras with USB v2.0 interfaces run as fast as several megabytes/second.)
When its USB interface is set to PTP mode, the Konica Minolta DiMAGE A200 supports direct printing (no computer required) to PictBridge compatible photo printers. The extent of PictBridge support varies greatly between cameras, and the A200's support is more robust than many. Provide that it's connected to a printer that offers an equivalent level of support and control, you can select paper size, bordered or borderless, print quality, and date imprint options directly from the camera's menu system. (Very slick.)
Recommended Software: Rescue your Photos!
Since we're talking about connectivity and memory cards, this would be a good
place to mention recovering images from damaged memory cards: Just as important
as an extra memory card is a tool to rescue your images when one of your cards
fails at some point in the future. I get a lot of email from readers who've
lost photos due to a corrupted memory card. Memory card corruption can happen
with any card type and any camera manufacturer, nobody's immune. A surprising
number of "lost" images can be recovered with an inexpensive, easy
to use piece of software though. Given the amount of email I've gotten on the
topic, I now include this paragraph in all my digicam reviews. The program you
need is called PhotoRescue, by DataRescue SA. Read our review
of it if you'd like, but download the program now, so you'll have it.
It doesn't cost a penny until you need it, and even then it's only $29, with
a money back guarantee. So download PhotoRescue
for Windows or PhotoRescue
for Mac while you're thinking of it. (While you're at it, download the
PDF manual
and quickstart
guide as well.) Stash the file in a safe place and it'll be there when you need
it. Trust me, needing this is not a matter of if, but when... PhotoRescue
is about the best and easiest tool for recovering digital photos I've seen.
(Disclosure: IR gets a small commission from sales of the product, but I'd highly
recommend the program even if we didn't.) OK, now back to our regularly
scheduled review...
Video Out
The Konica Minolta A200 provides a video output jack with an accompanying video cable. The signal timing can be set to NTSC or PAL via the Setup menu. The Video output duplicates the contents of the LCD in all modes, permitting it to be used as an auxiliary viewfinder.
Power
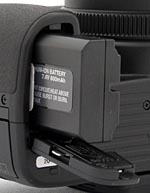 The
Konica Minolta DiMAGE A200 uses an NP-800 rechargeable lithium-ion battery pack
for power, or the optional AC adapter. The camera comes with a battery and charger
and shows excellent battery life, but I highly recommend picking up a spare
and keeping it freshly charged at all times.
The
Konica Minolta DiMAGE A200 uses an NP-800 rechargeable lithium-ion battery pack
for power, or the optional AC adapter. The camera comes with a battery and charger
and shows excellent battery life, but I highly recommend picking up a spare
and keeping it freshly charged at all times.
Here are the power-consumption numbers I measured for the DiMAGE A200 in the
lab, along with estimated run times, based on a single lithium-ion cell:
| |
(@6 volts on the external power terminal) |
(800 mAh cell) |
| Capture Mode, w/LCD | |
|
| Capture Mode, no LCD | |
|
| Capture Mode, w/AntiShake | 427 mA |
139 |
| Half-pressed shutter w/LCD | |
|
| Half-pressed w/o LCD | |
|
| Memory Write (transient) | |
|
| Flash Recharge (transient) | |
|
| Image Playback | |
|
With a worst-case run time of 144 minutes (capture mode, rear LCD operating), and playback runtime of nearly 5.6 hours, the Konica Minolta DiMAGE A200 shows good to very good battery life. Its performance is also helped by the fact that it can be set to go to sleep fairly quickly, and it awakens gracefully when it's time to shoot again. My standard recommendation that serious shooters purchase a second battery right along with the camera still holds, but run times on a single battery are still pretty good.
In the Box
The DiMAGE A200 ships with the following items:
Recommended Accessories
Test Results
In keeping with my standard test policy, the comments given here summarize only my key findings. For a full commentary on each of the test images, see the Konica Minolta DiMAGE A200's sample pictures page.
Not sure which camera to buy? Let your eyes be the ultimate judge! Visit our Comparometer(tm) to compare images from the Konica Minolta DiMAGE A200 with those from other cameras you may be considering. The proof is in the pictures, so let your own eyes decide which you like best!
As with all Imaging Resource product tests, I encourage you to let your own eyes be the judge of how well the camera performed. Explore the images on the pictures page, to see how the Konica Minolta A200's images compare to other cameras you may be considering.
Conclusion
| Free Photo Lessons | |
|
<<A200 Sample Images | Additional Resources and Other Links>>
Reader Comments!
Questions, comments or controversy on this product? Click
this link to see what other Imaging Resource readers have had to say about
the Konica Minolta DiMAGE A200, or add comments of your own!

