Use your browser's "Back" button to return to the previous page, or the links at the top and bottom of this page to navigate to related information. If you have difficulty fitting the text on this page onto your printer output, simply resize your browser window to a narrower width and print again.
![]() Back to Full Nikon Super Coolscan LS-2000 Review
Back to Full Nikon Super Coolscan LS-2000 Review
Go to Super Coolscan LS-2000 Pictures Page
Up to Imaging Resource Scanners Page
 Nikon Super CoolScan LS-2000 Film & Slide Scanner "Drum-scanner quality", plus amazing "Digital ICE" defect-removal
Original Review Date: December 3, 1998 |
 |
|
True professional-quality scans |
|
|
2700 dpi resolution (28 meg file from 35mm neg!) | |
|
|
36-bit color depth, plus 16x for 42-bit equivalent | |
|
|
High-speed SCSI interface (card included for PC) | |
|
|
Amazing "Digital ICE" dust & scratch removal | |
Nikon is one of the truly famous names in photographic history, with a well-deserved reputation for optical quality. They've recently been making waves in the digital world with their highly successful CoolPix 900 digital camera, but for much longer have been serious players at the high end of 35mm desktop film scanners. (In our experience, Nikon was the first manufacturer to truly figure out color management for negative film, with their original model 3510.)![]()
Recently, Nikon forged new ground with their "CoolScan" family of slide and film scanners, the "Cool" in the name referring to the use of LEDs as the light source, rather than an incandescent lamp. Their earlier Super CoolScan LS-1000 was by any measure an excellent scanner, but with the LS-2000, Nikon has achieved dramatic improvements, and significantly raised the bar for the entire field of desktop scanners. With a retail price of less than $2,000 US, the LS-2000 sets a new standard for desktop scanning, and introduces a near-magical technology for automatically removing dirt and film blemishes. (This last referring to their implementation of the "Digital ICE" technology developed by the aptly named company Applied Science Fiction.)![]()
Given the extraordinary range of control offered by the LS-2000, this review is likely to be one of the longer ones on this site: Bear with us though, the details are well worth exploring!![]()
The Basics
The LS-2000 is a compact desktop package that can operate in either of two orientations. Most users not taking advantage of the automatic slide feeder attachment (see further discussion below) will likely operate the unit standing upright, in which case it takes up about as much desktop real estate as a thick book. At 3.4 x 5.6 x 10.8 inches (8.5 x 14.2 x 27.5 cm), and approximately 5 pounds (2.4 kg), it should fit easily on even a crowded desktop.![]()
The LS-2000 is a SCSI-connected device, a virtual necessity due to the enormous amounts of data it's capable of generating. Both Mac and PC versions are available, the PC version including an Adaptec (a "name brand") SCSI adapter card and cable. (For this review, we worked with the Macintosh version, attached first to an aging PowerMac 7200, and later to a PowerMac G3/300 (oh, happy day!). The maximum resolution of the LS-2000 is 2700 dpi, resulting in a maximum image size of 2592 x 3894 for 35mm film. ![]()
The LS-2000 comes equipped out of the box for scanning both 35mm slides and film strips. An APS adapter and automatic 35mm slide feeder are available as accessories. All adapters can be "hot swapped," in that they can be changed without powering-down the scanner or requiring any special operations in software. In practice, we found this a very useful feature, as we could switch between slides and negatives very rapidly, without interrupting our workflow. We did not have the opportunity to try either the APS adapter or the automatic slide feeder, but some aspects of the operation of the APS adapter are similar to the handling of 35mm film strips, and we'll highlight these as we come to them.![]()
"Bit depth" is an important characteristic of digital scanners, affecting both color accuracy and tonal density range. At 12 bits per channel, the LS-2000 is at the top of the field, but stretches even this specification with an option to average multiple measurements of each pixel, up to 16x. We'll discuss this capability in greater detail later, but suffice to say that it provides a "noise level" in images of dense slides or negatives equivalent to a 14 bit per channel device! Nikon rates the maximum optical density capability of the LS-2000 as 3.6, a figure we have no reason to quibble with. This is at least in part because we have no adequate way to measure this parameter! - The LS-2000's performance does appear to equal or exceed scanners we've used in the past which were also rated at a Dmax of 3.6, though.![]()
The scanner uses three color LEDs to illuminate the film, a design unique to Nikon, as far as we know. The LEDs have very well-controlled light characteristics, and aren't subject to the fading of conventional color filter materials. The LED light source is also somewhat collimated (the light waves travel in relatively straight lines), which produces very sharp scans, but also has a tendency to emphasize scratches, dust, and film defects. The aforementioned "Digital ICE" gives the LS-2000 some unusual technology for dealing with dust and scratches, though.![]()
Documentation for the LS-2000 is quite extensive, but we grumbled a bit over the fact that the most-detailed documentation is provided only in the form of Acrobat PDF files on the software CD. The upside is that manuals are provided in no less than six different languages, but we dislike having to print out our own manuals, just to have hardcopies.![]()
Special Features
Beyond its exceptionally strong basic capabilities, the LS-2000 has a number of special features that really set it apart from more ordinary scanners. These are sufficiently unique that we wanted to call attention to them separately:![]()
"Digital ICE"
|
|
|
|
|
|
Nikon's "Digital ICE" (for Image Correction Enhancement) defect-removal solution, is truly one of the most amazing innovations in scanner technology we've ever seen. Under optimal circumstances, it can completely remove scratches, dust, and fingerprints from a slide or negative, while leaving the underlying image untouched! This was so amazing, we had to try it ourselves, and so found an old and badly scratched color negative to scan. This particular negative was rescued from the concrete floor of a storage area, where it had fallen out of a storage box, been walked on, and apparently handled with extremely dirty, sweaty fingers: In normal use, we doubt you'd ever encounter a negative as badly damaged as this one was. Even with this extreme level of damage though, the results were pretty astonishing, as seen in the before/after images above and below. While Nikon and the technology developer Applied Science Fiction (appropriate name, that) are perhaps deliberately sketchy on the details, ICE generally works by varying the lens focus to separate defects on the film's surface or substrate, at a different depth within the film/emulsion sandwich than the image data itself. (In fact, a "white paper" published by Nikon seems to suggest that the technology is even capable of discriminating tiny voids within individual emulsion layers, removing defects that affect only one color layer of the emulsion but not others.)![]()
In practice, we found the ICE technology very effective, at least on the film emulsions we tested. (Nikon's own literature suggests it isn't effective with Kodachrome film, perhaps due a thin emulsion, or the way the layers of the emulsion are stacked.) At any given resolution level, it produces a slight softness in the image relative to an unadjusted scan, but the overall result is incredible! (There is an automatic sharpening function included in the "Clean Image" options in NikonScan, but you'll want to experiment with it a bit. We found the built-in sharpening fairly effective for lower-resolution scans, but still preferred the unsharp masking in Photoshop, as it gave us much more control over how the sharpening was applied.) On a negative as deeply scratched as this one, the process can't completely eliminate all evidence of damage, particularly at higher resolutions. The images below of the eye and cheek show the effect of the technology, at maximum scanner resolution. You'll note that there are still minor blemishes left in the image, but their nature is such that they'd be quite easy to remove either by cloning or with a "smudge" tool in a paint program. ![]()
|
|
|
|
|
|
In total, it's hard to over-emphasize the impact the Digital ICE technology could have in a production scanning environment: The tendency is to focus on severe damage of the sort we've shown here, but in practice, you're much more likely to encounter random dust specks that require tedious "spotting" to clean up. After working with it, we're convinced that Digital ICE can completely eliminate the need for this operation, at the savings of countless hours in production shops. We have to say that this is one of the most truly useful innovations we've seen to date in scanner technology, capable of saving literally hours of retouching for each damaged image it recovers!![]()
Analog Gain Control
Underexposed slides or dense negatives are a challenge for any film scanner: With so little light coming through the film, the electronics have a hard time measuring it, and "noise" from the sensor often swamps the signal coming from the image. Approaches for dealing with this range from using analog-to-digital converters (the "measuring" component) with greater bit depth, to designing lower-noise electronics. Both of these approaches add substantial cost though, and the LS-2000 is already an excellent performer in these areas.![]()
Instead, Nikon took several different approaches to improving performance for high-density subjects. One of the most basic enhancements was to recognize that simply increasing the brightness of the light source would increase the amount of light making it through to the sensor. This is accomplished via the somewhat mis-labeled "analog gain control" function, which increases or decreases the brightness of the LEDs providing the illumination. While this increases overall brightness and depth into the shadows (on slides, that is: in the highlights on negatives), the less-dense areas of the film can suffer from a light overload. Thus, this control's usefulness will depend somewhat on the particular image being scanned. It will be most useful on film or slides that are dark overall.![]()
We found the analog gain control to be of great practical benefit for darker images, particularly when working with our very challenging "train" test slide. For this image, we found we could run all the gain-control sliders almost all the way up to their limits to improve shadow detail, without losing detail in the highlights. (We found that the individual red, green, and blue sliders added to the effect of the main or overall gain slider: By running the sliders for the individual channels up in addition to the main one, we achieved much more shadow detail than we could by using just the overall control.) We were surprised by how far we could push the analog gain without losing highlight detail in this slide, where the clouds and sun-baked sand are nearly transparent on the original.![]()
Multi-Sample Scanning
Another approach to reducing noise in dark areas of the scan is to take multiple readings for each pixel, and average the results. Because the noise is random from one measurement to another, its effect tends to average-out over large numbers of measurements. The LS-2000 takes advantage of this by providing the option to average multiple measurements, taking either 1, 4, or 16 samples per pixel.![]()
In practice, we felt there was little difference between the 1x and 4x, but the 16x seemed to significantly improve noise in the shadows. Of course, there's a price to pay, in that the scans take greatly longer, since the LS-2000 is essentially scanning the entire image 16 times. Also, it appears that this function applies to the preview mode as well, drastically slowing preview scans. Thus, we recommend turning it off during previews and back on again for the main scan. Despite the inconvenience this introduces to the workflow, and the longer time it takes to perform a scan with the function enabled, the results are well worth it for very dark slides: We venture to say that the LS-2000 is capable of extracting useful scans from slides that other scanners would be completely incapable of handling.![]()
Full 12-bit per channel output
Adobe Photoshop(tm) versions 4 and 5 and Corel PhotoPaint(tm) version 8 can both handle images with up to sixteen bits of data in the red, green, and blue color channels. In support of this, the LS-2000 can export TIFF files containing the full 12 bits of data per channel captured by the scanner. (Note though, that this will double your file size, as the TIFF standard only supports either 8 or 16 bits/channel.) This option is particularly valuable if you need to make substantial adjustments to tone or color after the scan is captured: By giving the application more data to work with, fairly radical tonal shifts can be made, without the severe "posterizing" of the image that can occur with 8-bit data.![]()
Optional APS Film and 35mm Batch Scanning
The LS-2000 supports flexible batch-scanning of APS and 35mm film strips, a real benefit if you're using some of the more time-consuming options such as Digital ICE and/or multi-sample scanning! The process is quite straightforward, but not terribly well-documented: After scanning the thumbnail previews, select those needing adjustment, and set the scanning parameters as you normally would. Once you've made all your adjustments, select the images you want to scan by doing a control left-click in Windows, or a command-click with the Mac on the corresponding thumbnails. This will select multiple thumbnails without de-selecting those you've already chosen. When all have been selected, click scan to proceed. Nikon Scan will ask you where to store the images and what to call them. It will take the file name you give it, and name successive scans "name1," "name2," etc.![]()
Color Management
Most low-end scanners give you no choice about the "color space" the scan is performed in, simply making some broad assumption about the sort of monitor you're using, and how it is set up. By contrast, Nikon Scan and the LS-2000 provide a choice between uncalibrated RGB, the new sRGB standard, CMYK, and HSL (hue, saturation, level) color spaces. With the color management option enabled, Nikon Scan also supports ICC-standard color profiles. ![]()
For professional applications, ICC profiles and a robust color-management system can be important to repeatable color and an efficient workflow. Since we don't have any methodology for evaluating color-management systems, we didn't experiment with Nikon Scan's color management options. (Nikon also points out in their manual that the color management system both slows the scanning process and dramatically increases memory requirements.) Thus, while we take it as a very positive indication for graphics professionals that the LS-2000 includes an ICC-compliant color-management system, we can't offer any assessment of its effectiveness. (In our evaluation, the scanner was connected to a PowerMac G3 system, with an uncalibrated monitor set to 5000K white point, and a gamma of 1.0. Since the sRGB standard uses a much higher gamma setting, and is otherwise geared more to the default conditions of Windows machines, we found that we obtained the best results using the uncalibrated RGB mode. If we had a calibrated monitor system though, and were working in a production environment, we almost certainly would have used ICC profiling for all our work.)![]()
Film Handling
The LS-2000 comes with three film holders, one for mounted 35mm slides, one for loose strips of 35mm film, and a third "clamshell"-style holder for handling badly-curved strips of film via the slide adapter.![]()
The various film adapters plug into a long cavity in the front of the unit. Some adapters (such as the film-strip feeder) have an electrical plug on their back that carries power and signals between the film transport and the scanner itself. As mentioned earlier, the various media adapters can be plugged and unplugged with impunity at any time the LS-2000 isn't actually scanning: The scanner and driver software automatically recognize which adapter is currently in use.![]()
The SA-20 film strip feeder can handle strips of film from 2 to 6 frames long. The Nikon manual cautions against attempting to feed film strips that are curved side-to-side (across the narrow dimension of the film) by more than a couple of millimeters. To help judge whether a piece of film is too badly curved to feed safely, Nikon provides a gauge on top of the film strip adapter. In practice, only our "severe damage" test negative was curled appreciably in this direction, most chose to curl along the length of the film. Even negatives that were fairly tightly curled along the length of the film fed without problem. (In fact, in the course of feeding many dozens of pieces of film into the unit during our testing, we never had a single problem with film transport.) Some users on the Nikon tech forum have reported film jamming problems with the SA-20, but many of these appear to be due to film with slightly ragged edges: Based on various end-user reports, cutting with a razor-sharp scissors or razor knife seems to cure many problems. Others reported difficulty with thin film, but our experience with the resolution target on Kodak Tech Pan (a relatively thin film) was flawless.![]()
Nikon's FH-2 clamshell film holder deserves special mention here, thanks to its construction and ease of use: It did an excellent job handling the badly-curled "severe damage" negative: In our experience, clamshell holders of this sort are often awkward to use with curled negatives, but we had no such problem with the Nikon version. The Nikon device is a composite of metal and plastic, with the structural support and latching mechanism provided by the metal parts, and the actual film registration by the plastic pieces. Where the Nikon holder differs significantly from others we've used is that the film guides take the form of two continuous ridges in the plastic that run the entire length of one half of the clamshell assembly. Thus, you simply lay the film between the guides, and are assured that it will properly align as you close the holder, even if the piece of film consists of only a single frame. Other holders we've used employ alternating ridges and recesses on both sides of the clamshell. This can make it difficult to keep the film aligned as the clamshell closes, particularly if the piece of film is short.![]()
The MA-20 35mm mounted-slide feeder couldn't be much simpler: It's basically a passive chunk of plastic that plugs into the scanning aperture, with a slot to manually push the slide into, and a button to press to manually eject the slide when you're done: Not much to go wrong there!![]()
(Disclaimer: The next two paragraphs are based solely on information collected from Nikon's published materials, since we didn't have access to the devices in question for this review.)![]()
The IA-20 APS film adapter plugs into the scanner in much the same way as the 35mm film strip adapter, projecting from the front by the same couple of inches. APS cartridges are simply dropped into the front of the unit, and the software will scan "thumbnail" representations of the entire roll of film in about 80 seconds (for 25 frames - longer and shorter rolls will vary proportionately in their pre-scan times).![]()
The SF-200 auto slide feeder plugs into the LS-2000 in the same fashion as other adapters, but its construction requires both devices to rest on their sides. (The LS-2000 has rubber feed on both its edge and its side, to support operation in either orientation.) The auto slide feeder can hold and process up to 50 slides, and can unload one slide and load the next in about 12 seconds. A warning about the SF-200 adapter from the Nikon tech forum though: While it appears to work fine with modern (plastic) slide mounts, there are apparently significant problems with older cardboard mounts. These seem to arise as a result of the higher frictional coefficient of the cardboard mounts, often causing two slides to feed at once. (Some old mounts are particularly rough, and more likely to cause problems.) The problems with the older mounts appear to be very solvable though, as several users have posted notes and photos of "slide gate" devices they've attached to their LS-2000's. - Highly recommended reading for anyone planning to scan old slides! (This is a natural application for the LS-2000, particularly in light of the unique "ICE" dust-removal technology.)![]()
System Interface and Included Software
As we mentioned above, the LS-2000 is a SCSI-based scanner. (For those unfamiliar with the SCSI interface, this is a high-speed connection originally developed for hard drives, but now utilized by various scanners and even some high-end digital cameras.) Nikon rates the LS-2000's data-transfer capability at 3 megabytes/second, a number consistent with the 20-second scan time for images acquired without use of ICE, multiple sampling, or Nikon's color management. (This is very fast, with many competing units struggling to achieve minimum scan times under 60 seconds.) Note though, that the scan time increases greatly when any of the special features are engaged, such as color management, Digital ICE, or multi-sample scanning.![]()
On Mac systems, connecting the scanner is as simple as plugging the SCSI cable into the built-in SCSI interface port. Windows users face the more daunting challenge of adding a SCSI adapter board to their system. Speaking from prior experience, if your system is relatively "clean" (not very many added pieces of hardware), and you only have a single hard-drive interface device or card in your system, the SCSI card addition can be trivial. On the other hand, if your PC is stuffed to the seams with extra cards and interfaces, you may have problems getting a SCSI card to work at all! One tip: The SCSI card Nikon ships with PC versions of the LS-2000 is a PCI device. If you can't get this card to work, consider getting an ISA-bus card (assuming your machine has an ISA slot available). The ISA card won't be as fast as the PCI one, but by switching busses, you may be able to escape a hardware conflict. (If all this talk of PCI, ISA, and hardware conflicts has you confused, you're not alone! Thousands of computer service outlets exist for a good reason - Consider paying one of them to install your SCSI card for you if you're not comfortable messing about inside your computer...)![]()
We're concerned that all this talk about SCSI cards might give some potential buyers pause: It shouldn't. When it comes right down to it, for the next year or two (until "Firewire" becomes common), SCSI is really the only choice for interfacing a scanner with the power of the LS-2000. If you need professional-level quality and speed, don't consider for a minute a device connecting via a parallel port -- you'll never get the throughput necessary for professional production! (Parallel port-connected devices are fine for personal or home use, but if your time has value, and you need to do a lot of scans, you need a SCSI-based unit like the LS-2000.)![]()
Included software consists of the (excellent) Nikon-Scan software drivers (along with Photoshop and TWAIN drivers), and a toss-in copy of InMedia's Slides and Sound Plus slide-show application. No photo-editing application is included, since most purchasers of an LS-2000 are likely to already own one (or two).![]()
Interface issues aside, installation of the scanner itself was very simple and straightforward. Note though, that there are TWO locking screws which must be removed before attempting to operate the scanner. You'll also need to check the setting of the SCSI ID switch on the back, and set it to a number not presently in use on your system. The scanner has it's own internal power supply, running from standard 110/220 line power. The back panel SCSI connectors are the "HDI-50" fine-pitch type common on SCSI-III peripherals. The provided cable is a DB25 to HDI-50 type: If you have other SCSI devices on your computer, you'll probably need some sort of adapter cable to chain from the LS-2000 to the other units. (Unlike some units, the LS-2000 provides two SCSI connectors on the back panel, allowing you to "daisy-chain" other SCSI devices with it.) In a nice touch, the LS-2000 also includes a switchable internal active terminator, should you want to place it on the end of your SCSI chain.![]()
Operation and User Interface
Wow! This is going to be a big section! The LS-2000 has one of the richest user interfaces we've ever seen in a desktop scanner. The extent of control it provides over the scanning process is unmatched, but this flexibility comes at some cost in terms of the learning curve associated with it. (And in terms of the number of words and pictures we'll need here to describe it all to you.) Stay with us, we'll try to fit it all in! (We'll resort to a more terse presentation of some of the features, based on heavy use of screen shots. Hopefully, this will make the information easier to scan through, while keeping the word-count to a reasonable level!)![]()
Overview
All scanner operations are controlled from the main window of the NikonScan application. A system of "drawers" let you access the full range of scanner options with relatively few mouse-clicks, although we found this interface initially took some getting used to. We'll step through the various operations in roughly the order one would encounter them during normal scanning.![]()
Normal Operating Sequence
As we step through the myriad functions of the various control panels and interface screens, it would be easy to get lost in a maze of features, and end up with little actual idea of how the scanner and software actually work. To counter this, we present here a very basic outline of the sequence of operations, with links to the appropriate parts of the more-detailed operating description. Our hope is that this will concisely convey a sense of how the scanner works, while still allowing for the excruciating detail we're known for. Herewith the sequence:
Launch application or acquire module
Insert film strip
Pop open thumbnail drawer, if film strip or APS feeder (Main control panel)
Select thumbnail (Main control panel)
Preview scan (Main control panel)
Set cropping and resolution (Scan size drawer)
Tonal adjustment (Curves and levels drawer)
Color correction (Color balance drawer)
Scan it! (Main control panel)
 |
|
|
Main Control Panel Overview
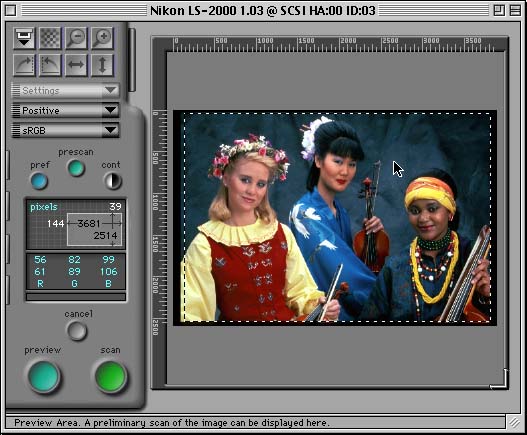
Given the unusual number of parameters and controls that NikonScan incorporates, the user interface was a significant challenge for the program's designers: How to effectively display the huge number of controls without using-up all the available "real estate" on the computer screen? Nikon's answer was to develop a main control panel with multiple "drawers" that slide out to reveal various groups of controls. At first, we weren't too keen on this interface, as there seemed to be a lot of opening and closing drawers necessary to getting the scans done. As time went on however, we (a) got used to the interface, to the point that it seemed quite natural, and (b) had a hard time imagining how the designers could possibly have fit in as much functionality any other way. As shown above, the main control panel exists primarily as a gateway to the drawers, although it does display some status information, such as scan type (negative/positive), color space (RGB, sRGB, CMYK, HSL), and the current crop size (in pixels), and crop position within the active scanning area. Just under the scan-size window, a pixel data display provides RGB or CMYK readouts for the pixel beneath the cursor in the preview window. (Note that the two sets of number shown on the RGB readouts correspond to the values before and after the current tonal correction is applied. Thus, the upper set of numbers represents the "raw" values recorded by the scanner hardware. This information can be useful when setting the Analog Gain Control mentioned earlier and again below.)![]()
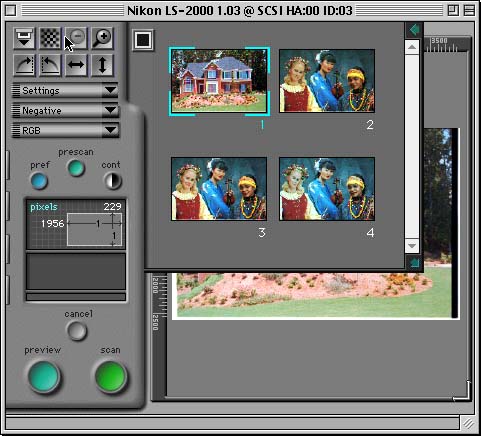
The tab at upper right on the main control panel pulls out to reveal a thumbnail display, whenever you're using a film adapter that supports multiple scans. (The APS or 35mm strip-film adapters). The screen shot below was taken with the thumbnail drawer open, showing thumbnails for four frames of a film strip, and a preview image of the highlighted frame peeking through from behind. To save time, you can also disable the thumbnail previews and revert to a mode in which each frame is indicated only by an icon and a frame number.![]()
 |
|
|
Variable Preview Size!
A very welcome feature of the NikonScan software is the ability to resize the preview area to take in as much screen real estate as you have available. In professional applications, proper setting of highlight and shadow points based on pixel-value readouts can be critical. The small, fixed-size preview images employed by many low-end scanners can make it difficult or impossible to select the exact area you want to take a brightness/color reading from. In NikonScan, you can take advantage of professional-sized monitors, by expanding the preview window to the edges of the screen. Note though, that doing so greatly increases preview scan times, because the software automatically scans at a resolution appropriate to the size of the preview window you're using.![]()
Across the top of the panel, a double row of buttons provides the following functions: Eject media, autofocus (two options), zoom out, zoom in, rotate right, rotate left, flip horizontally, and flip vertically. The autofocus process may be conducted at a user-selected point in the image, by holding down the option key on the keyboard (the ALT key on PCs?) when clicking on the button, and then clicking on the desired point within the preview window.![]()
The main control panel contains six named buttons. Here are their functions:
pref - brings up the preferences window (more on this later)
prescan - normally, a prescan is performed to automatically adjust exposure settings whenever the preview button (see below) is pressed. If you want to see a completely "raw" scan for yourself, click the Prescan button.
cont - automatically sets contrast to optimize the image. Automatically selected settings can be canceled or adjusted in the exposure & contrast "drawer."
preview - normally (if option is set in preferences) prescans image, auto-adjusts exposure, and displays in preview window for cropping or manual tonal/color adjustment.
scan - performs full-resolution scan, incorporating any manual exposure, color, or tonal adjustments.
cancel - cancels scan in progress.
![]()
Preferences Window
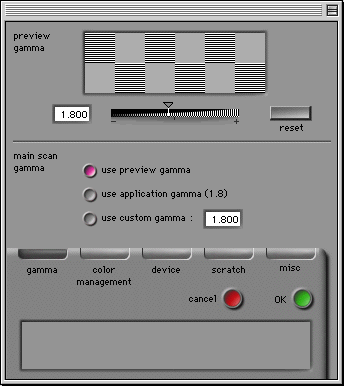
Accessed via the "pref" button on the main control panel, the preferences window (shown below) allows you to control many of the most basic scanning characteristics. Most of the settings here fall into the "set it and forget it" category, as you won't need to change them frequently. It is accessed via the "pref" button on the main control panel, mentioned earlier. When this button is clicked, the window at right appears. Five different tabs select different scan parameters to adjust. The five tabs and their associated controls are described below. This window defaults to the "gamma" adjustment screen shown when opened.![]()
 |
|
|
gamma - for adjusting the output "gamma" values used in displaying preview images and in making the final scan. (To drastically over-simplify, gamma is a measure of how "light" or "dark" midtone brightness is relative to the ends of the tonal scale. This is a fairly important adjustment, particularly for a device that may be used on either Macintosh or Windows platforms, which have significantly different default gamma settings.)
color management - as mentioned earlier, the LS-2000 supports a very sophisticated "color management" system, allowing it to be calibrated to different display or output devices. The Color Management preferences allow you to choose ICC-standard color profiles for the preview, main scan, and CMYK output respectively. NOTE that messing around with the color management settings can significantly mess up your images! Unless you know what you're doing, leave these settings at the factory defaults. ANOTHER NOTE: The color management system is very powerful, but is also a huge consumer of system resources. If you find scans running excessively slow, or the scanning software requiring massive amounts of memory, try turning the color management system off entirely!
Device - You won't need this tab unless you have more than one Nikon scanner connected to your computer: Its only function is to select from multiple scanners, and to determine which scanner should be used as the default unit.
Scratch - Due to its high resolution and great bit depth, scans made with the LS-2000 can be huge, often far larger than your system memory would support directly. To accommodate such large amounts of data, NikonScan uses hard drive space for "scratch memory," to hold pieces of the image data on a temporary basis. This panel lets you specify which of your hard drives you want the application to use for this purpose.
Miscellaneous - As the name would suggest, a miscellany of scan-related functions. Here's the list:
perform autoexposure before preview - normally, a prescan is performed to determine exposure prior to a preview scan. To save time, you can turn this function off with this checkbox, but your previews may be a little hard to interpret on light or dense film.
Perform autoexposure before main scan - Normally, no autoexposure is performed before the main scan. (Presumably, you've set the exposure prior to this point, and don't want the scanner to mess with it again.) You may want to use the preview only for cropping though, and let the scanner determine the exposure itself before the main scan. This button lets you do this. NOTE though, that regardless of your choice for either this option or the one preceding, the scanner will always perform an autoexposure determination whenever the "prescan" button in the main control window is clicked.
Perform autofocus before main scan - By default, the (rather time-consuming) autofocus operation is only done when you click the autofocus button in the main control window. If you're batch-scanning slides in a variety of mounts though, you'll probably want/need the scanner to reset its focus before every scan.
Batch scan stops on error - If you're scanning a filmstrip, an APS roll (with the optional APS adapter), or a batch of slides in the optional slide-feeder, you can choose to have the scanner stop whenever an error is encountered. (The default is to proceed ahead with the next scan, even if an error occurred with the current one.) This option could be useful to make sure the scanner stops if/when it runs out of disk space when batch-scanning slides or an APS roll.
Close thumbnails after preview - by default, the thumbnail drawer closes to get itself out of the way after a preview scan has been performed. Click this box to have the thumbnail drawer remain open.
Close window after scanning - normally, the NikonScan window will close after a scan has been passed-over to the host application (if running as a TWAIN or Photoshop plug-in). This option lets the scan window stay up after the scan. (Handy if you find yourself going back and forth between NikonScan and Photoshop on a particularly tough scan.)
Acquire thumbnails - If you're scanning a filmstrip or APS cartridge, the default is for the scanner to create and display thumbnails for all the frames when the thumbnail drawer is opened. If this checkbox is off, frames will be indicated by number only. (Handy if you don't feel like waiting for the whole APS roll to spool by, if you know you're interested only in frames 14 & 15.)
Cache preview images - Only applicable to the slide-mount adapter: When you zoom in on a preview image, NikonScan normally stores the previous preview image to speed the image refresh when you zoom back out again. If you turn this option off, the scanner will repeat the preview scan every time you zoom back out.)
Live picture updates - By default, changes made in the Curves & Levels drawer only take effect in the preview window after you stop dragging the particular control involved (such as a point on the gamma curve). With this option enabled, preview-window updates happen continuously while you're dragging. Nikon warns that this may "require a powerful computer," but we suspect anybody shelling out nearly $2,000 (November, 1998) for a film scanner will already have a powerful-enough CPU.
Pop-out "Drawer" menus
Finally, we get back to the actual scanning controls! - A series of four pop-out "drawers" along the left-hand edge of the main control panel hold controls governing the most commonly-used scanner functions. These are generally arranged in the order in which you would encounter them during the normal scanning process.![]()
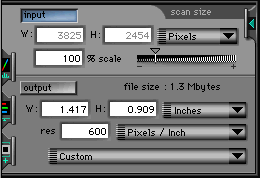 Scan Size
The first pop-out menu controls the scan size or resolution. We found this menu to be rather confusing, as the interaction between its various controls wasn't immediately obvious. The region of the image which will be scanned is set in the preview window, via a click & drag operation. One the area of interest has been chosen, you need to tell the scanner what resolution to scan it at. There are two sections in the scan size menu, corresponding to input and output specifications. The dimensions shown in the input section show the actual (physical) area of the scan, as selected in the preview window. You can "lock" this area by clicking on the "input" button, to prevent the scan size from inadvertently being changed in response to changes made in the "output" section. Frankly, describing all the interactions between input size, % scale, output size, and output resolution would take more time than we care to spend here. Suffice to say that we found ourselves routinely locking the input size, and then changing the output resolution to produce the desired scan size. Users scanning images for inclusion in printed publications (where the output dimensions matter) may also need to use the percent scale setting, or the output dimension settings directly.![]()
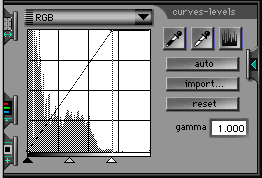 Curves-Levels
This drawer is the one we found ourselves using most often for adjusting the tonal balance of our scans. It displays the tonal content of the image in a histogram window, with the curve indicating how many pixels in the image have each brightness value. This is an interface familiar to us from Photoshop, and is our preferred method of making tonal adjustments in images. (The one feature we found lacking is one available only in the Macintosh versions of Photoshop: The ability to see what parts of the image are "blowing out" to pure white or "plugging" to solid black in response to the settings of the white/black point sliders.) This control in Nikon Scan is interesting though, in that it combines histogram controls with a tone curve, either of which may be manipulated from the same control panel.![]()
You can choose to adjust the tonal balance in the image either automatically or manually. The "auto" button seems to do a pretty fair job of setting highlight, shadow, and gamma values, but we usually found ourselves manipulating the controls manually, to achieve best results. As in Photoshop, the black point slider sets a minimum brightness value for the image: Any pixel values below this level will be set to zero. Likewise, the white point slider sets the maximum brightness value: Any pixel values above this level will be set to 255. Values in between the extremes are stretched to cover the range specified. The "gamma" slider in the middle controls how the midtone values are mapped from input to output, by setting the brightness value the program will map to a 50% gray. Thus, sliding the gamma control to the right will darken the image, while sliding it to the left will brighten it.![]()
For tricky images, you can add control points to the gamma curve simply by clicking anywhere in the histogram/gamma grid: A point will be added wherever you click, and the curve adjusted to pass through the new point. This provides very fine control over input/output tonal mapping, which experienced users can take advantage of to make optimal use of the available tonal range.![]()
You can also operate on each of the color channels separately with the curves-levels controls, simply by clicking on the channel menu button (the one that says "RGB", at the top of the window), and pulling down to select the specific color channel you're interested in. This feature can be very useful for working with images that have color casts or unusual lighting.![]()
Finally, Nikon Scan provides eyedropper controls for setting white and black points directly from the preview image. This is probably the fastest method, and simultaneously removes most color casts from your images.![]()
Hue-Saturation-Level (HSL) controls
All of the preceding discussion is based upon the RGB or CMYK color space options: In Hue/Saturation/Level color space, the curves-levels controls work quite differently.![]()
Quite frankly, we didn't experiment much with the HSL controls in Nikon Scan, but they appear to offer very powerful tools for selectively correcting colors in an image. In particular, the Hue channel control lets you shift a specific color to a different one, without affecting other colors in the image. For instance, you could change a red flower to a yellow one, without affecting blue or purple flowers. However, any other red objects in the input image would also be shifted to yellow as well.![]()
This HSL control is unique among the scanners we have tested to date (November, 1998), and appears to be an exceptionally powerful tool, albeit one that could require a bit of learning to use to its full effectiveness. We regret not being able to cover it in greater detail here, but frankly it's beyond the scope of even one of our reviews! (If a reader wanted to write a detailed explanation of how he/she uses this function though, we'd be happy to post it separately, on a linked page.)![]()
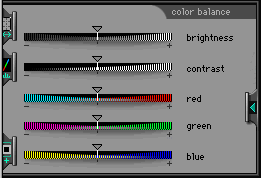 Color Balance
As a simpler alternative to the curves-levels drawer, the "Color Balance" drawer provides fairly rudimentary controls to adjust the brightness, contrast, and color balance of the image as a whole. (In grayscale scanning mode, only the brightness and contrast sliders will appear.) These controls work exactly as you would expect, but in our experience are of limited value for obtaining professional results. Nonetheless, they can be a quick way to make overall image adjustments, and may be the fastest way to process large numbers of non-critical scans.![]()
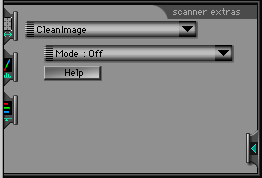 Scanner Extras
This is the menu that controls all the special "goodies" the LS-2000 offers! We mentioned most of these earlier, but will run down the menu entries here for completeness.![]()
The Scanner Extras menu has eight different options, available via a drop-down menu. (In the screenshot at left, it says "CleanImage". (By default, it opens to the "pixel data size" option.) Once an option is selected, the lower drop-down menu becomes active, to turn the function on or off, or set appropriate parameters. Herewith the "Scanner Extras" options:![]()
Pixel data size - Choices are 8- or 12-bit, referring to the bit depth of the R,G, and B color channels. 12-bit images are converted to 16-bit depth when opened by compatible applications, or to 8 bits if the CMYK color space is being used. Images in HSL color space are always processed at a bit depth of 16 bits per pixel, but converted to 8 bits when passed to the host application, if the 8-bit option is selected.
"Clean Image:" Digital ICE defect correction - This is one of the major features of the LS-2000, described earlier. Options are off, on, or on with sharpening applied. See our description of this function toward the beginning of this review for full details.
Manual focus adjustment - We found the LS-2000's automatic focus to be particularly effective, especially when using the option that allows you to select a specific (preferably high-detail) portion of the image to focus on. To focus manually, you adjust the slider on this menu, then observe the results in the preview window. No numeric feedback is provided as in some scanners, a feature we sorely missed. On the other hand, the automatic focus was so good that we were never able to improve upon it through manual adjustments, so this entire function may be moot.
Analog gain control - Described earlier, this control allows you to boost the brightness of the illuminator LEDs, to bring out deep shadow detail, at the possible expense of strong highlights.
Multi-sample scanning - Also described earlier, this option allows you to select 1, 4, or 16 samples per pixel. Greatly lengthens scan time at the higher settings, but dramatically reduces noise in deep shadows.
Miscellaneous - The sub-options here include the interpolation method to be used for scans beyond the scanner's maximum resolution. Pre-scan choices are labeled the not-terribly-informative "Normal" and "Alternative." "Alternative" is intended for use with images that don't have any clear black or white-point. (The example cited by Nikon in the manual is close-up photos, in which a narrow range of colors predominates.)
Strip-film offset adjustment (SA-20 module only) - This option only appears when the SA-20 strip-film adapter is inserted. It allows you to adjust where the scanning process begins relative to the film frames. We fortunately seldom needed this, but found it a bit frustrating when we did: In order to see the results of your adjustment, you need to click the Reload button to do another preview scan, a time-consuming process. (You'd think it would have been fairly easy to provide some visual feedback while making the adjustment itself.)
Initial crop setting (IA-20 module only) - This option only appears when the IA-20 adapter for APS film is present. It allows you to set the initial cropping in the preview/crop area to suit photos made at the three APS aperture settings of "classic," "wide," and "panorama."
Feed images (SF-200 module only) - This option only appears when the SF-200 bulk slide-feeder module is attached. To support batch scanning, you can enter a number in the "Feed Images" text box, representing the number of slides to be scanned with the current scan settings when the scan button is pressed. Set to "999" to scan all slides in the feeder.
Test Results
Whew! We thought we'd never get through describing all the functions of this scanner! ![]()
If one thing's clear with the LS-2000, it's that you (sometimes) clearly get what you pay for. While scanners we've tested selling in the $300-$500 range are capable of producing nice results (and in the process, far exceeding the performance of all but the highest-end professional digital cameras), the Super CoolScan LS-2000 completely blows them away! Of course, this should probably come as no surprise for a scanner costing almost $2000, but we were surprised at just how great the difference was.![]()
First and foremost, the LS-2000 is capable of producing great scans simply by using its default settings: Far less twiddling of the scan parameters are required to obtain excellent results. This deserves some special comment: If you're in a production environment, you need to crank out scans with the absolute minimum of fuss and bother possible. While many scanners can produce reasonably good images given sufficient tweaking of the controls, the LS-2000 consistently produced good results using only default settings: With these results as a starting point, the process of making fine adjustments to arrive at the final scans went much faster. Unfortunately, other than making a brief observation to this effect, we really have no way to quantify for you just how "fast" or "slow" a scanner is in this respect.![]()
When you do need to tweak the settings, the LS-2000 provides you a tremendous range of control, in some cases allowing you to affect the basic operation of the scanner to extract the most from each frame. As you might imagine, the wealth of capabilities means there's a bit of a learning curve to traverse to become comfortable with this product, and to effectively make use of all its capabilities. Overall though, once we'd ventured up this learning curve ourselves, we found the LS-2000 quite straightforward to operate. The one area we never seemed to get used to though, was specifying scan size and resolution. Given more routine use of the unit, this doubtless would have become clear also, but in our relatively brief experience, we always found ourselves fumbling around a bit each time, before we finally got the scan size set to where we wanted it.![]()
We really came to appreciate the power of the LS-2000 when we were working with our perpetually challenging "train" image. This slide is SO dark that most scanners can't handle it, and we're usually left with considerable post-scan tweaking in Photoshop to get anything remotely usable. With the LS-2000 though, we used a combination of analog gain control, 12-bit data depth, and multi-sample scanning to produce a remarkably good image straight from the scanner. This is not to say that we didn't spend a lot of time tweaking the scanner controls and re-scanning to achieve the final result! The bottom line though, was that we were able to produce a very clean, detailed scan of an almost impossible subject, on a desktop scanner.![]()
While on the nebulous subject of how long it takes to get a good scan, we feel compelled to make at least some mention of quoted "scan times." As noted, the Nikon Super CoolScan 2000 is a very fast desktop film scanner, with a minimum scan time of 20 seconds. In practice though, this doesn't mean you'll be able to crank out a couple of scans a minute. A variety of factors combine to reduce the actual throughput of any scanner, relative to it's spec-sheet value, and the CoolScan 2000 is no exception. Preview scans will take an appreciable amount time, particularly if you have the preview window expanded to a fairly large size. Then, there's the time for auto focus and autoexposure, usually required before every scan. Finally, your system configuration may be such that the scanner can't achieve maximum data throughput, due to other demands on system resources, etc. All this is to say that the specmanship engaged in by all the companies around the value of "minimum scanning time" may be completely meaningless in the real world. Overall, the LS-2000 is a fast scanner, but your normal usage of is very unlikely to be such that you'll actually see 20 second scans. Face the fact up front that reasonable-sized previews are going to take upwards of 30 seconds to create, and that full-resolution scans will require on the order of a minute, and you'll be quite happy with the unit: Expect 20 second scans all the time, and you'll be disappointed. And, on those rare occasions like our tough "train" scan, count your blessings when it takes 5 minutes for a full-res scan with multi-sample scanning, Digital ICE, etc. -- Think of how that compares with sending out for a "drum" scan, or the hours of retouching it would take to equal what Digital ICE does in a few minutes!![]()
There's much more to say about how the LS-2000 performed with our standard test images, and we say it all on the separate "pictures" page. Rather than repeating all of that here, we'll just refer you over there for the scoop.![]()
Conclusion
Without a doubt, the Nikon Super CoolScan 2000 is a world-class scanning instrument. It's excellent "default" performance minimizes the amount of tweaking needed to produce superb scans from common subjects. Yet, when the occasion demands it, there's a powerful set of hardware and software capabilities to let you handle images that would simply be impossible with a lesser machine. At a "street" price of $1700-1800 (in late November, 1998), it clearly won't be a casual purchase decision for most users. If you're serious about your 35mm or APS photography though (whether professional or amateur), it would be hard to find a more suitable scanner.
Reader Comments!
See what other Imaging Resource readers have had to say about the Super CoolScan 2000, or add comments of your own. (Do you have a Super CoolScan? Share your experience!) Read what's here, then add your own!![]()
View the Test Images from the LS-2000![]()
![]() Visit the Nikon Web page for the LS-2000
Visit the Nikon Web page for the LS-2000
![]() View the Nikon specifications page for the LS-2000
View the Nikon specifications page for the LS-2000
![]() View the Nikon FAQ & user's manuals for the CoolPix 900
View the Nikon FAQ & user's manuals for the CoolPix 900 ![]()
Up to Imaging Resource Scanners Page![]()
Or, Return to the Imaging Resource home page.
This document copyright (c) 1998, The Imaging Resource, all rights reserved. Visitors to this site may download this document for local, private, non-commercial use. Individuals who have themselves downloaded this page may print a copy on their personal printers for convenience of reading and reference. Other than this explicit usage, it may not be published, reproduced, or distributed in print or electronic and/or digital media without the express written consent of The Imaging Resource.