The Imaging Resource
Quick Review
Sony Cyber-shot DSC-M1 Digital Camera
 |
Camera QuickLook | |
|
By |
|
|
Review
Date |
09/09/2004 | |
|
User Level |
|
|
|
Product Uses |
|
|
|
Digicam Design |
|
|
|
Picture Quality |
Great, 5.1-megapixel CCD | |
|
Print Sizes |
Sharp 8x10s and larger | |
|
Availability |
|
|
| Suggested Retail
Price (At time of introduction) |
|
|
Introduction
|
||||||||||
The Sony DSC-M1 is the latest in Sony's tradition of making innovative Cyber-shot models that aim to identify traditional "problem" areas in other digicams, and improve on them. Sony digital cameras span the full range of price and performance, and Sony enjoys a leading position among digital camera manufacturers, but the DSC-M1 is truly a unique product in the digicam marketplace. Based on the existing T1 model, Sony's Cyber-shot M1 is a truly full-featured digital camera, with a 5 megapixel CCD, a 3x optical zoom lens, a huge 2.5-inch LCD screen, and a full complement of options such as variable ISO settings, color saturation, contrast, and sharpness adjustments. Automatic exposure control offers point-an-shoot ease, with a handful of scene modes for more difficult shooting situations. The main focus for Sony on the M1 has been on improving the movie clip functionality, however - with the camera body and firmware redesigned to make the camera conducive to recording a combination of still images and movies. Packaged with a camera dock for quick USB connection to a computer, the Cyber-shot M1 offers great portability and a large selection of features. Read the review below for the details, but if you're looking for an compact, functional five-megapixel digicam, and enjoy taking short movie clips, the Sony DSC-M1 should be on your "short list".
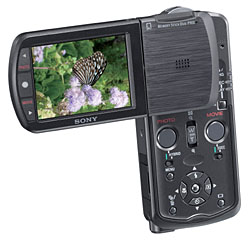
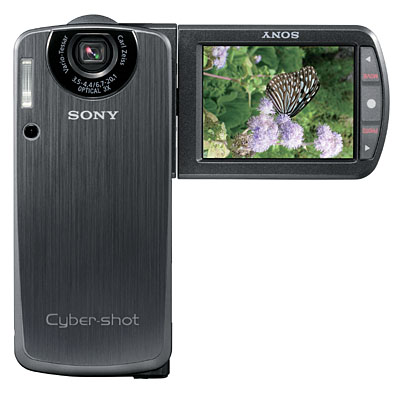
The Sony Cyber-shot DSC-M1 looks nothing like any of its Cyber-Shot predecessors, with an unusual (and honestly, rather difficult to describe) body that will definitely attract attention wherever you use it. Somewhat akin to a cell-phone (although a bit larger), the camera's vertical body has two sections attached at the top by a 90-degree swivel. The camera opens out into an inverted L shape for use, with the LCD sticking out the left side, where it can also be swivelled to face up, down or even forwards towards your subject. The camera's profile is quite attractive, with smooth, brushed black metal body panels and very few protrusions, and its mostly-metal body conveys an impression of ruggedness (although on our prototype, the main swivel mechanism had quite a bit of "flex" in it).. The M1 has a vertical lens design (similar to what we've seen on Minolta's DiMAGE X series digicams), which eliminates any lens protrusion on the front panel. Almost as small and light as Sony's compact Cyber-shot DSC-P100 model, the DSC-M1 should fit easily in most coat pockets or purses, and is quite travel-worthy. The most noticeable feature on the DSC-M1 is its large, 2.5-inch color LCD monitor, which serves as a grip for your left hand once you "unfold" the camera. With your right hand wrapped around the lower half of the vertical portion of the camera body, your thumb falls naturally over not one, but two large shutter buttons (one for photos, and one for movies). Though compact, the DSC-M1 doesn't skimp on features, offering a 3x optical zoom lens with a range of focus options, a 5.1-megapixel CCD for high-resolution images, and a host of preset shooting modes and exposure options.
The DSC-M1 is equipped with a Carl Zeiss Vario Tessar 3x, 6.7-20.1mm lens, equivalent to a 38-114mm lens on a 35mm camera. (A fairly standard zoom range, going from an average wide angle to a good telephoto.) Normal focus ranges from approximately 1.6 feet (0.5 meters) to infinity, with a Macro setting that lets you get within 3.25 inches (8 centimeters) when the lens is zoomed to its wide angle position, and 9.8 inches (25 centimeters) at its telephoto setting. A Magnifying Glass scene mode (described below) gets even closer, focusing as close as one centimeter (though it also uses digital zoom to enlarge detail). Besides its default automatic focus control, the DSC-M1 offers a range of fixed focus settings through the Record menu, as well as Center AF, Spot AF, and Multi AF focus area options. (Spot AF reads from the very center of the frame, and Center AF from a larger area at the center.) An AF illuminator lamp on the front of the camera helps focus at low light levels, a very handy feature I wish more digicam manufacturers would add to their cameras. In addition to the camera's 3x optical zoom, the DSC-M1 offers a maximum of 2x Precision Digital Zoom. Sony's Precision Digital Zoom does an excellent job of minimizing loss of quality, although there's no getting around the tradeoff between resolution and magnification that Digital Zoom implies. The 2.5-inch LCD monitor is the only viewfinder on the camera, and the generous size definitely helps with framing. Unlike most digicam LCDs though, the screen on the M1 is "transflective," which means that it functions every bit as well in full sunlight as it does under indoor conditions. (Overall, this is one of the best LCD screens I've yet seen on a digital camera.) The informative display reports a variety of camera settings (including aperture and shutter speed when the Shutter button is halfway pressed), and features an optional live histogram display in both Playback and Record modes. An additional display mode turns off the backlight, presumably saving battery power without eliminating the display entirely. (The battery-life info overlay is disabled in this mode, but my tests of the DSC-T1 model which shares much of the same hardware indicated that turning off the backlight increased battery-life by about 25%.)
Exposure is automatically controlled on the DSC-M1, great for novices and casual users looking for simplicity. However, a range of nine preset Scene modes is available, as well as a handful of adjustable exposure options. An On/Off button on the right side of the camera turns the camera on (as does opening the swivelling body), and a Mode button on the camera's rear selects between Playback and Record modes. Within Record mode, you can select Automatic, Program AE, Magnifying Glass (Macro), Twilight, Twilight Portrait, Landscape, Snow, Beach, High-speed Shutter, Fireworks, and Candle exposure modes. The Automatic setting takes away all user control, with the exception of flash, macro, and resolution settings. Program AE mode keeps exposure control automatic, but allows user control over all other exposure variables. Magnifying Glass mode magnifies the subject on the LCD display up to 3.3x (a separate function from Macro mode), focusing on subjects as close as one centimeter. However, keep in mind that this mode also employs the digital zoom function, which may degrade image quality slightly. Both Twilight modes optimize the camera for low-light shooting by allowing longer shutter times, while Landscape mode sets the camera up for shooting broad vistas. Snow mode enhances saturation to prevent loss of color in bright white snowscapes, while Beach mode ensures that blue tones are recorded accurately in lakeside or seaside photos. Both Snow and Beach modes bias the exposure system to help avoid the underexposure problems most cameras have with overall-bright scenes of this sort. High Speed Shutter mode is best for moving subjects, and uses faster shutter speeds to freeze action. Fireworks mode preserves color by using a slower shutter speed and smaller aperture setting to capture the full display, and Candle mode uses a slower shutter speed and biases the white balance system for attractive candle-lit shots at birthday parties and the like.
Although the camera controls aperture and shutter speed at all times, it does report the settings it's chosen on the LCD information display, so you have an idea of what the exposure parameters are while you're shooting. The camera uses a 49-segment Multi metering system to determine the exposure, which takes readings from throughout the frame. You can manually increase or decrease the overall exposure from -2 to +2 exposure equivalents (EV) in one-third EV steps, and sensitivity is adjustable to ISO equivalents of 100, 200, or 400, with an Auto setting as well. When shooting at slower shutter speeds or higher ISO settings, the DSC-M1 automatically enables a Noise Reduction system to eliminate excess image noise. The DSC-M1 offers Saturation, Sharpness, and Contrast adjustments, as well as a Picture Effects setting that lets you record images in black and white or sepia monotones. White Balance options include an Auto setting, as well as Daylight, Cloudy, Fluorescent, Incandescent, and Flash modes. The DSC-M1's flash operates in Forced, Suppressed, Auto, Red-Eye Reduction, and Slow-Sync modes.
In Movie exposure mode, the camera captures either 640 x 480-, or 320 x 240-pixel resolution moving images with sound for as long as the memory card has available storage space. At the 640 x 480 setting, movies are recorded at 30 frames per second, while at the lower 320 x 240 setting you have a choice of either 15 or 30 frames per second. A first for Sony, the movies are recorded using the MPEG4 codec, rather than the more common MPEG1. This allows for higher quality videos (Sony quotes 50% more vertical resolution), with only 1/4 the bit-rate of MPEG1. This means you can have high-resolution, high-framerate video with smaller file-sizes than previously. Another first for Sony is that the DSC-M1 has two microphones, allowing for stereo sound recording - rather than the mono sound that you get with the great majority of digital cameras.
Two unusual operating modes related to the camera's movie functionality that bear a little further description are accessed via switches on the rear of the camera. Even though the M1 is capable of recording movie clips for as long as there is memory space and battery life available, the "5SEC" switch enables a mode where movie clips are limited to five seconds in length. Should you decide when already recording a movie that five seconds is not sufficient, you can press the Movie shutter button again to reset the counter and give yourself another five seconds of recording time. There is no way to stop the movie from recording before the most recent five second counter runs out. The idea of this, according to Sony, is to emphasise the fact that the M1 is not intended to replace a camcorder, and is better suited to taking short video clips. Even more unusual is the Hybrid mode, accessed via a Hybrid switch. Whenever the camera is operating in Hybrid mode, it is recording video from the CCD to the camera's internal buffer. At any time, there will be up to five seconds of video stored in the buffer, and anything older is discarded. When you press the Photo shutter button, the most recent five seconds of video is saved to the Memory Stick PRO Duo card. The camera then captures a still image, then (if enabled in the setup menu) records a further three second video clip. This is in a way reminiscent of the still image burst mode in some cameras, in that it allows the camera to help you in capturing unexpected action that happened before you pressed the shutter button, albeit in the form of a lower resolution video clip, rather than a high resolution still image. The main goal of this mode is to "surround" still images with several seconds of video that effectively 'set the scene' for the photo, although how useful this will be in real life, I'm not sure. Certainly the idea of being able to capture still images during video recording seems attractive, but there are a couple of things I'd like to see changed. For one, there is currently about a one second gap on either side of the still image where no video is recorded; it would be nice to see this gap reduced greatly. I'd also like to see it become possible to record a still image at any time during a video recording, simply by pressing the Photo shutter button - something the DSC-M1 cannot do. Still, the Hybrid mode is certainly an interesting idea, and could capture some fun moments with which to surround your still images...
Through a Record menu option, the DSC-T1 also offers a Multi Burst mode, which captures an extremely rapid 16-frame burst of images, at a selectable rate of 7.5, 15, or 30 frames per second. Multi Burst shots are played back as a slow-motion animation on the camera, but appear as a single large file with 16 sub-images in it when viewed on a computer. (This is a useful tool for analyzing golf and tennis swings.) The same menu option also offers Exposure Bracketing and Speed Burst options. Exposure Bracketing mode captures a series of three images at different exposure settings, and you can set the exposure step size that's applied between shots. Speed Burst mode works like a motor drive on a traditional 35mm camera, capturing a maximum of four images in rapid succession. A Self-Timer mode provides a 10-second delay between the time the Shutter button is pressed and the time that the camera actually takes the picture, giving the photographer time to run around and get into the picture.
The DSC-M1 stores images on Sony Memory Stick Duo and Memory Stick PRO Duo memory cards, available separately in capacities as large as 128MB for standard Duo cards and 512MB for PRO versions (cards as large as 1GB are slated for availability in November 2004). A 32MB Memory Stick Duo comes with the camera, but I'd recommend immediately purchasing a larger capacity card so you don't miss any shots. For power, the DSC-M1 uses a single NP-FT1 Info-Lithium battery pack, which accompanies the camera. An included USB cradle also acts as the battery charger and AC adapter, and connects the camera to a computer as well. The DSC-M1 doesn't have any standard connection terminals itself, though the cradle features USB, DC In, and AV Out connector jacks. A software CD is loaded with Sony Picture Package v1.2 software and USB drivers, for downloading and organizing images.
Basic Features
- 5.1-megapixel CCD.
- 2.5-inch color LCD monitor with Transflective design for dramatically improved readability in bright light.
- Carl Zeiss Vario Tessar 3x zoom lens, equivalent to 38-114mm on a 35mm camera.
- Maximum aperture of f/3.5 - f/4.4, depending on lens zoom position.
- As much as 2x Precision Digital Zoom.
- Full Auto and Program AE exposure modes.
- Shutter speeds from 1/1,000 to one second.
- Built-in flash with four modes.
- Memory Stick Duo and Memory Stick PRO Duo image storage, 32MB Memory Stick Duo card included.
- USB cradle included for battery charging, and easy connection to a computer or television set, USB and A/V cables included.
- Power supplied by NP-FT1 Info-Lithium battery (supplied) or AC adapter (via USB cradle).
- Software and USB drivers included for both Windows and Mac platforms.
Special Features
- Separate shutter buttons for photo and movie recording
- MPEG4 movie format (dubbed 'MPEGMOVIE4TV'), a first for Sony, offers smaller file size, better video quality
- Magnifying Glass (Macro), Twilight, Twilight Portrait, Landscape, Snow, Beach, High-speed Shutter, Fireworks, and Candle preset scene modes.
- 10-second Self-Timer for delayed shutter release.
- Picture Effects menu with Black-and-White and Sepia effects.
- Macro (close-up) lens setting.
- White balance (color) adjustment with six modes.
- Multi Burst, Auto Exposure Bracketing, and Speed Burst record modes.
- Multi-Pattern metering mode.
- Sensitivity setting with three ISO equivalents (100, 200, 400) and an Auto setting.
- Five-area Multi-Point auto focus with Spot and Center AF modes, and AF illuminator.
- Automatic Noise Reduction for longer exposures.
- PictBridge and DPOF (Digital Print Order Format) compatibility.
Recommendation
Compact and versatile, the Cyber-shot DSC-M1 offers some of the capabilities of a digital video camera combined with those of a digital still camera -- great for when you want to record a combination of video clips and still images. (A useful feature for say, a ballet recital, where you'd like to record a decent amount of footage, but capture a few stills of the performers.) The camera sports a completely new design aesthetic compared to the rest of the line, and though it's fairly compact, offers excellent features like a Carl Zeiss zoom lens, large LCD monitor, and 5.1-megapixel CCD. It offers the convenience of point-and-shoot simplicity, but with enough advanced features to make it possible to take photos in otherwise challenging situations (low light, fast action, etc.). A unique Hybrid shooting mode captures a combination of still images and video, all with a single press of the shutter button - effectively surrounding your still photos with video that helps "tell the story" for you. All in all, an easy to use camera that offers an eye-catching design and some rather unusual features.
Sony's Cyber-shot line of digital still cameras spans a wide range, including models in most categories - whether you're looking for something at the entry level or packed with features, and regardless of whether you place an emphasis on size and fashion-consciousness or versatility. The new Sony Cyber-shot DSC-M1 takes the line in a completely new direction, focusing on the integration of movie capture functionality into a digital still camera. Most digicams offer movie recording as an option nowadays, but such features are frequently hidden as a selection on a mode dial or in a menu - not promoted by the manufacturer, and infrequently remembered or used by the owner. Several recent models from a variety of manufacturers have taken tentative steps towards changing this - including the addition of separate shutter buttons for still image and movie recording, for example - but the fact remains that at the end of the day, most of these models are clearly aimed at still recording, with movie almost an afterthought. The M1, says Sony, has been designed with a form factor, control layout and feature set aimed at improving the movie functionality. The company still makes it very clear that it considers this a digital camera with enhanced movie functionality, though, rather than a camcorder or a "convergence" device (the latter long being a buzzword in some quarters of the digicam industry, among those who feel that eventually one product will satisfy the demands of both still and movie capture).
The DSC-M1 packs a variety of features into a fairly small package. The main items, such as the five megapixel Sony SuperHAD CCD image sensor, prism-folded Carl Zeiss Vario Tessar 3x optical zoom lens, and 2.5" transflective LCD display are identical to those seen in Sony's Cyber-shot DSC-T1 ultracompact camera. The body design is totally different, though. The camera body has a vertical design similar to a cell-phone, but with two sections connected at the top by a 90-degree swivel. Measuring 2.0 x 4.5 x 1.06 inches (51 x 114 x 27.8 millimeters) with the swivel closed, the DSC-M1 should fit well into larger coat pockets and purses, and comes with a wrist strap for carrying (though I'd recommend picking up a soft case for better protection). With the battery and memory card installed, the DSC-M1 weighs only 7.5 ounces (215 grams), which is fairly light considering its mostly metal construction. For comparison purposes, the M1 is only slightly bigger and heavier than Sony's compact Cyber-shot DSC-P100 model.
The thicker of the two body sections contains the lens, flash, battery, connectivity, and most of the controls. The thinner section swivels outward 90 degrees clockwise for image capture, such that the camera as a whole forms an inverted L shape. Swivelling this section outwards also acts as a power switch, starting the camera up in record mode. This section houses the LCD display (itself able to swivel 270 degrees to face either directly upwards, downwards, or even towards the subject in front of the camera), as well as two microphones (for stereo sound recording), a mono speaker, Memory Stick PRO Duo slot, and a few more controls. When shooting, you wrap the fingers of your right hand around the base of the vertical portion of the camera, and use your right thumb to press the various controls on the camera's rear. While the camera could be controlled single-handed, your left hand will tend to hold the end of the LCD display for steadiness, putting your left thumb within reach of the controls at the end of the display. This way of holding the camera gives a good, secure grip, along with keeping your hands away from the lens and flash. Two shutter buttons are within reach of your right thumb (one for still images, and one for movies), plus there are a further two buttons (part of a group of three) at the left of the LCD that double as shutter buttons in reach of your left thumb - serving the exact same purpose.
I had the opportunity to play with a preproduction sample of the DSC-M1 fairly extensively, while preparing this article. While the concept is intriguing, I felt that the M1 had a number of rough edges, from a design / ergonomics standpoint. Here are some of my observations:
- It is natural to curl a finger behind the LCD display - but doing so potentially blocks one or both of the microphones used for stereo sound recording.
- With the exception of the two shutter buttons, the array of buttons within easy reach of your right thumb are mostly too small and give too little button-feel to press with the pad of your thumb - resulting in your having to change your grip on the camera to use the tip of your thumb, every time you try to press a button.
- The position of the Memory Stick PRO Duo slot on the edge of the camera, and with no cover of any kind, seems to be asking for something to bump the card, not to mention the potential for dust / water / debris to enter the slot. Were you to bump the card accidentally and eject it, you'd probably be OK, since the card still requires a gentle tug to remove. If the mechanism loosens enough for the tiny card to fall out by itself as the camera ages, though, you could potentially lose it. Given Sony's recent announcement of higher capacity cards, and updating pricing, this could conceivably cost you up to $350 for a 1GB High Speed card (!). Surely it wouldn't be too difficult to add a small cover over the card slot to provide a little extra peace of mind?
- It is thoroughly confusing to find that you can close the 90-degree swivel and the camera remains in record mode, with two shutter buttons temptingly within reach if you were to hold the camera horizontally. The reason this is confusing is that if you hold the camera horizontally, its lens is now tilted on its side; turn the camera to a vertical orientation, and while the lens is now upright, you'll find the LCD is now on its side instead, and there's no shutter button within reach any more. Realistically, the camera is completely unuseable for recording without the swivel opened (that is, unless you walk around with your head glued to your left shoulder!). It would be more intelligent if the camera would switch to playback mode automatically when the swivel was closed with the LCD facing outwards.
- Perhaps related to the previous point, but when the swivel is closed with the LCD facing inwards, one would expect the camera to power itself off (and in fact, the draft manual we received with the camera said that this would happen). With our prototype, the only way to power the camera off, however, was to press the power button on the side of the camera. Closing the swivel would not even turn off the LCD to save power, let alone power the entire camera off.
- Again, perhaps a related point, but if you open the swivel, turn the LCD around to face outwards, and close it immediately, the camera never actually powers itself on (the power LED illuminates briefly, then goes back off). It would seem more logical to automatically power the camera on in playback mode in this situation.
- The entire double-swivel design seems to leave the camera feeling rather fragile in one's hands, even despite the mostly metal finish of the camera. The 270-degree swivel connection of the LCD has a lot of flex in it, potentially leaving a gap of perhaps half a centimeter between the two halves of the body when closed. It is easy to imagine sliding the camera into a pocket without paying proper attention, resulting in your actually sliding only one half of the camera into the pocket. It is equally easy to imagine snapping the entire LCD off through just such an error. Whether this would actually be an issue in practice (and with production models) is open to question, but the flex in the swivel mechanism of the prototype I handled did leave me concerned about its sturdiness and likely longevity.
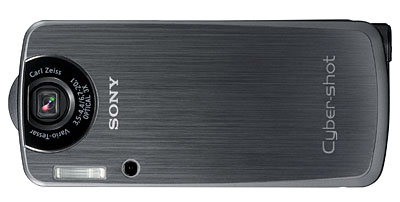
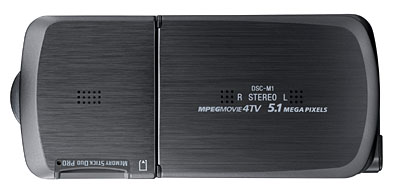
The front of the camera features the lens, self-timer lamp / AF illuminator, and flash (when the main swivel is closed). An internally-actuated, motorized lens door protects the lens when the camera is powered off, or when it is in playback mode. With the swivel opened, and the LCD display facing towards the rear of the camera, you can also see the two separate microphones used to provide stereo sound for movies.
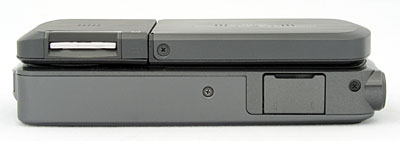
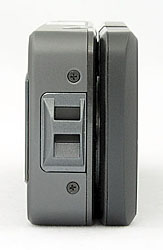
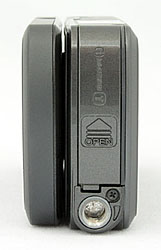
The main swivel swings upwards on the right-hand side of the camera body (as seen from the rear), when opened. With the swivel closed, you can see the Memory Stick PRO Duo slot on this side of the camera; with the swivel opened, the slot ends visible from the top of the camera. The only other detail on this side is the connector for the bundled camera dock, covered by a small, hinged plastic door which requires the use of a fingernail to open.
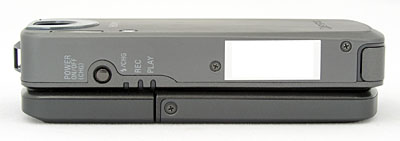
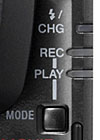
The opposite side of the Cyber-shot DSC-M1 is mostly smooth and featureless, with the exception of a small, recessed power button, and the edges of three small LEDs (Flash / Charge, Record, and Play) which wrap around to the rear of the main panel.
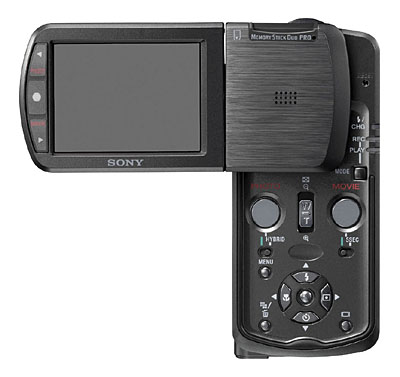
Almost all of the DSC-M1's controls and features are located on the back of the two panels. Most of the time, you'll have the main swivel opened - with no less than fourteen buttons, two switches and a zoom slider visible between the two panels. A small recessed Reset button, which can be pressed with a fine-tipped object such as an unfolded paperclip, is located at the top of the main panel. This allows you to reset the camera in the event of a problem, and will reset to the defaults all settings, including the date and time. Directly below the reset button, on the edge of the panel, three LEDs wrap around the side of the camera. The top LED, Flash / Charge, flashes orange when the camera's flash is charging, and illuminates steady orange when the flash is ready to fire or the camera's battery is being charged. The lower two LEDs, Record and Play respectively, will light green to indicate the camera's current operating mode. Directly below these LEDs, the Mode button switches the camera between Record and Playback mode.
Next in order down the main panel are two large circular buttons, the left being the Photo shutter button, and the right being the Movie shutter button. These surround the Zoom slider, which controls the optical and digital zoom functions of the camera. Below the Photo shutter button, the Hybrid switch changes the camera between regular and Hybrid shooting modes. The "5SEC" switch below the Movie shutter button changes the camera between recording movie clips of unlimited length, and clips limited to 5 seconds per press of the Movie shutter button. A group of four arrow buttons with a central "Set" button at the bottom of the camera are used to navigate menus and select options, as well as to view images and movies in Playback mode. The four arrow buttons also each have second functions in Record mode - the Up arrow doubling as a Flash button, the Right arrow as a Metering button, the Down arrow as a Timer button, and the Left arrow as a Macro button. Finally for this panel, at the bottom left corner is the Image Size / Delete button, and at the bottom right corner is the Display button.
The LCD display itself is located on a stalk which allows it to swivel 90 degrees upwards, or 180 degrees downwards (resulting in it facing forwards, towards the subject - ideal for self-portraits). This swivel can obviously only be turned when the main swivel has been opened, allowing the panel space to turn. The main swivel can be closed regardless of whether the LCD display is facing outwards (suitable for image review) or inwards (to protect the LCD when the camera is powered off).
To the left of the LCD display, a group of three buttons duplicate the effect of buttons located on the main panel. In record mode, the top button acts as a second shutter release for capturing still photos, and the bottom button acts as a second shutter release for capturing movies, while the middle button has no effect. In playback mode, the top and bottom button scroll through the available images and movies in the same manner as the left and right arrows on the Four-Way Controller, while the middle button duplicates the function of the Set button located in the center of the Four-Way Controller. All three of these buttons are constructed from one piece of soft plastic through which you can press a small microswitch, so they give very little tactile feedback (especially the smaller, triangular top and bottom buttons). To the right of the LCD display, you can see the camera's speaker (a grid of 15 small holes just below the Memory Stick PRO Duo slot).
With the main swivel closed, you can see only the Memory Stick PRO Duo slot peeking around from the side of the camera, the speaker, the 2.5-inch transflective LCD display, and three buttons lining the edge of the LCD (described above),. In this arrangement, the camera is really only useful for image / movie playback since (as described previously) either the lens or LCD display will be tilted on one side, depending on how you hold the camera. Given the large LCD display, it would be quite good for showing movies and images to friends and family, serving as a portable image viewer of sorts, though.
The bottom panel of the DSC-M1 features only the battery compartment and the tripod mount. The battery compartment is covered by a plastic door which slides outwards and then remains attached to the camera by a flexible plastic hinge. On our prototype, this door didn't really 'click' in place when closed, making it very easy to bump open. The battery itself is held in the slot with a good spring-loaded catch, so there's no chance of it falling out, but we'd still like to see the door improved on production models. Given the tiny size of the camera's bottom panel thanks to its vertical design, it is not surprising to see the tripod mount at the very edge of the camera, and still right on top of the battery compartment as well. It seems unlikely that users will often put the M1 on a tripod or use it in a studio, so neither is likely to be of much importance in the real world.
With a large number of external controls (given the size of the camera), the Cyber-shot DSC-M1's user interface may take a little time with the user's manual to learn, but the LCD menu system is quick and easy to understand. A Four-Way Controller on the rear of camera lets you adjust a range of exposure features without activating the LCD menu. The operating mode is selected by the Mode switch on the camera's rear panel, and the Exposure Mode is set through the camera's menu system. You can capture still images or record movies at any time (when in record mode) by pressing either the Photo or Movie shutter button on the rear of the camera, or the duplicate buttons to the left of the LCD display.
When it is necessary to enter the LCD menu system, you'll find it simple to navigate. Three menus are available - a menu each for the Record and Playback settings (only accessible in the appropriate operating mode), plus the Setup menu, which is available in any mode and accessed through the other two menus. The arrow keys of the Four-Way Controller scroll through each selection, and the Set button, located in the center of the Four-Way Controller, confirms any changes. It shouldn't take much more than half an hour to an hour to become familiar with the camera setup, as it's reasonably intuitive.
 Record
Mode Display:
The DSC-M1's LCD monitor reports a fair amount of camera information in Record mode, including the battery level and approximate operating time left (a feature unique to Sony digicams, thanks to their "InfoLITHIUM" battery technology), image resolution and quality, exposure mode, flash mode, autofocus mode, and any other basic settings. A set of focus brackets is in the center of the frame. A half-press of the Photo shutter button adds the shutter speed and aperture settings to the bottom of the display. The Display button cycles through a range of display modes, enabling a histogram, as well as eliminating the information overlay. A fourth display mode turns off the LCD's backlight, presumably to save power (although this mode also disables the battery-life display, so we're unsure as to the extent of the gain in battery life.)
Record
Mode Display:
The DSC-M1's LCD monitor reports a fair amount of camera information in Record mode, including the battery level and approximate operating time left (a feature unique to Sony digicams, thanks to their "InfoLITHIUM" battery technology), image resolution and quality, exposure mode, flash mode, autofocus mode, and any other basic settings. A set of focus brackets is in the center of the frame. A half-press of the Photo shutter button adds the shutter speed and aperture settings to the bottom of the display. The Display button cycles through a range of display modes, enabling a histogram, as well as eliminating the information overlay. A fourth display mode turns off the LCD's backlight, presumably to save power (although this mode also disables the battery-life display, so we're unsure as to the extent of the gain in battery life.)
 Playback
Mode Display:
In Playback mode, the LCD monitor reports basic information such as the image resolution, battery level and time, folder number, image series number, file name, and the date and time the image was captured. Pressing the Display button enables an expanded information display with basic exposure information and a small histogram. You can also cancel the information display entirely, by pressing the Display button a third time. As in Record mode, a fourth press of the button disabled the LCD's backlight, but doesn't shut the LCD off. Sliding the zoom control to the wide-angle side brings up a 9-image thumbnail display of previously-captured images, and doing it a second time switches to a 16-image display. Pressing the telephoto side of the zoom control reverses the process, and continued pressing smoothly zooms in on the currently-displayed image. When zoomed, the arrow keys scroll the enlarged view around the image as a whole.
Playback
Mode Display:
In Playback mode, the LCD monitor reports basic information such as the image resolution, battery level and time, folder number, image series number, file name, and the date and time the image was captured. Pressing the Display button enables an expanded information display with basic exposure information and a small histogram. You can also cancel the information display entirely, by pressing the Display button a third time. As in Record mode, a fourth press of the button disabled the LCD's backlight, but doesn't shut the LCD off. Sliding the zoom control to the wide-angle side brings up a 9-image thumbnail display of previously-captured images, and doing it a second time switches to a 16-image display. Pressing the telephoto side of the zoom control reverses the process, and continued pressing smoothly zooms in on the currently-displayed image. When zoomed, the arrow keys scroll the enlarged view around the image as a whole.
External Controls
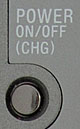
Power Button: Recessed slightly to reduce accidental activation,
this button on the right side of the camera powers it on and off. The camera can also be powered on by swivelling LCD section 90 degrees outwards, but swivelling it back inwards will not turn the camera off unless you do it immediately after swivelling it out (in which case, the power light turns on and back off, but the camera never starts up).
Mode Button: Located on the upper right rear of the main section of the camera. Switches the camera between Record and Playback mode, indicated by the green LEDs directly above this button.

Zoom Slider: Located to the left of the Movie Shutter button, this
slider moves upwards and downwards several millimeters, controlling the optical
and digital zoom, as well as the playback multi-display and playback zoom. A
small ridge on the button serves to give a little purchase on it, but it can
still be a little difficult to move accurately with the pad of your thumb. In
Record mode, moving the slider upwards zooms out, and moving it downwards zoom
in. In Playback mode, sliding it downwards enables the playback zoom function,
which zooms into the image from 1.1x to 5.0x in 17 steps (1.1x, 1.2x, 1.3x,
1.5x, 1.6x, 1.8x, 2.0x, 2.2x, 2.4x, 2.7x, 3.0x, 3.3x, 3.6x, 3.9x, 4.3x, 4.7x,
5.0x). When zoomed in, you can pan around the images with the Four-Way Controller,
and zoom back out by moving the Zoom slider upwards. When zoomed out, pushing
upwards on the Zoom slider switches the camera to a 9-image thumbnail display
on the first press, and to a 16-image thumbnail display on the second press.

Photo Shutter Button: Directly to the left of the Zoom slider, this button
sets focus and exposure when halfway pressed, and fires the shutter when fully pressed.
Hybrid Switch (see above): Directly below the Photo shutter button, this
switch sets the camera to regular or hybrid shooting modes. Whenever the camera
is operating in Hybrid mode, it is recording video from the CCD to the camera's
internal buffer. At any time, there will be up to five seconds of video stored
in the buffer, and anything older is discarded. When you press the Photo shutter
button, the most recent five seconds of video is saved to the Memory Stick PRO
Duo card. The camera then captures a still image, then (if enabled in the setup
menu) records a further three-second video clip.

Movie Shutter Button: Directly below the Mode button, this large circular
button starts movie recording on the first press, and stops it on the second
press. There is no separate movie mode on the DSC-M1; movies can be recorded
whenever the camera is in record mode.
5SEC Switch (see above): Located directly below the Movie shutter button, this switch sets the camera to regular (unlimited) or five second movie-clip recording mode. When in the five second mode, movie clips are limited to five seconds in length. Should you decide when already recording a movie that five seconds is not sufficient, you can press the Movie shutter button again to reset the counter and give yourself another five seconds of recording time. There is no way to stop the movie from recording before the most recent five second counter runs out. The time remaining is shown on the LCD display as a series of five dots which disappear one by one, at one-second intervals.
![]()
Menu Button: Located below the Hybrid switch,
this button displays or dismisses the settings menu in Record or Playback mode.
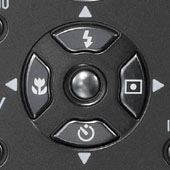
Four-Way Controller Buttons: Located in the bottom center of the camera's rear panel, this group of four buttons navigates menu choices, navigates between images and movies, cues backwards / forwards through movies, and pans about in images when the Playback zoom is active. Each of the four buttons also has a second action when in Record mode;
the Up arrow doubles as a Flash button, the Right arrow as a Metering button, the Down arrow as a Timer button, and the Left arrow as a Macro button.
Set Button (see above): Located in the center of the Four-Way Controller buttons, this button (labelled with a white dot, and not named anywhere in the documentation) confirms selections in menus, selects images in the thumbnail playback mode, and returns from the playback zoom to the full image in one press. It also starts playback of movies, and stops the camera cuing through movies after pressing the Left or Right Arrow button. It doesn't appear to have a function in Record mode, although it does beep when pressed.
![]()
Image Size / Delete Button: Located at the very bottom left corner of the camera's rear panel, in Record mode this button calls up the Photo Size / Movie Size menu, where you can select the size at which to record images and movies. In Playback mode, this calls up the Single-Image Delete menu, where you can select to delete the current image, or exit without deleting it.
![]()
Display Button: Located at the very bottom right corner of the camera's rear panel, this button cycles through a range of display modes in both Record and Playback mode, enabling a histogram, as well as eliminating the information overlay. A fourth display mode turns off the LCD's backlight, presumably to save power (although this mode also disables the battery-life display, so we're unsure as to the extent of the gain in battery life.) When a menu is active, this button just cycles between turning the LCD's backlight on and off.

Left Arrow / Photo Shutter Button: Located at the top of
a group of three buttons to the left of the LCD display, this button duplicates
the effect of the Photo Shutter button in Record mode, but without the ability
to half-press the button to focus and meter the scene. In Playback mode, it
duplicates the effect of the Left Arrow button in the Four-Way Controller.

Duplicate Set Button: Located directly below the Left Arrow / Photo Shutter button, this button (labelled with a white dot, and not named anywhere in the documentation) duplicates the effect of the Set button in the center of the Four-Way Controller buttons.
![]()
Right Arrow / Movie Shutter Button: Located at the top
of a group of three buttons to the left of the LCD display, this button duplicates
the effect of the Movie Shutter button in Record mode. In Playback mode, it
duplicates the effect of the Right Arrow button in the Four-Way Controller.
Camera Modes and Menus
Record Mode: In Record Mode, the camera can capture still images or movie files, controlling the shutter speed and aperture automatically. Both photos and movies can be captured, courtesy of separate shutter buttons for each. Two modes for movies are available, accessed by a switch on the camera's rear panel. The regular mode allows for clips with length limited only by available memory space and battery life. A "5SEC" mode shortens this to five seconds per clip, although you can extend clips for another five seconds each time you press the Movie shutter button during recording. Also, a Hybrid mode (accessed by a separate switch on the rear of the camera) sets the camera to regular or hybrid shooting modes. Whenever the camera is operating in Hybrid mode, it is recording video from the CCD to the camera's internal buffer. At any time, there will be up to five seconds of video stored in the buffer, and anything older is discarded. When you press the Photo shutter button, the most recent five seconds of video is saved to the Memory Stick PRO Duo card. The camera then captures a still image, then (if enabled in the setup menu) records a further three second video clip. Pressing the Menu button displays the Record settings menu, with options varying depending on the exposure mode selected (each option is marked on the LCD as related to photos, movies or both):
 Camera:
Offers Auto, Program AE, Magnifying Glass (Macro), Twilight, Twilight Portrait,
Landscape, Snow, Beach, High-speed Shutter, Fireworks, and Candle exposure
modes. The mode selected dictates which of the following options are available.
Program mode offers all of the following, most of the others offer less. Auto
mode provides access only to the Mode and Setup menu options.
Camera:
Offers Auto, Program AE, Magnifying Glass (Macro), Twilight, Twilight Portrait,
Landscape, Snow, Beach, High-speed Shutter, Fireworks, and Candle exposure
modes. The mode selected dictates which of the following options are available.
Program mode offers all of the following, most of the others offer less. Auto
mode provides access only to the Mode and Setup menu options. - Exposure Compensation: Increases or decreases exposure from -2 to +2 exposure equivalents (EV) in one-third step increments.
- Focus: Changes the focus area to Multi AF, Spot AF, or Center AF, or selects from a range of fixed focus settings (0.5, 1.0, 3.0, or 7.0 meters, or Infinity).
- White Balance: Sets the color balance to Auto, or adjusts for Daylight, Cloudy, Fluorescent, Incandescent, or Flash light sources.
- ISO: Sets the camera's sensitivity to Auto, or to 100, 200, or 400 ISO equivalents.
- Image Quality: Sets the JPEG compression level to Fine or Standard.
- Mode: Changes the recording mode to Normal, Multi Burst, Exposure Bracketing, or Speed Burst modes.
- Bracket Step: (Only available if Exposure Bracketing is selected above.) Sets the level of exposure variation for Auto Exposure Bracketing shots. Step sizes include 1.0, 0.7, or 0.3 EV.
- Interval: (Only available in Multi Burst mode.) Specifies the shutter interval for Multi Burst mode. Options are 1/7.5, 1/15, or 1/30.
- Flash Level: Sets the flash intensity to Normal, Low, or High.
- Picture Effects: Applies creative effects like Black and White or Sepia, or turns Picture Effects off.
- Saturation: Adjusts the overall color saturation, with High, Normal, and Low options.
- Contrast: Controls the level of contrast in images, with options for High, Normal, and Low.
- Sharpness: Adjusts the in-camera sharpening. Options are High, Normal, and Low.
Playback Mode: This mode allows you to review captured images and movies on the memory card, erase them, protect them, rotate them, resize them, set them up for printing, or play them back in a slideshow. Pressing the Menu button displays the following options (sorry no screenshots of this menu):
- Folder: Selects the folder of images to be played back.
- Protect: Write-protects the current image, or removes protection.
- DPOF: Marks the current image for printing on a DPOF device, or removes the print mark.
- Print: Prints images using a PictBridge-compliant printer.
- Slide: Enables a slide show of all images captured on the Memory Stick PRO Duo. You can control the interval between each image, the range of images to be played back, and whether or not the slide show repeats.
- Resize: Resizes the current image to one of the available resolution sizes.
- Rotate: Rotates the current image 90 degrees clockwise or counterclockwise.
Set-Up Mode : The following four-page Set-Up menu is available in Record and Playback modes, as an extension of the LCD menu:
- Camera :
 Hybrid
Record: Enables or disables the post-capture movie file when the
camera is operating in Hybrid mode. If enabled, the camera will capture
a five second movie file, a still image, then a three second movie file
for Hybrid-mode captures. If disabled, the camera will skip the second
movie file, and only capture the first five-second movie file and still
image.
Hybrid
Record: Enables or disables the post-capture movie file when the
camera is operating in Hybrid mode. If enabled, the camera will capture
a five second movie file, a still image, then a three second movie file
for Hybrid-mode captures. If disabled, the camera will skip the second
movie file, and only capture the first five-second movie file and still
image.- Digital Zoom: Enables or disables the camera's digital zoom function.
- Date/Time: Controls the date and time display, options are Day & Time, Date, or Off.
- Red-Eye Reduction: Enables the Red-Eye Reduction flash (which will fire with all flash modes), or turns it off.
- AF Illuminator: Puts the AF Illuminator into Auto mode, or simply turns it off.
- Auto Review: Activates the Auto Review function (which automatically displays the most recently captured image post-capture), or turns it off.
- Memory Stick Tool
 Format:
Formats the Memory Stick PRO Duo, erasing all files (even protected ones).
Format:
Formats the Memory Stick PRO Duo, erasing all files (even protected ones).
- Create Rec. Folder: Creates a new folder for recording images.
- Change Rec. Folder: Changes the folder that images are recorded to.
- Setup 1
 Beep:
Controls the camera's beep sound, setting it to Shutter, On, or Off.
Beep:
Controls the camera's beep sound, setting it to Shutter, On, or Off.- Language: Changes the camera's menu language. Our prototype offered only two selections, but we would expect final cameras to offer more choices.
- Setup 2
 File
Number: Sets file numbering to Series or Reset. The Series option continues
numbering files from one memory card to the next, while Reset starts over
with each new memory card.
File
Number: Sets file numbering to Series or Reset. The Series option continues
numbering files from one memory card to the next, while Reset starts over
with each new memory card. - USB Connect: Places the USB connection into PictBridge, PTP or Normal modes.
- Video Out: Specifies the camera's Video Out signal as NTSC or PAL.
- Clock Set: Sets the camera's internal clock.
In the Box
Packaged with the Cyber-shot DSC-M1 are the following items:
- 32 megabyte Memory Stick Duo card.
- Memory Stick Duo Adapter.
- UC-MA Cyber-shot Station camera dock.
- NP-FT1 rechargeable lithium-ion battery pack.
- AC-LM5 Battery charger with AC plug cord.
- Video cable.
- USB cable.
- Wrist strap.
- Software CD.
- Operating manual and registration card.
You can use the DSC-M1 right from the box, but the following items may increase our enjoyment of it:
- Larger capacity Memory Stick PRO Duo memory card.
- Additional NP-FT1 lithium-ion battery pack.
- Small camera case.
Recommended Software: Rescue your images!
Just as important as an extra memory card is a tool to rescue your images when
one of your cards fails at some point in the future. I get a lot of email from
readers who've lost photos due to a corrupted memory card. Memory card corruption
can happen with any card type and any camera manufacturer, nobody's immune.
A surprising number of "lost" images can be recovered with an inexpensive,
easy to use piece of software though. Given the amount of email I've gotten
on the topic, I now include this paragraph in all my digicam reviews. The program
you need is called PhotoRescue, by DataRescue SA. Read our review
of it if you'd like, but download the program now, so you'll have it.
It doesn't cost a penny until you need it, and even then it's only $29, with
a money back guarantee. So download PhotoRescue
for Windows or PhotoRescue
for Mac while you're thinking of it. (While you're at it, download the
PDF manual and quickstart guide as well.) Stash the file in a safe place and
it'll be there when you need it. Trust me, needing this is not a matter of if,
but when... PhotoRescue is about the best and easiest tool for recovering
digital photos I've seen. (Disclosure: IR gets a small commission from sales
of the product, but I'd highly recommend the program even if we didn't.)
OK, now back to our regularly scheduled review...
See camera specifications here.
Since the camera we reviewed was a prototype, we have not completed our usual timing and battery life testing at this time. I can report that Sony's InfoLithium technology suggests a battery life of 100 minutes in regular Record mode, 78 minutes in Hybrid Record mode, and 186 minutes in Playback mode. The several times I've tested InfoLithium cameras in the past, I've found InfoLithium's reported times have proven surprisingly accurate.
Since the camera we reviewed was a prototype, we have not completed our usual array of standardized test photos at this time.
| Free Photo Lessons | |
|

The ability to get reasonably good quality photos and video out of one compact device goes some way to solving that problem. That's an area in which the DSC-M1 definitely impresses. We've seen lots of digital camcorders that offer great video and terrible stills, and lots of digicam cameras with great image quality, but sub-par videos. The middle ground has thus far been very sparsely occupied, and the DSC-M1 offers perhaps the best combination of both still and video quality we've yet seen. There's no question that Sony's choice of the MPEG4 codec has helped bring the quality of videos a little closer to that of the still photos, which these days are getting to be rather attractive even in the lower-cost cameras. The lower bitrate of MPEG4 also means that the file size of your videos comes down, although you'll still almost certainly find it easier to deal with video tapes (be they analog or digital) than with MPEG files for really long videos. (This isn't a camera for filming the whole of your child's piano recital - as Sony themselves have said, you'll still want a separate camcorder for events like that). For shorter clips though, you'll find the MPEG4 clips a lot less unwieldy to store on your computer, and to back up for safe keeping.
The concept of mixing video with stills is an interesting one, but I must confess that I'm unsure whether this is something users actually want. Sony's Hybrid mode on the M1 is honestly rather confusing to explain to somebody who's unfamiliar with it. That may give the company problems at retail, where salesmen rattle off two or three specifications that they believe give customers a "universal goodness quotient" to compare cameras (and inevitably, to buy the most expensive one) - the customer will be left unaware of features like the Hybrid mode unless they actually take the time to research it themselves. Still, there seems to be the potential for such a feature to be attractive as a way to "package" your photos, wrapping them in a story - rather than letting them stand alone.
Overall, my initial thought is this: the DSC-M1 is a unique and rather interesting camera that looks to offer good still and video quality, as well as some truly unusual features - but could perhaps have been more appealing in another package. Given the current overload of more conventional still cameras awaiting review though, we probably won't return to do a complete test of the DSC-M1, unless reader emails seem to warrant it.
Other Reviews
Steve's Digicams's Sony Cyber-shot DSC-M1 ReviewDigital Photography Review's Sony Cyber-shot DSC-M1 Review

Follow Imaging Resource: