Back
to Full Toshiba PDR-M60 Review
Back
to Full Toshiba PDR-M60 ReviewGo to Toshiba PDR-M60 Data Sheet
Go to Toshiba PDR-M60 Pictures Page
Up to Imaging Resource Cameras Page
Use your browser's "Back" button to return to the previous page, or the links at the top and bottom of this page to navigate to related information. If you have difficulty fitting the text on this page onto your printer output, simply resize your browser window to a narrower width and print again.
Remember us when it's time to buy!
Dave here: Have our reviews been helpful to you? (Is this article you're reading right now useful?) Preparing this level of information on as many products as we do is incredibly hard work, not to mention expensive. Things on the Internet may look like they're free, but they're not. (As a lot of big dot.com companies are finding out these days.) Somewhere, somebody has to pay to produce worthwhile content. YOU can help us though, by remembering us when it comes time to make your purchase. Would you consider coming back to our site and clicking-through to one of our advertisers to make your purchase? Every dollar you spend with one of our advertisers helps us directly (in affiliate fees) or indirectly (the advertiser will keep renewing their ad contract with us). To make it easy for you to support us, here's a URL you can visit, to see all our current advertisers, with links to click on that will register your visit to them as having come from our site. It's up to you where you buy, but Mike, Mike, Kim, Yazmin, Marti and I would be really grateful if you'd help us out by choosing one of our advertisers to purchase from.
Thank you for your support!
Dave Etchells, Founder & Publisher
Visit our "Buy Now" Page:
https://www.imaging-resource.com/buynow.htm
Back
to Full Toshiba PDR-M60 Review
Go to Toshiba PDR-M60
Data Sheet
Go to Toshiba PDR-M60
Pictures Page
Up to Imaging Resource Cameras
Page
Toshiba PDR-M60Toshiba introduces a "value-priced" 2 megapixel camera with nice image quality and a 2.3x optical zoom. Review First Posted: 1/12/2001 |
|
 |
|
1.3 megapixel sensor for 1280x960 pixel images |
|
|
Simple user interface | |
|
|
Enough exposure control for most shooting situations | |
|
|
Compact design |
Executive Overview
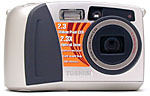
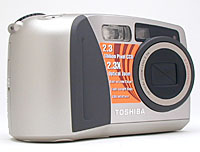
With its smooth contours and somewhat bulbous shape, Toshiba's PDR-M60 represents a scaled down, slightly slimmer version of its popular relatives, the PDR-M5 and PDR-M70 models. The all-plastic body keeps the camera at a very light weight (10.2oz, 290g), though at 4.76 x 2.95 x 2.4 inches (121 x 75 x 61mm), its size warrants a slightly larger coat pocket for carrying to special events and family outings. Toshiba has eliminated the need for a lens cap by including a built-in, retractable lens cover that slides open when the camera is turned on. The lens then telescopes out about 1/4 inch into its operating position. We appreciate the large, rounded hand grip, which provides a comfortable hold and a substantial point of balance.
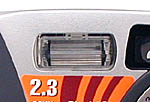
For composing images, the PDR-M60 provides an eyelevel optical viewfinder and a 1.8-inch color LCD monitor. An information display reports camera settings, available image space, and battery power on the LCD monitor, but can be canceled while composing images to eliminate unnecessary distractions. The LCD monitor also provides standard playback zoom and index display functions, as well as a quick image preview that pops up for two seconds after each image capture. For optics, the PDR-M60 features a 2.3x, 8-18mm optical zoom lens (equivalent to a 38-86mm lens on a 35mm camera). Focus is automatically controlled via a contrast detection system which bases its readings on the center portion of the image. A macro and 2x digital telephoto function are available in any capture mode. (Remember that digital zoom degrades image quality by producing higher noise levels and lower resolution.)
The PDR-M60 offers both Automatic and Manual exposure modes, although in this case, Manual mode is limited to White Balance, Exposure Compensation, and ISO adjustments. There are no manual aperture or shutter speed controls, except for the Bulb exposure mode, which allows you to set one- or two-second exposure times. In both Automatic and Manual exposure modes, the user can adjust the ISO speed equivalency setting or color mode. Choices include 100, 200, and 400 ISO, as well as a B&W (black-and-white) setting. In Manual mode, the White Balance setting provides Auto, Daylight, Cool Fluorescent, Standard Fluorescent, and Incandescent lighting adjustments. Exposure Compensation, which is also available only in Manual mode, ranges from -1.5 to +1.5 in one-third exposure equivalency unit (EV) increments. The built-in flash operates in Automatic, Red-Eye Reduction, Forced, Suppressed, or Slow Synchro modes, all controlled by an external button on the camera's top panel.
In addition to the Bulb setting, the PDR-M60 also offers a Multi-Shot mode, which captures 16 sequential 448 x 300 pixel images at up to 0.25-second intervals with one press of the shutter button. All 16 of these small images are saved as a single 1,792 x 1,200-pixel resolution image. The camera's self-timer can be set to either two or 10 seconds, through the Record menu. And an Erase button on the back panel allows you to quickly erase images, either in Record or Playback mode, with an option to format the entire SmartMedia card.
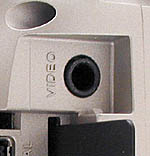
An NTSC video cable accompanies US and Japanese versions of the camera. (We assume that European models are equipped for PAL timing, given the option to change the video format in Set-Up mode). The television set acts as a larger LCD monitor, allowing you to compose or review images. Images are saved to SmartMedia cards (a 4MB card is included) in JPEG format. Also included with the camera are a USB cable and software CD for connecting and downloading images to a computer. The Sierra Imaging's Image Expert software provides moderate image editing and correcting tools, as well as the ability to organize images into albums and set them up for printing.
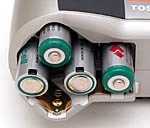
The PDR-M60 is powered by four AA batteries (a set of alkaline batteries is included); an AC adapter is available as an optional accessory. To help conserve power, the PDR-M60 features an auto shut-off function that powers down the camera after a user-specified period of inactivity.
Overall, we enjoyed shooting with the PDR-M60 and appreciated the simple user interface, which took no time at all to figure out. It is perfect for those consumers who want a good digicam, but who don't want to be bothered with complex exposure decisions. The camera's automatic exposure controls cover all the basics, while features like White Balance, ISO, and Exposure Compensation give the experienced shooter just a taste of manual control. Lightweight and very portable, the PDR-M60 combines the convenience of USB computer connection with a 2-megapixel chip and a reasonable price.
Design
Measuring approximately 4.76 x 2.95 x 2.4 inches (121 x 75 x 61mm), the PDR-M60 is a little too bulky for the average shirt pocket, but should fit quite well into a large coat pocket or purse. The camera weighs only 10.2 ounces (290 grams) and comes with a neck strap to make toting it a little easier. The PDR-M60's large, comfortable hand grip wraps around the camera's battery chamber, with a soft pad on the front for your fingers and a natural crevice on the back for your thumb. The overall layout is quite simple, with a sprinkling of control buttons on the top and back panels, and a large Mode dial to control the camera's power and operating mode. Most of the PDR-M60 features lend themselves to one-handed camera operation.
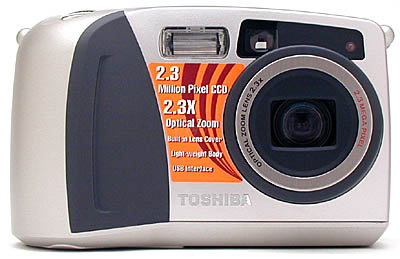
The front of the camera features a simple, sleek design, with a lens, built-in flash, viewfinder window, and self-timer LED lamp. A retractable, shutter-like cover protects the lens by automatically closing when the camera is turned off. When the Mode dial on top of the camera is set to a capture position (Auto or Manual), the lens cover retracts and the lens barrel extends about 1/4 inch out into its operating position.
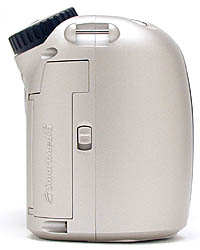
On the right side of the camera is the battery chamber, neck strap attachment eyelet, SmartMedia slot, and Digital and Video Out jacks. The SmartMedia slot and connection jacks are covered by a hinged, plastic door, which opens by releasing a sliding lever on the side. The SmartMedia slot is so close to the side of the compartment, that it can be a little tricky to push the card all the way into the slot, because there's not much room for your finger to move around. We also noticed that the slot will accept the card loaded the wrong way, so be sure to keep the gold electrodes facing the compartment door when loading.
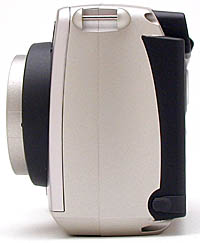
The opposite side of the camera has only the second neck strap eyelet and the DC-In jack, which is covered by a flexible rubber flap. The flap remains attached to the camera once pulled out, and fits snugly into place when you are not using the adapter.
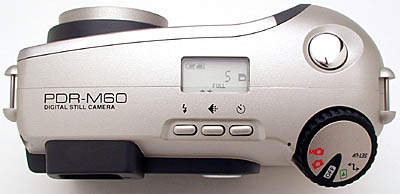
On top of the PDR-M60 is a small status display panel, the shutter button, three control buttons, and the Mode dial. The benefit of the small status display panel is that it reports most of the camera's settings, so you don't have to power up the LCD monitor every time you take a picture (thereby conserving precious battery power). The large Mode dial includes a power-off position and five operating modes, with finger-gripping rubber notches around the edge of the dial to make it easy to turn.
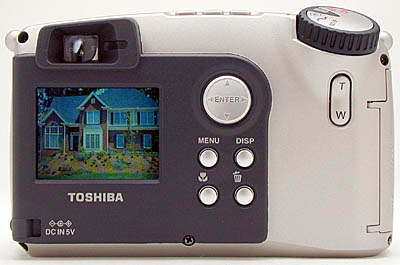
The remaining controls are on the camera's back panel, along with the LCD monitor, optical viewfinder eyepiece, and status LED. The back panel layout is designed to accommodate one-handed operation, with most control buttons positioned within thumb's reach. The rocker arrow key pad, which Toshiba refers to as the "Enter" button, is used as a navigation tool to simplify scrolling through menu items and captured images. The wide-angle/telephoto zoom control is located under the Mode dial. The four control buttons beneath the Enter button include: Menu, Display (DISP), Macro, and Trash.

Finally, the PDR-M60's bottom panel includes a plastic, threaded tripod mount and the battery compartment door. We found the battery door to be a little awkward, as it requires you to pull up on a lever bar to pop open the compartment. The hardest part is getting the door closed again, because the pull lever serves as the compartment door locking mechanism, and it isn't as fluid as other battery door designs we've seen. We also noticed that the battery compartment and tripod mount are too close to one another to allow quick battery changes when the camera is mounted on a tripod. Given the portable nature of this camera, however, we don't think this will be much of an issue for most users.
 Viewfinder
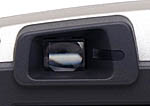
The PDR-M60 sports both an eyelevel optical viewfinder and an LCD monitor for composing images. The optical viewfinder zooms along with the lens, but doesn't show the 2x digital telephoto, which must be viewed on the camera's LCD. We noticed that at the full wide-angle setting, the lens barrel is just barely visible in the bottom left corner of the viewfinder. While this may be a bit annoying when composing images, it does not appear in images taken at the wide-angle setting. A status LED on the viewfinder's eyepiece indicates the camera's operating status. A solid green light appears when the camera has locked focus and exposure and is ready to shoot. If the LED flashes green, the camera's metering system is indicating a slow shutter speed, or the self-timer is in operation. A solid red LED means that the camera is writing an image to the SmartMedia card or that the lens cannot focus due to an obstacle. A flashing red LED indicates that the lens cannot focus or that the exposure conditions are too bright or too dark.
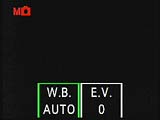
The 1.8-inch, amorphous silicon, TFT LCD monitor features a color display with approximately 71,760 pixels. The LCD automatically turns on when the camera is activated, but it can be turned off by pressing the Display button. The Display button also controls the information display, which reports various camera settings, including shooting mode, number of available images, flash, macro, self-timer, digital zoom, date, time, and battery consumption. To cancel the information display, press the Display button once. A second press cancels the LCD display altogether, and a third press brings back both the image and information displays. In Playback mode, the Display button cycles through a similar pattern, displaying both the captured image and standard on-screen display (file name and number), then the image with its capture information (resolution, date, and time), and finally just the image itself. The LCD brightness level can be adjusted in both Playback and Record modes through the settings menu.
In Playback mode, the LCD monitor provides an index display of up to nine thumbnail images on a page, as well as an image enlargement option that zooms into captured images for a close-up view. Captured images can be enlarged up to three times their actual size, using the Zoom button on the camera's back panel. The nine-image index display is activated by pressing the Enter button.
 Optics
The built-in, 2.3x, 8-18mm zoom lens is equivalent to a 38-86mm zoom lens on a 35mm camera. Focus is automatically controlled via a contrast detection method, and ranges from 19.7 inches (50cm) to infinity in normal shooting mode. Pressing the Macro button on the back panel reduces the focal range to 2 to 19.7 inches (5 to 50cm). Aperture is automatically controlled at all times, with a maximum lens opening of f/2.8 or f/3.2, depending on the zoom setting. Toshiba doesn't specify the M60's minimum aperture in its documentation, but we found it to be f/13.5 in our own testing. Instead of a lens cap, the PDR-M60 has an automatic, retracting lens cover that opens when the camera is set to either Auto or Manual capture modes. When activated, the lens extends approximately 1/4 inch through the two retractable "doors" and returns to the camera body when the camera is powered off.
Activated by pressing the Up arrow on the Enter button, the 2x digital telephoto function crops the image from the center of the CCD, and saves it as an image file at the camera's smaller (896 x 600) image size. This has the effect of doubling the "telephoto" effect of the lens, but at the cost of half your resolution. (The effect is exactly the same as if you'd shot a full-resolution photo, and then cropped out the central portion on the computer afterward. Digital telephoto automatically saves images at the low-resolution 896 x 600-pixel size regardless of the camera's resolution setting (except in Multi-Shot mode, which creates a 1,792 x 1,200-pixel image comprised of 16 tiny ones). Thus, this is only a "telephoto" effect for low-resolution images.
Exposure
The PDR-M60 features two capture modes, Automatic and Manual, which are accessed through the Mode dial. In both exposure modes, the camera controls shutter speed and aperture. Available shutter speeds range from 1/1,000 to 1/2 second, with one- and two-second exposure times available in the Bulb mode (accessed manually). The camera's instruction manual didn't report the full range of aperture settings, but listed the maximum setting as f/2.8 or f/3.2, depending on the amount of optical zoom. Our own tests revealed the minimum aperture to be f/13.5. The majority of the exposure functions are fully automatic, with the exception of White Balance and Exposure Compensation, which can be adjusted in Manual mode, and flash and ISO equivalency, which can be adjusted in both Manual and Automatic modes.
An LCD-based menu system controls most of the exposure settings, although the Flash, File size/quality, Self-Timer, Digital Zoom, Optical Zoom, and Macro modes feature external controls. The Record menu, which is accessed by pressing the Menu button, remains the same in both Automatic and Manual exposure modes. Upon switching to Manual mode, the White Balance and Exposure Compensation menu items automatically appear on-screen, displayed over the LCD image. Pressing the Up arrow button pulls up sub-menus with a range of options from which to choose.White Balance options include Auto, Daylight, Cool White Fluorescent, Standard Fluorescent, or Incandescent. Exposure Compensation can be adjusted from -1.5 to +1.5 in one-third EV increments. (The camera automatically controls white balance when shooting in Automatic exposure mode.) To display the standard information screen in Manual mode, simply press the Enter button to remove the White Balance and Exposure Compensation menus.
The PDR-M60 also provides adjustable ISO settings through the Record menu, with sensitivity equivalents of 100, 200, and 400, and a B&W (black-and-white) setting, which, if selected, records images in black-and-white. As a default setting, the PDR-M60 automatically displays a two-second preview immediately after an image is captured. To disable this preview, simply turn the setting off in the Record menu. An Erase button on the back panel allows you to delete the previously captured image, but is ineffective during the image preview. A built-in self-timer counts down from either 10 or two seconds before firing the shutter, after the shutter has been fully depressed. Although it is activated via the Self-Timer button on top of the camera, the countdown time is adjustable through the Record menu, in both Automatic and Manual exposure modes. Once the countdown begins, the viewfinder LED and the Self-Timer LED on the front panel blink to indicate the countdown.
 Flash
Flash
The PDR-M60's built-in flash offers five operating modes: Auto, Red-Eye Reduction, Forced Flash, Suppressed Flash, and Slow Synchro. The Automatic setting places the camera in charge of when to fire the flash, based on current exposure conditions. Red-Eye Reduction eliminates the red-eye effect by firing a small pre-flash before the full flash, to allow the subject's pupils to adjust to the light. This mode is most effective when the camera is level with the subject's line of sight and at the closest distance possible. The Forced Flash mode fires the flash with every exposure, regardless of the light level. Likewise, Suppressed Flash mode completely disables the flash. Finally, Slow Synchro mode synchronizes the flash with a slow shutter speed, to allow more ambient light into night scenes. When shooting with the flash in Slow Synchro mode, use a tripod to prevent blurring in the image caused by camera movement. The flash is completely disabled when shooting in the Multi-Shot and Bulb record modes. The Flash button on top of the camera controls the flash mode, and the camera remembers the previous mode setting after it has been powered off (unless the batteries or AC adapter have been completely removed, which signals the camera to revert to factory default settings). Toshiba estimates that the PDR-M60's flash is effective from 1.65 to 9.8 feet (0.5 to 3.0 meters). In our own tests, we noticed a significant drop in flash brightness in moving from 8 to 9 feet, so we'd rate it as having a range of somewhere around 8.5 feet, not 9.8.
Multi-Shot Mode
Accessed through the Record Mode menu option under the Record menu, the PDR-M60's Multi-Shot capture mode captures 16 consecutive images at approximately 0.25 second intervals, with one press of the shutter button. The 16 images are saved as one 1,792 x 1,200-pixel resolution image. The actual shot-to-shot cycle time varies with the amount of image information being processed, and the flash capability is disabled. Available in both Automatic and Manual exposure modes, the Multi-Shot mode is a unique way to capture the actions of a moving subject.
Bulb Mode
For long exposures of night subjects, such as fireworks or cityscapes, the Bulb photography mode offers one- and two-second exposure times. The flash is disabled in this mode, and a tripod is highly recommended to keep the camera steady. After the exposure, the camera takes another couple of seconds to process the image. As we've noted with other Toshiba digicams, the PDR-M60 is actually taking two pictures each time you snap the shutter in Bulb exposure mode. The first exposure captures the subject, and the second takes a picture with the shutter closed. Since the image should be completely black when the shutter is closed, the camera assumes that anything it "sees" there is noise, which it then subtracts from the image of the subject. This greatly reduces image noise and the problem of "stuck" pixels.
Thanks to Toshiba's clever implementation of bulb mode, the PDR-M60 does much better at low light shooting than many competing inexpensive two megapixel models.
Shutter Lag/Cycle Times
When you press the shutter release on a camera, there's usually a lag time before the shutter actually fires. This pause allows the autofocus and autoexposure mechanisms time to do their work, and can amount to a fairly long delay in some situations. Since this number can significantly affect the picture-taking experience, and is almost never reported by the manufacturer or other reviewers, we now routinely measure it using a proprietary Imaging Resource testing system.
|
|
||
|
|
|
|
| Power On -> First shot |
|
Faster than average
|
| Shutdown |
|
A little slow, but not usually an issue.
|
| Play to Record, first shot |
|
Essentially instant if the lens is extended. 2.5 seconds if lens is retracted. VERY fast in normal usage!
|
| Record to play (max/min res) |
|
A bit faster than average
|
| Shutter lag, full autofocus |
|
Rather slow |
| Shutter lag, prefocus |
|
VERY fast! |
| Cycle time (max/min res) |
|
Very fast. (Toshiba is known for fast processing in their cameras.) |
| Frame Rate, continuous mode, frames per second (fps) |
|
This is for the 1/4 resolution multi-image mode. Very fast, but small images.
|
Speed-wise, the PDR-M60 is a little bit of a mixed bag. On the one hand, it's shutter lag in full autofocus mode is a rather long 1.4 seconds. This long a delay between pressing the shutter button and the camera actually snapping a picture would make it difficult to capture any fast-paced action. On the other hand though, if you let the camera prefocus by half-pressing and holding the shutter button prior to your actual exposure, the delay drops to a blazing 0.07 seconds. This is one of the fastest prefocus performances we've measured to date. Thus, if you can arrange things such that you can prefocus the camera on a given spot, the M60 could be one of the best bets out there for catching the action.
Shot to shot, the PDR-M60's cycle times are very good, and it's also excellent when switching from playback to record mode, a feature we like to see. With many cameras, it's all too easy to switch your camera to playback mode to check the last shot, and then not be able to react quick enough to the next shot unfolding in front of you. The M60 doesn't have this problem in the slightest.
Overall, a very credible set of performance timings from a low-cost camera.
Operation and User Interface
The user interface on the PDR-M60 is very uncomplicated and quick to learn, requiring only a quick overview of the instruction manual. A limited number of control buttons are provided for direct access to camera settings, leaving the majority of exposure settings controlled through the LCD menu. Although we prefer to see as little reliance as possible on the LCD monitor for camera adjustments, the PDR-M60 has such a modest range of features (compared to its more sophisticated cousins, the PDR-M70 and PDR-M5) that you could feasibly keep the LCD turned off most of the time. The small status display panel on top of the camera provides access to most camera settings, and buttons are provided to adjust the flash, image size/quality, self-timer, Macro mode, digital zoom, and optical zoom externally. The camera's portable size and easily accessible controls lend themselves to effective one-handed operation.
We found all of the camera's external controls user friendly, and its LCD menu system is very navigable. The only control we had trouble with was the locking mechanism for the battery compartment door, which was somewhat tricky to open and close. Other than that, camera operation was very smooth.
Control Enumeration

Shutter Button: Located on top of the hand grip portion of the camera, this large, silver button sets camera focus and exposure when depressed halfway. Fully depressing the button triggers the shutter release. When the Self-Timer function is enabled, fully depressing the shutter button kicks off the timer countdown.
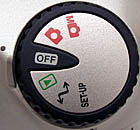
Mode Dial: Located at a slight angle from the camera's top panel to the back, this notched dial controls the camera's power and operating mode, and provides the following options:

Flash Button: Located on the camera's top panel, under the lower left corner of the status display panel, this button chooses on of five flash modes: Auto, Red-Eye Reduction, Forced Flash, Suppressed Flash, and Slow Synchro.

Image Size/Quality Button: Directly to the right of the Flash button, this controls the image size and quality settings, cycling through the 1,792 x 1,200- and 896 x 600-pixel file sizes, as well as Fine, Normal, and Basic JPEG compression levels.

Self-Timer Button: Adjacent to the Image Size/Quality button on the right side, this button enables and disables the Self-Timer function. Once enabled, a full press of the shutter button begins the timed countdown. The Self-Timer can be set to two or 10 seconds through the Record menu.
![]()
T/W Zoom Toggle: Located beneath the Mode dial on the camera's back panel, this toggle button controls the optical zoom in any capture mode. In Playback mode, it controls the enlargement of captured images.

SmartMedia Slot Release Lever: To the right of the SmartMedia slot compartment door, this sliding lever releases the hinged, plastic door -- allowing you to insert and remove SmartMedia cards.

Enter/Rocker Arrow Button: Adjacent to the top right corner of the LCD monitor, this button features Up, Down, Left, and Right arrows, with an "Enter" function in the center. The arrow buttons navigate through all menu options, and the Enter function confirms choices. In either Automatic or Manual record modes, the Up and Down arrow buttons control the digital zoom, which provides up to 2x enlargement. In Manual mode, the Enter button cancels and recalls the White Balance and Exposure Compensation menu displays, which are navigated with the arrow buttons. In Playback mode, the Left and Right arrow buttons scroll through captured images. When the playback zoom feature is enabled with the T/W Zoom button, all four arrows enable the user to scroll around inside the captured image. Also in Playback mode, the Enter button calls up the nine-image index display, which is then navigated by the four arrow buttons.

Menu Button: Directly beneath the Enter button, this activates the settings menus in Playback and Record modes. It also cancels the menu display.
![]()
Display Button: Just to the right of Menu, this button controls the LCD display in Record and Playback modes. When used in Automatic and Manual Record modes, the button cycles through the following on-screen displays: image and settings, image display only, no display at all. In Playback mode, the button cycles through: image and information display (file name and number only), image and image information display (exposure and camera settings for the selected image), and image display only.
![]()
Macro Button: Below the Menu button, this button is marked with the traditional macro flower symbol. In both Automatic and Manual capture modes, this button enables the Macro shooting mode, which reduces the focusing range to 2.0 to 19.7 inches (5 to 50cm).
![]()
Erase Button: To the right of Macro, this button is marked with a trash can symbol. In both capture modes, this button erases the previously recorded image (with an option to cancel). In Playback mode, pressing this button deletes the currently displayed image (also with an option to cancel). In Playback and both Record modes, holding down the Erase button for two seconds pulls up the Erase menu. From there, you can erase a single frame or all frames, or format the SmartMedia card.
Camera Modes and Menus
Manual Exposure Mode: Accessed by turning the Mode dial to the red camera symbol next to an "M," this mode allows the user to manually control White Balance and Exposure Compensation. The user also has control over Flash mode, ISO, File size/quality, Digital and Optical Zoom, Macro mode, Erase function, and Record mode. Pressing the Enter button displays the following menu on the screen:
 White Balance: Sets the camera's White Balance mode to Auto, Daylight, Cool White Fluorescent, Standard Fluorescent, or Incandescent.
Pressing the Menu button in this mode pulls up the standard Record settings menu:
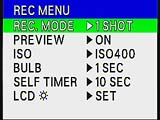 Record Mode: Sets the capture mode to One Shot, Multi, or Bulb.
Automatic Record Mode: Marked on the Mode dial with a plain, red camera symbol, this mode gives the user control over the same functions as in Manual exposure mode, with the exception of White Balance and Exposure Compensation. Pressing the Menu button pulls up the same settings menu as in Manual mode.
Off: This position on the Mode Dial shuts the camera off, and retracts the camera lens if it was previously extended.
Playback: Noted on the Mode Dial with the traditional green playback symbol (a green triangle within a rectangular outline), Playback mode enables users to review captured images, as well as resize, protect, erase, or compress them. An index display is available for a quick review of saved images on the memory card, and a playback zoom option enlarges captured images for closer inspection (up to 3x). Pressing the Menu button displays the following Play menu options:
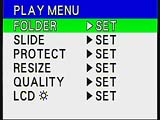 Folder: Selects the image folder to be played back, if the SmartMedia card has more than one folder.
PC Mode: Turning the Mode Dial to the bent arrow symbol sets up the camera for connection to a PC or Macintosh computer. A USB cable is included with the camera for high-speed dowload of images from the camera to the computer.
Set-Up Mode: Labeled on the Mode Dial as SET-UP, this mode displays the camera's basic settings menu, as follows:
 Language: Changes the camera's menu language to English, German, French, Spanish, or Japanese.
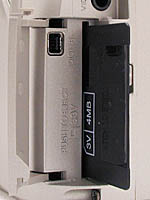 Image Storage and Interface
The PDR-M60 uses SmartMedia for image capture and storage. A 4MB card is supplied with the camera, but upgrades are available up to 64MB. Remember to use only 3.3V SmartMedia (sometimes marked simply 3V) and steer clear of the 5V version. The table below shows card capacities, based on the 4MB memory card, and approximate JPEG compression ratios for the various size/quality combinations the camera provides.
|
|||||||||||||||||||||||
SmartMedia should never be removed while the camera is on, nor should the camera be turned off while performing any operation, because there is a risk of damaging the media. Always load the SmartMedia card with the gold electrodes going into the camera first and facing the compartment door. Unlike many digital cameras, the PDR-M60 SmartMedia slot will accept the card inserted incorrectly. This doesn't damage the card, but might leave you scratching your head, wondering why the camera is insisting the card isn't working. The card is released by pressing the card down quickly, which should pop it up slightly. The card can then be pulled out of the slot.
You can write-protect SmartMedia cards by placing a write-protection sticker in the designated area. Write-protection stickers can only be used once and must be clean to be effective. You can protect individual images in Playback mode, through the Playback menu. Protecting images in the Playback mode prevents them from being accidentally erased or manipulated in any other way (such as resizing or compressing), except when the card is formatted, which erases all of the images.
Frames are assigned file numbers from 0001 to 9999 with a preceding directory or folder number. Once 9999 is reached, the directory number goes up by one. Setup mode allows you to reset the frame numbering sequence for new cards, and the Playback menu lets you select the image folder you'd like to review. Images are saved in DCF compliant (Exif Ver.2.1 JPEG) format. Two image sizes are available: 1,792 x 1,200 and 896 x 600 pixels, with a choice of Fine, Normal, and Basic JPEG compression levels. Through the Playback menu, 1,792 x 1,200-pixel images can be resized to 896 x 600 pixels. Likewise, Fine and Normal images can be compressed further.
The Erase button on the camera's back panel works in both Playback and Record modes. In Auto or Manual Record modes, the button can be used to delete the previously recorded image. Simply press the Erase button to bring up the Erase Frame options. Use the Up arrow on the Enter toggle button to highlight "YES" and press the center of the Enter button to complete the function. In Playback mode, you can delete the currently displayed image in the same manner. Pressing the Erase button with "NO" highlighted cancels the command. In either Record or Playback modes, holding down the Erase button for two seconds pulls up the full Erase menu, with options to erase a single frame, all frames, or to format the SmartMedia card (which erases all images and re-initializes the card).
A USB cable and software CD are provided for connecting to a computer and downloading images from the SmartMedia. USB download speed is a little slower than average, about 200 KBytes/second. (About 20 seconds to empty the 4 MB card the camera ships with.)
 Video Out
An NTSC video cable is supplied for connecting to a television set (European models come with a PAL cable). The video signal is adjustable through the Set-Up menu, with options for NTSC or PAL, as is the menu language setting. You can view recorded images or compose new ones, using the television set as an extension of the LCD monitor. Note that live images will appear less clear than playback images because they are displayed at a lower resolution.
 Power
Power
The PDR-M60 uses four AA alkaline, NiCd, or NiMH rechargeable batteries. Four AA alkaline batteries are supplied with the camera. An AC adapter is available as a separate accessory, and we highly recommend you invest in one for time-intensive tasks such as downloading images to a computer or reviewing images in Playback mode. A battery power level indicator appears on both the LCD monitor and small status display panel, to report the remaining battery charge. (The symbol is the standard battery outline with the shaded portion indicating power level.) A blinking battery symbol means that the batteries are completely dead.
The PDR-M60 features an Auto-Off function, which shuts down the camera after a specified time of inactivity. Through the Set-Up menu, the shut-off time can be set to one, two, or three minutes. One minute is the default setting.
|
|
|
| Capture Mode, w/LCD |
|
| Capture Mode, no LCD |
|
| Half-pressed shutter w/LCD |
|
| Half-pressed w/o LCD |
|
| Memory Write (transient) |
|
| Flash Recharge (transient) |
|
| Image Playback |
|
Overall, the PDR-M60 showed better than average power consumption, particularly when the rear-panel LCD was left off. If you leave the LCD display off, you could easily leave the camera on all day without killing your batteries. Even with the LCD enabled, power drain in capture mode is a bit lower than average. (A set of high-capacity NiMH AA cells should provide about two hours of continuous operation in capture mode with the LCD running.) Power drain in playback mode is fairly typical of other cameras we've tested.
Included Software and Accessories
The software CD packaged with the Toshiba PDR-M60 includes Sierra Imaging's Image Expert software, as well as a USB driver and full copies of the PDR-M60 camera and software manuals. Though the software manual states that Image Expert is compatible with Windows systems only (Windows 95/98/2000/NT), we were able to install the program on an iMac running OS 8.6, so Mac users with OS 8.6 and higher should be able to load the software. Image Expert provides limited image-editing and correction tools, as well as a Camio viewer for viewing and organizing your images into albums. Image Expert also prepares images for printing.
Accessories shipped with the camera include a 4MB SmartMedia card, USB cable for connecting to Macintosh or PC computers, a video cable, shoulder strap, and four AA Alkaline batteries.
Test Results
In keeping with our standard policy, our comments here are rather condensed, summarizing our key findings. For a full commentary on each of the test images, see the Toshiba PDR-M60's "pictures" page.
As with all Imaging Resource camera tests, we encourage you to let your own eyes be the judge of how well the devices performed. Explore the images on the pictures page, to see how well the Toshiba PDR-M60 performed, and how its images compare to other cameras you may be considering buying.
The PDR-M60 did a pretty good job with color balance, although we noticed a bit of a warm cast in many of our images. In general, we used the automatic white balance setting for most situations, though it had some trouble with the harsh lighting of the outdoor portrait. Still, the automatic setting did the best job of interpreting each light source, with the exception of the indoor portrait, which the incandescent setting handled pretty well. The PDR-M60 reproduced the large color blocks in our Davebox test target nearly accurately, though a little undersaturated. Tonal handling looked good, as the subtle variations of the Q60 target were visible up to the "B" range, and the camera distinguished between the red and magenta color blocks on the horizontal color chart. Despite the camera's tendency to produce rather warm images, the PDR-M60's color performance is not too bad.
The M60 did fairly well in the resolution test, with a resolution in the horizontal direction of 650 lines per picture height, and a resolution in the vertical direction of 600 lines. This is a shade off the best performance we've seen for a 2 megapixel camera, but not far. Close examination of the resolution target also shows why some of the "natural" scenes appeared a bit "soft", despite good detail: The M60 appears to use a bit less in-camera sharpening than is common on digicams, with the result that the edges of objects aren't overemphasized to the extent that they are in competing units. The result is arguably more accurate photos, although many users at this level would perhaps prefer a camera that "over-sharpens" to produce crisper-looking prints. A big plus for web or email users is that the M60's low-resolution capture mode produces relatively "clean" images, correcting a problem we saw in previous Toshiba digicams.
The PDR-M60 features complete automatic exposure control, with the user able to adjust white balance, exposure compensation, ISO, and flash mode only. A well-executed "bulb" exposure mode let us capture good (albeit somewhat noisy) images in light levels as low as about 1/4 of a foot-candle. To put the PDR-M60's low light performance into perspective, an average city night scene under modern street lighting corresponds to a light level of about one foot candle, so the PDR-M60 should be able to handle most normal night shooting situations.
We found the PDR-M60's optical viewfinder to be slightly tight at the wide angle setting, showing approximately 81 percent of the final image area. The viewfinder proved to be more accurate at the telephoto end, showing approximately 92.5 percent of the final image area. (Percentages were the same for both the 1792 x 1200 and 896 x 600 resolution sizes.) All of the images framed with the optical viewfinder showed a slant towards the lower left corner, with the entire target shifted up and to the left. When framing with the optical viewfinder at the telephoto setting, we noticed that the final image was shifted even further to the left, so that the edge of the target and part of the wall behind it are visible on the right side. The LCD monitor was only slightly more accurate than the optical viewfinder, showing approximately 93 percent of the final image area at wide angle, and about 95 percent at telephoto (again for both image sizes). Since we usually like to see LCD monitors as close to 100 percent accuracy as possible, the PDR-M60's LCD monitor does a pretty good job.
The PDR-M60 performs well in the macro category, capturing a minimum area of 2.39 x 1.60 inches (60.80 x 40.72mm). Color balance was a little cool, but detail and resolution both look great. The PDR-M60's built-in flash has some trouble throttling down for the macro area, as its intensity is much too strong for the close-up shooting range and completely washes out the exposure.
Overall, the PDR-M60 produced good images, but was slightly off the mark of the best two megapixel cameras that we've worked with. (Appropriate, given its fairly aggressive pricing.) It has some trouble with harsh outdoor lighting, and produces warm color casts in many situations. Still, color balance looks nearly accurate, even with the warm casts, and the camera's low light capabilities should extend your shooting range to include most night situations. Overall resolution is also very nice. The automatic-only exposure mode makes it perfect for consumers who don't want to worry over exposure decisions, and the ability to alter the white balance, ISO, flash mode, and exposure compensation make it flexible enough to handle most situations.
Conclusion
The Toshiba PDR-M60 offers several features that endeared us to its more expensive siblings, the PDR-M70 and PDR-M5, but are scaled down to meet the more affordable price. Though most exposure controls are automatic, the user can adjust ISO, White balance, and exposure compensation. When used at its highest quality setting, the PDR-M60 image quality is very good--enhanced by a sharp LCD monitor that displays captured image files in bright, accurate color. The lightweight, smoothly contoured body is well-balanced, with a large hand grip surrounding the bulky battery compartment. Though it's a bit large for your shirt pocket, it should slip easily into most coat pockets or purses. Overall, the PDR-M60 is a great option for on-the-go consumers who don't have time to worry over exposure decisions, but still want to take great pictures at an affordable price.
<<Toshiba PDR-M60 Sample Images | Additional Resources and Other Links>>
Reader Comments!
Questions, comments or controversy on this product? Click
this link to see what other Imaging Resource readers have had to say about
the Toshiba PDR-M60, or add comments of your own!