Back
to Full Toshiba PDR-M70 Review
Back
to Full Toshiba PDR-M70 ReviewGo to Toshiba PDR-M70 Data Sheet
Go to Toshiba PDR-M70 Pictures Page
Up to Imaging Resource Cameras Page
Use your browser's "Back" button to return to the previous page, or the links at the top and bottom of this page to navigate to related information. If you have difficulty fitting the text on this page onto your printer output, simply resize your browser window to a narrower width and print again.
Remember us when it's time to buy!
Dave here: Have our reviews been helpful to you? (Is this article you're reading right now useful?) Preparing this level of information on as many products as we do is incredibly hard work, not to mention expensive. Things on the Internet may look like they're free, but they're not. (As a lot of big dot.com companies are finding out these days.) Somewhere, somebody has to pay to produce worthwhile content. YOU can help us though, by remembering us when it comes time to make your purchase. Would you consider coming back to our site and clicking-through to one of our advertisers to make your purchase? Every dollar you spend with one of our advertisers helps us directly (in affiliate fees) or indirectly (the advertiser will keep renewing their ad contract with us). To make it easy for you to support us, here's a URL you can visit, to see all our current advertisers, with links to click on that will register your visit to them as having come from our site. It's up to you where you buy, but Mike, Mike, Kim, Yazmin, Marti and I would be really grateful if you'd help us out by choosing one of our advertisers to purchase from.
Thank you for your support!
Dave Etchells, Founder & Publisher
Visit our "Buy Now" Page:
https://www.imaging-resource.com/buynow.htm
Back
to Full Toshiba PDR-M70 Review
Go to Toshiba PDR-M70
Data Sheet
Go to Toshiba PDR-M70
Pictures Page
Up to Imaging Resource Cameras
Page
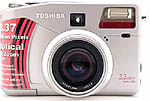
Toshiba PDR-M70Toshiba brings true photographic features to their new 3 flagship model! Review First Posted: 8/17/2000 |
|
 |
|
3.37 megapixel CCD delivers 2048x1536 images
|
|
|
3x optical zoom, 35-105mm equivalent focal length range
|
|
|
|
Aperture and Shutter priority metering
|
|
|
|
Both movie and sound-only recording options
|
|
| * | Powerful processor for fast shot-to-shot cycle times | |
Executive Overview
Overall, we were pleased with the PDR-M70. You get a fair range of control options without too much hassle, and a clean user interface. The PDR-M70 is relatively compact and lightweight, although slightly thick. Still, the camera should fit into most large pockets and purses, and an accompanying neck strap should help out as well. The lens telescopes out from the body when the camera is turned on, and even in the retracted condition the lens assembly protrudes slightly, requiring a protective lens cap when the camera's not in use. And for some reason, Toshiba has left out any type of strap for securely attaching the lens cap.
Unlike the earlier PDR-M5, the PDR-M70 doesn't have much of a hand grip, or any type of finger rest for gripping the camera, possibly in an effort to streamline the camera body. We generally like a little more to wrap our fingers around, or at least to grab onto. Aside from that, all of the buttons and controls are well placed and easy to reach. We were a little disappointed with the layout of the bottom of the camera, which puts the tripod mount and the battery compartment too close together. This is only a concern, however, if you plan to do a lot of studio or other tripod work. We were glad to see a dioptric adjustment control on the optical viewfinder (which makes life a little easier for eyeglass wearers), and the inclusion of an external flash sync terminal.
The PDR-M70 features a real-image optical viewfinder and an LCD monitor for composing images. The LCD monitor displays a good bit of information (almost too much) about the camera and the exposure settings, as does the smaller LCD panel on top of the camera. Also on the LCD monitor is a histogram of the image's tonal range, which helps you gauge how much an image may be under or overexposed. We generally like to see less reliance on an LCD based menu system, but we found the PDR-M70's menu screens very quick to navigate and change settings in, with a very straightforward interface.
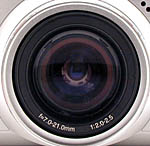
The 3x optical zoom 7.0 to 21.0 mm lens, equivalent to a 35 to 105 mm lens on a standard 35 mm camera, offers six different aperture choices, from f/2.0 to f/8.0. Focal range extends from approximately 31 inches (80 cm) to infinity in normal mode. In macro mode, the focus ranges from around 4 inches (9 cm) to infinity at the wide angle setting and from 8 inches (20 cm) to infinity at the telephoto setting. The macro button also accesses an Infinity focus mode, for shooting far away subjects with a fixed focus. (Particularly useful for night shots when it's too dark to focus.)
We experienced very nice exposure control on the PDR-M70, thanks to its bounty
of features. Automatic capture mode is pretty standard, with the camera making
all of the major exposure decisions. However, you do have access to some presets
for special shooting situations: Portrait, Landscape, Night, Fast-Moving Subject
and Multi-Shot. The Multi-Shot function actually captures 36 small images and
saves them as one 2048 x 1536 image. Aperture Priority and Shutter Priority capture
modes give you control over the shutter speed (eight to 1/1,000 seconds) or aperture,
as well as exposure compensation (+/-1.5 EV in 1/3 EV steps), white balance (Auto,
Outdoors, Blue Fluorescent, Red Fluorescent and Incandescent), AE/AF lock (top,
bottom, left, right and center), ISO (100, 200 or 400) and the Automatic Bracketing
feature. A "hidden" full-manual exposure mode allows control over both
aperture and shutter speed simultaneously, as detailed on a Toshiba
FAQ page for the camera. In all capture modes, you have control over the flash
(Auto, Red-Eye Reduction Auto, Redeye Reduction Forced, Forced, Suppressed and
Slow Synchro), access to the Continuous Shooting exposure settings, sharpness,
contrast, special color modes and the Self-Timer and Macro functions. There's
also a 2x digital zoom feature, although we recommend taking advantage of the
optical zoom for the best quality.
Depending on the available SmartMedia space, the PDR-M70 also allows you to record short movies with sound and play them back (files are saved in the AVI format). In the Audio capture mode, you can record short audio clips, without images, to accompany captured still images or to simply serve as reminders. The PDR-M70 goes quite a bit beyond most digicams that include a sound option, actually presenting itself as a fairly capable digital audio note-taker.
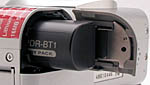
The PDR-M70 ships with a single Toshiba PDR-BT2 lithium-ion battery pack, which is recharged simply by leaving it in the camera and connecting the AC adapter to the camera body. The inclusion of the small status display on the top of the camera helps a little with battery consumption, as it reports the majority of the camera's settings so you can work without the LCD monitor. Also included with the camera is an NTSC A/V cable for connecting to a television set (European models come with PAL cabling). An included USB cable allows you to download images to either a Mac or PC, and the accompanying ImageExpert software helps organize and correct your images, as well as play back movie and audio files.
As we mentioned earlier, the PDR-M70 is a fun camera with a lot of exposure options. It accommodates both point & shoot users looking for fully automatic exposure control, or photo buffs who need explicit aperture and shutter control. Plus, its 3x optical zoom, movie and sound recording capability, and relatively compact size make it a perfect companion for vacations or trips to the park. Although there's no full manual mode, the histogram function and the ability to directly control shutter speed or aperture will meet the needs of many more advanced photo buffs.
Design
Toshiba's PDR-M70 features an all plastic, silver-toned body that keeps it relatively
lightweight and portable, at only 12 ounces (340g) excluding the battery, SmartMedia
and any accessories. Size-wise, it ought to fit in larger coat pockets, measuring
a slightly robust 4.6 x 3 x 2.4 inches (116 x 76 x 62 mm). An accompanying neck
strap should help with the portability. For some reason, Toshiba has left out
the slightly bulky handgrip on the right side of the camera, but you still get
a pretty good grasp around the side (although we'd really like some rubber finger
grips or deeper grooves to hook into). The lack of a handgrip does help the
camera to maintain its smooth design, which, discounting the lens, doesn't have
too many protrusions.
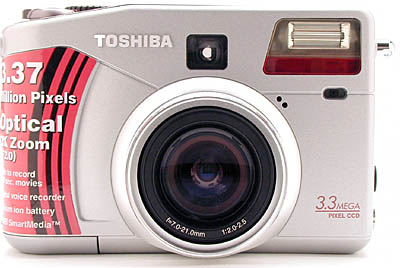
The front of the camera is very basic, holding the lens, optical viewfinder
window and flash. Whenever the camera is turned on with the mode dial is set
to one of the capture modes, the lens extends from the body into its operating
position. Likewise, it retracts when the camera is switched off. The lens is
protected by a plastic lens cap, which doesn't attach to anything, so you'll
need to keep an eye on it.
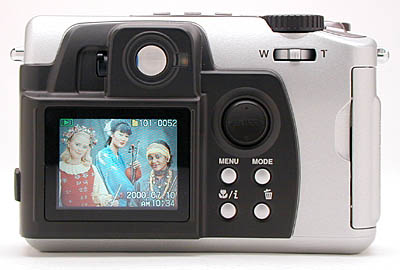
The back of the camera holds most of the controls, including the optical viewfinder
with its dioptric adjustment dial, zoom control, rocker toggle button, LCD panel
and various other control buttons. All of the back panel control buttons are
placed very close together so that, with the exception of the top control buttons
beneath the small status display, you could conceivably operate the camera one
handed.
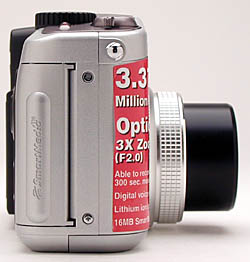
On the right (hand grip) side of the camera is the SmartMedia slot, which is
protected by a smooth plastic door that snaps into place.
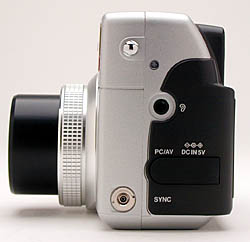
The opposite side of the camera houses the external flash sync terminal, an
earphone jack, the USB/ AV jack and the DC-in port. The USB and DC-in jacks
are protected by a soft, flexible rubber covering that snugly fits into place.
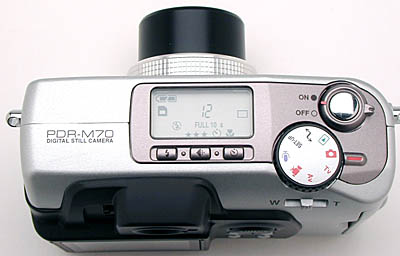
On top of the camera are the shutter button, power switch, mode dial, a few control buttons and the small status display panel. During our tests in the studio, we really appreciated the Image Quality button, which let us quickly change the setting without going into the LCD menu. The small status display panel is also nice, because it reports the majority of the camera's settings, allowing you to shoot and save battery power by not using the larger color LCD screen. In dark surroundings, the status display illuminates with a blue backlight so you can actually read it. (A very handy feature we'd like to see other digicam manufacturers adopt.) Also visible from a top view of the camera are the two neck strap eyelets on either side.
The bottom of the camera boasts the speaker, battery compartment and tripod
mount. We were a little disappointed that the battery compartment and
tripod mount are so close together, making it difficult to make quick
battery changes while using a tripod. Additionally, the curve of the camera
bottom so close to the tripod mount puts a lot of stress on the plastic
mount threads if the camera is rocked even a little while attached to
a tripod. Despite these limitations, we actually encountered a very solid
mount while working in the studio.
 Viewfinder
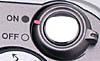
The PDR-M70 offers both an optical viewfinder and an LCD monitor for composing images. The real-image optical viewfinder zooms along with the lens and features small, black crosshairs in the center of the field of view, for lining up shots. It also features a dioptric adjustment dial, to accommodate the needs of eyeglass wearers. On the outside edge of the viewfinder, a small, red and green LED clues you in to the camera's status (i.e., if the focus is set, flash is ready, etc.).
The 1.8 inch color LCD monitor on the back panel can be turned on and off through the Record menu, which is an interesting method (we're accustomed to a Display button). Once activated, the LCD monitor reports a great deal of camera information. For example, you can quickly check the camera mode, flash mode, number of exposures, exposure compensation, etc. with a glance at the LCD monitor. It also reports the time and amount of remaining battery power. Our only gripe about the information display is that so many of the camera settings are reported that the LCD screen seems a little crowded, which made it a little difficult for us to quickly center and line up an image. We would have liked to be able to cancel the information overlay somehow, either through the Record menu or a control button.
However, we did like the small histogram in the lower right corner, which
plots a graphic representation of the subject's tonal range. The horizontal
axis shows brightness, which increases from left to right, and the vertical
axis shows the number of pixels at each brightness level. This is a great
tool for determining if a subject is over- or underexposed. Keep in mind
that the rightmost bar is pure white, meaning that any indication there
means there are pixels in your image that are being blown out to pure
white. (No highlight detail.) Histogram displays provide an excellent
way to tell how the overall exposure of an image is doing, but are less
useful for telling when a small area of the image has lost highlight detail.
Still, a very useful feature, and one that we'd like to see on more digital
cameras, from more manufacturers.
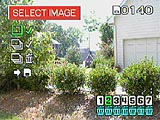
The LCD's more functional features in Playback mode include a nine image thumbnail display and a playback zoom function that allows you to get a close up view of areas within a captured image.
We found the PDR-M70's optical viewfinder to be a little tight (a change in our nomenclature, we previously referred to this behavior as "loose", showing only about 88 percent of the final image area at wide-angle and about 84 percent at telephoto. The LCD monitor a bit more accurate, showing 89 percent of the final image area at wide-angle and 91 percent at telephoto. To give you an idea of what we're looking for, we really prefer to see LCD monitors as close to 100 percent accuracy as possible. There is an argument to be made though, for having the LCD and optical viewfinders basically agree with other, which is that having consistent viewfinder coverage avoids confusion when switching between the two. We found the same accuracies at both the 2048 x 1536 and 1024 x 768 image sizes, with both viewfinders. Images framed with the optical viewfinder are shifted towards the lower right corner, while the LCD framing appears to be relatively square. We should note here that during our testing, we found it a little difficult to frame images in the LCD, because of the ever-present information display.
 Optics
A 3x, 7.0 to 21.0 mm lens comes with the PDR-M70, the equivalent of a 35 to 105 mm lens on a 35 mm camera. The lens is protected by a plastic lens cap, which unfortunately doesn't attach to anything, making it rather easy to lose. When the camera is turned on and the mode dial is set to any of the capture modes, the lens extends outward from the camera body into its operating position. Once the camera is shut off, or left in Playback mode for any length of time, the lens then retracts. The autofocus uses a contrast detection system with a focal range from 31 inches (80 cm) to infinity in normal mode. Macro mode is controlled by the Macro/Infinity button on the back panel, and offers focal ranges from 4 inches (9 cm) to infinity at the wide angle setting and from 8 inches (20 cm) to infinity at the telephoto setting. Hitting the Macro/Infinity button twice sets the focus at infinity, perfect for landscape shots. Six aperture settings are available, ranging from f/2.0 to f/8.0 and can be manually or automatically selected. (NOTE: As with most zoom lenses on digicams, the effective aperture of the PDR-M70's lens varies as you zoom from wide angle to telephoto. The stated maximum aperture of f/2.0 is valid only for the widest angle focal length setting: As you move to maximum telephoto, the maximum aperture drops to f/2.5. Likewise, the minimum aperture varies from f/8.0 to f/9.9 over the full focal length of the lens, the wider f/8.0 aperture corresponding to wide angle focal lengths.)
In our business, we test a lot of digital cameras, and so were interested to note that the outward characteristics of the PDR-M70's lens appears essentially identical to that on the Sony DSC-S70 and Epson PhotoPC 3000Z. The Sony lens is loudly advertised as being manufactured by Zeiss, and was one of the sharpest lenses we'd seen to that point on a digicam. In the case of the PDR-M70, the raw resolution of the camera didn't seem to quite measure up to that of the Sony S70, but we discovered that it improved considerably if additional unsharp masking was applied after the fact in Photoshop(tm). On our laboratory resolution test target, we "called" the horizontal visual resolution as 850-900 lines per picture height, although there was some slight aliasing apparent as early as 650-700 lines, and good detail was visible all the way to 1000 lines, with color artifacts appearing at about 1100 lines per picture height. In the vertical direction, we again saw slight aliasing as early as 650 lines per picture height, called the visual resolution as 800 lines, saw good detail all the way to 900, and color artifacts beginning at about 950 or so. Overall a very good performance, easily among the top three-megapixel performers in this particular test.
A 2x digital telephoto extends the camera's zoom capabilities to 6x, but remember that the quality of the image will suffer in the form of reduced resolution when the digital telephoto function is engaged. The digital telephoto can be turned off and on through the Record menu. A set of filter threads on the lens accommodates a variety of auxiliary lenses via an optional adapter tube accessory. When the lens cap is in place, it firmly grips the inside of these threads, protecting them from damage.
An unexpected bonus on the PDR-M70 was a manual focus option, as detailed on a
Toshiba
FAQ web page for the camera. To gain manual control of the focus, you first
must place the camera in manual exposure mode, through a somewhat complicated
series of control actuations. See the following section on "Exposure"
for the procedure to enter manual mode. Once in manual exposure mode, the "Focus"
LCD menu item that normally just has options for "Auto" or "Infinity"
gains a "MF" or manual focus position as well. The PDR-M70's manual
focus option isn't quite as robust as we'd like to see, since it relies entirely
on the LCD screen for focus feedback: There is no distance readout showing the
current focus distance, nor is there any enhanced focus feedback of any sort provided.
Still, it's a useful feature, particularly when you focus with the lens wide open
(set to its largest aperture) and then stop down to increase depth of field (and
therefore improve focus on your intended subject).
Exposure
We experienced very good exposure control on the PDR-M70, and found its LCD based
menu system, as well as the control layout, straightforward and uncomplicated.
In addition to a fully automatic mode, the PDR-M70 also offers Aperture Priority
and Shutter Priority exposure modes, which allow you to control either the aperture
or shutter speed while the camera controls the other variable. You can adjust
the aperture from f/2.0 to f/8.0 and the shutter speed from eight to 1/1,000 seconds.
On higher-end digicams, we always also look for full-manual exposure modes, in
which you can control both aperture and shutter speed independently. Initially,
we thought we'd be disappointed by the M70 in this respect, but it turns out the
engineers built in a "hidden" manual mode, as detailed on the same Toshiba
FAQ web page for the camera as held the manual-focus information mentioned
earlier. Here's the somewhat torturous procedure for entering manual exposure
mode: (Note that the camera exits full-manual mode as soon as you rotate the mode
dial away from the Av position, or turn it off.):
Procedure - Full Shutter and Aperture Control
- 1. Turn on the camera.

- 2. Turn the Mode Dial to Set Up mode.
- 3. Press and hold the MENU Button.
- 4. While holding the MENU Button, turn the Model Dial to the AV Mode.
- 5. Release the MENU Button.
If this procedure was successful, you'll see a yellow " M " in the
top left corner of the display on the rear of the camera. Once in this mode,
you can use the arrows on the rear-panel rocker toggle control to manually adjust
both the shutter speed and aperture settings. A very nice touch here is that
the readout area on the LCD screen that's normally reserved for exposure-compensation
display now shows the amount over- or underexposed that the camera thinks your
chosen aperture and shutter settings will leave the final picture. Very handy!
(But why, oh why, did Toshiba bury this exceptionally useful function so deeply
in their user interface, and completely neglected to put any mention of it in
their user manual?)
An interesting feature on the PDR-M70 is that while shooting in Automatic exposure
mode, you can select between a range of preset camera settings: Portrait, Landscape,
Fast-moving Subjects, Night and Multi-Shot. The Portrait setting adjusts the
aperture so that the background is blurred and the subject is the main focus.
The Landscape setting adjusts the camera for distant scenes and landscapes,
presumably by adjusting the focus for infinity. Under Fast-moving Subjects,
the camera increases the shutter speed so that you can capture fast paced action
such as sporting events. (Based on our tests, it appears that this mode both
selects a wider lens aperture, as well as slightly boosts the CCD's ISO rating.)
As you might expect, the Night setting allows you to photograph people against
dark backgrounds, such as city scapes, without losing any of the background's
details. The Night mode works well with the Slow-Synchro flash mode. Finally,
the Multi-Shot mode actually takes 36 small images continuously at 0.07 second
intervals, which are saved as one 2048 x 1536 image, best used with moving subjects
as a sort of timeline.
Exposure compensation (EV) on the PDR-M70 can be adjusted from -1.5 to +1.5
EV, in 1/3 EV increments, by pressing the left and right arrow buttons of the
rocker toggle key in any capture mode. White balance is adjustable through the
Record menu and can be set to Automatic, Outdoors, Cloudy, Bluish Fluorescent,
Reddish Fluorescent and Incandescent to match a variety of light sources. You
also have an ISO adjustment, with the options of setting the camera's sensitivity
to Normal (ISO 100), 2x (ISO 200 or 4x (ISO 400). Through the record menu, you
can adjust the image sharpness as well as the contrast. A self-timer function
allows you to set up a shot and then fire a delayed shutter, with either a 10
or two second countdown. A fun feature on the PDR-M70 is the Color menu, which
allows you to choose between Standard color, Vivid color, Monochrome and Sepia
tones. (We like the inclusion of both normal and "vivid" color settings
on digicams, but felt that the Vivid setting on the PDR-M70 was so subtle as
to be almost unnoticeable. We encourage the digicam manufacturers to pursue
this sort of option more though, even to the point of providing multiple saturation
settings from which users can choose.) You also have the freedom to change the
AE/AF Lock Area. Through the on-screen menu in Shutter and Aperture Priority
modes, you can set the AE/AF Lock area to top, bottom, center, right or left,
giving you a little more flexibility when composing images.
An optional quick image preview appears after firing the shutter, allowing you
to delete an image if you aren't satisfied with it. This saves a little time,
as you don't have to switch over to Playback mode to check your image. (Note
that a handy feature of the PDR-M70 is that you can delete the last image shot
at any time, by pressing the Erase button.)
As we mentioned earlier, the PDR-M70 displays a small histogram in the lower
right corner of the LCD screen, which plots the tonal values of the image. This
is a great tool for checking whether an image is over or underexposed, in that
you can check the distribution of white, black and mid-tone values throughout
the image. If too much of the graph is "piled up" on the right side
of the display, then many of the lighter tones will be forced to white and appear
blown out. Likewise, a large peak on the extreme left hand side of the graph
indicates that darker tones being forced to black. We generally really like
histogram functions for precise exposure control, but did find that on the PDR-M70
a little tricky to use during our testing. The problem was that the rather small
display area meant that you could only see the effect of fairly large regions
of the image being forced to white: Levels that we thought should be okay often
resulted in images with washed-out highlights. In hindsight, it would be very
helpful if the histogram display could be modified to alert you in some way
whenever detail was being lost in highlights. (Maybe an expanded-scale red bar
on the right-hand side of the display, that would respond with greater sensitivity
to pure white pixels?)
 Flash
Flash
The PDR-M70's built-in flash is controlled by the Flash button on top
of the camera and operates in six modes: Automatic, Redeye Reduction Auto,
Redeye Reduction Forced, Forced, Suppressed and Slow Synchro. Most of
the flash modes are pretty self explanatory. Automatic fires the flash
depending on the light level. Redeye Reduction Auto and Forced both fire
a small pre-flash before firing the full flash to reduce the Redeye Effect.
However, the Auto setting lets the camera judge when the flash is needed
and the Forced setting simply fires the Redeye flash with every exposure.
The standard Forced flash mode fires the flash with the shutter, no matter
what the light levels are. Likewise, Suppressed prevents the flash from
firing at all. Finally, Slow Synchro fires the flash in conjunction with
a slower shutter speed for night scenes. Note that when shooting in Aperture
or Shutter Priority modes, the Forced, Suppressed and Redeye Reduction
Forced modes are the only ones available. (The Auto and Slow Syncro modes
are only available when the camera is in full-automatic exposure mode.)
Toshiba reports the PDR-M70's flash range as effective from 2.6 to 13
feet (0.8 to 4.0 m) in the wide angle setting. In our testing, we found
the PDR-M70's flash to be reasonably effective all the way out to 14 feet.
A slight magenta cast appears at eight feet and slowly increases with
the distance, so that by the 14 foot mark, the color cast is fairly pronounced.
The table below shows results obtained at a range of distances from eight
to 14 feet. Toshiba also included an external flash sync connection, for
connecting a more powerful external strobe unit. If an external flash
is connected, the flash setting must be changed in the Record menu to
External in order for the accessory flash unit to fire. Note that the
camera's internal flash will not fire when using an external flash.
Continuous Shooting
 In
this mode, the camera fires the shutter at approximately 0.8 second intervals,
as long as the shutter button is held down, with a maximum speed of five
images in four seconds. Up to eight images can be taken continuously,
or as many as the buffer memory will hold. While the shutter button is
held down, images are saved to a temporary buffer memory before being
saved to the SmartMedia card. Toshiba's implementation of the post-exposure
image-selection function is one of the best we've seen, making the Continuous
mode more useful than it might be otherwise. After releasing the shutter
button, you will be asked to verify your images. This allows you to discard
images you don't want, and thereby save a little SmartMedia space. The
maximum number of images captured per burst also depends on the amount
of SmartMedia card space and the size of the image. This mode is not available
when shooting with the Night and Multi-Shot settings in the Automatic
exposure mode.
In
this mode, the camera fires the shutter at approximately 0.8 second intervals,
as long as the shutter button is held down, with a maximum speed of five
images in four seconds. Up to eight images can be taken continuously,
or as many as the buffer memory will hold. While the shutter button is
held down, images are saved to a temporary buffer memory before being
saved to the SmartMedia card. Toshiba's implementation of the post-exposure
image-selection function is one of the best we've seen, making the Continuous
mode more useful than it might be otherwise. After releasing the shutter
button, you will be asked to verify your images. This allows you to discard
images you don't want, and thereby save a little SmartMedia space. The
maximum number of images captured per burst also depends on the amount
of SmartMedia card space and the size of the image. This mode is not available
when shooting with the Night and Multi-Shot settings in the Automatic
exposure mode.
Auto Exposure Bracketing
The PDR-M70 also offers the convenience of an Auto Exposure Bracketing function, available only in the Aperture and Shutter Priority exposure modes. Once activated (by pressing the Mode button three times), the bracketing function takes three images when you press the shutter button, snapping images at -0.3, 0.0 and +0.3 EV exposure compensation values. All three images are saved to the SmartMedia card without individual review. (You can of course view them and delete the ones you don't like after the fact, in playback mode.)
Movie Mode
Movie mode on the PDR-M70 is accessed simply by turning the mode dial to the movie camera symbol. The amount of available recording time will display on the LCD monitor, and depends on the battery power and available SmartMedia space. To record, you simply press the shutter button once and then press it again to stop recording. Movies are recorded with sound and saved as AVI files. Available image sizes are 320 x 240 and 160 x 120, and the image is displayed in the center of the LCD monitor, not enlarged to full screen, to increase clarity. Unlike some digicams with multimedia modes, the PDR-M70 lets you zoom the lens during movie recording, and the autoexposure function continues to operate while "filming." (Note though, that zoom lens actuation during recording does produce some motor noise on the audio track.)
Audio Mode
This mode allows you to record audio only, as notes or reminders. After accessing the mode by turning the mode dial to the microphone symbol, the amount of available recording time is displayed in the LCD monitor. As with recording movies, pressing the shutter button once begins recording, and pressing it a second time ends the recording.
The PDR-M70's audio-recording mode deserves some special mention, as it is quite a bit more extensive that what we're accustomed to seeing on digicams. You're provided with a fairly complete control panel on the LCD display, and audio clips are stored and recalled separately from still images: An index of stored audio clips, complete with information on date, time, and duration is available whenever you hit the "enter" button (center of the rocker toggle control) in Audio mode. Unlike many digicams, audio recording duration is limited only by the amount of SmartMedia space that's available: The provided 16 megabyte memory card allows up to an hour of audio to be recorded. An added bonus is the ability to turn off the LCD while recording, to extend battery life. (We estimate that a fully charged battery should last for about two hours of recording time with the LCD on, and perhaps 3.5 hours with it off.) This all combines to make the PDR-M70 into a useful audio note-taking device, albeit with a few limitations. We did find that the internal microphone isn't terribly sensitive relative to the needs of recording conversations in a large room. Also, the sound quality seemed fairly low overall, although this could have been the result of the tiny speaker in the camera: We didn't try listening to the recorded sounds through a separate amplifier and speakers. Of course, the point of a portable recording device isn't to deliver symphony-quality sound, but rather to simply capture verbal notes and conversations. The PDR-M70 seems fairly well suited for such uses.
Shutter Lag/Cycle Times
When you press the shutter release on a camera, there's usually a lag time before the shutter actually fires. This time allows the autofocus and autoexposure mechanisms time to do their work and can amount to a fairly long delay in some situations. Since this number is almost never reported on, and can significantly affect the picture taking experience, we now routinely measure it using a special electronic test setup.
|
|
||
|
|
|
|
| Power On -> First shot |
|
Start with lens retracted. Time is delay until first shot captured.
|
| Shutdown |
|
Time until lens is retracted, camera is powered down.
|
| Play to Record, first shot |
|
Time is delay until first shot captured.
|
| Record to play |
|
|
| Shutter lag, full autofocus |
|
|
| Shutter lag, continuous autofocus |
|
|
| Shutter lag, prefocus |
|
(Prefocus means half-pressed shutter button before shot.) |
| Cycle Time, shot-shot, high res |
|
Times are for autofocus mode/infinity focus mode. |
| Cycle Time, shot-shot, low res |
|
Times are for autofocus mode/infinity focus mode. |
| Cycle Time, continuous mode |
|
|
Operation and User Interface
As we mentioned earlier, we found the PDR-M70's user interface very friendly and straightforward. Although we generally like to see less reliance on the LCD menu system, we did find the PDR-M70's menus very smooth to navigate. The camera remembers which menu option was last changed. When you reenter the menu, it automatically highlights the previously changed selection. We also found that, with the exception of the three small control buttons on the camera's top panel, the PDR-M70 could conceivably be operated with one hand. The inclusion of the small status display window on top of the camera is also nice, as you can quickly check the camera's settings without activating the LCD monitor. You can also change the image size and quality settings without the LCD, through the control buttons. Now, we'll take you through the function of each button and control on the PDR-M70.

Shutter Button: Located on the top of the camera, encircled by the power switch, this button sets the focus and exposure when halfway pressed and fires the shutter when fully pressed.
Power Switch: Also located on top of the camera, cradling the shutter button, this switch powers the camera on and off.

Mode Dial: Positioned on top of the camera, this notched dial controls the camera's operating mode with the following choices:
![]()
Self-Timer Button: Centrally located on top of the camera and marked with the traditional self-timer symbol, pressing this button activates and cancels the self-timer mode. Pressed sequentially, the button cycles through 10 second timer, two second timer and off settings.
![]()
Quality / Size Button: Located directly to the left of the Self-Timer button, this button cycles through each combination of image size and quality.
![]()
Flash Button: Situated on the left side of the Quality / Size button, this button controls the following flash modes:
![]()
Wide/Tele Zoom Lever: Positioned on the top right corner of the back panel, this lever controls the 3x optical zoom, and when enabled, the 2x digital telephoto. In Playback mode, when playing back movie or audio files, the "T" end of the lever increases the playback volume and the "W" end of the lever decreases volume. When playing back still images, the zoom lever controls the playback zoom. When playing back Multi-Shot images, the "T"end of the lever starts the sequential playback of the 36 small images.

Rocker Toggle Button: Centrally located on the back panel of the camera, this rocker button with arrows in all four directions serves many functions. In both Playback and Record menus, the arrow buttons navigate through menu items and the center of the button, when pressed, serves as the Enter function to accept changes. In any of the record modes, the right and left arrows control the exposure compensation from -1.5 to +1.5 in 1/3 EV increments. In Automatic Exposure mode, the up and down arrows provide access to the following presets:
In Shutter and Aperture Priority modes, the up and down arrows adjust either the shutter speed or lens aperture.
In Playback mode, the right and left arrow buttons scroll through captured still images and activate the playback of movie and audio files. Once zoomed into a captured image, the four arrow buttons allow you to scroll around within the image to investigate small details.
![]()
Menu Button: Adjacent to the LCD monitor, this button accesses the control menu in all of the record modes as well as in Playback mode.
![]()
Mode Button: Located to the right of the Menu button, this button cycles through Single Shot and Burst options while in any record mode, and also through Auto Exposure Bracketing while in Shutter or Aperture Priority modes.
![]()
Macro / Infinity Button: Directly beneath the Menu button, this button cycles through the Macro and Infinity focus settings when in any record mode.
![]()
Erase Button: Sitting to the right of the Macro / Infinity button, this button erases images in any of the record modes as well as in Playback mode.
![]()
Dioptric Adjustment Dial: Located on the left side of the optical viewfinder, this dial adjusts the optical viewfinder to accommodate eyeglass wearers.
Battery Compartment Lock: Positioned on the bottom of the camera, in the center of the battery compartment door, this button unlocks and opens the battery compartment when pressed down and toward the front of the camera body.
Camera Modes and Menus
Automatic Exposure Mode: Accessed by turning the mode dial to the
red camera symbol, this mode puts the camera in charge of aperture and
shutter speed. The user can select from a menu of presets (Portrait, Landscape,
Fast-moving Subject, Night and Multi-Shot), specify exposure compensation,
flash and ISO value. The user also has access to Continuous Shooting mode
and the normal color, Vivid color, Black & White and Sepia modes.
Shutter Priority Mode: Noted on the mode dial by the letters "TV"
("Time Value), this mode allows the user to set the shutter speed
from eight to 1/1,000 seconds while the camera controls the lens aperture.
The user retains control over the exposure compensation, flash, white
balance, ISO, Continuous Shooting mode and Auto Exposure Bracketing function.
The user also has access to Continuous Shooting mode and the normal color,
Vivid color, Black & White and Sepia modes.
Aperture Priority Mode: Accessed by turning the mode dial to the "Av" ("Aperture Value" position, this mode allows the user to set the lens aperture in six steps from f/2.0 to f/8.0 while the camera selects the proper shutter speed. The user has control over all the same options as with Shutter Priority mode.
Movie Mode: Marked on the mode dial by a red movie camera symbol, this mode allows the user to capture short movies with sound. The camera determines the shutter speed and aperture, while the user can select the ISO.
Audio Mode: Noted on the mode dial by a purple microphone symbol, this mode allows the user to capture small audio files with no images.
Setup Mode: Listed on the mode dial as "Setup" in black letters, this mode pulls up the Setup menu for changing the camera's internal settings.
Transfer (PC) Mode: Turning the mode dial to the black, double-ended arrow symbol puts the camera in digital transfer mode, allowing the user to download images from the camera into a computer.
Playback Mode: Turning the mode dial to the green playback symbol accesses the Playback mode, for reviewing captured still and movie images, and deleting, protecting or resizing them.
Record Menu: Entered by pressing the Menu button while in any of the record modes, this menu offers the following options:
Shutter Priority and Aperture Priority Settings Menu: Accessed by pressing the Enter key (center of the rocker toggle button), this menu offers the following selections:
 White
Balance: Sets the camera's white balance to Automatic, Outdoors,
Cloudy, Bluish Fluorescent, Reddish Fluorescent or Incandescent.
White
Balance: Sets the camera's white balance to Automatic, Outdoors,
Cloudy, Bluish Fluorescent, Reddish Fluorescent or Incandescent.
Playback Menu: Accessed by pressing the Menu button when in Playback mode.
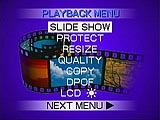 Slide Show: Activates a slide show playback of captured images.
 Image
Storage and Interface
Image
Storage and Interface
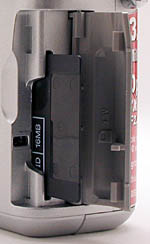
The PDR-M70 utilizes SmartMedia as its image storage medium, and a 16 megabyte
card comes with the camera. You can purchase additional cards in 32 and 64 megabyte
sizes. (128 megabyte SmartMedia cards are due by early 2001.) SmartMedia is
easily write protected by placing a write protection sticker over the designated
area on the card. Likewise, removing the sticker disables write protection.
Remember that these stickers can only be used once and write protection may
fail if the sticker gets dirty. To protect individual images from accidental
erasure (except from card formatting), the settings menu in Playback mode gives
you an image protect option. Protected images are denoted by a key symbol beneath
the image. Protection can be removed through the same process.
The PDR-M70 organizes captured images into storage folders. When the SmartMedia
card is formatted, it automatically creates a folder entitled 100TOSHI. Data
from photographed still images is recorded to this folder and cannot be changed.
Movies are recorded to a separate folder indicated by a movie camera symbol.
Once the image number reaches 9999, a new folder (101TOSHI) is automatically
created. When there are two or more xxxTOSHI folders, the playback folder default
is the folder assigned the largest xxx value. You can change the playback folder
through the settings menu in Playback mode.
Reducing image size saves memory and allows you to continue taking more pictures.
Half sized images (1024 x 768 pixels), images taken in the Multi mode, protected
images and images from another camera cannot be resized. While in Playback mode
you have the option of selecting which 2048 x 1536 images you want to resize
and are given the option to reconsider before executing the command. Also through
the Playback menu, you can compress images (images already in Basic quality,
images from another camera and protected images cannot be further compressed,
nor can you compress images on write protected SmartMedia). The quality setting
will be noted under each image by the number of stars (three for Fine, two for
Normal, one for Basic).
The PDR-M70 also allows you to copy an image from one SmartMedia card to another,
through the Playback menu. Select the image to copy and press Enter (you can
cancel a selection here as well). Repeat the procedure to copy two or more images.
When you execute the copy, a Change Card message will appear, allowing you to
remove the old SmartMedia card and replace it with a new one. Follow the menu
prompts and select OK when finished. Don't remove the SmartMedia card (except
when indicated) or turn the camera off during the copying procedure to avoid
damaging the cards. You'll be prompted to press Enter once copying is complete
and can exit the Playback menu by hitting the Menu button.
You can erase images in Playback or in the Automatic, Aperture Priority and
Shutter Priority photography modes. When in Playback, use the arrow buttons
to select the image and hit the Erase button on the back panel. You'll be asked
to confirm this decision. Protected images cannot be erased, nor can images
on write protected SmartMedia. When in the before mentioned photography modes,
hit the Erase button and it selects the last image taken. Again, you are asked
to confirm this decision. The same button also allows you to erase entire folders.
Simply hold down the trash can button for two seconds. The Erase menu appears
with the options of erasing one frame or all images or to format the SmartMedia.
But even if all the images in a folder are erased, the folder itself cannot
be erased unless you format the SmartMedia.
The table below shows the number of still images that can be stored on a 16
megabyte card in various size/quality modes, and their approximate compression
ratios:
| Resolution/Quality vs Image Capacity |
|
|
||
|
|
|
|
|
|
| Fine Quality |
|
|
|
|
| Normal Quality |
|
|
|
|
| Economy Quality |
|
|
|
|
The PDR-M70 connects to a host computer via a built-in USB port. Many digicams these days are equipped with fast USB ports, a welcome relief after years of users struggling with deathly slow serial interfaces. Even among speedy USB-equipped cameras though, download times range widely. In our tests, the PDR-M70 was one of the faster cameras we've seen, transferring 8.98 megabytes of files in only 12.44 seconds, a transfer rate of nearly 740 Kbytes/second. This is really very fast, almost as fast as the best external card reader devices.
Video Out
The PDR-M70 comes equipped for both NTSC and PAL video formats, configurable
via the Setup menu. US and Japanese models ship with the appropriate NTSC cables,
and the European models with PAL cables. By attaching the camera to a television
set, you can record and review images using the television screen as an enlarged
version of the LCD viewfinder. You can also record your movies and sound clips
to video tape by hooking up a VCR. (The A/V out cable for the M70 has separate
audio and video connectors.
Power
 For power, the PDR-M70
utilizes a PDR-BT2 lithium-ion battery pack, which comes with the camera. An
AC adapter also comes with the camera, and serves as the mechanism for charging
the battery. You simply connect the power cord to the camera and the battery
charges. in-camera charge time is approximately 4 hours for a fully depleted
battery. (The optional external charger will fully charge a battery in about
70 minutes.) Alternatively, you can use the AC adapter for downloading and reviewing
images, to save on battery power. An automatic shutoff powers the camera down
if inactive for a preset period of time. Through the Setup menu, you can adjust
this time period from one to three minutes. Power consumption in various operating
modes is detailed in the chart below, measured at the external power connector,
at the specified 5v supply voltage.
For power, the PDR-M70
utilizes a PDR-BT2 lithium-ion battery pack, which comes with the camera. An
AC adapter also comes with the camera, and serves as the mechanism for charging
the battery. You simply connect the power cord to the camera and the battery
charges. in-camera charge time is approximately 4 hours for a fully depleted
battery. (The optional external charger will fully charge a battery in about
70 minutes.) Alternatively, you can use the AC adapter for downloading and reviewing
images, to save on battery power. An automatic shutoff powers the camera down
if inactive for a preset period of time. Through the Setup menu, you can adjust
this time period from one to three minutes. Power consumption in various operating
modes is detailed in the chart below, measured at the external power connector,
at the specified 5v supply voltage.
|
|
|
| Capture Mode, w/LCD |
|
| Capture Mode, no LCD |
|
| Half-pressed shutter w/LCD |
|
| Half-pressed w/o LCD |
|
| Memory Write (transient) |
|
| Flash Recharge (transient) |
|
| Image Playback |
|
| Sound Recording w, w/o LCD |
|
| Sound Recording, w, w/o LCD (Estimated battery power) |
|
These figures show the PDR-M70 to be a rather power-hungry digicam, particularly given the relatively limited capacity of the small battery pack it uses. (Increasingly popular among digicam manufacturers, despite the much greater power capacity of the more traditional pack of 4 AA NiMH cells.) Even with the LCD monitor turned off, power consumption was fairly high. We'd estimate maximum run time with the LCD monitor on as about 1 hour, or about 1.5 hours with it off. Toshiba rates the battery capacity at 110 images with the LCD on, or 165 images with it off. Given the way people tend to use digital cameras, we really discount ratings specified in terms of the number of pictures that can be taken, and would much prefer to see manufacturers rate their cameras in terms of run time: It's really uncommon for users to turn the camera on, snap a picture, and then turn it right off again. More often the camera stays on for fairly long periods of time between shots, and much time is spent viewing images on the LCD screen. (After all, that's probably a large part of why you wanted a digicam in the first place!)
Included Software
A software CD ships with the PDR-M70 and includes ImageExpert, QuickTime and a USB driver, for both Windows and Macintosh platforms (Windows 95/98/NT 4.0/NT 2000 and Macintosh OS 8.1 and higher). With ImageExpert, you can organize your still images into albums, perform minor corrections, set images up for printing and play back your movies. A USB cable is included with the camera for connection to a computer, but you can also purchase a floppy adapter for the SmartMedia card.
Test Results
In keeping with our standard policy, our comments here are rather condensed, summarizing our key findings. For a full commentary on each of the test images, see the M70's "pictures" page.
As with all Imaging Resource camera tests, we encourage you to let your own eyes be the judge of how well the devices performed. Explore the images on the pictures page, to see how well the PDR-M70 performed, and how its images compare to other cameras you may be considering buying.
Overall, the PDR-M70 performed very well, with good color balance even in difficult lighting situations, such as the very high contrast Outdoor Portrait and the dimly-lit Indoor Portrait. We chose to shoot with the automatic white balance setting the majority of the time, since it did a very nice job of matching a variety of light sources (although we did use the incandescent setting for our Indoor Portrait without flash). Color saturation looked only slightly weak in the large color blocks of our Davebox target, and the subtle tonal variations of the Q60 target were only visible up to the "D" range. Still, the PDR-M70 handled most of our tests rather well, producing nearly accurate color most of the time. We did notice a slight magenta cast in some of the darker images, but overall, the PDR-M70 does a nice job.
The PDR-M70 did quite well on the laboratory resolution test, supporting our earlier surmise that it actually had more raw resolution available than appeared in some of our test shots, due to insufficient in-camera sharpening. On this laboratory target, we "called" the horizontal visual resolution as 850-900 lines per picture height, although there was some slight aliasing apparent as early as 650-700 lines, and good detail was visible all the way to 1000 lines, with color artifacts appearing at about 1100 lines per picture height. In the vertical direction, we again saw slight aliasing as early as 650 lines per picture height, called the visual resolution as 800 lines, saw good detail all the way to 900, and color artifacts beginning at about 950 or so. Overall a very good performance, easily among the top three-megapixel performers in this particular test.
The PDR-M70 offers a nice range of exposure control, with both Aperture Priority and Shutter Priority exposure modes, as well as a "hidden" full-manual mode. The user can also control ISO, exposure compensation and white balance. The camera performed relatively well in our low light tests, although we had to tweak the settings a little to get a good exposure. In the end, we obtained reasonably bright, useable images as low as 1/4 foot candles (2.7 lux) at the 100 ISO setting, with only moderate noise. We also shot with the 200 and 400 ISO settings, which did produce brighter images, but also increased the noise level. To put the PDR-M70's low light performance into perspective, an average city night scene under modern street lighting corresponds to a light level of about one foot candle.
We found the PDR-M70's optical viewfinder to be a little tight, showing approximately 88 percent accuracy at wide angle, and 84 percent at telephoto. (Note that we've changed our nomenclature on this to better reflect what you see when looking into the viewfinder. We previously would have referred to the PDR-M70's viewfinder as "loose.") These numbers were consistent with both image sizes. The LCD monitor proved to be only slightly more accurate, showing approximately 89 percent accuracy at wide angle, and about 91 percent at telephoto. We did observe that the ever-present LCD information display made framing images in the LCD monitor rather little difficult at times. (It would have been nice to be able to turn it off.) We generally prefer LCD monitors to be as close to 100 percent accuracy as possible, so the PDR-M70 falls slightly below the mark in this regard.
The PDR-M70 is about average in the macro category, capturing a minimum area of 4.37 x 3.28 inches (111.02 x 83.26 mm). Although resolution appears slightly soft in this macro shot, we did notice a fairly nice level of detail. However, we also picked up a small amount of barrel distortion from the wide angle setting of the lens.
Overall, the PDR-M70 performs moderately well for its 3.3 megapixel class, providing good exposure control and nice image quality, and good resolution. Still, the camera's performance in the low light category and its relatively accurate white balance system can tackle most difficult lighting situations, making it a versatile performer.
Conclusion
With the PDR-M70, Toshiba has finally developed a true "enthusiast" camera, with all the manual exposure control you could want, as well as unusual options like a full-featured sound recording function, and the on-screen histogram display to help with exposure determination. The lens (which we suspect to be a Zeiss design) is quite sharp with low distortion, and image quality is overall quite good. It provides a standard PC-type external flash connection, a welcome feature in a market that seems increasingly dominated by custom flash connectors and adapter cables that are months late to market. Overall, an impressive entry by Toshiba in the 3 megapixel marketplace.
<<M70 Sample Images | Additional Resources and Other Links>>
Reader Comments!
Questions, comments or controversy on this product? Click
this link to see what other Imaging Resource readers have had to say about
the Toshiba PDR-M70, or add comments of your own!