Back
to Full Nikon D100 Review
Back
to Full Nikon D100 ReviewGo to Nikon D100 Data Sheet
Go to Nikon D100 Pictures Page
Up to Imaging Resource Cameras Page
Use your browser's "Back" button to return to the previous page, or the links at the top and bottom of this page to navigate to related information. If you have difficulty fitting the text on this page onto your printer output, simply resize your browser window to a narrower width and print again.
Remember us when it's time to buy!
Dave here: Have our reviews been helpful to you? (Is this article you're reading right now useful?) Preparing this level of information on as many products as we do is incredibly hard work, not to mention expensive. Things on the Internet may look like they're free, but they're not. (As a lot of big dot.com companies are finding out these days.) Somewhere, somebody has to pay to produce worthwhile content. YOU can help us though, by remembering us when it comes time to make your purchase. Would you consider coming back to our site and clicking-through to one of our advertisers to make your purchase? Every dollar you spend with one of our advertisers helps us directly (in affiliate fees) or indirectly (the advertiser will keep renewing their ad contract with us). To make it easy for you to support us, here's a URL you can visit, to see all our current advertisers, with links to click on that will register your visit to them as having come from our site. It's up to you where you buy, but Mike, Mike, Kim, Yazmin, Marti and I would be really grateful if you'd help us out by choosing one of our advertisers to purchase from.
Thank you for your support!
Dave Etchells, Founder & Publisher
Visit our "Buy Now" Page:
https://www.imaging-resource.com/buynow.htm
Back
to Full Nikon D100 Review
Go to Nikon D100
Data Sheet
Go to Nikon D100
Pictures Page
Up to Imaging Resource Cameras
Page
Nikon D100Nikon ups the ante with 6 million pixels, superb color and resolution, at a 'bargain' price! Review First Posted: 5/31/2002 |
|
 |
|
True Nikon pro SLR that just happens to be digital |
|
|
6.1- megapixel CCD, 3,008 x 2,000-pixel images |
|
|
|
ISO from 200 to 1600 ("ISO Boost" to 6400) |
|
|
|
2.5 frames per second, super-fast shutter delay! |
|
|
|
Part of Nikon "Total Imaging System" - Compatible with >90% of all Nikon F-mount lenses ever made! |
Manufacturer Overview
As I say before each of my Nikon reviews, Nikon is one of the names that
literally needs no introduction in the world of photography. Long a leader in
the film world, they offer cameras for both the serious amateur and working
professional. Their professional line contains cameras like the legendary F3,
continuously produced for over 20 years now, and new "legends in the making"
like the F5 and F100, renowned for their toughness and advanced features. In
the digital world, Nikon has developed a commanding presence in the "prosumer"
market with their Coolpix series. They broke new ground for usability and features
with their Coolpix 900 several years back, building on that success with the
2 megapixel 950, followed by the 3 megapixel 990, which has now been upgraded
to the 995 with a 4x zoom lens and improved flash configuration, and the five-megapixel
Coolpix 5000. At the same time, they've broadened their line to include more
purely consumer-oriented cameras like the Coolpix 775 and 885, and the new internal-swivel
Coolpix 2500. The "Nikon Total Imaging System" also includes the hugely
successful Super Coolscan 4000ED and Coolscan IV film scanners, which we've
reviewed elsewhere. (Well, technically, only the 4000ED is "reviewed"
as we write this, the Coolscan IV will be going up on the site soon.)
In early 1999, Nikon announced their first all-digital professional SLR, the D1. At the time, the specifications and price point (2.7 megapixels and a list price of $5850 for the body) rocked the pro camera world, and left many wondering whether Nikon could actually do it. They did. Not quite two years later, they raised the bar again with the D1x, a 5.47 megapixel camera at an even lower price point than the original D1. Now, they're bringing their digital SLR technology down from the pro market into a range accessible to well-heeled amateurs and the vast majority of professionals, with the D100. With a full 6.1 megapixel sensor and all the "Cameraness" of a true Nikon SLR, the most amazing aspect is its selling price of under $2,000 US! There's no question that this new price point for a Nikon digital SLR will revolutionize photography yet again, as literally thousands of Nikon shooters can now afford to enter the "no excuses" territory in the digital realm. Naturally, price by itself doesn't constitute a revolution - The camera itself has to meet the needs of photographers in the areas of resolution, color, image noise, tonality, and operating characteristics. After spending some time with a late-model "Initial Production" version of the D100 though, I can confidently say that it measures up in every category. Read on for all the details!
High Points
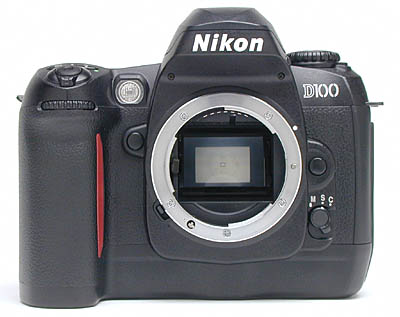
Dominating the D100's front panel is Nikon's standard “F” lens mount, which accommodates a broad spectrum of Nikkor lenses (the instruction manual has a complete list of compatible lens types). A small black button on the left side of the lens (as viewed from the back) unlocks the lens, letting you twist it out of the mount. Just below this button is the Focus Mode dial, which selects between Single-Servo and Continuous-Servo AF modes, or the Manual focus mode. On the opposite side of the lens is the Depth of Field Preview button, just below the AF assist lamp. Also visible from the front is the Sub-Command dial at the top of the hefty hand grip.
The right side of the camera (again, as viewed from the back) is devoid of detail apart from an eyelet for attaching the neck strap.
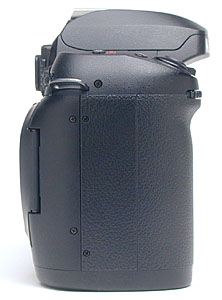
The left side of the D100 features another neck strap eyelet and the connector compartment. A flexible, rubbery flap protects the compartment, and remains attached to the camera when opened. Inside the compartment are the Digital, DC In, and Video Out connector jacks. I initially found this flap a little difficult to get back into place. I eventually discovered the sight trick of pushing the "hinge" of the flap back into the camera body first, then smoothing the rest of the flap into place. Once I learned to get the hinge properly stowed first, the flap was very easy to deal with. (And more substantial feeling than most such flaps I've encountered.) Also visible from this view is the Flash Release button, on the side of the pentaprism housing, just below the tip of the flash compartment lid.
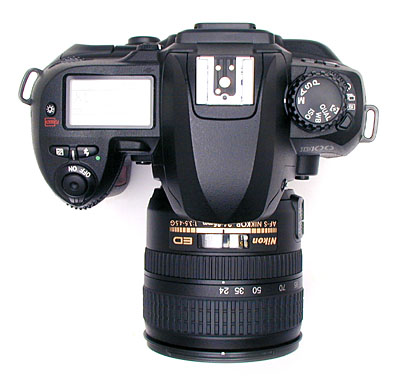
The pop-up flash compartment and external flash hot shoe are centrally located on the D100's top panel. To the right of the flash unit, a small status display panel reports basic exposure information, as well as a few main camera settings. This panel lets you change a variety of camera settings without entering the LCD menu system, a feature I always appreciate. Remaining camera controls include the Shutter button, Mode dial, Flash and Exposure Compensation buttons, as well as a LCD Illuminator button that lights the status display panel when it's too dark to see otherwise. The Function Dial sits on top of the Mode Dial, which has a small button to lock it in place. Finally, the Power switch surrounds the Shutter button, with a large tab to make turning easy and quick.
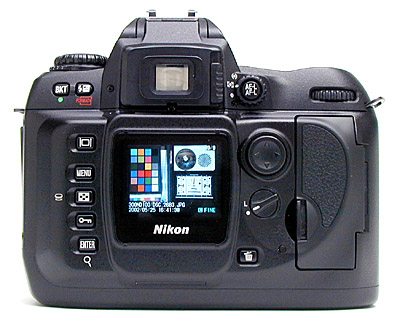
The D100's back panel holds the majority of the camera's controls, as well as the LCD monitor, viewfinder eyepiece, and memory card compartment. The optical viewfinder has a fairly high eyepoint, so the full display remains visible at a good distance from the camera. - This is a decided plus for eyeglass wearers like myself. As further accommodation to those of us with suboptimal eyesight, a sliding diopter adjustment on the right side of the eyepiece changes the focus of the viewfinder optics. Positioned just left of center, the 1.8-inch LCD monitor comes with a protective plastic cover that keeps the monitor safe from accidental scratches. Several camera controls flank the LCD monitor on each side, including a Four-Way Arrow pad for navigating the LCD menu system. The memory card compartment takes up the far right side of the back panel, with a hinged plastic door that snaps shut. A small LED lamp just beside the compartment lights whenever the camera accesses the memory card (indicating that you shouldn't open the compartment door or remove the card). Directly above the memory compartment is the Main Command Dial, which navigates menus and changes camera settings.
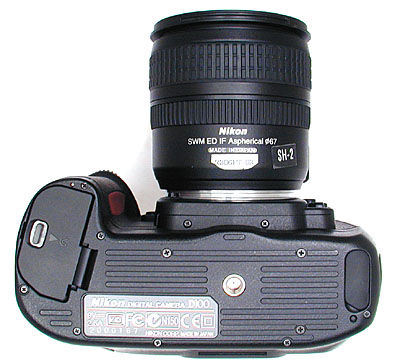
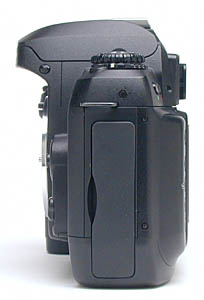
The camera's bottom panel has slightly raised ribs traversing it, to provide better friction when mounted on a tripod head. Apart from these though, it's quite flat overall. A threaded metal tripod mount sits near the center of the body, aligned with the optical center of the lens, and very close to the center of mass of the camera. The the battery compartment is on the right side of the body (when viewed from the back). A lock button in the battery compartment door prevents it from opening accidentally, and the pressure of the door holds the battery in place. Opposite the battery compartment, a small rubber plug protects a set of electrical contacts that interface with the optional portrait grip/battery unit.
 Like
other SLRs, the D100 uses an optical viewfinder that works through the lens. (The
LCD monitor is for image playback and accessing the menu system.) A sliding diopter
adjustment control adjusts the focusing of the viewfinder optics to accommodate
eyeglass wearers, and the viewfinder also has quite a high eyepoint (meaning you
can see the full frame with your eye a good distance from the rear objective).
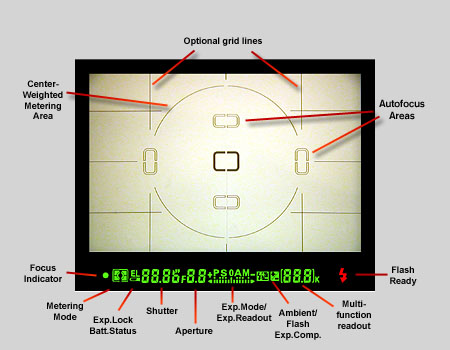
An illuminated display inside the viewfinder provides detailed exposure and camera
information, including focus area indicators, shutter speed, aperture, exposure
mode, metering, AE lock, exposure and flash compensation, frame counter, ready
light, and five sets of focus brackets. When activated, the view also includes
an alignment grid, useful for lining up difficult shots. A large circular outline
in the center of the view indicates the Center-Weighted metering area. The optional
grid (enabled via Custom Menu setting number 19) and focus area indicators can
be set to illuminate briefly when the shutter button is half-pressed, through
Custom Menu setting number 18. The shot below shows the viewfinder display, with
all segments of the readout illuminated.
Like
other SLRs, the D100 uses an optical viewfinder that works through the lens. (The
LCD monitor is for image playback and accessing the menu system.) A sliding diopter
adjustment control adjusts the focusing of the viewfinder optics to accommodate
eyeglass wearers, and the viewfinder also has quite a high eyepoint (meaning you
can see the full frame with your eye a good distance from the rear objective).
An illuminated display inside the viewfinder provides detailed exposure and camera
information, including focus area indicators, shutter speed, aperture, exposure
mode, metering, AE lock, exposure and flash compensation, frame counter, ready
light, and five sets of focus brackets. When activated, the view also includes
an alignment grid, useful for lining up difficult shots. A large circular outline
in the center of the view indicates the Center-Weighted metering area. The optional
grid (enabled via Custom Menu setting number 19) and focus area indicators can
be set to illuminate briefly when the shutter button is half-pressed, through
Custom Menu setting number 18. The shot below shows the viewfinder display, with
all segments of the readout illuminated.
Like those on essentially all digital SLRs, the LCD panel on the D100 isn't
usable as a viewfinder. It does, however, provide a great deal of information
about your pictures after you've shot them. No less than seven different display
screens are available, ranging from no information at all, to a very detailed
list of the exposure information, to a histogram display. A common feature
among other professional digicams, the histogram is simply a graph of how
many pixels in the image have each brightness level. The brightness is the
horizontal axis, running from black at the left to white at the right. The
height of the graph shows the relative number of pixels at that brightness
level. This sort of display is very handy for determining under- or overexposure.
With an evenly-exposed, low-contrast subject, the histogram would stretch
across the entire width of the display, using the full range of brightness
values available. An underexposed image will have a histogram with all the
data lumped on the left-hand side, with nothing reaching all the way to the
right. Likewise, an overexposed image will have all the data lumped on the
righthand side.

Another useful display mode, carried over from the D1 and D1x models, is the Highlights display, which "blinks" any highlights that are saturated all the way to pure white. It does this by toggling the pure white areas on the LCD between white and black. This is another area though, where I had a minor quibble with the D100's designers. In other cameras I've used with a "blink" mode (the D1x included), only those areas that were actually blown out to pure white blinked. On the D100,the "blink" extends into regions that in fact don't appear to be completely saturated. When I first started using the D100, I paid too much attention to the blinking display and ended up underexposing several shots. Eventually, I became accustomed to what the blinking display on the D100 corresponded to in terms of exposure, but was left with an uncomfortable feeling that I didn't really know what was going on with the exposure of my subjects. What it seems to be doing is blinking whenever any one of the RGB channels is saturated. This is probably a good thing, but I'd really like to have some way to tell which channels were blowing out, and/or a way to adjust the level of sensitivity of the display.
The D100 also offers greatly expanded options for display magnification relative to earlier Nikon D-SLRs. You have the normal thumbnail or normal-sized displays available, but can also enlarge the display up to 4x to examine critical focus and framing. The animated series of screen shots below show how this works. As you enter a zoomed playback mode, the display changes from a 3:2 aspect ratio view showing all of the image to a 4:3 one, matching the dimensions of the LCD monitor. Pressing the Thumbnail Display button while rotating the Main Control Dial zooms in on the image. Once zoomed, you can use the Four-Way Rocker Pad control to scroll around within the larger image. Holding down the Thumbnail Display button while rotating the Sub-Command Dial toggles to a display showing the position of your zoomed window within the normal-sized image, indicated by a bold red outline. You can move this window around with the Rocker Pad control, and then pop back into the zoomed view by once again holding down the Thumbnail Display and turning the Sub-Command dial. - This all sounds a little complicated, and it is, but after a little acclimatization, I found I could move around within the enlarged display very fluidly using this arrangement. - See the animated screen shot below for a whirlwind tour of the feature.

 Like
other Nikon SLRs, the D100 accommodates a wide range of Nikkor lenses, via the
standard Nikon "F" lens mount. The D100's lens mount includes both mechanical
AF coupling for older lenses, and AF electrical contacts for the latest AF-IF
or AF-S Nikkor lenses with internal focus motors. With very few exceptions, you
can use the D100 with any F Mount Nikkor lens ever made. (Actually, I'm not personally
aware of any F-mount lenses that flat-out *wouldn't* work, but do know that some
of the really unusual Nikkor lenses from the past [full-frame fisheye lenses?]
had problems on some camera bodies, requiring mirror lockup to function properly.
This is a vanishingly small percentage of the possible lenses that could be used
with the camera though, so you can safely assume that most any F mount lens in
your camera bag will work just fine with the D100.)
Like
other Nikon SLRs, the D100 accommodates a wide range of Nikkor lenses, via the
standard Nikon "F" lens mount. The D100's lens mount includes both mechanical
AF coupling for older lenses, and AF electrical contacts for the latest AF-IF
or AF-S Nikkor lenses with internal focus motors. With very few exceptions, you
can use the D100 with any F Mount Nikkor lens ever made. (Actually, I'm not personally
aware of any F-mount lenses that flat-out *wouldn't* work, but do know that some
of the really unusual Nikkor lenses from the past [full-frame fisheye lenses?]
had problems on some camera bodies, requiring mirror lockup to function properly.
This is a vanishingly small percentage of the possible lenses that could be used
with the camera though, so you can safely assume that most any F mount lens in
your camera bag will work just fine with the D100.)
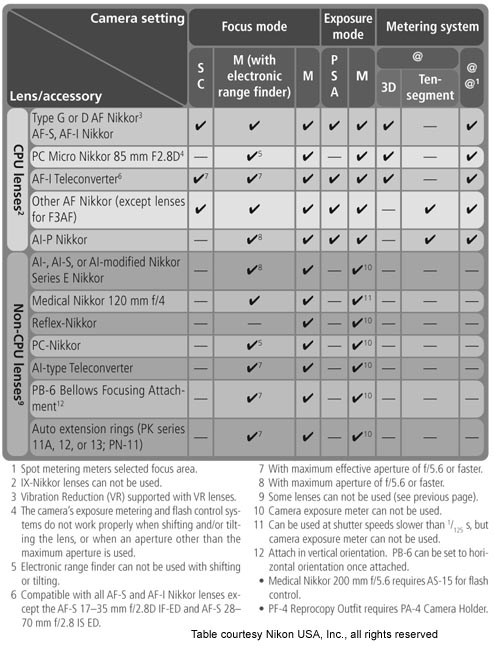
Given that the optical characteristics will depend entirely on the lens attached,
I'll instead concentrate here on the focusing options and modes. There's a lot
to talk about, given the exceptional control and flexibility afforded by the
D100's autofocus systems. The D100 lets you take advantage of auto or manual
focus via a small dial on the front of the camera, next to the lens. Setting
the switch to "M" puts the camera into manual focus mode, "S"
places it in Single Servo AF (focus priority), and "C" puts it into
Continuous Servo AF (release priority). Single Servo simply means that the camera
sets focus only once, when the Shutter button is first pressed halfway, and
is best for still objects. Continuous Servo means that the camera continuously
adjusts the focus, as long as the Shutter button is halfway pressed, and is
best for moving objects.
There's an important difference between Single and Continuous Servo modes: In Single Servo mode, the shutter won't release unless the lens is focused. (Focus Priority) In Continuous Servo mode however, the camera will fire regardless of the state of focus. (Release Priority) If you want to be sure that the camera is focused when you snap the picture, use Single Servo mode. Use Continuous Servo for moving subjects, and/or times when the instant of shutter release is more important to you than sharp focus.
The AF Area Mode option on the Mode dial lets you select between Single Area and Dynamic Area by turning the Main Command dial, both of which offer a Closest Subject Priority option. Single Area AF simply means that the camera judges focus based on one part of the subject. Dynamic AF employs all five of the autofocus brackets, or areas. When Dynamic Area focusing is enabled, the camera first focuses on the subject in the central focus area. When the subject moves to a different AF area, the camera shifts the focus to "follow" the subject. This is great for irregularly moving subjects. (Sports and kids come to mind.) The Closest Subject Priority option (enabled through the Custom Settings menu) means that the camera first focuses on the closest object that falls into one of the five focus areas and then tracks it as it moves. (Note that no focus area brackets are illuminated in the viewfinder with this mode and that this mode doesn't work well with telephoto lenses or poorly lit subjects, according to Nikon). In Single Area AF mode, you can change the primary focus area by unlocking the focus area selector (the Four-Way Arrow pad on the back panel) and then shifting the focus area using the up, down, right, or left arrow keys. You can lock the focus area selection by turning the switch back to the lock position. By default, the D100 does not "wrap" the focus area selector as you scroll between focus areas. Through the Custom Settings menu though, you can opt for a "Wrap" function. What this means is that if you press the right arrow key again, after the right focus area is already selected, the selection will immediately jump to the left focus area. The same thing happens when moving the focus area selection vertically as well.
There are two methods by which you can lock focus on the D100. The first is to half-press the shutter button to lock the focus, placing your subject in the selected focus area, halfway pressing the Shutter button, then realigning the composition and firing the shutter. (This is the default behavior of the shutter button, but it can be disabled. - Unlike most cameras, you can choose whether or not the shutter button also locks exposure, via an option on the Custom Settings menu.) Alternatively, when using Single Servo AF, you can press the AF-L/AE-L button to lock focus (and exposure, unless the button is set for focus only in the Custom Settings menu). Keeping this button pressed will lock focus and/or exposure, even if the Shutter button is released. This lets you recompose the photograph without keeping your finger on the Shutter button, but on the AE-L/AF-L button instead. (Reducing the chance that you'll accidentally trip the shutter when you don't intend to.)
There are several options available for the AE-L/AF-L button, which can be set via Custom Settings Menu 14. You can program it to lock either focus or exposure separately, or both together (the default). You can also change its operation so a single press locks and holds the exposure setting. (No need to keep the button pressed down.) Finally, you can set the AE/AF lock button so it alone controls the autofocus system, meaning the autofocus won't actuate when the shutter button is half-pressed, only when the AE/AF lock button is pressed instead.
Autofocus Speed
I mention AF speed because it's the topic of frequent questions from my readers,
although I confess to having no quantitative way to measure it. I'm also hampered
somewhat in my assessment by not having other D-SLRs close at hand to do direct
comparisons with. I also need to point out that AF speed will vary greatly with
the lens being used. All that said, the D100's AF speed struck me as merely
average. I did most of my shooting with Nikon's 24-85mm f/3.5-4.5 G-series AF-S
Nikkor lens. This is one of their "silent" AF lenses, with an internal
motor, and as such is a fairly fast-operating lens. Switching rapidly between
distant subjects and ones near the closest focusing distance, my subjective
sense was that it took about a half-second to achieve focus. Traversing smaller
distances, the focus lock was much faster. With a moving subject (Charlotte
the Wonder Dog), and the camera set in Continuous Servo focusing mode, I felt
that the camera was consistently lagging the subject a bit. This was an entirely
unscientific test, but I was left with the distinct impression that the lens/camera
combination could have been faster. (I'd guess that she was moving about 12-15
mph towards me, at a distance of around 20 feet when I was snapping the picture.
- The most sharply-focused area seemed to be a couple of feet behind her under
those conditions.) I didn't have one at hand to compare with the D100, but my
recollection was that the D1X/H models could track action better, even though
the D100 showed lower autofocus-derived shutter lag in my static tests.
|
Exposure
|
Just like the original D1 and D1x models, the D100 gives you a tremendous amount
of exposure control and multiple options that can get quite involved. Available
exposure modes include Program AE, Manual, Aperture Priority, and Shutter Priority
modes with shutter speeds from 1/4,000 to 30 seconds available, as well as a
Bulb setting for longer exposures. A very nice touch is that, while in Program
AE mode, you can rotate the Main Command dial to select different combinations
of aperture and shutter speed settings than those normally chosen by the autoexposure
system. (That is, if the automatic program would have chosen 1/125 second and
f/5.6, you could instead direct the camera to use 1/60 at f/8 or 1/30 at f/11,
to get greater depth of field.) This is a very handy option for those times
when you need some measure of increased control, but still want the camera to
do most of the work for you.
An interesting feature when using Manual exposure mode is the electronic analog
exposure display visible in the optical viewfinder data readout. This shows
the amount an image will be over- or underexposed, based on the settings you
have selected, and helps you find the best exposure for the subject.
ISO sensitivity ranges from 200 to 6,400, adjustable by setting the Mode dial
on “ISO” and turning the Main Command dial to change the setting.
The 3,200 and 6,400 values appear as “Hi-1” and “Hi-2” in
the display. A Noise Reduction mode in the settings menu reduces fixed-pattern
image noise when shooting at the higher sensitivity settings at longer exposure
times. White balance modes include Auto (useful from 4,200K to 7,000K), Incandescent
(set to about 3,000K), Fluorescent (4,200K), Direct Sunlight (5,200K), Flash
(5,400K), Cloudy (6,000K), Shade (8,000K), and Preset (which allows you to manually
adjust the white value by using a white card or object as a reference point).
All white balance settings are adjustable from -3 to +3 units on an arbitrary
scale by turning the Sub-Command dial (on the front of the hand grip) with the
Mode dial set to the White Balance option (with the exception of the Preset
option, which is not adjustable). Higher values correspond to a decrease in
the camera's white point, in degrees Kelvin (meaning the images become "cooler"
in appearance). This is a very nice feature, as I often wish I could use one
of a camera's standard white-balance settings, but tweak it to be just a bit
warmer or cooler than the default. To be sure, some experimentation would be
required to familiarize yourself with the impact of these "tweaked"
white balance settings, but having them available is a definite plus. The table
below shows approximate white point temperatures in degrees Kelvin for the various
adjustments in each of the major white balance settings.
| Camera Display--> | -3 | -2 | -1 | 0 | 1 | 2 | 3 |
| Direct Sunlight | 5600 | 5400 | 5300 | 5200 | 5000 | 4900 | 4800 |
| Shade | 9200 | 8800 | 8400 | 8000 | 7500 | 7100 | 6700 |
| Overcast | 6600 | 6400 | 6200 | 6000 | 5800 | 5600 | 5400 |
| Incandescent | 3300 | 3200 | 3100 | 3000 | 2900 | 2800 | 2700 |
| Fluorescent | 7200 | 6500 | 5000 | 4200 | 3700 | 3000 | 2700 |
| Flash | 6000 | 5800 | 5600 | 5400 | 5200 | 5000 | 4800 |
The D100 has three metering options: 3D Matrix, Center-Weighted, and Spot.
The 3D Matrix setting integrates exposure information from a large number of
areas across the frame (useful when brightly colored or very dark subjects occupy
a significant portion of the frame) with distance information from the microchip
in D- and G-series lenses. The result is much more accurate metering response
than more conventional center-weighted. Center-Weighted metering measures light
from the entire frame but places the greatest emphasis on a circular area in
the center. Spot metering is pretty self-explanatory, taking a reading from
the dead center of the image (best when using the AE Lock function).
In my testing, I found the D100's metering to be very accurate, although it
significantly underexposed some of my outdoor test shots when I was shooting
contrasty subjects with strong highlights under direct sun. This may have been
a prototype issue, or may have been a result of my own lack of familiarity with
the camera. I'll recheck this aspect of the D100's performance when I receive
a production model to test.
The D100's Exposure Compensation adjustment lightens or darkens the overall
exposure from -5 to +5 exposure equivalents (EV) in one-third step increments,
in all exposure modes. An Auto Bracketing feature takes three shots of the same
subject with varying exposure values determined by either the photographer in
Manual mode or by the camera in all other modes. Exposure settings for bracketing
can vary from -2 to +2 EV (values are added to the already chosen exposure compensation
value), with step sizes of one-third, one-half, or one EV unit, and the bracketing
biased toward either underexposure, overexposure, or centered around the main
exposure value. Through the Custom Settings menu, the Bracketing function can
also be set to adjust white balance or flash exposures only. (By default, both
ambient and flash exposures are bracketed.) On a more mundane level, the D100
has a self-timer feature that allows you to set the time interval anywhere from
two to 20 seconds, and is activated by fully pressing the Shutter button.
A carryover from the D1 series, the Anti-Mirror-Shock Mode delays the exposure
until after the mirror shock subsides (intended times when the camera is on
a tripod). Set through the Custom Settings Menu, the default setting exposes
the image as soon as the shutter is released. Activating Anti-Mirror-Shock exposes
the image a fraction of a second after the shutter is released, giving time
for vibrations from the mirror actuation to damp out before the shutter opens.
The D100 also offers Sharpness, Tone Compensation (Contrast), and Hue adjustments,
accessed through the Shooting menu. I was impressed with the Tone Compensation
option's Custom setting, which accepts downloaded tone curves from a computer,
although as of this writing I haven't had a chance to experiment with it personally
yet. (If no curve is downloaded, the Custom setting defaults to the Normal setting.)
I'm particularly interested in the custom tone compensation option because I
felt the D100's default tone curve was rather too contrasty for my taste, and
didn't have a long enough "tail" on it in the highlight areas. (I
preferred to leave the camera set to use its built-in "low contrast"
tone setting most of the time.) By creating and loading a custom tone curve,
I could adapt the camera to more closely match my personal preferences.
The Hue adjustment offers arbitrary adjustments from –9 to +9 in increments
of three, with zero being the default setting. Raising the Hue setting above
three results in a stronger yellow cast in the image, causing reds to become
orange. Alternatively, lowering the Hue setting below three introduces a blue
cast, which consequently changes red to purple. A Color Mode setting in the
Shooting menu lets you capture images in sRGB or Adobe RGB color.
When reviewing images on the LCD monitor, you can call up a histogram and a
highlight function to give you a complete readout on the exposure. This is a
useful tool to examine your exposure in the camera instead of waiting to download
images and then deciding to reshoot. As I noted in my discussion of these features
in the Viewfinder section of this review, I'd like to see the Highlight function
be a little more restrained in its reporting of overly-strong highlights.
Continuous Shooting Mode
The D100's Continuous Shooting mode supposedly captures 2.5 frames per second
(as many as nine consecutive shots), depending on the amount of image information
and available CompactFlash space. In practice, I clocked it at 2.88 fps, a respectable
clip. Once the nine frame limit is reached, the camera is unable to record any
more photographs until at least one of the images is transferred from the buffer
memory to the memory card. As the photos transfer, the number of available consecutive
photographs displays in the viewfinder and on the status display panel when
the Shutter button is halfway pressed.
| What's up with RAW? | |
|
Flash
 Built
into the D100 is a pop-up flash unit, which operates in one of five modes: Front-Curtain
Sync, Red-Eye Reduction, Red-Eye Reduction with Slow Sync, Slow Sync, and Rear-Curtain
Sync. Front-Curtain Sync fires the flash at the beginning of the exposure, with
every shot. Red-Eye Reduction mode fires flashes the (very bright) autofocus
assist lamp before the main flash exposure, to reduce the Red-Eye Effect in
shots of people. Red-Eye Reduction with Slow Sync works in a similar fashion,
but combines the flash with a slower shutter speed for night portraits. (This
reduces the harsh effect of nighttime flash shots, allowing more of the ambient
illumination into the picture.) Slow Sync mode works with shutter speeds as
slow as 30 seconds to preserve color in night shots. Finally, Rear-Curtain Sync
fires the flash at the end of the exposure, producing light trails behind moving
subjects. In all flash modes, the flash fires with every exposure. Closing the
flash disables it completely. A Flash Compensation button on the camera's back
panel adjusts the overall brightness of the flash from –3 to +1 EV in one-third-step
increments.
Built
into the D100 is a pop-up flash unit, which operates in one of five modes: Front-Curtain
Sync, Red-Eye Reduction, Red-Eye Reduction with Slow Sync, Slow Sync, and Rear-Curtain
Sync. Front-Curtain Sync fires the flash at the beginning of the exposure, with
every shot. Red-Eye Reduction mode fires flashes the (very bright) autofocus
assist lamp before the main flash exposure, to reduce the Red-Eye Effect in
shots of people. Red-Eye Reduction with Slow Sync works in a similar fashion,
but combines the flash with a slower shutter speed for night portraits. (This
reduces the harsh effect of nighttime flash shots, allowing more of the ambient
illumination into the picture.) Slow Sync mode works with shutter speeds as
slow as 30 seconds to preserve color in night shots. Finally, Rear-Curtain Sync
fires the flash at the end of the exposure, producing light trails behind moving
subjects. In all flash modes, the flash fires with every exposure. Closing the
flash disables it completely. A Flash Compensation button on the camera's back
panel adjusts the overall brightness of the flash from –3 to +1 EV in one-third-step
increments.
The D100's internal flash is fairly powerful, with a guide number of 11 meters
or 36 feet at ISO 100. - That's a bit of an odd (albeit standard) rating, given
that the minimum ISO on the D100 is 200. At ISO 200, the corresponding guide
number would be 15.5 meters or 51 feet. (!) This means that an f/2.8 lens will
give you an effective range of 18.2 feet, an impressive distance for an on-camera
flash. At the same time, the angular coverage of the flash is enough to cover
the field of view of a 28mm lens on a 35mm film camera. - Applying the D100's
focal length multiplier ratio of 1.5, that translates to a coverage area adequate
to handle a 19mm lens.
Also included on the D100 is an external flash hot shoe, just behind the pop-up
flash compartment. The hot shoe accommodates Nikon accessory flash units, as
well as a wide range of third party flashes. The range of flash sync modes remains
available for compatible flash units. Different Nikon speedlights offer different
features when used on the D100. The table below (again use by courtesy of Nikon
USA, Inc.) shows the features available when using various Nikon speedlights
with the D100.
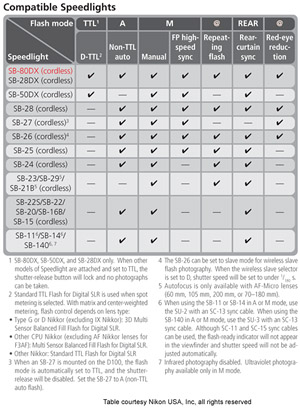
3D Matrix Flash Metering
I don't think I've commented much on Nikon's fill-flash metering system before, but it's a significant technology that deserves particular mention. The "3D" aspect of the Nikon metering system is that it uses subject distance information from the lens (only available with lenses that contain CPUs) to guide its exposure decisions. This is particularly key with flash exposures, because flash illumination falls off quite strongly as the subject gets further from the camera. I was reminded of how well 3D Matrix Flash Metering worked when I was playing with the D100, using its onboard strobe for fill illumination while shooting outdoors. What particularly impressed me was that I really didn't have to give a second thought to balancing the flash with ambient lighting. - I snapped a few test shots to see how much fill I wanted, deciding that a flash exposure compensation of about -2EV was giving me the level I wanted. I set that level of flash compensation, set the flash to "fill" mode, and that was it! I literally never had to think about the flash again, and the camera just kept churning out dozens of perfectly-exposed photos, under lighting that ranged from direct sun to deep shade and everything in between.
This is really a case of technology working perfectly in the service of creativity. The camera just quietly does its job, so you can focus on composition, color, interacting with your subjects, etc. It doesn't remove the creative decisions of how you want to light your subject, it simply removes the technical legerdemain from the equation. It won't by any means turn a duffer into a pro photographer, but it'll certainly take an average shooter a long ways in that direction.
|
|
|||
|
|
Normal Card |
SimpleTech 320 |
|
| Power On -> First shot |
|
|
Very fast.
|
| Shutdown |
|
|
"Shutdown" can be zero if card isn't writing, as no lens retraction to wait for. Longest time shown is when camera is clearing buffer with TIFF files, until card can be removed.
|
| Play to Record, first shot |
|
|
No more delay from play to record than minimum shutter lag in record mode. Very fast.
|
| Record to play (max/min res) |
|
|
Pretty fast review, even when shooting TIFF/NEF files.
|
| Shutter lag, full autofocus |
|
|
Will depend on lens being used, how far the focus has to traverse from prior shot. Time shown is minimum time with the 24-85 zoom we tested with. (Seems ike a fairly fast AF system. although) |
| Shutter lag, manual focus |
|
|
Very fast. (But about 28 msec slower than D1x.) |
| Shutter lag, prefocus |
|
|
Blazingly fast. (But about 28 msec slower than D1x.) |
| Cycle time, large/fine files |
|
|
Shorter time is for first 7-9 shots, then slows to. Note 30+% faster buffer clearing with faster card. |
| Cycle time, small/basic files |
|
|
Quite fast. Buffer didn't fill after 20+ shots, so no advantage to faster card in this mode. |
| Cycle time, TIFF files |
Buff clear 116 sec |
Buff clear 74 sec |
TIFF mode files are huge, take a long time to write. Faster card cuts time by 30+%. (Couldn't measure post-buffer cycle time on "conventional card, because our card was too small to exhaust the buffer.) |
| Cycle time, NEF files |
|
|
First time is for first 4 shots, then speed slows to second number shown. - In NEF mode, Faster card is almost twice as fast. |
| Continuous mode, large files |
(2.88 fps) |
(2.88 fps) |
2.88 frames/second for first 4-6 frames at max res, until buffer fills. Then takes time indicated by second number for buffer to clear. (Faster card is 1.8x as fast on buffer overruns.) Small/basic files show nearly identical behavior, but run length is 9 shots before buffer fills. |
The D100's performance is nearly identical to that of the D1x in most respects.
(I'd guess that their internal electronics are very similar.) The shutter delay
on the D100 is noticeably longer, although still very fast, at 100 milliseconds.
(The D1x came in at 72 ms, while the original D1 tested at 58 ms.) Note though,
that this is the shutter delay when the camera is prefocused or in manual focus
mode: Autofocus delay will be longer, and heavily dependent on the particular
lens used. The 24-85mm zoom lens I used in much of my testing increased shutter
lag only to 0.15 seconds, which is still very fast, but that was in a situation
where the lens was left in the same focus position from one test to the next.
Like the D1x, the D100 uses its buffer memory very well, even in single-shot mode. This is nice because no special gyrations are needed (as was the case in the original D1) to get the best cycle time performance from the D100. Buffer capacity on the D100 ranges from 7 to 9 frames, depending on the subject, and (slightly) on the speed of the card used. I measured the maximum continuous-mode speed at 2.88 frames/second, just slightly faster than the D1x, and a pretty good clip, considering the amount of data the D100 is dealing with.
Finally, the D1s starts up and shuts down very quickly, taking only 0.36 seconds from power-on to the first image captured, and shutting down in effectively no time at all. (Not surprising, since there's no lens to retract, as in many consumer cameras.) It switches from record to play mode fairly quickly (about 3 seconds), but from play to record mode almost instantly (0.1 seconds).
On a positive note, I really like the overall control layout, which places the main shooting controls on top of the camera and the rest on the back panel. The Function / Mode dial lets you adjust important settings such as ISO, image size, and quality, without delving into the menu system. Changing shutter speed, aperture, metering mode, etc. is quick and simple, with changes shown on the small black & white data readout on the top panel of the camera. The LCD menu itself is well-organized and simple to navigate, with four main menu pages. When shooting, the detailed information display in the viewfinder window does a good job of communicating current camera settings. Anyone already familiar with Nikon's SLRs, whether film or digital, will have no trouble operating the D100. For less experienced users, an hour or two spent with the manual and camera together should be enough to get comfortable.
Dave's Praise and Complaints
When I first saw a prototype of the D100 at the 2002 Spring PMA, my immediate reaction to the control layout was rather negative. Now that I've worked with the camera some, I found that the primary concern I had at PMA hasn't been an issue, but another one has loomed even larger.
Of all the cameras I've tested and shot with, I probably like the Nikon D1x's control scheme the best. All it takes to adjust primary camera functions like ISO, white balance, or flash sync is to press a button and rotate a command dial. This is very quick to do, and the camera remains in whatever shooting mode you've selected, always ready to snap the next frame.
By contrast, on the D100, a number of key camera functions are accessed through the same Function Dial that also selects shooting mode. While they are thereby made very accessible, setting them requires a significant interruption to the flow of your shooting. To change AF area mode, image size or quality, white balance or ISO, you have to leave the shooting mode you're in (program, shutter or aperture priority, or manual mode), rotate the Function Dial to select the function you want to adjust, rotate a command dial, and then rotate the Function Dial back to the shooting mode you just left.
My initial reaction to this arrangement was to worry that it would be too easy to miss the mark when returning to the desired shooting mode, inadvertently switching from program to shutter priority, for example. In practice, I didn't find this to be that much of an issue, although I imagine it could become one in the heat of a frenzied shooting session.
What I found far more objectionable though, was that this scheme takes the camera totally away from the "always ready to shoot" design of the other Nikon pro SLRs. If a choice moment occurs while you've got the Function Dial set to "ISO" (for example), forget about capturing it. You can't shoot until you rotate the dial back to one of the shooting mode settings. I'm no doubt an atypical user, given how much I play with camera settings in the course of my testing, but I very frequently found myself wanting to quickly snap a frame but being foiled by the @#! Function Dial. Before I could shoot, I had to rotate the dial back to one of the shooting mode positions.
Don't get me wrong, I like the concept of the Function Dial a great deal, as it makes the camera settings much more accessible to novice users, and saves even experienced users from hunting through the LCD menu system. The problem with its implementation on the D100 is that it can interfere with getting the next shot, a cardinal sin in my book when it comes to user interface design for cameras.
What I'd recommend to Nikon is that they provide a menu option by which you could assign a "default" shooting mode for times when the Function Dial was rotated to one of the settings positions, rather than a shooting mode. Pressing the shutter button would then drop the camera into shooting mode, with the default option selected. (Eg, Program, Aperture Priority, etc.) This would eliminate a major usability defect. Of course, there would remain the question of how the camera should be made to return to the settings mode after you'd hit the shutter button. The camera's operating state would be slightly obscure at this point, in that the Function Dial would still be set to whatever settings position it had been left in, but the camera would be in shooting mode. My suggestion would be to have any movement of the Function Dial at this point restore the normal operation of that control. While it might be confusing to users to have the camera actually in a shooting mode when the Function Dial was indicating otherwise, I think this would be far preferable to the current lack of shooting priority. - And since the user would have to select this behavior via a Custom Function Menu option, it shouldn't be all that confusing.
So how big a deal is this? In practice, probably not very, at least for most people. Most of the functions controlled by the Function Dial are ones that will be set relatively infrequently by most users. As noted above, I tend to spend an inordinate amount of time playing with camera settings because of my role as a reviewer. In a more normal shooting session, I'd have much less occasion to fiddle with the D100's Function Dial. (Although I do often find myself playing with ISO settings in available-light situations, as I often want to take a few high-ISO "insurance" shots to make sure I get a sharp photo, but drop back to lower ISO values to cut noise for the bulk of my shooting.) Bottom line, the Function Dial issue isn't enough to quench my yearning for a D100, nor do I think it will prove so for the majority of potential purchasers. It's definitely an area that could use some improvement though.
Control Enumeration, Command Dials
Here's my usual "walk around the camera," this time starting with the two Command Dials, the Main Command Dial and the Sub Command Dial. Most camera settings are made by pressing and holding the appropriate button while rotating one or the other of these two controls. Functions controlled by these dials are as follows:

Main Command Dial: The Main Command Dial is located on the back of the camera, in the upper right hand corner, right under your right thumb. Used in conjunction with other buttons and the Function Dial, this controls ISO, White Balance, Quality, and AF Area Mode settings. It also enables or disables the auto bracketing mode when used with the BKT button. Used together with the BKT button, it adjusts auto bracketing options. In Shutter Priority and Manual exposure modes, this dial sets the shutter speed, although it can be made to control the shutter speed instead, via a Custom Menu setting.

Sub-Command Dial: The Sub Command Dial is located on the front of the handgrip, just under the shutter button, conveniently placed for your index finger to grip. This dial fine-tunes the white balance across the -3 to +3 range (arbitrary units) when the Function Dial is set to the White Balance. It sets the resolution when the Function Dial is in the Quality position. In Manual and Aperture Priority modes, it sets the aperture value, although it can be made to control aperture instead, via a Custom Menu setting.
 Control
Enumeration, Top Panel Controls, Right
Control
Enumeration, Top Panel Controls, Right
The controls on the right side of the top panel are the primary shooting controls,
generally dealing with immediate camera operations. - Refer to the photo at
right to orient yourself for the locations of the individual controls.

Power Switch: Surrounding the Shutter button on the top right of the
camera, this switch turns the camera on and off. (BIG PLUS: Unlike Nikon's models
in the D1 series, the D100 will delay switching off until it has finished writing
any buffered images to the memory card. This avoids the problem of losing any
buffered images if you shut the camera off too soon.) Camera startup is very
rapid, an area in which the D100 wins out over the competing Canon D60.

Shutter Button: In the center of the Power switch, on the top of the
camera, this button sets focus (when in autofocus mode) when halfway pressed
and fires the shutter when fully pressed. Unlike most cameras, you can choose
whether or not the shutter button also locks exposure, via an option on the
Custom Settings menu.
When an image is displayed on the LCD monitor, halfway pressing the Shutter
button dismisses the display and readies the camera for shooting. (A partial
expression of Nikon's "shooting priority" philosophy. Unfortunately,
as noted earlier, if you happen to have the Function Dial turned to a non-shooting
position, pressing the shutter button will dismiss the playback display on the
LCD, but won't fire the shutter.)

Exposure Compensation Button: Directly behind the Shutter button on the
top of the camera, pressing this button while turning the main command dial
sets the Exposure Compensation from –5 to +5 exposure equivalents (EV)
in one-third step increments.

Flash Sync Mode Button: Directly beside the Exposure Compensation button,
holding this button and rotating the Main Command Dial cycles between the five
flash sync modes (Fill, Red-Eye Reduction, Red-Eye Reduction with Slow Sync,
Slow Sync, and Rear Curtain Sync). Pressing and holding this button together
with the Bracket button (far left side of the camera's back panel) for two seconds
resets the main camera settings to their default values.

Illuminate Button: Just to the right of the status display panel on top
of the camera, this button illuminates the panel with a green light. Pressing
and holding this button together with the Flash Compensation button signals
the camera to format the memory card. (The top-panel LCD data readout flashes
"For," but doesn't immediately format the card. Press both buttons
a second time to confirm the format operation.)
 Control
Enumeration, Top Panel Controls, Left
Control
Enumeration, Top Panel Controls, Left
The left side of the D100's top panel is dominated by the Function Dial and
the Mode Dial underneath it. - Refer to the shot at right to orient yourself
for the locations of the individual controls.

Function Dial: Covering most of the area to the left of the pentaprism
housing, this dial sets the main exposure mode and also accesses a handful of
camera adjustments. (With the Function Dial in any of its settings positions,
turning the Main Command Dial adjusts that setting.) Per my rant above, this
arrangement is nice for novices, but violates the "shooting priority"
philosophy that Nikon has so correctly adhered to in their previous digital
SLRs. The following settings are available. (Proceeding counterclockwise from
the "P" position.):
Mode Dial: Directly beneath the Function Dial, this dial sets the camera's drive mode. Options are Single Frame, Continuous Shooting, and Self-Timer.
Mode Dial Lock Release: The Mode Dial is locked to prevent accidental changes in its settings. To unlock it, press the release button just above it and to the left.
Control Enumeration, Rear Panel Controls
Most of the rest of the camera's controls are located on the rear panel. The controls along the top of the back panel generally relate to shooting settings, while those on either side of the LCD monitor are associated with playback and menu navigation. We'll start our tour at the top left. - Refer to the photo below to orient yourself.

Auto Bracketing Button: Positioned in the top left corner of the camera's
back panel and marked "BKT," pressing this button and rotating the
Main Command Dial enables the Auto Bracketing function. Turning the Sub-Command
dial instead of the Main Command Dial changes the bracketing step size. Pressing
and holding this button in conjunction with the Flash Mode button resets the
main camera settings to their default values. (Very handy for quickly getting
back to "neutral" when you have a number of settings active.)

Flash Compensation Button: To the right of the Auto Bracketing button,
pressing this button and rotating the Main Command Dial adjusts the flash intensity
over a range of –3 to +1 EV, in 1/3 EV steps. Pressing and holding down
this button together with the Illuminate button formats the memory card.
![]()
Diopter Adjustment Switch: Sitting vertically next to the right side
of the viewfinder eyepiece, this slide control adjusts the optical viewfinder
to accommodate eyeglass wearers. (Range is -2 to +1 diopters.)

Metering Selector Dial: To the right of the viewfinder eyepiece, this
dial surrounds the AE/AF Lock button. Rotating the ring selects between Spot,
Center-Weighted, and 3D Color Matrix metering options.

AE/AF Lock Button: Located in the center of the Metering Selector, this
button locks the exposure and/or focus when pressed. The settings remain locked
as long as you hold the button down, regardless of any action of the shutter
button. Several options for this control can be set via Custom Settings Menu
14. You can program it to lock either focus or exposure separately, or both
together (the default). You can also change its operation so a single press
locks and holds the exposure setting. (No need to keep the button pressed down.)
Finally, you can set the AE/AF lock button so it alone controls the autofocus
system, meaning the autofocus won't actuate when the shutter button is half-pressed,
only when the AE/AF lock button is pressed instead.

Focus Area Selector and Lock / Four-Way Arrow Rocker Pad: Just off the
top right corner of the LCD monitor on the back panel, this rocker button with
its associated locking switch (directly below it) controls the autofocus area
in Record mode. (Unless dynamic-area autofocus is enabled via CSM menu items
20 or 21, in which case the camera automatically selects the AF area corresponding
to the closest subject.) The switch beneath it unlocks the rocker control and
pressing any side of the rocker moves the active AF selection in that direction.
(by choosing one of the five brackets displayed in the viewfinder).
In Playback mode, the rocker pad's up and down arrows scroll through captured
images while the right and left arrow buttons cycle through various information
displays for each image. When you zoom in on an image in playback mode, the
rocker pad lets you scroll around the magnified image.
In any settings menu, the arrow directions on this control are used to navigate
through the LCD menu system.
![]()
Delete Button: Just below the locking switch of the Four-Way Arrow pad,
this button deletes individual images in playback mode, with a confirmation
screen to give you the opportunity to change your mind.
![]()
Monitor Button: Just off the top left corner of the LCD monitor, this
button displays the most recently captured image, putting the camera into Playback
mode. Once an image is displayed, the arrow keys navigate through the other
images saved on the memory card. This button also dismisses the image display.
![]()
Menu Button: Below the Monitor button, this button displays or dismisses
the LCD menu system.

Thumbnail View Button: Just below the Menu button, this button works
together with the Main Command Dial to display either a four or nine-image index
view. The chosen display mode remains selected indefinitely, even if the camera
is turned off. To return to normal viewing, press the Thumbnail View button
again, and rotate the Command Dial in the opposite direction. When a thumbnail
view is activated, you can scroll a cursor through the thumbnail images very
rapidly with the rocker pad. Pressing the Enter button magnifies the image that's
currently selected. Turning the Main Command and Sub-Command dials changes the
level of magnification, while the Sub Command Dial switches you into and out
of the zoomed view, showing the current zoomed display area as a red-bounded
rectangle. See the previous Viewfinder section of this review for a more complete
description of this function.
![]()
Protect Button: Next in line below the Thumbnail View button, this button
write-protects individual images, protecting them from accidental deletion.
(Note though, that even "protected" images will be lost when a card
is reformatted.) If an image is already protected, pressing the Protect button
removes protection.

Enter / Magnify Button: Just below the Protect button, this button confirms
menu selections. It also activates the playback magnification, when a captured
image is displayed in the LCD monitor.
Control Enumeration, Front Controls,
There are only three controls on the front of the camera body. They are:

Depth of Field Preview Button: On the right side of the body (as viewed
from the back), just beneath the AF assist light, this button lets you check
the depth of field with the current aperture setting. Pressing the button stops
down the lens, so you can get an idea of the depth of field through the viewfinder.

Focus Mode Selector Dial: On the other side of the camera, next to the
lens, this control selects between Manual, Single Servo, and Continuous Servo
focus modes. Single servo focuses once each time the shutter button is half-pressed.
Continuous Servo focuses continuously as long as the shutter button is held
down. An important difference between the two options is that Continuous Servo
will let you fire the shutter even if the subject isn't in focus. (Release priority.)
By contrast, Single Servo won't release the shutter unless the camera thinks
the subject is in focus. (Focus priority.)

Lens Release Button: Just above the Focus Mode Selector Dial, this button
releases the lens from its mount when pressed.
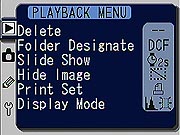
Menus:
There are four menus on the D100: Playback, Shooting, CSM (custom menus) and Set Up. All menu entries are selected via the 4-way Arrow Pad. The menus themselves are chosen via a "tabbed" interface, with icons on the left of the screen corresponding to the four menus. In the section below, rather than reproduce every menu screen in the main text here, I've shown screenshots for only the top level of each menu, with clickable links in the descriptive text leading to the individual screens.
Playback Menu:
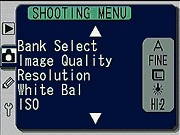 Shooting
Menu:
Shooting
Menu:
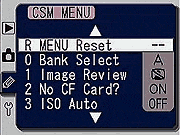 Custom
Settings Menu:
Custom
Settings Menu:
Setup Menu:
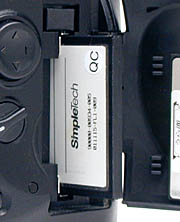 The
D100 uses CompactFlash memory cards for image storage, accommodating Type I and
II sizes, as well as the IBM Microdrive. Interestingly, the memory card slot on
the D100 is canted at about a 15 degree angle relative to the back of the camera,
apparently to provide clearance for the battery compartment, making for a more
compact hand grip. The D100 does not come with a memory card, so you'll need to
purchase one separately. The D100 utilizes a folder arrangement that lets you
organize images in the camera and a sequential frame counter option to avoid problems
with overwriting files when copying them to the computer.
The
D100 uses CompactFlash memory cards for image storage, accommodating Type I and
II sizes, as well as the IBM Microdrive. Interestingly, the memory card slot on
the D100 is canted at about a 15 degree angle relative to the back of the camera,
apparently to provide clearance for the battery compartment, making for a more
compact hand grip. The D100 does not come with a memory card, so you'll need to
purchase one separately. The D100 utilizes a folder arrangement that lets you
organize images in the camera and a sequential frame counter option to avoid problems
with overwriting files when copying them to the computer.Captured images can be individually write-protected via
the Protect button on the back panel. Write-protected files are only immune
to accidental deletion, not card reformatting. Three image sizes are available:
Large (3,008 x 2,000 pixels), Medium (2,240 x 1,488 pixels), and Small (1,504
x 1,000 pixels). File formats include several levels of compressed JPEG files
as well as TIFF and RAW data modes. The "raw" file format stores the
data exactly as it comes from the CCD array, either compressed or uncompressed.
Since the "raw" format is completely proprietary though, it can only
be processed by Nikon's "Nikon Capture" software, Mike Chaney's Qimage
Pro program, or Eric Hyman's "Bibble."
(Actually, neither program yet supports the D100's version of the NEF format
- I've emailed both authors and offered them samples of D100 NEF files though,
and expect that they'll offer support shortly.) The compressed RAW format is
a "lossless" compression, making it difficult to determine the actual
amount of compression being used. Nikon estimates that compression is 50 or
60 percent over the standard, uncompressed RAW format. (Although the LCD data
readout on my prototype camera showed the same memory card capacity for both
compressed and uncompressed NEF files.)
Below are the approximate number of images and their compression ratios for
a 128 MB CompactFlash card. Third-party cards are available as large as 1 GB
for both solid-state memory and IBM MicroDrives. (Even larger MicroDrives are
anticipated/rumored by the end of this year.).
| Resolution/Quality vs Image Capacity |
|
|
|
|||
|
|
|
|
|
|
|
|
| HI RAW data (Uncompressed) |
|
|
|
|
N/A | N/A |
| HI RAW data (Compressed) (Prototype showed same capacity for compressed as uncompressed.) |
|
|
|
|
N/A | N/A |
| HI RGB TIFF |
|
|
|
|
27 | 1:1 |
| Fine Quality |
|
|
|
|
142 | 5:1 |
| Normal Quality |
|
|
|
|
268 | 9:1 |
| Basic Quality |
|
|
|
|
440 | 16:1 |
Unlike the other Nikon pro digital SLRs (which use the IEEE 1394 "FireWire" interface), the D100 connects to the host computer via a USB port. The D100's USB port is no slouch however, as it turned in the fastest download speed I've yet seen from a USB-connected camera. Connected to my 500 MHz PowerMac G4 computer, it transferred a 7,153KB NEF file in just a shade over 10 seconds, a transfer rate of 715 KB/second.
Lost Images? - Download this image-recovery program so you'll have it when
you need it...
Since we're talking about memory and image storage, this would be a good time
to mention the following: I get a ton of email from readers who've lost photos
due to a corrupted memory card. It's tragic when it happens, there are few things
more precious than photo memories. Corrupted memory cards can happen with any
card type and any camera manufacturer, nobody's immune. "Stuff happens,"
as they say. A surprising number of "lost" images can be recovered
with an inexpensive, easy to use piece of software though. Given the amount
of email I've gotten on the topic, I now include this paragraph in all my digicam
reviews. The program you need is called PhotoRescue, by DataRescue SA. Read
our review of it if you'd like, but download the program now,
so you'll have it. It doesn't cost a penny until you need it, and even then
it's only $29, with a money back guarantee. So download PhotoRescue for
Windows or PhotoRescue for
Mac while you're thinking of it. (While you're at it, download the PDF
manual and quickstart
guide as well.) Stash the file in a safe place and it'll be there when you need
it. Trust me, needing this is not a matter of if, but when... PhotoRescue
is about the best and easiest tool for recovering digital photos I've seen.
(Disclosure: IR gets a small commission from sales of the product, but I'd highly
recommend the program even if we didn't.) OK, now back to our regularly
scheduled review...
Video Out
US and Japanese models of the D100 come with an NTSC video cable for connection to a television set or VCR (European models come with the appropriate PAL cable). This allows images to be played back on the TV screen and recorded to video tape, with all the menu options available.
Power
The D100 uses Nikon's new EN-EL3 lithium-ion battery pack or an optional AC adapter for power. An indicator on the status display panel lets you know approximately how much battery power is left. I didn't have access to the external AC adapter when testing the D100, so wasn't able to conduct my usual direct measurements of power consumption. That said, the D100/EN-EL3 combination seems to offer really exceptional battery life, as I could shoot literally hundreds of photos without draining the battery. (Nikon claims it's good for 500 shots without flash, a number I wouldn't dispute.) Despite the long battery life though, I still heartily recommend purchasing a spare battery pack and keeping it charged for long shooting days or for shooting in cold weather (which can greatly reduce battery capacity). As a separate accessory, Nikon also offers the MB-D100 Multi-Function battery pack, which attaches to the bottom of the camera and provides a vertical shooting grip (complete with secondary Shutter button and command dials). The battery pack also features a microphone, for recording short sound clips to annotate captured images.
Included Software
| |
||
|
The D100 ships with the "Nikon View" software, which provides basic manipulation and cataloging capabilities for images captured by the camera, and which can interpret the raw CCD format "NEF" files. A much more advanced package called Nikon Capture is available separately. I received copies of both View and Capture with my prototype eval unit, but haven't had time to work with them yet. - I'll try to come back and update this review at a later date with a full report on the updated versions of these applications. Users will also want to check out the third-party applications Bibble and Qimage Pro, both of which offer enhanced interpolation of NEF files, for even higher image resolution. (As of this writing, neither application has been updated to support the D100's NEF formats. I've contacted both authors though, and expect that they'll add support for the D100 shortly.)
In the Box
Included in the box with the D100 are the following items:
Test Results
|
From Dave: Read our shootout article, comparing this camera to 3 other digital SLRs!
I've had the D100 for less than a week now, so haven't had the time to do my usual full analysis of its images. - Stay tuned, I should the full treatment up within a week. Meanwhile, I've uploaded a representative sample of images, along with a collection of random shots I snapped with it. - These should give some idea of the camera's performance under a variety of shooting conditions. (Sorry, no night shots yet, but I'll try to get to some pretty soon.) There is one sequence of shots snapped with a blue-sky background at a range of ISO settings, from 200 to 6400, for the noise-analysis fanatics out there though. ;-) Look for the sample images page to be posted soon!
Conclusion
As I said at the outset, there's no question in my mind that the D100 is going to revolutionize photography even more so than the original D1 did when it first appeared. While its advent was made a little less startling by the near-simultaneous announcement of Canon's competing D60 model (selling for only a couple of hundred dollars more), these cameras will together open "no excuses" digital photography to thousands upon thousands of photographers for whom it was previously out of reach. I haven't done any sort of a complete analysis on my test images yet (stay tuned for about another week for that), but the early results are very impressive. Even beyond the image quality though, what stands out in my mind about this camera is how completely I can forget about the mechanics of shooting while using it. It facilitates the creative process by offering an almost totally transparent photographic tool, a rare quality. This impression may reveal some of the bias of my experience, since I've been a duffer-level Nikon shooter for years, making the generalized Nikon user interface more natural to me than that employed by Canon. I'll have a more detailed comparison between the D100 and D60 as I update this review, but my general impression is that the two cameras are pretty much on par with each other in most areas. Neither will cause devoted shooters of the other persuasion to switch sides, but the advent of the D100 means that many thousands of Nikon fans will now have an opportunity to enter the high-end digital world at an attainable price point. (I do think that both cameras will draw in a lot of people who've used film SLRs from other manufacturers in the past. - It's that segment of the market where the most competition will occur between these two titans.)
While a full analysis is still a week or more off, I can confidently say that Nikon has really delivered on its promises with the D100. My advice to anyone remotely interested is to get in line with a preorder as soon as Nikon begins letting dealers take orders for it. - The popularity and demand for this camera are going to eclipse anything we've yet seen in the digital world. Highly recommended!
<<D100 Sample Images | Additional Resources and Other Links>>
Reader Comments!
Questions, comments or controversy on this product? Click
this link to see what other Imaging Resource readers have had to say about
the Nikon D100, or add comments of your own!