Olympus Stylus 730 Operation
The Olympus Stylus 730 has two main operating modes: Normal and Simple. Simple is designed for beginners or anyone unfamiliar with digital cameras (like young children). Camera operation is restricted to very basic options, so it's hard to get into trouble. Normal mode allows access to all of the camera's operations. A button on the side of the camera toggles between the two.
In Normal mode, operations are easily managed. Major functions like image quality and setup options are accessed from the Menu button while settings that might change from shot-to-shot are accessed from the Function button in the middle of the Four-way navigator. If you need help, the Guide is available just by pressing the Record button, and navigating down to it. That's also where you'll find Movie mode.
Playback is easily initiated from the Playback button right next to the Record button. Icons on all buttons are illuminated, a very nice touch.
Record Mode Display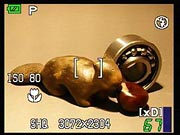 In Record mode, the LCD displays the subject with an overlay of data that tells you approximate Battery Life Remaining (graphically), Flash mode, Focus mode (Macro, Supermacro, or Normal), Autofocus mode setting, any currently-selected Exposure Compensation setting, ISO setting, White Balance, Drive mode, the current Size and Quality setting, and Number of images that can be stored on the remaining memory space at the current size and quality. A variety of other camera settings may appear on the LCD monitor when set to anything other than their defaults.
Playback Mode Display In Playback mode, the image display shows the most recently captured image, with an information overlay that reports basic camera settings, plus any print settings, and the image and sequence number. Pressing the wide-angle zoom button takes you through a series of index display modes, with a 4, 9, 16, 25-image index, or a Calendar display. Pressing the telephoto side of the Zoom lever when viewing an image full-size on the LCD screen will zoom in on the image, and you can use the Four-way keys to pan the view.
Olympus Stylus 730 Modes and Menus
Normal/Simple Mode: The camera has two main operating modes: Simple hides most menus from the user while Normal provides access to the camera's full capabilities.Shooting Mode: This mode includes four options available from the Record button:
 Still Picture: Captures still photographs in either Auto or Program mode, as set from the Function button menu.
- Movie: Captures video in three resolutions: 640 x 480, 320 x 240, and 160 x 120.
- Scene: The 20 Scene modes include Portrait, Landscape, Landscape & Portrait, Night Scene, Night & Portrait, Sport, Indoor, Candle, Self-Portrait, Available Light, Sunset, Fireworks, Museum, Cuisine, Behind Glass, Documents, Auction, Shoot & Select1, Shoot & Select2, Beach & Snow.
- Guide: Guide mode lets you select an effect like "Blurring background," and sets the camera to achieve it, telling you what to do. It's both effective and intelligent, and to top it off, transparent (unlike Scene modes) so you can actually learn a little photography.
Image Stabilization: Although not labeled as a mode itself, pressing the Stabilization button does change the camera's behavior much like a mode button. It enables Digital Image Stabilization (not optical image stabilization) to reduce camera blur by increasing the ISO speed, so shutter speeds are quicker than they might be in ordinary Auto or Program mode.
Playback Mode: The Playback button on the rear panel enables image review mode. In this mode, you can scroll through captured images, delete them, write-protect them, and set them up for printing on PictBridge-compatible printers. You can also copy, resize, and rotate images, as well as turn images Black and white or Sepia.
Function Menu: Pulled up by the OK/Func button, this menu offers quick access to the following settings:
 P/Auto: Selects between Program and Auto exposure modes.
- White Balance: Sets white balance to Auto, Daylight, Cloudy, Incandescent, Fluorescent 1, Fluorescent 2, or Fluorescent 3 modes.
- ISO: Sets the ISO to Auto, or anywhere from 80 to 3,200 equivalents when the Stabilizer is not active.
- Drive: Accesses the Continuous, and Hi Speed Continuous shooting modes, as well as Single Shot.
- Metering: Sets the metering mode to Digital ESP or Spot.
Record Menu: Available in all Record modes, the Record menu is accessed by pressing the Menu button. An initial shortcut screen pops up with options for Compare & Shoot, Image Quality, Multi-shot, , Panorama, Camera Menu, Setup, Scene, and Silent mode.
- Camera Menu: Displays the following options (some options are not available in all modes):
 White Balance: Adjusts the color balance of the image to match the light source. Options are Auto, Daylight, Cloudy, Incandescent, Fluorescent 1, Fluorescent 2, and Fluorescent 3.
- ISO: Adjusts the camera's light sensitivity. Options are Auto, or 80, 100, 200, 400, 800, 1,600, and 3,200 ISO equivalents. At 3200, image quality is limited to a maximum of 2,048 x 1,536.
- Drive: Sets the camera's drive mode to Single Shot, Continuous, or Hi Speed Continuous.
- Metering Mode: Chooses between Digital ESP (default) and Spot mode. Spot metering reads the exposure from the very center of the frame. Spot metering is handy for backlit subjects, or any time the subject and background have very different brightness levels. Digital ESP mode reads the entire frame to determine exposure.
- Fine Zoom: Combines optical and digital zoom to enable a maximum magnification of 5x. Image quality is limited to 1,600 x 1,200 or less.
 Digital Zoom: Turns the camera's digital zoom on or off. Combined with optical zoom, total maximum zoom is approximately 15x.
- AF Mode: Sets the AF mode to iESP or Spot.
- Sound Recording: Enables sound recording for a short, four-second caption to accompany an image file, recorded immediately after image capture.
- Label Shot: Allows you to capture a monochrome image to apply as a label to another image in Edit mode.
- Frame: Allows you to select a built-in frame to apply to images you are about to capture. Also available in Edit mode to apply to previously captured images.
 Image Quality: Sets the image quality, or resolution of the images to be captured. Compression options are also included. Still options are SHQ for 3,072 x 2,304 with low compression, HQ for 3,072 x 2,304 with standard compression, SQ1 for 2,560 x 1,920, or 2,304 x 1,728, or 2,048 x 1,536 all with standard compression, SQ2 for 1,600 x 1,200, 1,280 x 960, 1,024 x 768 at standard resolution, or 640 x 480 at low compression, 16:9 for 1,920 x 1,080 with standard compression. Movie image quality options are SHQ for 640 x 480, HQ for 320 x 240, and SQ for 160 x 120.
- Compare & Shoot: Shows you the last four shots captured on the left side of the LCD for comparison with the current shot. The newest shot is always at the top left.
- Panorama: Available only with Olympus brand xD-Picture Cards, this mode allows you to take up to three shots to be combined automatically in the camera, or up to 10 to be combined later on the computer using the provided Olympus Master software. You can specify which edge to connect (or direction to shoot).
- Multi-Shot: Takes up to nine shots while the Shutter button is held down, and combines them into one 2,048 x 1,536 pixel image.
- Silent Mode: Automatically shuts off operational sounds that occur during shooting, and playback, warning beeps, shutter sound, etc. Not available in Guide mode.
- Setup: Accesses the Setup menu below.
Playback Menu: As with the Record menu, a shortcut menu appears when pressing the Menu button, before accessing the main Playback menu.
- Slide Show: Enables an automated slide show of the captured images. Transition options include Normal (Scroll, Fader, Slide), Zoom (Down, Up), Checkerboard, Blinds, Swivel, or Random.
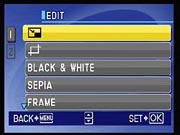
- Edit: Displays the following image, and video editing options:
 Resize Image: Changes the size of an image, saving it as a new file. Size options are 640 x 480 and 320 x 240.
- Crop: Crops an image, saving the crop as a new file. You use the arrow pad and the Zoom lever to adjust the position and size of the area selection box.
- Black & White: Converts the image to black and white, and saves it as a new file.
- Sepia: Converts the image to sepia, and saves it as a new file.
- Frame: Allows you to select one of the built-in frames to overlay on an image, and save as a new file.
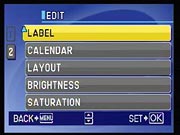 Label: Allows you to select a label image you've previously created to overlay on an image, and save as a new file.
- Calendar: Allows you to select a calendar format to combine with an image, and save as a new file.
- Layout: Allows you to make a layout of several images, overlaying them. Options include All Images in internal memory, all images in an Album, images selected by date in a Calendar, and individually Selected Images.
- Brightness: Allows you to adjust the brightness of an image, saving it as a new file.
- Saturation: Allows you to adjust the saturation of an image, saving it as a new file.
- Print Order: Allows you to set DPOF data like the number of prints, and date/time information for each image on the card.
- Calendar: Allows you to playback images in a calendar format, organized by the date the images were captured.
- Playback Menu: Displays the following options:
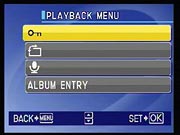 Protect: Protects an image from accidental erasure except when formatting the card.
- Rotate: Rotates the images 90 degrees left or right.
- Voice Memo: Record up to four seconds of audio with an image.
- Album Entry: Allows you to, organize images by sorting them into albums. Not available to images stored in internal memory.
- Setup: Accesses the Setup menu below.
- Album: Opens an album (an album has to be created on a card before this icon becomes available; otherwise, it is grayed out).
- Erase: Allows you to erase selected images or all images that are not protected.
- Silent Mode: Automatically shuts off operational sounds that occur during shooting, and playback, warning beeps, shutter sound, etc. Not available in Guide mode.
Setup Menu: Displays the following options:
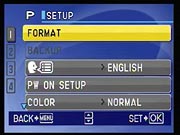 Format: Formats the internal memory or xD-Picture Card, erasing all files (even protected ones).
- Backup: Copies images from the internal memory to an xD-Picture Card.
- Menu Language: Selects the language for the LCD menu display.
- Power On Setup: Controls whether an image and sound are played on startup.
- Screen Setup: This option lets you register a captured image as the startup screen.
- Color: Changes the color of the menu displays. Options are Normal, Blue, Black, and Pink.
 Beep: Adjusts the volume of the beep sound played when a button is pressed.
- Beep Volume: Adjusts the volume of the camera's warning sound.
- Shutter Sound: Selects the type of sound and volume of the shutter noise.
- Volume: Controls the playback volume.
- Record View: Activates an instant image review function, or disables it.
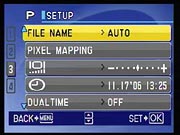 File Name: Resets file naming with each new memory card, or continues the numbering from card to card.
- Pixel Mapping: Runs a self-check of the camera's CCD. Olympus recommends only running this function once a year.
- LCD Brightness: Adjusts the brightness of the LCD display.
- Date and Time: Sets the camera's internal clock and calendar.
- Dual Time: Sets the date and time for another time zone, so you can track time at home vs. local time while traveling.
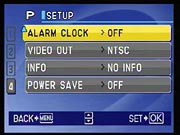 Alarm Clock: You can set an alarm to occur either one time only or daily.
- Video Out: Sets the timing of the video output signal to either NTSC or PAL.
- Info: Sets the amount of information displayed with an image during shooting or playback. Options include Standard, Detail, and No Info.
- Power Save: Toggles Power Save mode on, or off. When on, the LCD will shut down after 10 seconds of inactivity. Pressing any button restores the camera from power save mode.
 Fujifilm GFX 50S Review
 Fujifilm X-T3 Review
 Olympus E-M5 III Review

Follow Imaging Resource