The Imaging Resource
Quick Review
Sony Cybershot DSC-P8 Digital Camera
|
|||||||||||||||||||
|
|||||||||
Sony Electronics Inc. is well known for its consumer camcorders, notebook computers, and other multimedia products, blazing a long trail of innovations, including the first electronic still camera -- the Sony Mavica -- released in 1981. Over the last couple of years, they've developed a dominant position in the digital still camera market, with one of the broadest product lines in the industry.
In the "subcompact" camera market, Sony has developed a unique line of cameras with a thin, elongated profile. This shape lets them slide easily into small pockets, yet gives US-sized fingers plenty to grab hold of. With rugged metal cases, appealing design aesthetics, and strong feature sets, Sony's subcompacts have enjoyed wide popularity.
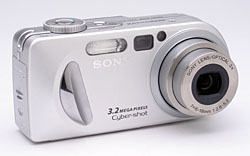
New to the series is the P8, with a 3.2-megapixel CCD, 3x optical zoom lens,
and a wide range of seven preset Scene modes to choose from. The P8 offers a
limited number of exposure adjustments, but more than enough to adapt it to
most common shooting situations, and the 3x zoom lens (with Macro mode) is great
for recording a wide range of subjects, from close-up portraits to scenic vistas.
Overall, an impressive camera in a tiny package.
Camera Overview
The DSC-P8's tiny shape and size ranks it among the smaller Sony Cyber-Shot models, perfect for travel and leisurely outings. The camera definitely passes the "shirt pocket" test, and would even fit into a rather small handbag. The P8's compact shape isn't all the camera has to offer though. A 3.2-megapixel CCD and an all-glass, 3x zoom lens deliver sharp, clear pictures, suitable for printing as large as 8x10 inches. There's also an Email size option that creates smaller-resolution files for sending over the Internet, in addition to whatever larger image size you've chosen. Plus, the handful of preset Scene modes can tackle a wide range of common exposure situations, from beach scenes to night shots.
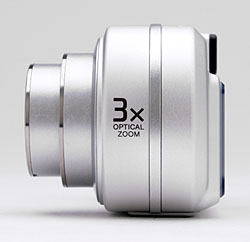
The P8's 3x optical zoom lens has a focal length range from 6-18mm, the equivalent of a 39-117mm lens on a 35mm camera. (Most digicams with 3x zoom lenses cover a range from 35 to 105mm equivalent. The P8's lens is thus biased just slightly toward the telephoto end.) Focus ranges from 19.7 inches (50 centimeters) to infinity in normal focus mode, with a macro setting that lets you get as close as 3.9 inches (10 centimeters). Closest focus occurs only when the lens is at its wide angle setting, producing a fairly average minimum macro area of 3.33 x 2.50 inches (85 x 63 millimeters).
Although the camera does not have a manual focus option, it does offer a range of specific fixed focus settings, from 0.5 meters to infinity. The three-area Multi-Point AF system bases focus on one of three areas in the center of the frame, depending on the location of your subject. Through the camera's Record menu, however, you can opt for Center AF mode, which bases focus only on the very center of the frame. Also available, through the Setup menu, are three AF operating modes: Single, Monitoring, and Continuous. In Single AF mode, focus is set whenever the Shutter button is halfway depressed. Monitoring mode continuously adjusts focus before the Shutter button is pressed, tracking any subject movement, but a half-press of the Shutter button still locks focus. Continuous AF mode continuously adjusts focus, regardless of the status of the Shutter button.
The P8's AF illuminator helps the camera focus in dark conditions, and works well with the Twilight scene modes. In addition to the 3x optical zoom, the P8 also features 3.2x Smart Zoom, which digitally enlarges the center portion of the CCD. Sony's "Smart" Zoom refers to the fact that the camera limits your digital zoom range, as determined by the ratio between your currently-selected image size and the full size of the CCD sensor. Basically, this means that the P8 limits the digital zoom range to whatever it can achieve without resorting to interpolation to "stretch" the CCD's pixels to cover a larger area in the final file. Personally, this is the way I think all digital zooms should work, but few do. (Offhand, I know that this is how Fuji does their digital zoom function, but don't know of any other manufacturers who have routinely adopted this approach.
The P8 has a real-image optical viewfinder and a 1.5-inch color LCD monitor for framing shots. In my testing, the optical viewfinder proved to be tighter than most, showing only about 80% of the final image area, but the LCD monitor was almost 100% accurate. An information display on the LCD monitor reports a handful of camera settings (including aperture and shutter speed) and features an optional histogram display as well. The histogram graphs the tonal distribution of the image, giving you a quick idea of any over or underexposure.
Exposure is automatically controlled on the P8, great for novices and casual users looking for simplicity. An On/Off button on top of the camera powers the camera on, and an adjacent Mode dial selects between Playback, Automatic, Program, Scene, Setup, and Movie modes. The Automatic setting removes all user control, with the exception of flash, macro, and resolution. Program mode still controls the exposure automatically, but does let you control all other exposure variables. Scene mode offers a range of preset exposure options, including Twilight, Twilight Portrait, Landscape, Beach, Snow, Fireworks, and Fast Shutter. By presetting a range of exposure variables, the Scene modes make it easy for novices to capture good-looking photos under what would otherwise be challenging conditions. Both Twilight modes optimize the camera for low-light shooting by allowing shutter times as long as two seconds, while Landscape mode sets the camera up for shooting broad vistas. Snow mode enhances saturation to prevent loss of color in bright white snowscapes, while Beach mode ensures that blue tones are recorded accurately in lakeside or seaside photos. Fireworks mode preserves color in shots of fireworks or other night light displays, and Fast Shutter mode is for capturing fast-moving action shots.
By default, the P8 employs a Multi-Metering mode to determine exposure, which reads the exposure from various sections across the frame. For higher-contrast subjects or more pinpoint accuracy, the P8 also offers a Spot metering mode through the Record menu. Exposure Compensation is adjustable from -2 to +2 exposure equivalents (EV), in one-third-step increments. You can also adjust the camera's sensitivity to 100, 200, or 400 ISO equivalents, or let the camera decide what ISO is best, via the Auto setting. The P8's adjustable White Balance option offers Auto, Daylight, Cloudy, Fluorescent, Incandescent, and Flash modes, for a variety of common light sources. Under the Picture Effects menu option, you can choose to record images in black and white or sepia monotones, or select the Solarize or Negative Art options. The camera also offers sharpness, saturation, and contrast adjustments. The DSC-P72's flash operates in Forced, Suppressed, Auto, Red-Eye Reduction, and Slow-Sync modes, and an intensity adjustment controls flash output.
In Movie exposure mode, the camera captures either 640 x 480-, or 160 x 112-pixel resolution moving images with sound for as long as the memory card has available storage space. (The availability of full 640 x 480 resolution recording to the limits of card capacity is a new addition to Sony's camera line this year, promoted under the MPEGMovieVX sobriquet.) The P8 also offers Clip Motion and Multi Burst modes. Clip Motion records a series of up to 10 images that are automatically saved in a single animated GIF file, and that can be played back as an animation sequence. (A feature I personally enjoyed on previous Cyber-shot digicams.) Multi Burst mode captures an extremely rapid 16-frame burst of images, at a selectable rate of 7.5, 15, or 30 frames per second. Multi Burst shots are played back as a slow-motion animation on the camera, but appear as a single large file with 16 sub-images in it when viewed on a computer. (This would be a fun way to catch someone crossing a finish line during a race, or to analyze golf and tennis swings.) A Self-Timer mode provides a 10-second delay between the time the Shutter button is pressed and the time that the camera actually takes the picture, giving the photographer time to run around and get into the picture. Also available on the P8 are Burst 2 and Voice record modes. Burst 2 records two images in quick succession (with an interval of about 0.43 seconds between them), with one press of the Shutter button. Voice mode records a short sound clip to accompany an image, useful for attaching voice captions.
Images are stored on Sony's Memory Stick media (a 16MB stick is included, though higher capacity cards are available), and they can be downloaded via a speedy USB connection to a PC or Macintosh computer. (The P8's USB connection is unusually fast - I suspect it's a USB 2.0 port, although the manual I had didn't mention anything about this in the specs.) An AV cable is also provided for viewing images or slide shows on your TV.
The P8 is powered by a Sony InfoLITHIUM battery pack (NP-FC10 model), and comes complete with an AC adapter and battery charger. I like the InfoLITHIUM batteries because they communicate with the camera to tell you how much running time is left on the battery pack, but I always (strongly) recommend buying a second battery, and keeping it charged and ready to go, especially when the AC adapter isn't close at hand: The P8 is pretty dependent on its LCD display (a large power drain), and you can't pick up extra batteries at the corner drug store.
Basic Features
- 3.2-megapixel CCD.
- 3x zoom lens (equivalent to a 39-117mm lens on a 35mm camera).
- 3.2x digital Smart Zoom.
- Real-image optical viewfinder.
- 1.5-inch color LCD monitor.
- Automatic exposure control.
- Built-in flash with five modes and an intensity adjustment.
- Sony Memory Stick storage (16MB card included).
- USB computer connection.
- InfoLITHIUM battery system (AC adapter included).
- Software for Mac and PC.
Special Features
- Twilight, Twilight Portrait, Landscape, Beach, Snow, Fireworks, and Fast Shutter preset shooting modes.
- Movie (with sound) recording mode.
- Clip Motion animation and Multi-Burst slow motion modes.
- E-Mail and Voice Memo capture modes.
- Shutter speeds from 1/2,000 to two seconds (with automatic Noise Reduction from 1/2 to two seconds).
- Aperture range from f/2.8 to f/5.6.
- Creative Picture Effects menu.
- Image sharpness, saturation, and contrast adjustments.
- Self-timer for delayed shutter release.
- Macro (close-up) lens adjustment.
- Spot and Multi-Metering modes.
- Adjustable AF area and three AF modes.
- Auto ISO setting or 100, 200, and 400 ISO equivalents.
- White balance (color) adjustment with six options.
- DPOF (Digital Print Order Format) printing compatibility.
User Recommendation
Beginning through intermediate users will be right at home with the P8, and
advanced users may buy it for its excellent portability. Although the P8 is
technically a high-end point-and-shoot digicam, it has a lot of creative options
and enough image adjustments to handle a wide variety of shooting situations.
So, while it's designed for users who don't want to make a lot of complicated
exposure decisions, I'd expect advanced amateurs and business users to appreciate
it, if only for its quality, portability, and varied shooting options.
The Sony DSC-P8 is compact, stylish, and ready to go anywhere, with a body style nearly identical to many of the subcompact Cyber-Shots, including the P9. Its streamlined, silvery metal body is only slightly longer than a typical business card, and nearly the same height, top to bottom. Measuring just 4.25 x 2.0 x 1.4 inches (105 x 51.5 x 35.8 millimeters) and weighing only 7.5 ounces (206 grams) with the battery and memory card installed, the P8 fits easily into small pockets or purses. When not in use, the telescoping zoom lens retracts neatly inside the body, and a small metal leaf shutter automatically closes over the lens to protect it. Outfitted with the accompanying wrist strap, it's quick on the draw and easy to hold onto.
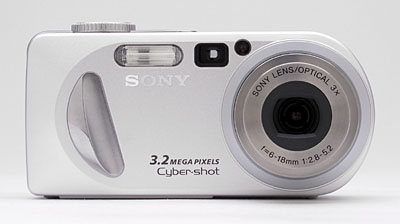
Despite its small size, the P8's elongated shape provides plenty of room to extend two average-size fingers comfortably across the front and top of the camera, without blocking the lens or any camera controls. By making the camera thinner but longer, Sony kept the P8 very compact, and avoided the lack of finger space that plagues many ultra-small digicams. The 3x, 6-18mm zoom lens (equivalent to a 39-117mm zoom on a 35mm camera), dominates the right side of the front of panel, with a small orange lamp just above and to the right of it, to help with focusing in low-light conditions. (This lamp also blinks when the self-timer is in use, to let you know when the camera is about to snap the picture.) A slightly larger window for the optical viewfinder comes next, followed by the built-in electronic flash. A large, raised vertical ridge on the right side serves as a finger grip on the front.
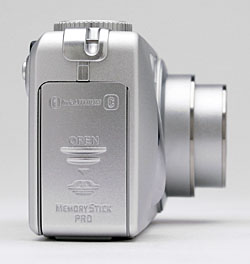
The right side of the camera (as viewed from the rear) houses the battery and Memory Stick compartment, protected by an easy to open, hinged plastic door. Above it is the small eyelet for attaching the wrist strap.
The left side has no controls, only a smooth, rounded surface to accommodate the lens barrel.
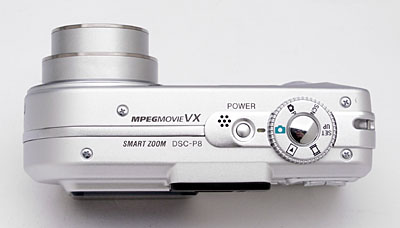
The camera's top panel includes a Mode dial with five settings (Setup, Movie, Playback, Automatic, Program, and Scene modes) and a Shutter button in the middle, as well as a small Power button on the left of the Mode dial. Just to the left of the Power button is a small microphone, for recording sound clips and movie audio.
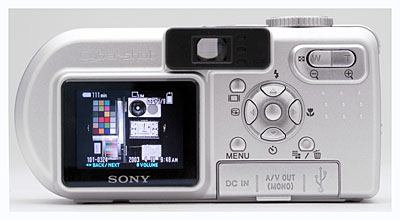
The camera's rear panel holds the remaining camera controls and function buttons, along with a 1.5-inch color LCD monitor for previewing and playing back images, and the optical viewfinder window. The LCD display reports a variety of camera and exposure settings, including the aperture and shutter speed settings (a nice bonus for people wanting automatic exposure control, but who are nonetheless interested in how the camera will expose the image). The optical viewfinder is located above the top right corner of the LCD monitor, and has three LED lamps along the right edge of the window, each of which reports the current status of various camera functions. The camera's Zoom control is in the upper right corner, conveniently located next to a series of small bumps for better thumb traction when holding the camera. In the center of the back panel is a Four-Way Arrow pad, with four small arrows pointing in opposite directions (Up, Down, Left, and Right). Each serves a dual purpose to either navigate through onscreen menus and enlarged Playback images or to activate different camera functions (Flash, Self-Timer, Quick Review, and Macro). Surrounding the Arrow pad are the LCD Display On / Off, Menu, and Image Resolution / Erase buttons. Just below these are the three connection jacks (DC In, USB, and A/V Out), all covered by a single plastic door, tethered by a flexible retention stub.
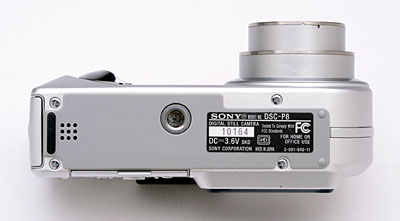
Finally, the P9's flat bottom holds the threaded (plastic) tripod screw mount
and a speaker for audio playback.
Operating the P8 is very straightforward, as the camera is under automatic exposure control at all times. The Mode dial on top of the camera controls the main operating modes, with options for Scene, Program, Automatic, Playback, Movie, and Setup. In all image capture modes, the P8 provides an onscreen LCD menu (activated by the Menu button), with a variety of options for adjusting image quality or adding special effects. The four points of the Four-Way Arrow pad are used to scroll through menu options, while the center of the pad is used as the OK button to confirm selections.
The four arrow buttons also serve as external controls when the camera's menus are turned off, or they can be used to scroll through captured images in Playback mode. Starting with the Up arrow and going clockwise, the functions they control include Flash, Macro, Self-Timer, and Quick Review modes. An Image Resolution button pulls up the available resolution settings, removing this item from the menu system. The Zoom control in the top right corner of the back panel adjusts both optical and digital zoom (when activated through the Setup menu). Overall, I was impressed by Sony's judicious use of space, especially with the large number of external controls provided, and the relatively short learning curve the P8's user interface entails. Along with Sony's other recent cameras, the P8 has one of the cleanest user interfaces I've seen, and will present few challenges to even the most novice user.
 Record-Mode
Display
Record-Mode
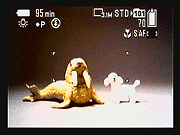
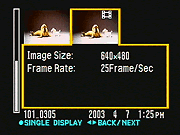
DisplayThree different information screens are available on the P8's LCD display in record mode, showing varying amounts of information. The default screens displays such information as remaining battery time (a unique advantage available only in cameras using Sony's InfoLITHIUM batteries), selected image size/quality, remaining Memory Stick storage space, autofocus mode, flash status, white balance, etc. A second screen ads a tiny histogram display, to help you judge overall exposure. Finally, a third option shows just the bare minimum information, providing a relatively unobstructed view of the subject.
 Playback-Mode
Display
Playback-Mode
DisplayIn playback mode, you can use the camera's zoom control to zoom in or out on an image. Zooming out from a full-frame view brings up a thumbnail display of the images on the card, letting you move quickly between them by via the arrow keys on the camera's back panel. Once in thumbnail display mode, a second press of the "W" side of the zoom control brings up a display showing detailed exposure information. When viewing images at normal size on the LCD, you can select between screens showing just the photo itself, the photo with overlaid file name and date information, and the photo with information overlay plus a small histogram display to help evaluate exposure. The screen shot at right shows the progression of playback displays, beginning with the detailed information display and ending with a zoomed view at the maximum 5x magnification.
External Controls

Power Button: Located just left of the Mode dial on the camera's top panel, this button turns the camera on and off.
Shutter Button: Located in the center of the Mode dial, this button sets focus and exposure when halfway pressed, and fires the shutter when fully pressed.
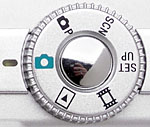
Mode Dial: Surrounding the Shutter button, this ribbed dial controls the camera's operating mode, offering Scene, Program, Automatic, Playback, Movie, and Setup modes. (See menus and descriptions below.)
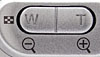
Zoom Control: Positioned in the top right corner of the rear panel, this two-way rocker button controls the optical and digital zoom (The latter only when it's enabled via the Setup menu).
In Playback mode, this button controls the digital enlargement of a captured image, which can go as high as 5x. (Very handy for checking focus or the expressions on people's faces in group shots.) Also in Playback mode, the wide-angle end of the button activates the Index Display mode, which displays as many as nine thumbnail images on the screen at one time.

Four-Way Arrow Pad: Located just to the right of center on the rear panel, this rocker control features four arrows, each pointing in a different direction (up, down, left, and right). In all settings menus, these arrow keys navigate through menu options. Pressing the center of the button confirms selections.
In any Record mode, the Up button controls the Flash mode, cycling through Auto, Forced, Suppressed, and Slow-Sync modes. The Right arrow turns the Macro (close-up) mode on and off, and the Left arrow accesses the Quick Review mode, which displays the most recently captured image on the screen. The Down arrow accesses the Self-Timer mode.
In Playback mode, the Right and Left arrows scroll through captured images. When Playback zoom is enabled, all four arrows scroll around within the enlarged view, while pressing the center of the button returns to the normal, 1x display.

Menu Button: Diagonally to the left, beneath the Four-Way Arrow pad, this button activates the settings menu in any camera mode (except Setup, which automatically displays the menu). The Menu button also turns off the menu display.
In Playback mode, when you zoom in on the image by using the T side of the Zoom rocker control, pressing the Menu button calls up the Trimming menu. This lets you make a new copy of the image that contains just the portion of the image shown on the LCD screen. - Very handy for "cropping" your photos in-camera to improve their composition. The original image is left unaltered.

Image Resolution / Erase Button: Diagonally to the right of the Four-Way Arrow pad, this button displays the available resolutions in any record mode. Choices are 3.1M (2,048 x 1,536), 2.8M (3:2 ratio), 2.0M (1,632 x 1,224), 1.2M (1,280 x 960), and VGA (640 x 480). Movie resolutions are 640 x 480-, and 160 x 112-pixels. Clip Motion sizes are 160 x 120- and 80 x 72-pixels.
In Playback mode, this button lets you erase the currently displayed image.

Display / LCD On/OFF Button: Straight up from the Menu button, this button
controls the LCD display, cycling through the image with information display,
the image with information and histogram display, the image with limited information
display, and no image display at all (in all Record modes). In Playback mode,
it cycles through the same series.
Camera Modes and Menus
![]()
![]() Scene
Mode: Noted on the Mode dial as "SCN," this mode sets up the
camera for capturing photos in specific situations. By presetting a variety
of camera options, the Scene modes make it easy to snap good-looking photos
in what might otherwise be challenging situations. Seven "scenes"
are available through the Record menu, including Twilight, Twilight Portrait,
Landscape, Beach, Snow, Fireworks, and Fast Shutter. Both Twilight modes capture
images in low light, though the Twilight Portrait mode automatically enables
the Red-Eye Reduction flash mode, combining it with a slower shutter speed.
Because the camera employs a slower shutter speed in both Twilight modes,
a tripod is highly recommended to prevent any blurring from camera movement.
Landscape mode sets the focus at infinity and uses a smaller lens aperture
to capture sharp details both near and far away. Beach and Snow modes optimize
the camera for bright situations and prevent color loss from overexposure.
Fireworks mode uses a slower shutter speed to preserve color in nighttime
light displays, and Fast Shutter freezes action in fast-moving subjects.
Scene
Mode: Noted on the Mode dial as "SCN," this mode sets up the
camera for capturing photos in specific situations. By presetting a variety
of camera options, the Scene modes make it easy to snap good-looking photos
in what might otherwise be challenging situations. Seven "scenes"
are available through the Record menu, including Twilight, Twilight Portrait,
Landscape, Beach, Snow, Fireworks, and Fast Shutter. Both Twilight modes capture
images in low light, though the Twilight Portrait mode automatically enables
the Red-Eye Reduction flash mode, combining it with a slower shutter speed.
Because the camera employs a slower shutter speed in both Twilight modes,
a tripod is highly recommended to prevent any blurring from camera movement.
Landscape mode sets the focus at infinity and uses a smaller lens aperture
to capture sharp details both near and far away. Beach and Snow modes optimize
the camera for bright situations and prevent color loss from overexposure.
Fireworks mode uses a slower shutter speed to preserve color in nighttime
light displays, and Fast Shutter freezes action in fast-moving subjects.
![]() Program
Mode: This mode is marked on the Mode dial with a black camera icon and
a "P." In this mode, the camera selects shutter speed and aperture,
while the user controls all other exposure variables.
Program
Mode: This mode is marked on the Mode dial with a black camera icon and
a "P." In this mode, the camera selects shutter speed and aperture,
while the user controls all other exposure variables.
![]() Automatic
Mode: Indicated on the Mode dial with a green camera icon, this mode
puts the camera in control over the exposure and all variables, except for
Macro, image size and quality, zoom, flash, and the Self-Timer.
Automatic
Mode: Indicated on the Mode dial with a green camera icon, this mode
puts the camera in control over the exposure and all variables, except for
Macro, image size and quality, zoom, flash, and the Self-Timer.
![]() Playback
Mode: Playback mode is noted on the Mode dial with the traditional Playback
symbol (a triangle enclosed within a black rectangle outline). In this mode,
you can scroll through captured images, delete them, write-protect them, and
set them up for printing on DPOF-compatible printers. You can also copy, resize,
and rotate images.
Playback
Mode: Playback mode is noted on the Mode dial with the traditional Playback
symbol (a triangle enclosed within a black rectangle outline). In this mode,
you can scroll through captured images, delete them, write-protect them, and
set them up for printing on DPOF-compatible printers. You can also copy, resize,
and rotate images.
![]() Movie
Mode: A filmstrip icon marks this mode on the Mode dial. In Movie mode,
you can record moving images and sound, for as long as the Memory Stick has
space. Resolution and quality choices are 640 x 480-, or 160 x 112-pixels.
While recording, a timer appears in the LCD monitor to let you know how many
minutes and / or seconds are remaining on the Memory Stick, and how long you've
been recording, so you'll have some idea of how much time you have left to
go.
Movie
Mode: A filmstrip icon marks this mode on the Mode dial. In Movie mode,
you can record moving images and sound, for as long as the Memory Stick has
space. Resolution and quality choices are 640 x 480-, or 160 x 112-pixels.
While recording, a timer appears in the LCD monitor to let you know how many
minutes and / or seconds are remaining on the Memory Stick, and how long you've
been recording, so you'll have some idea of how much time you have left to
go.
Through the Setup menu, you can also program the Movie mode to record "Clip
Motion" animation sequences or Multi Burst files. Clip Motion records
as many as 10 frames of still images to be played back in rapid succession.
Frames can be captured at any time interval, with successive presses of the
Shutter button. Available image sizes are 160 x 120- and 80 x 72-pixels, and
each set of images is recorded as a single GIF file, ready to be dropped into
a web page or emailed to a friend. Multi Burst shots are played back as a
slow-motion animation on the camera, but appear as a single large file with
16 sub-images in it when viewed on a computer.
Record Menu: Available in all three Record modes by pressing the Menu
button, the Record menu offers the following options (some options are not
available in all modes):
- Scene: (Scene mode only) Offers Twilight, Twilight Plus, Landscape, Beach, Snow, Fireworks, and Fast Shutter "scene" modes.
- EV (Exposure Compensation): Increases or decreases the overall exposure from -2 to +2 exposure values (EV) in one-third-step increments.
- Focus: Sets focus control to Multi AF or Center AF, or one of five preset focus distances (0.5, 1.0, 3.0, and 7.0 meters, and Infinity) .
- Metering Mode: Chooses between Multi-Metering and Spot modes. Spot metering reads the exposure from the very center of the frame (identified by a cross hair target on the monitor). Spot metering is handy for backlit subjects, or any time the subject and background have very different brightnesses. Multi-Metering mode reads the entire frame to determine exposure.
- White Balance: Adjusts the overall color balance of the image, to suit the light source. Options are Auto, Daylight, Cloudy, Fluorescent, Incandescent, and Flash.
- ISO: (Not available in Scene mode.) Adjusts the camera's light sensitivity. Options are Auto, or 100, 200, and 400 ISO equivalents.
- Picture Quality: Sets the JPEG compression to Fine or Standard for still images.
- Record Mode: Offers a selection of image-recording modes. (This is the only menu available when the camera is in fully automatic mode, selected via the green camera icon on the camera's mode dial.)
- Voice: Records small sound clips to accompany captured images. You can record up to 40 seconds of sound for each image.
- E-mail: Records a separate 320 x 240-pixel file that's small enough to e-mail, along with the normal size image.
- Burst 2: Records two consecutive images at a rapid frame rate with one press of the Shutter button.
- Normal: Records an image at the size and quality settings selected via the other menu options.
- Flash Level: Adjusts the intensity of the built-in flash, with options of High, Normal, and Low.
- Picture Effects: Offers four creative shooting modes:
- Solarize: Significantly increases the image contrast, making the image look more like an illustration.
- Black and White: Records the image in black and white.
- Sepia: Records an image in sepia tone.
- Negative Art: Reverses the color and brightness of the image, making it appear more like a negative.
- Sharpness: Controls the overall image sharpness and softness, in arbitrary units from -2 to +2 (five steps). (Available only in Program mode.)
- Saturation: Adjusts the overall color saturation, with three settings. (Available only in Program mode.)
- Contrast: Alters the level of contrast in images, with three adjustment levels. (Available only in Program mode.)
Playback Menu:
- Folder: Selects the folder for playing back images.
- Protect: Write-protects the current image (or removes protection), preventing it from being deleted or manipulated in any way other than through card formatting.
- DPOF: Marks the current image for printing on a DPOF device. A small icon of a printer with a check mark next to it appears as an overlay on any image that's been marked for printing. This same option also removes the print mark.
- Slide: Plays back images in an automatic slide show. You can set the interval between images, the folder the images are taken from, and whether or not the sequence of images repeats. (Movies saved on the card play in their entirety, regardless of how long the interval between images is set.)
- Resize: (Applicable to still images only.) Resizes the image to 2,048 x 1,536; 1,632 x 1,224; 1,280 x 960; or 640 x 480 pixels. (When an image is resized, the original image is left in place, and a new copy is made at the selected size.)
- Rotate: Rotates the image 90 degrees clockwise or counterclockwise.
- Divide: (Applicable to movie files only.) Allows you to trim material from the beginning or end of a recorded movie, or to extract an interesting bit of action from the middle of a longer clip. (Very handy.)
Setup Mode: This mode allows the user to change a variety of camera settings. The Setup menu is automatically displayed upon entering the mode.
- Camera:
- Moving Image: Sets Movie mode to record MPEG movies, Clip Motion animations, or Multi-Burst files.
- AF Mode: Sets the focus mode to Single, Monitor, or Continuous.
- Smart Zoom: Turns the 3.2x Smart Zoom on or off. (When enabled, the digital zoom kicks in as you hit the end of the optical zoom's range, as long as the resolution is set to a level less than maximum. The amount of digital zoom available will be a function of the difference between the camera's maximum resolution and that currently selected.)
- Date / Time: Determines whether the date and / or time is overlaid on captured images.
- Redeye Reduction: Enables or disables the Redeye Reduction flash mode, affecting both Auto and Forced flash modes.
- AF Illuminator: Turns the AF Assist light on or off. If on, the light automatically illuminates in dark shooting conditions.
- Memory Stick Tool:
- Format: Formats the Memory Stick, erasing all files (even protected ones).
- File Number: Sets the file numbering to Series (which continues file numbering from one Memory Stick to another) or Reset (resets file numbering with each new card, or each time the current card is reformatted).
- Create REC Folder: Creates a new folder for recording images. Folder names are automatically generated by the camera, so "custom" names aren't an option.
- Change REC Folder: Changes the folder that images are recorded to.
- Setup 1:
- Power Save: Turns the camera's power save function on or off. If on, the camera will shut itself off after a period of inactivity.
- LCD Brightness: Controls the brightness of the LCD display. Options are Bright, Normal, and Dark.
- LCD Backlight: Controls the level of the LCD's backlight, with options of Bright, Normal, and Dark.
- Beep: Controls the camera's beep sounds, turning them on or off. A Shutter option enables only the shutter beep noise.
- Language: Selects either French or English for the menu language. (These options pertain to cameras sold on the North American continent. Cameras in other parts of the world will have different language options.)
- Clock Set: Sets the camera's internal clock and calendar.
- Setup 2:
- USB Connect: Sets the USB connection type to PTP or Normal. - Most users will likely want to use Normal, as in that mode the camera automatically mounts as a disk drive on Windows XP and Mac OS X systems.
- Video Out: Establishes the A/V Out signal as NTSC or PAL.
In the Box
Included with the Sony DSC-P8 digital camera are the following items:
- Wrist strap..
- 16MB Memory Stick..
- NP-FC10 InfoLITHIUM rechargeable battery pack..
- AC adapter / in-camera battery charger.
- USB cable.
- AV cable.
- Software CD containing Pixela ImageMixer v1.0 and USB drivers.
- Extra NP-FC10 InfoLITHIUM battery pack
- Larger capacity Memory Stick (at least 16MB or 32MB)
- Carrying case
Recommended Software: Rescue your images!
Just as important as an extra memory card is a tool to rescue your images when
one of your cards fails at some point in the future. I get a lot of email from
readers who've lost photos due to a corrupted memory card. Memory card corruption
can happen with any card type and any camera manufacturer, nobody's immune.
A surprising number of "lost" images can be recovered with an inexpensive,
easy to use piece of software though. Given the amount of email I've gotten
on the topic, I now include this paragraph in all my digicam reviews. The program
you need is called PhotoRescue, by DataRescue SA. Read our review of it if you'd like, but download the program now,
so you'll have it. It doesn't cost a penny until you need it, and even then
it's only $29, with a money back guarantee. So download PhotoRescue for
Windows or PhotoRescue for
Mac while you're thinking of it. (While you're at it, download the PDF
manual and quickstart
guide as well.) Stash the file in a safe place and it'll be there when you need
it. Trust me, needing this is not a matter of if, but when... PhotoRescue
is about the best and easiest tool for recovering digital photos I've seen.
(Disclosure: IR gets a small commission from sales of the product, but I'd highly
recommend the program even if we didn't.) OK, now back to our regularly
scheduled review...
Test Images
See the full set of my
sample pictures and detailed analysis here.
The thumbnails below show a subset of my test images. Click on a thumbnail to
see the full-size photo.

|

|

|
| |
|
|
|
|
|
|
| |
|
|
|
|
|
|
| |
|
|


"Gallery" Photos
For those readers interested in a set of less "standardized" photos
from the P10, here are some thumbnails of more random shots snapped with it.
Click on one any of the thumbnails below for a larger view. Click on the larger
view again to see the original image from the camera. (Photos in this gallery
were shot by Gibbs Frazeur or Stephanie Boozer. Thanks Gibbs and Stephanie!)
NOTE: that these are big files, so be aware that (a) they'll take a while to download, and (b) they'll chew up a pretty good chunk of bandwidth on us. (Read the "support this site" blurb at the top the carrier pages, and think about it while you're waiting for the images to download.
NOTE TOO: Some browsers have difficult with very wide images, and distort them a lot when they display them. (I don't know about others, but IE 5.0 on the Mac definitely does this. If the full-sized images appear to be stretched horizontally, you may need to just download them to your hard drive and view them in an imaging application, or possibly try another browser.)

1,480.6 KB Shutter: 1/ 400 Aperture: F6.3 Exposure EV: 13.9 ISO Speed: 100 |

1,463.4 KB Shutter: 1/ 200 Aperture: F5.6 Exposure EV: 12.6 ISO Speed: 100 |

1,416.9 KB Shutter: 1/ 320 Aperture: F8 Exposure EV: 14.3 ISO Speed: 100 |

1,411.1 KB Shutter: 1/ 400 Aperture: F5.6 Exposure EV: 13.6 ISO Speed: 100 |

1,449.2 KB Shutter: 1/ 800 Aperture: F5.6 Exposure EV: 14.6 ISO Speed: 100 |

1,459.9 KB Shutter: 1/ 400 Aperture: F5.6 Exposure EV: 13.6 ISO Speed: 100 |

1,326.9 KB Shutter: 1/ 1000 Aperture: F5.6 Exposure EV: 14.9 ISO Speed: 100 |

1,423.3 KB Shutter: 1/ 320 Aperture: F5.6 Exposure EV: 13.2 ISO Speed: 100 |
1,405.5 KB Shutter: 1/ 200 Aperture: F7.1 Exposure EV: 13.2 ISO Speed: 100 |

470.2 KB Shutter: 1.3 Aperture: F3.5 Exposure EV: 3.2 ISO Speed: 100 |
See the specifications sheet here.
Picky Details
Cycle times, shutter lag, battery life, etc can be found here.
- Sony Cyber-shot DSC-P8 user reviews on PriceGrabber.com
- Sony Cyber-shot DSC-P8 user reviews on PC PhotoREVIEW
Test Results
This section has now been updated based on results obtained from a full production-level camera. See the P9's sample pictures page for a full analysis.
- Color: The DSC-P8 produced good, nearly accurate color in most
cases, though the camera had a tendency toward a slightly warm color balance
both indoors and out. Color saturation and accuracy was quite good overall,
with only slight problems with deep/rich blue tones. Its white balance system
handled most lighting well, but had a little trouble with the very warm
color cast of the incandescent lighting in my "indoor portrait"
test, a not-uncommon failing among digicams I've tested.
- Exposure: The DSC-P8's full automatic exposure system was generally
pretty accurate, with a slight tendency toward overexposure. The good news
though, is that it handles high-key (very light-toned) subjects better than
most cameras I've tested. A welcome change in Sony's 2003 camera lineup
is that they've now removed the previous shutter speed limitation of 1/30
second in normal shooting modes: The P8 will cheerfully deliver up to a
1-second exposure without forcing you to go to one of its "Twilight"
modes. (Exposure times does extend to 2 seconds in "Twilight"
mode though.) Tonality seemed a little weaker than other Cyber-shot cameras
I've tested in the past, as the P8 was a bit more prone to losing highlight
detail than was its "big brother," the P9.
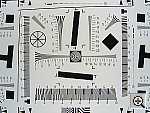
- Resolution/Sharpness: The DSC-P8 performed well on the "laboratory"
resolution test chart. It started showing artifacts in the test patterns
at resolutions as low as 800 lines per picture height in the vertical direction,
and around 650 lines horizontally. I found "strong detail" out
to at least 1,050 lines horizontally and 1,000 lines vertically. "Extinction"
of the target patterns didn't occur until about 1,400 lines. - This is plenty
of resolution to produce sharp 8x10 prints.
- Closeups: The DSC-P8 turned in about an average performance in
the macro category, capturing a minimum area of 3.33 x 2.50 inches (85 x
63 millimeters). The dollar bill, coins, and brooch all show good detail,
and resolution is high overall. All four corners are a bit soft, but the
effect isn't too strong. Color and exposure are both pretty good. The DSC-P8's
flash had trouble throttling down for the macro area, significantly overexposing
the shot. (Plan on using external illumination for your macro shots with
the P8.)
- Night Shots: When it came to low light shooting, the DSC-P8 is
good enough to shoot under average city street lighting, but not under conditions
much darker than that. AN added plus is its bright autofocus-assist illuminator,
which lets it focus in near total darkness, great for after-dark flash photography.
In my tests, the P8 produced clear, bright, usable images down to the 1/2
foot-candle (5.5 lux) light level, with good color at ISO 400 and 200. (Though
you could arguably use the image captured at the 1/4 foot-candle, 2.7 lux,
light level, at ISO 400.) At ISO 100, images were bright only as dark as
one foot-candle (11 lux), which is the equivalent of average city street
lighting at night. (The target is visible at the 1/2 foot-candle light level,
but the image is quite dim.) Noise is low at the ISO 100 setting, and increases
to a moderately high level at ISO 400.
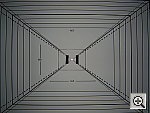
- Viewfinder Accuracy: The DSC-P8's optical viewfinder is rather
tight, showing only about 80 percent of the final image area at both wide
angle and telephoto zoom settings. (The standard for point & shoot digicams
seems to be 85% frame coverage for optical viewfinders, which is still too
tight, IMHO.) The LCD monitor proved much more accurate, showing nearly
100 percent accuracy at both settings. Given that I like LCD monitors to
be as close to 100 percent accuracy as possible, the DSC-P8's LCD monitor
is essentially perfect in that regard, but I'd really like to see a more
accurate optical viewfinder.
- Optical Distortion: Optical distortion on the DSC-P8 was rather
high at the wide-angle end, where I measured approximately 1.0 percent barrel
distortion. The telephoto end fared somewhat better, where I found 0.4 percent
pincushion distortion. There's a moderate amount (5-6 pixels) of coma-produced
fuzziness around the edges of target elements in the corners of the frame,
but chromatic aberration is fairly slight, with relatively little coloration
visible. (This distortion is visible as a very slight colored fringe around
the objects at the edges of the field of view on the resolution target.)
- Battery Life: The DSC-P8 uses a custom LiIon battery, using Sony's excellent "InfoLITHIUM" technology to keep you constantly apprised of how much charge is remaining. Worst case battery life by my own measurements is a decent but not outstanding 83 minutes in record mode with the LCD turned on (fairly typical for subcompact digicams), but a very generous 2.3 hours with the LCD off. (As always, I strongly recommend purchasing a second battery when buying a digicam, and bringing along a fully-charged spare on any photo outings.)
Conclusion
| Free Photo Lessons | |
|


Follow Imaging Resource: