Canon PowerShot Pro1New level of sophistication takes over the top spot in the PowerShot line.<<Executive Overview :(Previous) | (Next): Viewfinder>> Page 3:DesignReview First Posted: 05/14/2004 |
Design
Following design cues from previous EVF-style cameras from a variety of manufacturers, the PowerShot Pro1 is nonetheless unique in both look and function. Dispensing with the G-series' boxy look, the Pro1 is built for efficiency. Whereas the G-series looked as though it was designed to hold a roll of film on the left side, EVF-style cameras put the lens as far left as they can. This allows easier access to the lens, which in the case of the Pro1 is helpful because it allows easier access to the manually-actuated zoom ring. Weighing in at 22.4 ounces (635 grams) without battery or memory card, the Pro1 has a bit of heft to it. However, the hand grip is substantial enough to balance out the weight of the body and lens and provide a secure hold, and its more compact size moves the center of gravity closer to the grip. The Pro1 is pocketable only in a large jacket pocket, and would be none too stealthy while there, but is still a more compact handful than you might expect if you've seen it only in pictures. While they're small, EVF-based cameras like the Pro1 warrant their own case, both for their shape and relative dollar value.
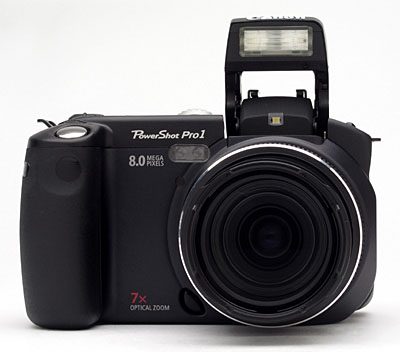
The Pro1's front panel houses the lens, built-in pop-up flash, autofocus sensor, self-timer lamp, accessory lens release, microphone, and one of two remote control sensors (on the front and right-front of the hand grip). The 7x zoom lens telescopes out about 2 1/4 inches from the camera body when the G5 is powered on, and retracts again when the camera is powered off. Zoomed all the way out to its maximum telephoto position, it extends a full 3 5/8 inches. The lens is protected by a small plastic lens cap. Unlike the lens caps of the G-series, the cap cannot be tethered to the camera body. The camera kit comes with a lens hood that mounts bayonet-style on the front of the lens. A deep hand grip on the right side of the camera provides a secure grip and good traction on the camera body for your fingers. Also visible on the front panel is a small button below and to the right of the lens. This is a latch for the bayonet-mount for accessory lenses. Pressing this latch lets you twist and remove the cosmetic lens barrel shroud, revealing a set of mounting flanges to which a lens adapter barrel attaches.
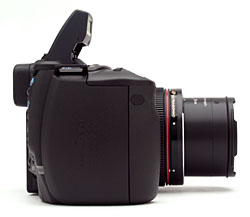
On the right side of the camera is a large sliding door that conceals the battery and CompactFlash slot. The door feels solid, and is mounted with a steel hinge. The camera accommodates both Type I and II CompactFlash cards, and unlike many current Canon cameras, there is more than enough room to remove the card after its released with the button. The battery is of the BP-511 style used on many Canon cameras, but the included BP-511A has more power, offering 1390 mAh vs the 1100 mAh of the original BP-511. At the top of the right side is an eyelet for attaching one end of the neck strap. (A nice, if subtle feature of the Pro1 is that its neckstrap eyelets are positioned close to the center of gravity, so the camera hangs fairly level from the neckstrap when it's powered down with its lens stored.) The secondary remote control sensor is also on this side of the camera, included in the design because both the optional Macro Ring Lite MR-14EX and Macro Twin Light MT-24EX block the front sensor. The CF card access lamp is also visible from this angle.
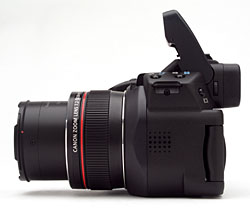
The left side of the camera has a speaker for playing back recorded sound, and the top left has the other neck strap attachment eyelet. From here you can also see the knurled zoom/focus ring around the lens and the diopter correction wheel on the side of the EVF.
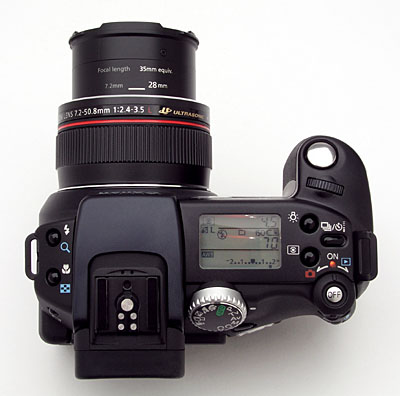
The Pro1's top panel features from left to right: Flash/zoom button and Macro/index button. Centered over the lens is a pop-up flash and hot shoe. Right in front of the hot shoe, two tiny holds constitute a minimalist grille for the built-in microphone. The Mode dial is angled down the back so that it's viewable from both front and back. In front of this is the status LCD display. Pressing the backlight button illuminates it with an amber glow. I always appreciate status display panels like the one on the Pro1, as they report camera settings and other miscellaneous information without the need for powering up the LCD monitor. (Although, on an EVF-style camera like the Pro1, either the LCD or EVF is of necessity powered up all the time anyway. Below this is the light metering selection button, and to the right is the capture mode button, which selects between continuous, single, and self-timer/remote control modes. The Power mode selector is toggled left or right to switch between capture and playback modes. A lock button on the back of the rocker must be pressed in first to release the switch. (In practice, the lock button is naturally pressed in whenever you press your thumb against the power switch to actuate it. An effective design, because it works well as an interlock, but never actually interferes with your normal use of the control.) To turn the unit off, press on the silver off button on the top of this arrangement. The Shutter button on the Pro1 is out on the top front of the camera grip, more like the company's SLR line, with the Main Dial nearby for quick access to shutter speed and aperture. In manual mode, a downward press on the Main Dial switches between aperture and shutter speed.
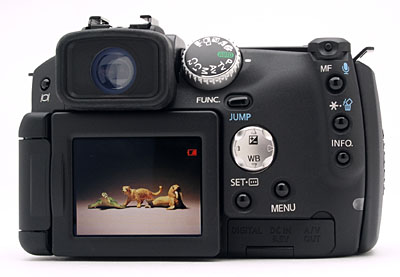
The majority of the exposure controls are located on the camera's back panel, along with the EVF (electronic viewfinder) and LCD monitor. The Pro1's eye-level viewfinder features a diopter adjustment dial on the left. The swiveling LCD monitor pops out of the camera back and rotates 270 degrees when fully extended. You can fold it back into its storage compartment with the monitor facing outward or leave it extended and turn the screen to accommodate a variety of shooting angles ranging from directly in front of the camera (good for self-portraits) to above the camera (good for ground level macro shots), to directly below the camera (great for over-the-head shots in crowds). Finally, the monitor can be turned around and popped back into the panel face-down, protecting it from accidental scratches and fingerprints. All in all, a very handy design. Left of the EVF is the Monitor selector button, which is pressed to switch between the LCD panel and EVF. A four-way arrow pad is mounted at an angle, which makes for surprisingly comfortable activation. In addition to serving as a navigational tool through settings menus, the Four-Way Arrow pad also controls White Balance and Exposure Compensation settings. Just above the four-way is the Function/Jump button, and below are the Set and Menu buttons. A contoured indent runs between this cluster and the three buttons on the right, making for a substantial thumb grip. The MF/Audio button is on the top of this ridge right under the Power switch, and the AE Lock/Erase, and Info buttons are below that. Down and to the right from there is the CF access indicator light. And below all of this is a plastic hinged door that conceals the USB, AC adapter, and AV out ports.
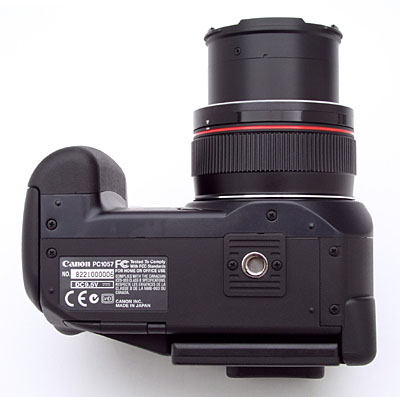
The Pro1's bottom panel is flat, with a slightly raised platform around the threaded metal tripod mount. The tripod mount is positioned just slightly off-center to the right of the lens. Because the battery door is on the right, there is no longer a problem changing batteries while the camera is on a tripod, as we saw with the G-series.
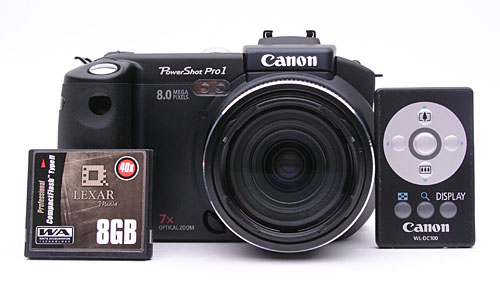
Accompanying the camera is a small infrared remote control, with a rated working range of up to 16.4 feet (5 meters) from the front sensor, and to about 9.83 feet (3 meters) from the side sensor. The shot above shows both the remote and a CompactFlash card posed in front of the camera, so you can get a sense of the size of both the camera and the remote, by comparing it to the CF card. By activating the Continuous / Self-Timer / Wireless Controller button in Shooting mode, you can use the Remote to fire the shutter, adjust the optical zoom, or scroll through the LCD display screens without coming in contact with the camera body. This works well with the rotating LCD monitor, because you can mount the camera on a tripod and compose the shot while standing in front of the camera. The remote also offers several playback functions, which are useful when viewing images on a television screen. The Index display and Replay zoom buttons on the bottom of the remote control enable you to view up to nine thumbnail images at a time, or enlarge one captured image on the LCD monitor. The four arrow buttons on the Remote give you the same capabilities as the Four-Way Arrow pad on the back of the camera, permitting you to scroll through stored images or maneuver within a larger one. Depressing the Remote's Shutter button while in Replay mode lets you play movie files on the camera's monitor or a television. As with the G2, G3, and G5 models, I was glad to see the inclusion of this simple gadget as standard equipment for the Pro1, especially given its video capabilities, which allow the camera to be used as a presentation tool.
Reader Comments! --> Visit our discussion forum for the Canon PowerShot Pro1!

Follow Imaging Resource: