Back
to Full HP PhotoSmart 618 Review
Back
to Full HP PhotoSmart 618 ReviewGo to HP PhotoSmart 618 Data Sheet
Go to HP PhotoSmart 618 Pictures Page
Up to Imaging Resource Cameras Page
Use your browser's "Back" button to return to the previous page, or the links at the top and bottom of this page to navigate to related information. If you have difficulty fitting the text on this page onto your printer output, simply resize your browser window to a narrower width and print again.
Remember us when it's time to buy!
Dave here: Have our reviews been helpful to you? (Is this article you're reading right now useful?) Preparing this level of information on as many products as we do is incredibly hard work, not to mention expensive. Things on the Internet may look like they're free, but they're not. (As a lot of big dot.com companies are finding out these days.) Somewhere, somebody has to pay to produce worthwhile content. YOU can help us though, by remembering us when it comes time to make your purchase. Would you consider coming back to our site and clicking-through to one of our advertisers to make your purchase? Every dollar you spend with one of our advertisers helps us directly (in affiliate fees) or indirectly (the advertiser will keep renewing their ad contract with us). To make it easy for you to support us, here's a URL you can visit, to see all our current advertisers, with links to click on that will register your visit to them as having come from our site. It's up to you where you buy, but Mike, Mike, Kim, Yazmin, Marti and I would be really grateful if you'd help us out by choosing one of our advertisers to purchase from.
Thank you for your support!
Dave Etchells, Founder & Publisher
Visit our "Buy Now" Page:
https://www.imaging-resource.com/buynow.htm
Back
to Full HP PhotoSmart 618 Review
Go to HP PhotoSmart 618
Data Sheet
Go to HP PhotoSmart 618
Pictures Page
Up to Imaging Resource Cameras
Page
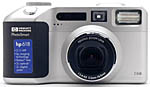
HP PhotoSmart 618HP's capable mid-level model offers 2.1 megapixels, an optical zoom lens, and ease-of-use. Review First Posted: 03/19/2001 |
|
 |
|
2.1-megapixel CCD delivers up to 1,600 x 1,200-pixel photos. (Good for up to 8x10-inch print sizes.) |
|
|
3x optical zoom equivalent to 34-108mm. | |
|
|
Flexible exposure controls include aperture- and shutter-priority metering modes. | |
|
|
Good white balance system handles a wide range of lighting conditions. |
Executive Overview
HP's PhotoSmart 618 packs a lot of features into a compact, 35mm-style body, with a nice range of exposure controls, including aperture- and shutter-priority modes; user selectable white balance, spot, average, and center-weighted metering; and exposure compensation. The 618 also offers two unique features we've come to love in HP cameras -- the JetSend infrared port for beaming images to other HP compatible products, and a proprietary Imaging Technology that maximizes color balance and file interpolation for better image processing. The 2.11-megapixel CCD and 30-bit color depth (10 bits per color) also contribute to the camera's exceptional image quality and color.
Measuring 5.0 x 2.8 x 2.2 inches (127.5 x 56.5 x 71.5mm) and weighing 14 ounces (400 grams) with the batteries, the PhotoSmart 618 is the perfect size for carrying in a large coat pocket or purse, and an attachable shoulder strap offers quick, on-the-spot shooting. The camera features more external controls than the entry level PhotoSmart 215 and 315 models, including a convenient Mode dial on top. The large 2-inch LCD monitor provides a limited information display, reporting camera readiness and various functions that are selected using the soft keys below the screen. The real-image optical viewfinder includes a diopter adjustment dial, a central autofocus target for lining up shots, and a high eyepoint to facilitate viewing for eyeglass wearers.
The high-quality Pentax 3x, 5.2-16.5mm zoom lens (equivalent to a 34-108mm lens on a 35mm camera), has an aperture range of f/2.4 to f/9.6, plus automatic or manual focusing from 1.64 feet (0.5 meters) to infinity in normal mode, and from 0.33 to 1.97 feet (0.1 to 0.6 meters) in Macro mode. A fixed-focus Infinity mode is ideal for landscape photography. In addition to the optical 3x zoom, the 618 also provides up to 2x digital enlargement, activated by zooming past the optical telephoto range. (Users should be aware that digital zoom is not the same as optical zoom, since the digital zoom is merely cropping and enlarging the center portion of the CCD. As a result, digitally enlarged images often result in higher image noise and/or softer resolution.)
The majority of the 618's exposure controls are accessed through the LCD menu system, with the exception of the Flash, Self-timer, Remote, and Macro and Infinity Focus modes. Exposure modes include Auto, Aperture Priority, Shutter Priority, Landscape, Portrait, and Action, with the Aperture and Shutter Priority modes allowing the user to select the appropriate exposure setting, while the camera chooses the best corresponding value to achieve a good exposure. Shutter speeds range from 1/1,000 to four seconds, giving the 618 more low-light capabilities than the entry level models. The 618 also provides adjustable exposure compensation from -2 to +2 exposure values (EV) in one-half-step increments, plus Spot, Average, and Center-Weighted Metering options to help establish more accurate exposures based on specific lighting conditions.
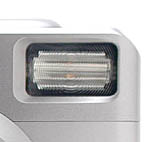
White Balance settings include Auto, Daylight, Tungsten, and Fluorescent light sources, and the adjustable ISO feature can be set to Auto, 100, or 200 sensitivity equivalents (depending on exposure mode). A File Settings menu enables the user to select between JPEG and TIFF File Types; Good, Better, and Best Quality Level settings; 1/4 or Full Size Resolution; as well as Full Color, Black and White, and Sepia shooting options. The 618's built-in flash operates in seven modes (Auto, Auto with Red-Eye Reduction, Forced On, Forced On with Red-Eye Reduction, Forced Off, Night, and Night with Red-Eye Reduction), each controlled by the flash button on top of the camera.
The PhotoSmart also offers a Remote Control mode for use with the accompanying Infrared Remote Control. When the Remote mode is set, a three-second countdown is engaged by pressing the shutter button on the remote, a nice feature for taking group photos with the photographer in the picture. A 10-second self-timer is also available, triggered by a full press of the shutter button in Self-Timer mode. In addition to the standard single exposure mode, the 618 also offers Continuous shooting and Time-Lapse photography modes. Continuous shooting takes an unlimited series of images in rapid succession for as long as the shutter button is held down (or until the memory card runs out of space). In Time-Lapse mode, the camera takes a preset number of images at specified time intervals.
The 618 is capable of recording up to 45 seconds of sound to accompany each captured image or series of images (such as Continuous and Time-Lapse images), and an Image Stamp function can print text or logo watermarks on images, with a series of logos available from HP's website.
The 618 has two image viewing modes that are selected through the Mode dial: Playback and Review. The Playback mode provides information about each image in an overlay bar across the top of the screen, including the image number and the date and time it was recorded. The three soft keys underneath the LCD monitor are used to play and stop image slide shows, zoom in and out of an image for closer inspection, and "Collapse" or "Expand" groups or sequences of images stored on the CompactFlash card. (Collapsing a series of images makes only the first image visible in Playback or Review modes. Expanding the series makes all of the images in a group visible.) There is only one set of menus in Playback mode, these are the Play Settings. Slideshow allows the user to determine the content of a slideshow, the duration, whether the sound is on or off, and whether or not the slide show loops or stops after one play through. Playback rate can also be determined, and the video connection set to NTSC or Pal format.
In Review mode, the Edit menu allows you to delete images, link them together as groups, write-protect individual images, and categorize them by subject (Scenery, Vacation, Friends, etc.). A Print Order Form menu sets up images for DPOF printing, and a Transmit menu allows the user to send images via the 618's infrared port from Camera-to-Camera, when used with other HP Digita enabled digicams, and from Camera-to-Printer, when used with an HP JetSend enabled printer. Finally, a Find menu enables the user to search through stored images by Date or Category.
An NTSC video cable is provided to connect the camera to a television (PAL for European models), where images can be played back using all of the functions in the 618's Playback and Review menus. A USB cable is also supplied to connect the camera to a computer for downloading captured images.
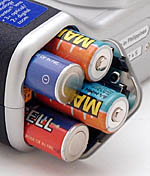
The 618 is powered by four AA batteries, and a set of alkaline batteries accompanies the camera. You can also use lithium batteries, NiMH rechargeables, or the optional AC adapter. Hewlett-Packard offers a set of NiMH rechargeables, with a battery charger, as optional accessories.
Two software CDs supplied with the camera are loaded with HP's Photo Imaging software, a copy of the User's Guide, plus ArcSoft PhotoImpression and PhotoMontage software programs. HP's Photo Imaging software (for Windows only) provides minor editing, organizing, printing, and Web sharing utilities, while the Mac and Windows compatible ArcSoft PhotoImpression software provides similar image editing, organizing, and printing tools. ArcSoft's PhotoMontage (also dual platform) creates large images from mosaics of hundreds or thousands of smaller images.
We found the 618 to be an important addition to the HP PhotoSmart line, as it provides a wider range of exposure options than the 215 and 315 models, and slightly less sophisticated capabilities than the high-end 915 model. The camera's multi-talented infrared interface enables high-speed communication with HP compatible printers and cameras, and the extensive in-camera image sorting and categorizing capabilities are very useful tools for photographers who want to keep track of their images in an organized manner. Overall, we feel the PhotoSmart 618 is a worthy candidate for novice photographers who appreciate having automatic capabilities while they learn about various photographic functions, and room to "grow" into their cameras. Add the portable size and classic styling, and you have a well-rounded digicam with simple, point-and-shoot capabilities that can handle just about any situation.
Design
The third in a family of four HP digital cameras, the PhotoSmart 618 offers both automatic and manual controls, with an impressive range of sophisticated features designed to enhance the photography experience. The smooth-contoured, silver-toned body is very similar in size and shape to a compact 35mm camera, with just enough heft and solidity to give it the feel of a well-built camera. Measuring approximately 5.0 x 2.8 x 2.2 inches (127.5 x 56.5 x 71.5mm), and weighing about 10.6 ounces (300 grams), the 618 could easily fit into a large coat pocket or purse, but it may be more comfortable carried in a small camera bag or hanging around your neck on the accompanying shoulder strap.
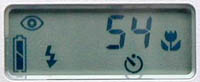
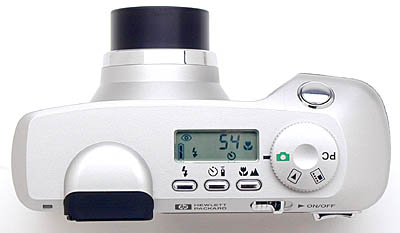
Among the first features we noticed on the 618 was its extensive range of external camera controls, which takes many of the functions previously located in the LCD menu, and makes them more easily accessible. A small status display panel on top reports critical information such as Flash, Focus, Self-timer, and Remote modes, plus remaining battery power and the number of shots remaining on the CompactFlash card. This combination of external camera controls and a detailed status display window allows users to save battery power by operating the camera without the LCD monitor enabled.
On the inside, the PhotoSmart 618 features a 2.11-megapixel CCD, 30-bit color depth, and HP's proprietary Imaging Technology, which provides high-performance color balance and demosaicing (the 618's ability to complete missing picture information, or interpolation) as part of the image processing. Normal digicam interpolation estimates the values between the known values in an image, which may or may not accurately represent the missing data. HP claims that their demosaicing process focuses on a larger area surrounding the missing data, and assesses a more likely value, thereby producing less digital artifacts in the final image.

The front panel of the camera is what gives the 618 its classic 35mm styling. The high-quality zoom lens is a Pentax 3x 5.2-16.5mm (34-108mm equivalent), which features a mechanical, retracting lens cover that slides open when the camera is powered on. (We like the idea of the retractable lens cover because it eliminates the need for a lens cap.) The lens also telescopes out from the camera body about an inch when the camera is powered on, and extends and retracts as you adjust the zoom. (Surprisingly, the lens also engages when the camera is in Playback or Review modes.) In addition to the lens, the front panel houses a built-in flash, viewfinder window, JetSend/Digita infrared interface, microphone, self-timer LED, and flash sensor.
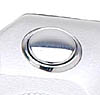
The shutter button, which is set on a sloped portion of the top/front panel, is within easy reach of the right forefinger, directly on top of the right hand grip. The hand grip is covered with a leather-like textured surface that provides a good grip for your fingers as they wrap around the camera. The only other feature on the camera's right side is a set of attachment eyelets through which you can thread the provided shoulder strap.
The Mode dial, status display panel, and three control buttons are located on the 618's top panel. The notched Mode dial controls the camera's operating modes (Capture, Playback, Review, and PC Connect), while the control buttons activate the Flash, Self-timer/Infrared Remote, and Focus modes. The status display panel reports a variety of camera settings (see second paragraph above) and enables you to operate the camera in a basic shooting mode without activating the LCD monitor.
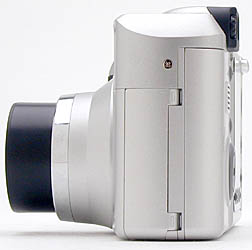
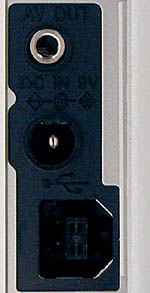
The left side of the camera has two compartments, lined up side-by-side, one for the connector jacks and one for the memory card. Both compartments are protected by hinged, plastic doors -- the connector door pulls open at the bottom with a fingernail (even short ones), while the memory door slides outward before it swings open. The larger compartment on the right holds a single CompactFlash card, with a small black button on the end to releases the card for removal. We appreciate the out-of-the-way location, as it allows easy access to the memory card while mounted on a tripod. The smaller left compartment features the A/V Out, DC In, and USB connection jacks.
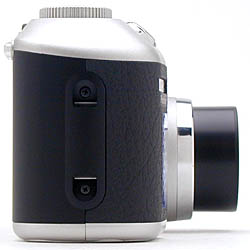
As mentioned above, the right side of the camera has only a pair of holes for attaching the shoulder strap.
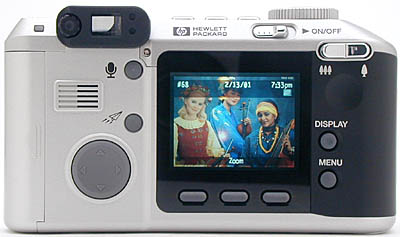
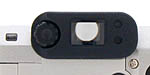
The remaining camera controls, LCD monitor, speaker, and optical viewfinder eyepiece are all located on the 618's back panel. At the top of the panel is the On/Off switch, which controls the camera's power. The optical viewfinder eyepiece features a diopter adjustment dial and two LED lamps that report the camera's status. A solid green LED indicates that focus and exposure are set, while a flashing green LED means that the camera's autofocus system is having trouble focusing. A solid red LED means that the flash is charged and ready to fire. If the red LED is flashing, the flash is either charging, or there's a problem with the camera or memory card (the LCD monitor should then report the error). A tiny orange LED lamp on the left side of the eyepiece lights whenever the camera is accessing the memory card.
The other control buttons on the back panel include a four-way rocker pad, which navigates through menu settings, and the Display, Menu, JetSend (paper airplane icon), Sound, and Zoom buttons. Three soft keys lined up below the LCD monitor change functions depending on the camera mode. Each button's function is displayed in the LCD monitor directly above the button when the mode is activated.
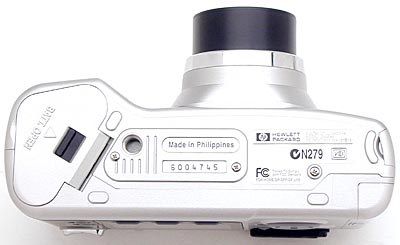
The battery compartment door and tripod mount are the sole features on the 618's bottom panel. Unfortunately, the battery compartment door is too close to the tripod mount to allow quick battery changes while the camera is mounted on a tripod, although this probably isn't a problem for most casual shooters. We did found the battery compartment's spring-loaded door a little tricky to close though. Opening the door is a snap, simply slide the lock button and the door flips open instantly. It's trying to slide the lock button closed again that makes it difficult to close. We found it easiest to rest the top of the camera on a flat surface, then hold down the compartment door firmly with two fingers while sliding the lock button into place.
A tiny IR Remote Control accompanies the 618, with only one small button to trigger the shutter. These remote control units come in quite handy when shooting closeup macro subjects (preventing any blurring from camera movement when you press the shutter button) or when the photographer wants to be in the picture.
 Viewfinder
The PhotoSmart 618 offers both an optical viewfinder and an LCD monitor for composing images. The real-image optical viewfinder zooms along with the lens, but is unable to show the 2x digital telephoto, which requires use of the LCD monitor. A central autofocus and exposure target mark helps line-up shots, and is useful when working in Spot Metering mode. The viewfinder eyepiece features a diopter adjustment dial, which adjusts the viewfinder focus to accommodate eyeglass wearers. We were able to see the full eyepiece view from a good distance, meaning that eyeglass wearers with thick lenses shouldn't have any trouble seeing a complete view of the scene. Two LED lamps on the right side of the viewfinder eyepiece indicate the camera's current status. A solid green LED reports that the focus and/or exposure is set. A flashing green LED indicates that the camera is having trouble focusing (a similar message appears in the LCD monitor). A solid red LED indicates that the flash is charged and ready, while a flashing red light means that the flash is charging or there is a problem with the camera or memory card (if so, the LCD monitor will report the problem or error). Hewlett-Packard estimates that the optical viewfinder shows about 85 percent frame accuracy.
 The two-inch, low-temperature, polysilicon, TFT LCD monitor features a color display with approximately 130,338 pixels. The Display button on the right side of the screen controls the LCD display, turning it on or off. An information overlay across the top of the LCD monitor reports any exposure information or camera messages, such as when the camera is having trouble focusing, or when the batteries are too low. The bottom text area of the LCD monitor reports the current soft key functions (lined up along the bottom of the LCD monitor). The top and bottom overlay screens, where the text messages appear, can be canceled by pressing the center soft key (labeled "Overlay" on the LCD screen).
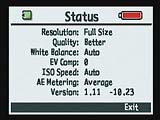 The Status function (activated by pressing the far right soft key during the normal image display in Capture mode) pulls up a full screen display of the camera's settings, including Resolution, Quality, White Balance, EV Compensation, ISO Speed, and AE Metering mode. This is useful when you want to double check exposure settings, without having to fish back through the menu screens.
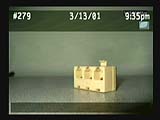 In Playback mode, the top overlay bar provides capture information, including the image number and the date and time it was taken. The bottom center soft button is a playback zoom function, which enlarges captured images to 2x for closeup viewing of fine details. The button on the left plays a slideshow of the captured images, while the button on the right Expands and Collapses groups or sequences of images stored on the CompactFlash card. Playback mode offers only one menu of "Play Settings" which determines Slideshow content and duration, Playback rate for Time-Lapse and groups of images, and sets the Video Out preferences to NTSC or PAL.
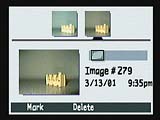 The Review mode has its own notch on the Mode dial. Instead of an index display, it automatically displays small thumbnail images along the top of the LCD and a larger thumbnail of the selected image below it. Next to the larger thumbnail is a text area that provides the image number, date and time it was taken, and group name if one has been selected. This is the mode where most of the Review functions are set, with Edit, Print Order Form, Transmit, and Find menus. The center soft key is used to delete an image, the left button to mark an image for printing, and the right button provides the same Expand and Collapse functions found in the Playback mode.
 Optics
The built-in Pentax 3x, 5.2-16.5mm lens is equivalent to a 34-108mm zoom lens on a 35mm camera. The lens itself is protected by a retractable cover that slides open and out of the way when the camera is powered on. At the same time, the lens telescopes out from the camera body about an inch (regardless of the camera mode). The lens features nine elements in eight groups, with two aspherical elements. The aperture can be manually or automatically controlled, with settings ranging from f/2.4 to f/9.6.
Focus is also manual or automatic, with a focal range of 1.64 feet (0.5m) to infinity in normal mode and 0.33 to 1.97 feet (0.1 to 0.6m) in Macro mode. When set on Auto Focus, the 618 uses a contrast-detection method to focus, and a green LED lamp next to the viewfinder provides a status of the process: It glows steadily when it's finished focusing and flashes when the camera is having trouble focusing. If the green light is flashing, try locking the Auto Focus (described further down), or you can change to Macro mode or Manual focus. Once enabled through the Photo Assist menu, Manual Focus is controlled with the right and left arrows of the rocker button. Instead of a distance scale, the current focus distance is displayed in meters in the top left corner of the LCD menu. The Focus button (far right) on top of the camera cycles between Normal, Macro, and Infinity Fixed Focus modes, in Auto Focus only.
In addition to its 3x optical zoom, the 618 also offers up to 2x digital zoom, activated by zooming past the optical zoom range with the Zoom button. The camera's instruction manual reports that digital zoom offers 1.2, 1.5, and 2x settings, though these figures aren't reported on the LCD screen and it's a little hard to control the amount of digital zoom. Instead, a magnifying glass with a plus (+) sign appears in the top right corner to indicate that the Digital Zoom has been activated. Keep in mind that digital zoom is only cropping out and enlarging the center portion of the CCD image, usually resulting in a loss of image quality due to lower resolution or excess image noise.
The PhotoSmart 618 does not have an auto focus lock, but it does allow you to manually lock the focus for a particular part of the subject. To lock focus, frame the desired portion of the subject in the center of the viewfinder, press the shutter button down halfway, then recompose the shot while keeping the shutter button halfway pressed. The focus is locked until you either let go of the shutter button or press it all the way down to capture the image.
 Exposure
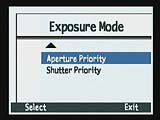
The PhotoSmart 618 features a much wider array of exposure controls than the HP 215 and 315 digicams. Though the 618 doesn't feature a fully manual exposure mode, it does offer Aperture Priority and Shutter Priority options, in addition to Auto, Landscape, Portrait, and Action exposure modes. Exposure modes are controlled through the Capture menu, under the Photo Assist>Exposure Mode sub-menus. In standard Auto exposure mode, the camera controls both the shutter speed and aperture settings, while the user maintains control over EV Compensation, White Balance, AE Metering, ISO Speed. Shutter Priority mode allows the user to set the shutter speed, from 1/1,000 to four seconds, while the camera chooses the best aperture setting to obtain a good exposure. Aperture Priority mode gives the user control over the lens aperture, from f/2.4 to f/9.6, while the camera selects the best corresponding shutter speed. In both modes, the up and down arrow keys adjust the exposure values. If the camera's metering system disagrees with your settings, the exposure value readout in the top overlay of the LCD monitor will turn red.
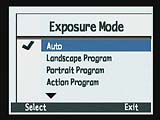 The 618 also offers Landscape, Portrait, and Action exposure modes for shooting in specific situations. Landscape mode fixes the focus at the infinity setting and uses a smaller lens aperture to capture a greater depth of field (keeping the background and foreground in sharp focus). Because this mode uses smaller aperture settings, which typically require a slower shutter speed, a tripod is recommended to prevent blurring from camera movement. Portrait mode employs a larger aperture setting to decrease the depth of field, which places the subject in sharp focus and blurs the background, placing all the emphasis on the subject. Action mode optimizes the camera for shooting fast subjects, using a faster shutter speed to freeze action.
An Instant Review function automatically displays the recently captured image on the LCD screen for a few seconds while the image is being written to the memory card. During this time, you can delete the image on the spot by pressing the soft key labeled "Delete" before the image disappears. The Instant Review function is controlled through the camera's Capture menu under the Preferences and Display submenus, where you can turn off the Instant Review or set the length of time that the review displays on the monitor.
Exposure compensation is adjustable from -2 to +2 exposure equivalents (EV) in one-half-step increments, through the Photo Assist menu (we'd prefer to see an external control for this, to bypass the LCD). White balance is also adjustable, with Auto, Daylight, Tungsten, and Fluorescent lighting options. Three metering modes are available under the AE Metering submenu. Average metering (the default setting) averages readings from the entire image area to determine the best exposure. Center-Weighted metering takes several readings from a large area in the center of the image, then averages them to find the best overall exposure. Spot metering bases the exposure on a single reading taken from the very center of the image. This last mode is useful for backlit or high-contrast subjects, where an averaged reading would not give you the correct exposure for the subject.
In both the Auto and Aperture Priority exposure modes, the 618's ISO can be set to Auto, 100, or 200 ISO equivalents. (The ISO setting is grayed-out in the Photo Assist menu when operating in Shutter Priority, Landscape, Portrait, or Action capture modes, when the camera assumes automatic control). Color is set through the Capture Settings menu (File Settings submenu) to Full Color, Black and White, and Sepia options.
A Self-Timer/Remote Control button on top of the camera controls the camera's Remote and Self-Timer capture modes. One press of the button enables the Self-Timer mode, which counts down from 10 seconds before taking the exposure (after the shutter button is fully pressed). A second press of the Remote/Self-Timer button puts the camera into Remote Control mode, which works with the accompanying IR Remote Control. When the shutter button on the IR Remote is pressed, the camera counts down from three seconds before firing the shutter. A third press of the control button places the camera back into normal exposure mode.
 Flash
Flash
The PhotoSmart 618's built-in flash features seven operating modes: Auto, Auto with Red-Eye Reduction, Forced On, Forced On with Red-Eye Reduction, Forced Off, Night, and Night with Red-Eye Reduction. The Flash button on top of the camera controls each mode setting, cycling between them. The Auto mode places the camera in charge of when to fire the flash, based on the existing lighting conditions. Forced On fires the flash with every exposure, regardless of light level, while Forced Off completely disables the flash. The Night setting synchronizes the flash with a slow shutter speed, allowing more ambient light in to balance the exposure. Auto, Forced On, and Night modes also feature a Red-Eye Reduction mode, which fires a small pre-flash before firing the flash at full power with the exposure. This reduces the occurrence of red-eye effect, which is caused by a reflection through the subject's pupils. Hewlett-Packard estimates the 618's flash to be effective from 0.98 to 18.0 feet (0.3 to 5.4 meters).
 Sound Recording
A tiny microphone on the front of the camera enables the user to record up to 45 seconds of sound per captured image. To record sound in Capture mode, the Instant Review function must be turned on in the Preferences menu (Display submenu). Once an image has been captured, you press the Sound button on the camera's back panel while the review screen is active. The amount of available recording time appears on the LCD monitor, and the camera records sound until the Sound button is pressed a second time. (For best results, make sure to talk into the microphone on the front of the camera.)
After you've finished the recording, you can use the soft keys below the LCD to playback or delete the recording, or exit the Instant Review screen. Playback sound issues from a small speaker grille on the rear panel of the camera, next to the microphone button. You can also record sound in Playback and Review modes, by selecting the image to which you'd like to attach the recording, and following the same procedure as above. In addition to One-Shot images, you can attach sound clips to the final image of a Continuous series or the first image of a Time-Lapse series.
Special Capture Modes
The 618 offers three main photography modes: One-Shot, Continuous, and Time-Lapse. The far left soft key controls the photography mode, cycling between the three. One-Shot mode is the default mode, it captures a single image with one press of the shutter button. In Continuous mode, the camera captures a rapid series of images for as long as the shutter button is held down, or until the memory card runs out of room. You can use the flash in Continuous mode, but this increases the shot-to-shot cycle time as you have to wait for the flash to charge between shots.
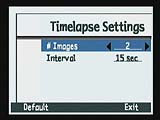 Time-Lapse photography mode allows you to capture up to 1,000 images in a series, at specific time intervals (from 15 seconds to 24 hours). Shooting begins with a single press of the shutter button and ends when the preset number of images is reached (you can cancel the mode at any time by pressing the Stop soft key). The actual number of images that can be recorded depends on the amount of available space on the CompactFlash card. Images are saved as a group of images on the memory card, which means they are linked together as a series.
Image Stamp Menu
 An Image Stamp menu in the 618's Capture menu allows you to add text or a logo to captured images. Using the Date & Time submenu you can opt to have the date, time, or both stamped on the image. The Text submenu allows you to print your own messages on the image, by scrolling through and selecting individual letters from the alphabet. In both Date & Time and Text menu options, you can designate the placement of the text in the frame, the transparency of the words, the text color, and the background color. The Logo submenu allows you to download preset logos from the Hewlett-Packard Web site (www.hp.com/photosmart) and paste them into one of the four corners of the picture.
Shutter Lag/Cycle Time
When you press the shutter release on a camera, there's usually a lag time before the shutter actually fires. This time is to allow the autofocus and autoexposure mechanisms time to do their work, and can amount to a fairly long delay in some situations. Since this number is almost never reported on, and can significantly affect the picture taking experience, we now routinely measure it using Imaging Resource proprietary testing.
|
|
||
|
|
|
|
| Power On -> First shot |
|
Not too bad, just a little slower than average among cameras with telescoping lenses.
|
| Shutdown |
|
Quite fast for a telescoping-lens camera.
|
| Play to Record, first shot |
|
Time until first shot is captured, from playback mode. Quite fast.
|
| Record to play (max/min resolution) |
|
Faster than average to first view, slower than average to full-res. (First numbers in each set are for low-res preview, second number is for display of full-resolution image.
|
| Shutter lag, full autofocus |
|
About average |
| Shutter lag, manual focus |
|
Slightly slower than average. |
| Shutter lag, prefocus |
|
About average.
|
| Cycle Time, max/min resolution |
|
Widely varying results, see text. |
The PhotoSmart 618 performs pretty well in terms of shutter lag and cycle times. It's not a speed demon, but it's no slouch either. Startup time is fairly typical for a camera with a telescoping lens, and the shutter lag figures are about average for middle- to high-end digicams we've tested. The real puzzler is the camera's cycle time (shot-to-shot speed) performance, which varied widely in our testing. Normally, a camera is fairly fast for the first couple of shots, until its "buffer memory" fills, then it slows afterward. In Full Size/Best Quality Level, the 618 performed in much the same way, with a cycle time of about 2.5 seconds for the first four shots, dropping to a bit less than 4 seconds on subsequent shots. On the ninth shot, however, the cycle time sped back up to 2.7 seconds for one shot, and then reverted to the 3.9-second performance. We didn't spend time investigating further, but the single "blip" back to a shorter cycle time was unusual.
We saw the same kinds of variations in the 1/4 Resolution/Good Quality mode. Interestingly, the cycle time for these images is actually longer than for Full Size/Best Quality images. It appears that the camera always captures full-resolution images, and then downsamples them on the fly to make the low-resolution version. This produces very good quality, low-resolution images, but at the cost of increased cycle times. Overall cycle time performance is average to a bit slower than average for other midrange digicams we've tested.
Operation and User Interface
The PhotoSmart 618's user interface is reasonably uncomplicated, but with more menus and external controls than the 215 and 315 camera models, which in some cases requires more reliance on its LCD menu. However, if you operate the camera in standard Auto Exposure mode, you can easily use it without the LCD monitor, because the optical Zoom, Flash, Self-timer, Remote, and Macro/Infinity Focus modes are all controlled externally.
We appreciated the status display on top of the camera, which reports the Flash, Focus, Self-timer, and Remote modes, plus remaining battery power and the number of shots remaining on the CompactFlash card. The 618's LCD menu is colorful and easy to navigate using the four-way rocker pad and the soft keys underneath the LCD monitor.
Our only complaint with the menu system is that it's quite "deep", requiring you to sort through several pages of settings. On the one hand, this is a good feature, because it provides an extensive amount of user control, and is very easy for a novice user to understand. On the other hand, it can be quite tedious to make just a few simple changes. A copy of the camera's detailed User Guide is provided in PDF format on the software CDs, but it's more than 125 pages, requiring a hefty amount of paper to print. We'd like to see a smaller paper copy in the box as well, to use as a reference when shooting in the field. A Quick Start Guide is supplied, with step-by-step directions for basic camera operation.
Control Enumeration
Shutter Button: Located on the front of the camera, on a sloping edge from the top panel, this button sets focus and exposure when depressed halfway. When fully depressed, the button activates the shutter to record the exposure. When the Self-Timer mode is enabled, pressing the shutter button activates the 10-second countdown.
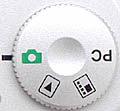
Mode Dial: Set on the far right side of the camera's top panel, this notched dial sets the camera's operating mode. The following options are available:

Flash Mode: The first in a series of three Status LCD Buttons on the camera's top panel, this button controls the 618's seven Flash modes, cycling between the following settings (corresponding icons include an Eye for Red-Eye Reduction, Lightening for Forced Flash, and Moon for Night mode):

Timer Mode: Directly to the left of the Flash Mode button, this one cycles through the Normal (no icon), Self-Timer (Clock), and Remote Control (Remote icon) capture modes. When the Remote Control mode is activated, the Remote LED lamp on the front of the camera begins flashing.

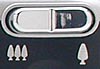
Auto Focus Range: The last of the Status LCD Buttons, this one is marked with the traditional Macro (flower) and Infinity (mountain range) focus symbols. In Record mode, this button cycles through the Normal, Macro, and Infinity focus settings.
![]()
On/Off Switch: Positioned at the top right of the camera's back panel, this sliding switch turns the camera on or off. When the camera is turned on, the lens cover opens and the lens extends from the camera body. It reverses this action when the camera is powered off.
Zoom Lever: Diagonally to the right of the On/Off switch, this lever controls the Optical and Digital Zoom. Once the end of the optical telephoto range is reached, pressing the Zoom lever on the telephoto end activates the Digital Zoom.

Display Button: On the right side of the LCD monitor, this button controls the LCD display mode. In Capture mode, pressing this button enables or disables the image display. In Playback mode, it controls the information overlay displays.

Menu Button: Just below the Display button, the Menu button activates and deactivates the settings menus in Capture, Playback, and Review modes.
![]()
Soft Keys: Along the bottom of the LCD monitor, these three buttons perform a variety of functions, depending on the camera mode and menu setting. In standard Capture mode, the far left button cycles between One-Shot, Continuous, and Time-Lapse modes. The center button activates and deactivates the information overlays, and the far right button pulls up the Status page, which reports the following exposure settings: Resolution, Quality, White Balance, EV Compensation, ISO Speed, and AE Metering.
When the Capture menus are displayed, the buttons' functions change, allowing you to edit menus or exit the menu screen. In Playback mode, the center soft key controls the 2x playback zoom, digitally zooming in and out of the captured image; the left key places image sequences or slideshows, and the right key expands or collapses series of images. In both Playback and Review Menu modes, the soft keys allow you to edit menu options or exit the menu screens. In Review mode, the far left key marks (selects) images, the center key deletes the currently selected image, and the right key expands or collapses series of images.
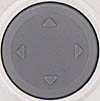
Four-Way Arrow Rocker Pad: Located on the left side of the LCD monitor, this large button features an arrow in each direction (up, down, right, left). In any settings menu, these arrow keys navigate through menu options. In Shutter and Aperture Priority exposure modes, the up and down buttons control either the shutter speed or aperture setting. In Playback and Review modes, these arrows scroll through captured images.
![]()
JetSend Button: Just above the rocker pad, this button is marked with a flying paper airplane symbol. In Playback or Review modes, pressing the JetSend button allows you to send the currently selected image to another JetSend device, via the infrared port on the front of the camera. In Record mode, pressing the JetSend button sends the last image captured.
![]()
Sound Button: Directly above the JetSend button, this one activates the sound recording feature, allowing you to record up to 45 seconds of sound to accompany an image. In Record mode, the sound function only works when Instant Review is enabled. In Playback and Review modes, pressing the button pulls up the sound recording icon, and begins recording sound until the button is pressed a second time.

Diopter Adjustment Dial: Located to the left of the optical viewfinder eyepiece, this dial adjusts the eyepiece focus to accommodate eyeglass wearers.
CompactFlash Release Button: Hidden inside the CompactFlash compartment, this button releases the CompactFlash card and pops it up slightly so that it can be removed from the slot.
Open Battery Switch: Located in the center of the battery compartment door, this button locks and unlocks the battery compartment door.
Camera Modes and Menus
Capture (Record) Mode: Accessed by turning the Mode dial to the green camera symbol, the Capture mode sets up the camera for recording images. The following exposure modes and options are available through the settings menus:
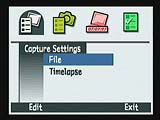 Capture Settings:
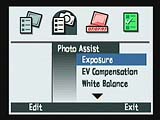 Photo Assist:
 Image Stamp: Designates the type of image stamp recorded on each image, with the following submenus:
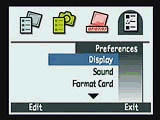 Preferences:
Playback Mode: The traditional playback symbol (a rectangle surrounding an arrow) designates Playback mode on the Mode dial. Here, you can scroll through captured images, play them back in an automated slideshow, or enlarge captured images to 2x. Pressing the menu button displays the following Play Settings options:
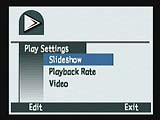 Slideshow:
Review Mode: This mode is indicated on the Mode dial by a rectangular box with smaller boxes inside, representing the index view format that it employs. In Review mode, images can be viewed, edited, and organized. The Review settings menu offers the following options:
 Edit: Offers the following edit tools:
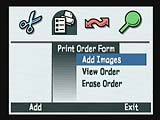 Print Order Form: Creates a DPOF file for printing images on compatible devices, with the following settings:
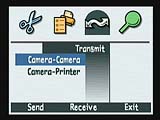 Transmit: Sets up the camera for transmitting images:
 Find: Searches images on the memory card, either by date of capture or category.
PC Mode: This mode enables the camera to connect to a computer via the USB interface.
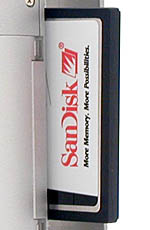 Image Storage and Interface
The PhotoSmart 618 records images to a Type I CompactFlash card and a 16MB card is packaged with the camera. Upgrades are available separately, up to 64MB from HP, and up to several hundred megabytes (!) from third parties. The CompactFlash card inserts into the card slot with the electrodes going in first, and the front of the card facing the back of the camera. The card will not go into the camera the wrong way. A black button next to the slot releases the card and pops it up slightly when you're ready to retrieve it.
Never remove the CompactFlash card while the camera is performing any function, to avoid damaging the media. The LED above the memory compartment lights orange when the camera is accessing the card. The 618's status display panel reports the number of available images on the card; when a flashing "000" appears on the display panel, the memory card is full.
Entire CompactFlash cards cannot be write-protected, but the 618 allows you to protect captured images through the Review settings menu. The Edit menu (Protect submenu) can be used to write-protect individual images, or any marked images on the card, which prevents them from being accidentally deleted or manipulated in any other way (except by formatting the card). The Review menu also provides Digital Print Order Format (DPOF) printing utilities, camera-to-camera and camera-to-printer image transfer, and image search functions. The Edit menu enables you to link images by group and/or categorize them by subject (such as "Vacation" or "Pets".) The Find menu allows you to search stored images by date and category. The 618 also provides Image Stamping tools (through the Capture menu), which allow you to add text, a logo, or the date and time to an image.
The PhotoSmart 618 features JetSend infrared technology, which allows the user to "beam" one image at a time from the 618 to other JetSend devices, such as HP cameras and printers, via the infrared port. To beam a photo, you simply choose the image you'd like to send from the installed memory card (Review menu), line up the camera's infrared port so that it's no further than six inches (15cm) from the JetSend device, access the Transmit submenu, choose either the Camera-Camera or Camera-Printer option, and press the shutter button. The camera's LCD will report that it's looking for the device, then show a status bar of the image transfer once the process begins. The 618's infrared port also hosts the Digita image transfer process, which communicates to other HP Digita cameras. The Camera-Camera option of the Transmit submenu enables the camera to send and receive image files from any other Digita camera.
Three JPEG compression levels (Best, Better, and Good) and two image sizes (1,600 x 1,200 and 800 x 600 pixels) are available on the HP 618. There's also an uncompressed TIFF mode. Below are the approximate still image capacities and compression ratios for a 16MB CompactFlash card:
|
Resolution/Quality |
|
|
|
|
|
| High Resolution 1600x1200 | Images | 2 | 15 |
|
56 |
| Approx. Compression |
1:1 | 5:1 |
|
20:1 | |
| Standard Resolution 800x600 | Images |
|
|
|
|
| Approx. Compression |
|
|
|
|
|
A USB cable and two software CDs also accompany the 618, for quick connection to a PC or Mac. The PhotoSmart 618 can connect to the host as either a "Digita Device", using communication protocols particular to the Digita operating system, or as a storage-class USB device. This last is a desirable feature, becoming more common on digital cameras. Storage Class USB connectivity means that the camera will be recognized as a hard drive by operating systems supporting this connection method. (Windows ME, Windows 2000, and MacOS 9.0 or later.) In our experience, storage class cameras also transfer data much more quickly than device-class cameras: In our tests, we clocked the PhotoSmart 618 at 696 KBytes/second (!) on our G4 Macintosh. This is very fast, a good 2-3x faster than is typical for other USB digicams we've tested.
 Video Out
The 618 is equipped with an A/V Out jack in its connector compartment, and US and Japanese models of the camera are packaged with an NTSC video cable. European models come with the appropriate PAL cable, with an NTSC or PAL video option selectable in the Playback menu. Once connected, the television acts as a larger version of the 618's LCD monitor, with all the functions available in Playback and Review modes.
 Power
Power
Four AA batteries power the PhotoSmart 618, and a full set of alkaline batteries accompanies the camera. You can also use lithium or NiMH AA batteries. Hewlett-Packard offers an accessory set of NiMH rechargeable batteries and a battery charger, as well as an optional AC adapter through its website. As always, we highly recommend picking up a couple of sets of rechargeable batteries and keeping a spare set charged at all times. If you plan on downloading images directly from the camera or spending a lot of time reviewing captured images in the camera, the accessory AC adapter is also a good idea.
The 618 features a Sleep Timeout option under the Capture settings menu (Preferences>Display submenus) which can be set from 30 seconds to five minutes. This option helps save battery power by shutting off the camera after a specified period of inactivity. When shooting in Time-Lapse mode, the camera automatically shuts the LCD monitor off between shots with long intervals. Also through the Preferences>Display submenu, you can turn off the Live View function, which saves battery power by keeping the LCD monitor display off when the camera is powered on (requiring you to press the Display button to activate the LCD). A battery icon on the status display panel reports the approximate amount of available battery power. The icon flashes and the camera beeps when the batteries are very low.
HP estimates that a new set of alkaline batteries should produce between 150 and 230 shots (depending on the camera settings), or approximately 90 minutes of image review time. Alternately, a fresh set of lithium batteries should provide between 500 and 810 shots, or approximately 220 minutes of playback time.
|
|
|
| Capture Mode, w/LCD |
|
| Capture Mode, no LCD |
|
| Half-pressed shutter w/LCD |
|
| Half-pressed w/o LCD |
|
| Memory Write (transient) |
|
| Flash Recharge (transient) |
|
| Image Playback |
|
In our tests, the PhotoSmart 618's power consumption was a bit lower than average, but we found that stepping between images in Playback mode consumed quite a bit more power than normal. HP's estimates may be accurate for Alkaline batteries, but we never recommend using alkalines for digital cameras. Buy yourself a couple of sets of high-capacity NiMH rechargeables and a good charger and you'll save literally hundreds of dollars in battery costs over the camera's life. A freshly charged set of high-capacity NiMH cells should give you a couple of hours of full-power run time, about average for digicams we've tested. As always, turning off the LCD screen in Capture mode greatly reduces power consumption and extends the battery life.
 About
Batteries
About
Batteries
We've gotten so many emails about power issues for digicams, that we're now
inserting this standard notice in the reviews of all AA-powered cameras on our
site: Don't even *think* about using alkaline AA batteries in a digicam!
Despite their being packed in the box with many cameras, they simply don't have
the juice to handle typical digicam demands. (Even the "high power"
ones the battery manufacturers say are designed for devices like digital cameras.)
Spend the $35-40 or so it takes to get a set (or two) of high-capacity NiMH
rechargeable batteries and a good charger! The few dollars up front will save
you literally hundreds of dollars in the long run, not to mention the hassle
of wimpy batteries running out in the middle of the action. We suggest you buy
two sets of batteries, so one can always be in the charger, ready to go, and
so have two sets available for longer excursions. Good brands of batteries include
Maha (our favorite), GP, Kodak, and Nexcell. Also, buy the highest capacity
AAs the manufacturer makes, the few extra dollars for the extra capacity is
usually well worth it. Getting a good charger is critical though, almost more
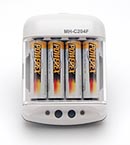
so than buying good batteries. We recommend the Maha C-204F (see the photo at
right), the charger we use the most in our own studio. - Read our review
of it for all the details. Or, just click
here to buy one, you won't regret it.
Included Software
Packaged with the PhotoSmart 618 are a USB cable and two software CDs. The first
CD contains HP's Photo Imaging software, for Windows only (98/2000/Me/NT 4.0),
and a copy of the User's Guide for both Macintosh and Windows. The second CD
contains ArcSoft PhotoImpression and PhotoMontage software for both Windows
and Macintosh (OS 8.6 and higher) operating systems. HP's Photo Imaging Software
is essentially a downloading utility that offers basic printing, viewing, and
editing utilities, as well as e-mail and image sharing tools for use with the
Internet and HP's Cartogra Web site. Though the application is not compliant
with the Macintosh operating system, Mac users can take advantage of similar
utilities with ArcSoft PhotoImpression, which also provides downloading, organization,
printing, and minor editing tools for digital images. Images can be organized
into "albums," or cropped, rotated, or flipped before being printed.
PhotoMontage is a fun, creative application that allows you to create one large
image made up of a mosaic of hundreds or thousands of tiny images. You can use
your own digital images or the application's library of images to create a montage.
Although we give HP some negative marks for not providing better support for
the Mac OS, the Windows-based software package included with the PhotoSmart
618 is quite capable and very easy to use, one of the best packages we've seen
included with a digicam.
In the Box
Included in the box are the following:
Test Results
In keeping with our standard policy, our comments here are rather condensed, summarizing our key findings: For a full commentary on each of the test images, see the PhotoSmart 618's "pictures" page.
As with all Imaging Resource camera tests, we encourage you to let your own eyes be the judge of how well the devices performed. Explore the images on the pictures page, to see how well the 618 performed, and how its images compare to other cameras you may be considering buying.
Overall, the 618's white balance system did a pretty good job: It did better than average with the difficult incandescent lighting of our indoor portrait shot (leaving only a very slight greenish cast in the images), and turned in about an average performance on the rest of our test shots. The white balance showed some tendency to change with exposure compensation settings, particularly in the Indoor Portrait and Closer Portrait test shots. but this didn't prove to be a significant problem. We did notice that the 618's white balance usually produced either slightly cool or slightly warm results. The deviations were never extreme, but we felt if it could only have "split the difference" somehow, it would have been consistently very accurate. Still, overall color looked quite good in most shots, with relatively good accuracy, though slightly weak saturation levels. Bright red objects, such as the red flower in the Outdoor Portrait and the large, red color block of the Davebox, often had a pixelated appearance, a not-uncommon effect in digicams we've tested. The strongest instance is in the Outdoor Portrait, where pixels are very distinct along the edges of the red petals. The other large color blocks of our Davebox test target appeared nearly accurate (though the cyan and kelly green blocks are a little weak). The 618 manages to distinguish between the red and magenta color blocks on the middle, horizontal color chart (which is a common problem area for many digicams), and picks up the variations of the Q60 chart all the way to the "B" range. Overall, we felt the 618 showed fairly good color, despite the warm and cool color casts and somewhat low saturation.
In our "laboratory" resolution test, the PhotoSmart 618 turned in only an average performance among two megapixel cameras, with resolution of about 600-650 lines per picture height in both horizontal and vertical directions. Beyond the absolute resolution figures, the image showed an overall softness that we observed in most of our other test shots. The detail is there, we suspect there's just a tad too little in-camera image sharpening being applied.
Optical distortion on the 618 is about average at the wide angle end, where we measured an approximate 0.7 percent barrel distortion. The telephoto setting produced much better results, as we saw only a half pixel of pincushion distortion or less, which was too small to measure. Chromatic aberration is low, showing about a two pixels of faint coloration on each side of the black target lines. (This distortion is visible as a very slight colored fringe around the objects at the edges of the field of view on the resolution target.)
We found the 618's optical viewfinder to be a little tight, showing approximately 80.3 percent of the wide angle view at the 1,600 x 1,200 resolution size, and approximately 80.5 percent of the image at the 800 x 600 resolution size. The optical viewfinder remains tight at the telephoto setting as well, showing approximately 81.25 percent of the image area at the 1,600 x 1,200 resolution size, and about 81.16 percent at the 800 x 600 resolution size. The LCD monitor fared slightly better, showing approximately 98.5 percent of the image area at wide angle, for both resolution sizes. However, the LCD's frame accuracy became a little loose at the telephoto end of the zoom range, showing approximately 98.4 percent of the image area at the 1,600 x 1,200 resolution size, and about 98.16 percent at the 800 x 600 resolution size. We say "loose" because the heavy black lines we use for measurement are just barely out of frame with the telephoto LCD shots. We determined the frame accuracy by measuring vertical line on the right side of the images, which is just barely cut off at the bottom of the frame. Given that we like to see LCD monitors as close to 100 percent accuracy as possible, the 618 still does a good job. (Just remember to frame a little extra into your telephoto shots when using the LCD monitor.)
The 618 performs very well in the macro category, capturing a minimum area of just 1.47 x 1.11 inches (37.43 x 28.07mm). Detail and resolution both look great, with the intricate details of the brooch completely visible and fairly sharp. We can even see the tiny fibers of the gray background. Color balance is a little warm from the automatic white balance setting. Noise is very low, and only faintly visible in the gray background. The 618's built-in flash does a good job of throttling down for the macro area, cooling the color balance slightly, but producing fairly even illumination throughout the image. The details of the dollar bill are crisper in the flash exposure, though the brooch and coin details soften slightly.
The 618 performs reasonably well in the low-light category, as we were able to obtain a bright, clear image only as low as one foot-candle (11 lux). The target was still visible at light levels from 1/2 to 1/16 of a foot-candle (5.5 to 0.67 lux), but with a strong orange cast and much higher noise levels. (You could arguably still use images at the 1/2 and 1/4 of a foot-candle light levels, despite the noise and color cast.) Noise level remains low from the one foot-candle light level and up, though it increases with each darker light level from 1/2 of a foot-candle on down, becoming moderately high at 1/16 of a foot-candle. (We direct readers to Mike Chaney's excellent Qimage Pro program, for a tool with an amazing ability to remove image noise without significantly affecting detail.) To put the 618's low-light performance into perspective, an average city night scene under modern street lighting corresponds to a light level of about one foot-candle, so the camera should be able to handle most average nighttime city shots pretty well.
Overall, the 618 proved to be a "middle of the road" camera, apart from it's much better than average macro performance. Color is consistent and accurate, if slightly understated. Resolution is about average for a two megapixel camera. As noted the macro performance is better than average. We see the 618 as a solid, consistent performer, distinguished mainly by the easy-to-learn user interface provided by its Digita operating system, and the good package of software that accompanies it.
Conclusion
A 2.11-megapixel CCD, expanded feature set, and more extensive exposure controls make the PhotoSmart 618 a good midrange addition to Hewlett-Packard's digicam line. While we're not crazy about the Digita user interface, which we feel nests too many important camera functions too deeply within the LCD menu system, we do have to admit that everything is presented in a clear, highly understandable fashion. Its easy-to-use automatic mode and more advanced exposure options like aperture and shutter priority, make the 618 a good choice for novice digital photographers who want to buy a camera that will grow with them. On the image quality front, the PhotoSmart 618 does quite well. Overall, it is a worthy competitor in the 2-megapixel-with-zoom digicam category, and certainly worth consideration for anyone shopping for a good all-around performer in that resolution range.
<<PhotoSmart 618 Sample Images | Additional Resources and Other Links>>
Reader Comments!
Questions, comments or controversy on this product? Click
this link to see what other Imaging Resource readers have had to say about
the HP PhotoSmart 618, or add comments of your own!