HP PhotoSmart 912HP and Pentax team up to make a true SLR digicam with Pentax lens, HP color wizardry, and ample features.<<Executive Overview :(Previous) | (Next): Viewfinder>> Page 3:DesignReview First Posted: 3/26/2001 |
Design
Sporting a body design similar to that of a traditional 35mm film camera, Hewlett-Packard's PhotoSmart 912 offers the highest level of exposure control in the PhotoSmart line to date (March 2001). Its matte-black exterior is accented by brushed silver panels -- each covered with a myriad of clearly labeled control buttons and dials, effectively reducing reliance on the LCD monitor and its menu system.
Measuring 5.6 x 3.6 x 4.1 inches (143.5 x 90.5 x 105mm), the 912 is too large to store in a pocket or purse. In fact, based on the size and weight (19 ounces / 540 grams without batteries) we suggest investing in a small camera bag to provide additional protection and convenience. When you're actively shooting, the accompanying neck strap is styled to comfortably support a its bulk.
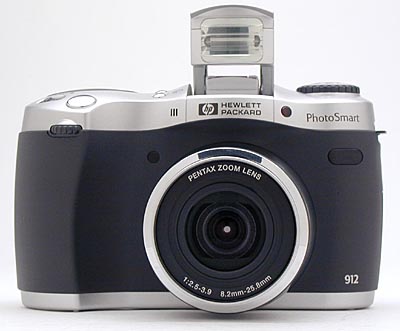
The high-quality Pentax 3x zoom lens dominates the front panel, sharing the space only with a Command wheel, microphone, IR Remote Control window, and JetSend infrared window. The 2.5-inch lens barrel features a notched, rubber finger grip that rotates right or left to control the optical zoom. Turning and holding it to the right after the optical zoom has reached the end of its range engages the 2x digital zoom. The entire front panel of the camera is covered with a black rubber-like coating that wraps around both ends of the camera. A large, curved hand grip provides a comfortable grasp on the right side, with sculpted finger rests on the front and back of the camera.
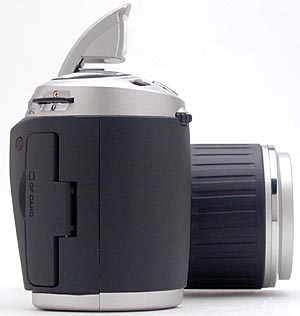
On the right side of the camera is the CompactFlash compartment, which is protected by a hinged, plastic door, with a wide opening that provides plenty of room to insert or remove the memory card. A small, red LED lamp just to the rear of the top of the compartment lights when the camera is accessing the card, letting you know that you shouldn't open the compartment or turn off the camera (when you're in a capture mode). A small gray button inside the compartment ejects the card when you're ready to remove it. Above the door is one neck strap attachment eyelet, which sits next to the AE Lock button on the top of the back panel.
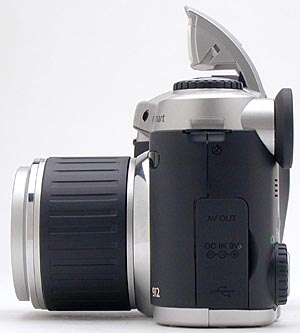
The connector compartment, which houses the USB, A/V out, and DC In jacks, is located on the left side of the camera. A flexible rubber flap covers the compartment, and is connected to the camera by a small rubber hinge. Though it appears to offer good protection for the jacks, the rubber cover can require a significant amount of manipulation to close again, as the corners are very difficult to pop back into place. We eventually got it closed, but it was a bit of a hassle until we got used to it. Above the connector compartment is the second neck strap attachment eyelet.
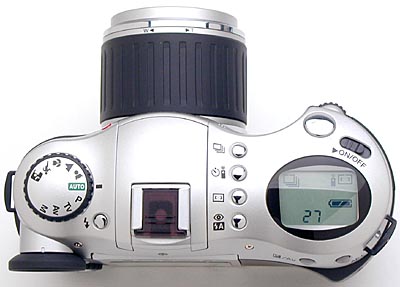
The contours of the 912's top panel are designed to provide maximum space for the many control buttons. The large Exposure Mode dial on the left offers 10 different exposure options, and includes a notched edge to facilitate turning. Directly to the right is the Pop-Up Flash button, which activates the Pop-up Flash. On top of the flash unit is an external flash hot shoe, which is protected by a small black plastic cover that could be a challenge to track down if separated from the camera. The shutter button, power switch, and status display panel are on the far right side, easily within reach of the right forefinger. The status display panel reports camera settings, such as file quality and size, autofocus area, flash mode, battery status, and remaining pictures, as well as various exposure settings. To the left of the status display is a series of small control buttons that are used to select the Image Type (shooting mode), Timer mode, Auto Focus Area, and Flash mode.
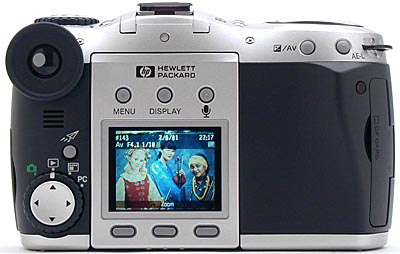
The remaining camera controls are on the 912's back panel, along with the optical viewfinder eyepiece and LCD monitor. The through-the-lens (TTL) optical viewfinder has a diopter adjustment dial, provided in the form of the plastic bezel surrounding the eyepiece. The bezel turns back and forth to adjust the focus for eyeglass wearers. A small plastic clip (not shown) is provided to shade the eyepiece when the camera is used on a tripod. (To prevent stray light entering the eyepiece from affecting the picture.) This clip is tiny and easily lost: We'd have greatly preferred some sort of on-camera shutter or other arrangement for shading the eyepiece when needed. Directly below the eyepiece are the Speaker, JetSend button, and four-way Arrow Rocker Pad, surrounded by the Camera Mode dial, which controls the camera's main operating modes. The two-inch LCD monitor sits on a panel that lifts up 90 degrees to provide a chest-level viewing angle. Three buttons along the top of the LCD monitor control the Menu, Display, and Sound options, while the three soft keys along the bottom of the LCD monitor change functions depending on the camera mode. The two remaining controls, on the top right side of the back panel, are the Exposure Compensation (AV) and AE Lock buttons.
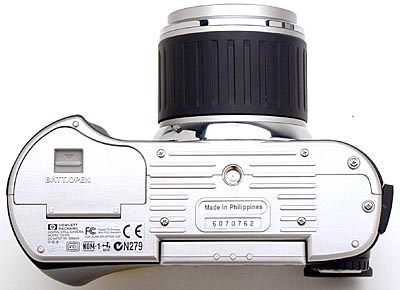
The 912 features a reasonably flat bottom, except for some light ridges surrounding the metal threaded tripod mount. Centered directly under the lens, the tripod mount is just a hair too close to the battery compartment to allow access to the batteries while the camera is mounted. The battery compartment is covered by a hinged, plastic door with a sliding lock button. Sliding the button backward allows the compartment door to snap open, while pushing the door closed again snaps the lock back into place. The battery compartment comes with an AA battery adapter inside, which can be popped out to accommodate the optional HP Li-Ion battery pack.
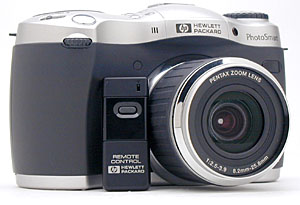
A tiny IR Remote Control unit is provided with the 912. About the size of a stick of gum, the Remote Control has only one button, which releases the shutter when the camera is in Remote Control or 3-Second Remote mode.
Reader Comments! --> Visit our discussion forum for the HP PhotoSmart 912!

Follow Imaging Resource: