Sony Cyber-shot DSC-R1Sony "breaks the mold" with a unique SLR/all-in-one hybrid design.<<User Interface :(Previous) | (Next): Image Storage and Interface>> Page 10:Camera Modes and MenusReview First Posted: 09/20/2005, Updated: 11/18/2005 |
Camera Modes and Menus
Still Capture Mode: Accessed by turning the camera on, this is the mode for all still-image capture operations. The Exposure Mode dial on the rear panel selects between Auto, Program AE, Aperture Priority, Shutter Priority, Manual, Twilight, Twilight Portrait, Landscape, and Portrait modes.
Playback Mode: The Playback button on the right side of the viewfinder eyepiece puts the camera into Playback mode, for image review.
Shooting Menu
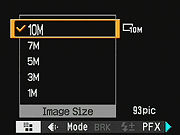 Image Size: Sets the pixel resolution of captured still images. Choices are (10M) 3,888 x 2,592; (7M) 3,264 x 2,176 3:2; (5M) 2,784 x 1,856; (3M) 2,160 x 1,440; and (1M) 1,296 x 864.
- Quality: Specifies the compression level of still images. Options are Fine and Standard.
- Record Mode: Enables the camera's RAW recording format. In RAW mode, the camera records a RAW data file in addition to the selected JPEG file. In Normal mode, only the JPEG file is recorded.
- Bracket Step: Sets the step size for Auto Exposure Bracketing mode. Choices are 0.3, 0.7, or 1.0 EV step sizes.
- Flash Level: Adjusts the flash exposure from -2 to +2 EV in 1/3-step increments.
- Picture Effects: Record images in Black and White or Sepia tones. An Off setting leaves the camera in normal record mode.
- Color: Sets the color mode to Adobe RGB, Vivid, or Standard.
- Saturation: Adjusts the color saturation in three steps.
- Contrast: Adjusts the contrast of the image, in three steps. You can also let the camera compensate for backlit and other difficult subjects automatically, via A.G.C.S. mode.
- Sharpness: Adjusts the in-camera sharpening, with options of "-", Normal, or "+".
- Setup: Displays the following Setup menu items:
- Camera 1
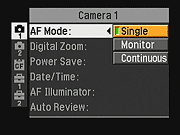 AF Mode: Sets the AF mode to Single, Monitor, or Continuous.
- Digital Zoom: Selects Smart or Precision digital zoom modes.
- Power Save: Specifies the length of time before the camera shuts itself off after inactivity. Choices are 20 seconds, or 1, 3, or 10 minutes. You can also turn Power Save off.
- Date/Time: Determines if the date and time overlays the captured image, and how it is displayed. (Day & Time, or Date only)
- AF Illuminator: Enables Auto control of the AF assist lamp or turns it off. In Auto mode, the lamp illuminates in dark shooting conditions to aid the autofocus system.
- Auto Review: If enabled, Auto Review mode automatically displays the captured image for about two seconds after capture.
- Camera 2
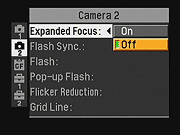 Expanded Focus: If activated, this setting enlarges the viewfinder image 2x when the focus is being adjusted manually, as an aid to determining correct focus.
- Flash Sync.: Sets the curtain sync for the built-in flash, and any external flash. Options are Rear (flash fires just before the shutter closes) and Front (flash fires at the beginning of the exposure).
- Flash: Select either internal or external flash.
- Pop-up Flash: Sets whether the flash automatically pops up based on the flash mode and available light, or whether it deploys immediately when the flash button is pressed. (When the flash is deployed manually, only forced-flash exposure options are available.)
- Flicker Reduction: Selects the fluorescent frequency for the flicker reduction (Framing) monitor mode. Choices are Auto, or 60Hz, or 50Hz.
- Grid Line: Enables or disables the viewfinder grid display.
- CF Card Tool
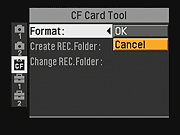 Format: Formats the CompactFlash card, erasing all files.
- Create REC Folder: Lets you set up new folders for recording images.
- Change REC Folder: Changes the folder for recording images.
- Memory Stick Tool
(Same menu items as for CF Card Tool above, menu changes depending on setting of the Memory Stick/CF switch on the back of the camera)- Format: Formats the Memory Stick, erasing all files.
- Create REC Folder: Lets you set up new folders for recording images.
- Change REC Folder: Changes the folder for recording images.
- Setup 1
 LCD Backlight: Sets the brightness of the LCD backlight to Bright, Normal, or Dark.
- EVF Backlight: As above, sets the backlight brightness for the EVF display to Bright, Normal, or Dark.
- Beep: Controls the camera's beep sound. "On" enables a beep with any camera adjustment, while "Shutter" sounds only when the shutter opens. You can also disable the sounds altogether.
- Zebra: Activates the "Zebra" display mode that appears with the histogram display. If on, an animated, striped pattern overlays overexposed portions of the image to assist in tuning the exposure.
- Language: Sets the camera's menu language. Options are Italian, French, Spanish, Chinese, Japanese, and English.
- Setup 2
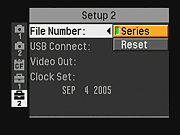 File Number: Specifies how the camera numbers files. Series continually numbers images, regardless of the media, while Reset begins a new series with each new memory card.
- USB Connect: Sets the USB mode to PictBridge, PTP, Mass Storage, or Auto (default setting).
- Video Out: Sets the video signal timing to NTSC or PAL.
- Clock Set: Sets the camera's internal clock and calendar.
- Camera 1
Playback Menu Options
The Playback menu offers three pages of options, all accessed by pressing the Menu button.
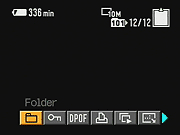 Folder: Selects the folder for image playback.
- Protect: Enables write-protection on the currently displayed image. (Note though, that write-protected images will still be erased if the card is reformatted.)
- DPOF Set: Sets up photos for DPOF (Digital Print Order Format) printing on a compatible standalone printer.
- Print: Directly prints DPOF or other selected images when the camera is connected to a printer.
- Slide Show: Initiates a slide show of photos on the memory card. You can set the interval (from three seconds to one minute per frame), folder, and repeat options.
- Resize: Lets you resize an image and save it as a separate file.
- Rotate: Lets you rotate an image counterclockwise or clockwise in 90-degree increments.
- Setup: Accesses the same Setup menu as above.
- Trimming: Lets you crop an image and save it as a separate file.

Follow Imaging Resource: