Back
to Full Minolta Dimage RD3000 Review
Back
to Full Minolta Dimage RD3000 ReviewGo to Minolta Dimage RD3000 Data Sheet
Go to Minolta Dimage RD3000 Pictures Page
Up to Imaging Resource Cameras Page
Use your browser's "Back" button to return to the previous page, or the links at the top and bottom of this page to navigate to related information. If you have difficulty fitting the text on this page onto your printer output, simply resize your browser window to a narrower width and print again.
Remember us when it's time to buy!
Dave here: Have our reviews been helpful to you? (Is this article you're reading right now useful?) Preparing this level of information on as many products as we do is incredibly hard work, not to mention expensive. Things on the Internet may look like they're free, but they're not. (As a lot of big dot.com companies are finding out these days.) Somewhere, somebody has to pay to produce worthwhile content. YOU can help us though, by remembering us when it comes time to make your purchase. Would you consider coming back to our site and clicking-through to one of our advertisers to make your purchase? Every dollar you spend with one of our advertisers helps us directly (in affiliate fees) or indirectly (the advertiser will keep renewing their ad contract with us). To make it easy for you to support us, here's a URL you can visit, to see all our current advertisers, with links to click on that will register your visit to them as having come from our site. It's up to you where you buy, but Mike, Mike, Kim, Yazmin, Marti and I would be really grateful if you'd help us out by choosing one of our advertisers to purchase from.
Thank you for your support!
Dave Etchells, Founder & Publisher
Visit our "Buy Now" Page:
https://www.imaging-resource.com/buynow.htm
Back
to Full Minolta Dimage RD3000 Review
Go to Minolta Dimage RD3000
Data Sheet
Go to Minolta Dimage RD3000
Pictures Page
Up to Imaging Resource Cameras
Page
Minolta Dimage RD3000Unusual 2-CCD design produces a professional-level SLR digicam at an affordable price. Review First Posted: 5/23/2000 |
|
 |
|
True SLR with through-the-lens viewfinder |
|
|
2.7 million effective pixels for 1984 x 1360 images | |
|
|
Removable lenses: Accepts most Vectis-mount lenses | |
|
|
Type II CF slot for Microdrive compatibility | |
|
|
ISO to 800, shutter speeds of 30 to 1/2000 seconds |
Design
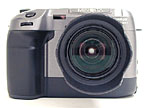
No doubt about it, the Minolta RD 3000
is a hefty piece of gear, but this larger size accommodates the camera's
internal prism system and its two 1/2 inch CCDs that work together to deliver an
approximately 2.7 megapixel final resolution. The RD 3000's actual dimensions
are 5.9 x 4.6 x 3.9 inches (150 x 117 x 101mm), and while the camera looks as
though it ought to be very heavy, it's actually lighter than you'd think at 32.1
ounces (910g). (We expected a lot more heft when we picked it up initially.)
With its accompanying neckstrap, we think that most users won't mind the larger
size, given the amount of exposure control, lens flexibility, and image quality
that it provides. Now let's take a look at the camera.![]()
![]()
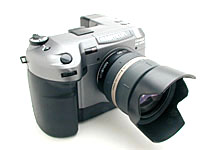
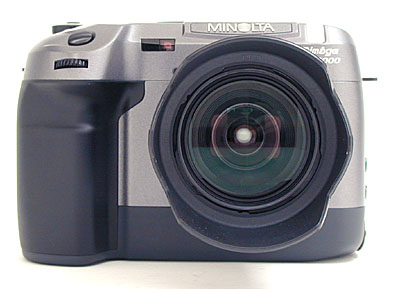
The front of the RD 3000
is very basic, featuring the Minolta V lens mount, lens release button, white
balance sensor, remote control sensor and self-timer light. While the basic
camera doesn't come with any lenses, the lens mount accepts most of the Vectis
lenses, according to Minolta. Our test model came with a Minolta 22 to 80mm
lenses, which we found very simple to remove and snap back into place. Other
packages include a variety of lens, bundled with the camera itself. To remove a
lens, hold down the lens release button and just turn the lens base until it
pops out, the same way most film-based SLR camera lens mounts operate. On the
right side of the camera front is the hand grip, whose only feature is a neck
strap eyelet. The front of the handgrip is coated in hard rubber, giving you a
very firm hold on the camera.![]()
![]()
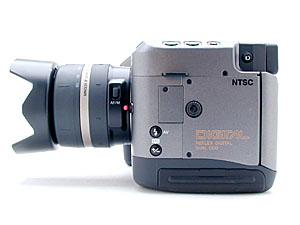
The left side of the RD
3000 holds a PC (flash sync) terminal, internal clock battery compartment,
manual fill flash button, exposure compensation button, dioptric adjustment
dial, video out terminal and SCSI connector. Our only minor complaint here is
with the soft rubber cover that protects the SCSI connector and video out
terminal. Since the cover isn't tethered to the camera in any way, it's easily
knocked out of place (in fact, we knocked it off several times during our
testing and were afraid we'd lose it).![]()
![]()
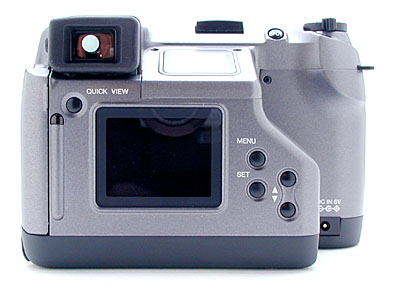
The back panel of the RD
3000 features the SLR optical viewfinder, LCD monitor, small information display
panel, CompactFlash slot and several control buttons (including the Menu, Set,
QuickView and up and down arrow buttons). The DC power jack is also on the back
panel, at the base of the handgrip.![]()
![]()
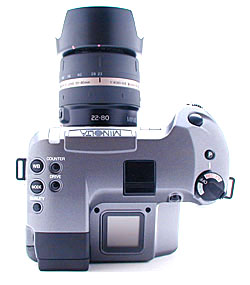
The majority of the
exposure controls are on the top panel of the camera, including the Drive, White
Balance, Mode, Quality, Counter and Spot buttons. There's also the Program
button, shutter button, small command dial, mode dial and the external flash
shoe, which is protected by a sliding plastic cover (this cover is also not
tethered to the camera but the fit is more secure than the SCSI cover and less
likely to slide out of place by mistake). A design feature that we really liked
is the lack of reliance on the LCD monitor. All of the exposure choices are
controlled by a combination of the buttons on the top panel and the small
command dial beneath the shutter button. The only LCD based menu is the Playback
menu, so you save a great deal of battery power.![]()
![]()
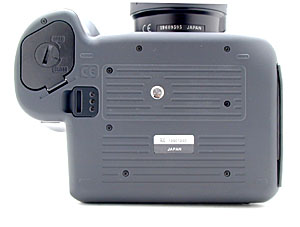
Finally, the RD 3000
features a nice, flat bottom that holds the battery compartment, another strap
eyelet and the metal tripod mount. The large amount of real estate on the bottom
means that the battery compartment is just far enough away from the tripod mount
to provide easy access for quick battery changes while on the tripod or attached
to a tripod mounting plate. The large flat bottom surface also makes for a very
stable tripod mount, helping to minimize camera shake during long exposures.![]()
While clearly not a pocket-sized
digicam, we found the RD 3000 quite comfortable to hold and operate. While the
ambient and flash exposure compensation adjustments were a little remote on the
lower left-hand side of the camera, most of the controls were readily
accessible. Some users could be intimidated by the number of buttons the user
interface presents you with, but in actuality the one button/one function design
makes for a very easy-to-operate camera. No fiddling around in multiple
sub-menus on the LCD screen: You pretty much just press a button and rotate the
command dial to select the desired setting.
Viewfinder
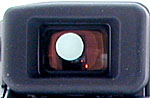
The RD 3000's prism system provides an SLR optical viewfinder,
which features a central autofocus target mark and a small LED display panel
which reports exposure settings like shutter speed and aperture, among other
information such as a focus indicator and flash signals. A dioptric adjustment
dial on the left side of the viewfinder accommodates eyeglass wearers, as does
its high eyepoint. Minolta estimates the optical viewfinder to be about 94 to
95 percent accurate in its frame coverage, although we found it to be more on
the order of 85-87 percent with the 22-80mm lens furnished with our test sample.
While not bad, we'd prefer to see a more accurate viewfinder on a professional
camera.![]()
The two inch, low temperature, polysilicon, color TFT LCD monitor is not available
as a viewfinder, but does provide a Quick View feature that lets you review
the previously captured image while remaining in Record mode. In fact, this
is the only use we could find in Record mode for the LCD monitor. In Playback
mode, the LCD lets you display either four or nine thumbnail images in an index
display. As noted earlier, we always appreciate cameras that allow you to change
exposure settings without resorting to an LCD based menu system. On the RD 3000,
the only LCD menu is the Playback menu.
 Optics
The RD 3000 is equipped with Minolta's V lens mount, which should fit most of
Minolta's Vectis lenses. Since the camera body doesn't come with a lens, an
entire range of lenses are available as accessories. Our test model was accompanied
by a Minolta V 22 to 80mm lens and sunshade. Like many film based SLRs, mounting
and releasing the lens was a snap, thanks to the small lens release button on
the side of the mount. The focus on our test lens was controlled either automatically
or manually, designated by a small button on the side of the lens. We assume
that the other Vectis lenses work similarly. You can also operate the manual
focus without taking the camera out of autofocus mode by halfway pressing the
shutter button and then manually adjusting the focus ring while keeping the
shutter button halfway pressed.![]()
While the CCD sensors in the camera are considerably smaller than a 35mm film
frame, the mirrors and prisms of the "reflex optics" used in the RD 3000's optical
path serve to reduce the effective difference, producing a final focal-length
multiplier of only 1.5x. (That is, lenses attached to the RD 3000 will produce
an angle of coverage equivalent to that of a lens having 1.5x the focal length,
attached to a 35mm camera.) Thus, the 22-80mm lens our evaluation unit was equipped
with corresponds to a 33-120mm lens on a conventional 35mm SLR. Available Vectis
lenses range from a 17mm wide angle (equivalent to a 25.5 mm wide angle on a
35mm camera) to an 80-240mm zoom (equivalent to a 120-360mm telephoto zoom on
a 35mm camera). This is a wonderful range of focal lengths compared to the miserly
3x zooms most of us in the "prosumer" digicam world have to content with, although
we would have liked to see a larger maximum lens aperture than the f/5.6 that
the 22-80mm lens on our evaluation unit had.![]()
As of this writing, Minolta sells the RD 3000 in three different configurations.
The most basic configuration is just the camera body by itself. This assumes
that you either already have compatible lenses, or that you want to purchase
specific lenses independently. The second configuration is the one we received
for testing, which consists of the camera body together with a V22-80mm lens,
a 64 MB CompactFlash memory card, and a set of NiMH batteries and charger. The
maximum configuration includes all this plus a 17mm wide-angle lens, an 80-240mm
telephoto lens, a 50mm macro lens, and a Minolta SF-1 flash. The total price
of the complete system with four lenses, batteries, charger, memory card and
flash unit is still less than any other professional SLR body alone, as of this
writing (May, 2000). (We can imagine this setup being an excellent digital "kit"
for a corporate setting, where enough versatility to accommodate a wide range
of possible requirements might be needed.)
Exposure
Shutter Lag / Cycle Times
When you
press the shutter release on a camera, there's usually a delay (lag time) before
the shutter actually fires. This is to allow the autofocus and autoexposure
mechanisms time to do their work, and can amount to a fairly long delay in some
situations. Since this number is almost never reported on, and can significantly
affect the picture taking experience, we now routinely measure it.![]()
Overall, the RD 3000 isn't the fastest
camera we've tested: With the provided lens, and shooting at fairly close range,
the shutter lag in full autofocus mode was 1.97 seconds. When the lens was
focused manually, the lag time dropped to 1.52 seconds, still far from speedy.
Only when the camera was prefocused by half-pressing the shutter button did the
time come up to par among digicams we've tested, with a delay of only 0.27
seconds. (Apparently, much of the shutter lag time is used for white balance and
exposure computation, since manual focusing didn't significantly improve the
delay.)![]()
Shot to shot, the RD
3000 is quite fast when left in the Continuous Drive mode, with a cycle time of
only 0.695 seconds (1.44 frames per second) when the shutter button is simply
held down for a burst of exposures. You can also shoot single frames in
Continuous Drive mode, simply by pressing and releasing the shutter when you
want to take the pictures. Working this way, the shot to shot time rises to only
0.92 seconds for up to five frames at full resolution. This is quite fast,
although after the fifth shot you have to wait for the first image to be cleared
out of buffer memory before you can shoot another. This process takes the same
amount of time as is normally required between shots in single-frame mode, 23 to
34 seconds depending on quality mode and image content. Actually, while its
non-continuous cycle time is rather slow, the RD 3000 does better than many
cameras in that it lets you shoot additional pictures in Continuous Drive mode
as soon as space is available in the buffer, rather than forcing you to wait
until everything is cleared out.![]()
The RD 3000 is quite fast when starting up, taking only 3.9
seconds from power on to the first picture captured. Likewise, it switches from
playback to record modes in only 3.0 seconds to the first picture. Switching to
playback from record mode takes longer, about 6.75 seconds until a rather blocky
low-resolution version of the image is displayed, 12 seconds for the
full-resolution image to appear. Shutdown can be either zero seconds or several
minutes, depending on your reckoning. If your main concern is to simply put the
camera away, the time required is zero, since there's no lens to retract. On the
other hand, if you want to shut the camera down so you can remove the memory
card, you could wait as long as two minute, if you've just shot a rapid-fire
sequence of images in Continuous Drive mode.
User Interface and Control Enumeration![]()
We found the RD 3000's user
interface very straightforward and quick to understand. With all the exposure
settings controlled by various buttons and command dials, there is no reliance
on an LCD menu system. All of the controls are spread out around the camera
body, so one-handed operation isn't possible (not to mention the camera's larger
size), but operation is exceptionally clear once you learn what the buttons do.
Some of the buttons serve multiple purposes, but a quick read of the manual
should clear up any questions. The only really obscure function is the process
by which you change the ISO setting. This requires you to push both the Exposure
Compensation and Spot buttons simultaneously, while rotating the command dial.
Once learned, this isn't at all difficult, but remembering the combination was
enough of a challenge to send us back to the manual several times. Playback is
the only mode that requires the LCD and features a small menu of playback
options.![]()
Control
Enumeration![]()
![]()
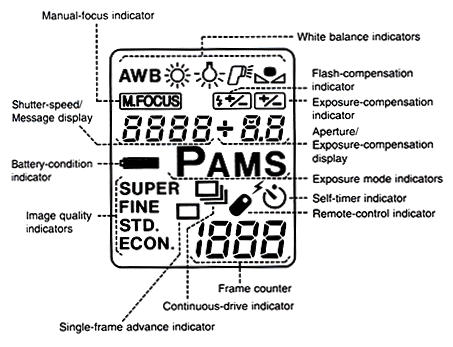
Status Display
Readout (above): As noted throughout this review, most of the user
interaction with the RD 3000 is governed by the LCD status readout on the top of
the camera. The image above (courtesy Minolta) shows all the data displayed on
this readout. We won't bother repeating the information already shown in the
callouts above, but the bottom line is it makes it very easy to set virtually
any option on the camera, never requiring the power-hungry color LCD screen on
the back of the camera for routine exposure control.![]()

Shutter Button: Located on the top right of the
camera, this button sets focus and exposure when halfway pressed and fires the
shutter when fully pressed. Halfway pressing the shutter button while turning
the manual focus ring on the lens allows you to manually focus the image without
explicitly taking the camera out of autofocus mode.![]()

Command Dial: Located just beneath the shutter
button, this dial selects various camera settings when turned in combination
with the exposure buttons. For example, when the Exposure Compensation button is
pressed and the command dial turned, you can adjust the exposure compensation
from +3 to -3 in 1/2 EV increments. In Aperture and Shutter Priority exposure
modes, turning the command dial adjusts either exposure variable. In Manual
exposure mode, turning the command dial alone adjusts the shutter speed and
turning the command dial while pressing the Manual Fill Flash button adjusts the
aperture setting.![]()
![]()
Program Reset
Button: Located on the top right side of the camera, this button returns the
exposure mode to Program when set to Manual, Aperture Priority or Shutter
Priority modes. Once pressed, this puts the camera in Program exposure mode,
sets the focus and white balance to Auto, returns the drive to single shooting,
deactivates the self-timer and sets the exposure and flash compensation at 0.0
EV.![]()
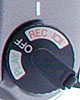
Mode Dial: Located
just beside the Program Reset button, this locking dial controls the camera's
power and operating mode with the following positions:
![]()
Spot
Button: Located to the left of the mode dial, this button activates the spot
metering mode, which bases the exposure on the very center of the image frame.
When an external flash is connected in either Program or Aperture Priority
modes, pressing the Spot button with the shutter button activates the Slow Sync
flash mode which uses a slow shutter speed with the flash to capture more
ambient light. Holding the Spot and Exposure Compensation buttons down together
while turning the command dial adjusts the camera's ISO value to either 200 or
800.![]()

Counter Button:
Located on the top left of the camera, this button displays the amount of
remaining CompactFlash space when pressed in Record mode.![]()

White Balance Button: Located to the left of the
Counter button, pressing this button while turning the command dial sets the
camera's white balance to Auto, Daylight, Tungsten, Flash or Custom.![]()

Mode Button: Located beneath the White
Balance button, pressing this button while turning the command dial lets you
select from among the following exposure modes:

Drive
Button: Located to the right of the Mode button, pressing this button while
turning the command dial selects from among the following camera drive
modes:

Quality
Button: Located on the top left of the camera beneath the Mode button,
pressing this button while turning the mode dial sets the image quality to
either Super (TIFF), Fine, Normal or Economy.![]()

Diopter Adjustment Dial: Located on the left side of the
optical viewfinder, this dial adjusts the viewfinder to accommodate eyeglass
wearers.![]()
![]()
Manual Fill Flash Button:
Located on the lower left side of the camera, pressing this button in record
mode with an automatic flash unit attached to the accessory shoe forces the
flash to fire ("fill flash"). Pressed in conjunction with the Exposure
Compensation button while turning the command dial sets the flash compensation
from +3 to -3 in 1/2 EV increments. In Manual exposure mode, pressing this
button while turning the command dial sets the aperture value.![]()
![]()
Exposure Compensation Button: Located just below
the Manual Fill Flash button, pressing this button while turning the command
dial sets the exposure compensation from +3 to -3 EV in 1/2 EV increments. When
pressed with the Manual Fill Flash button while turning the mode dial, this
button adjusts the flash compensation level from +3 to -3 EV in 1/2 EV
increments. Pressing the Exposure Compensation and Spot buttons in conjunction
while turning the command dial sets the camera's ISO values to 200 or 800.![]()

Lens Release Button: Located on the front
of the camera, on the side of the lens, this button releases the lens for quick
removal.![]()
![]()
Quick View Button:
Located on the camera's back panel, to the left of the LCD monitor, this button
provides an eight second review of the previously captured image on the LCD
monitor.![]()

Menu Button: Located on
the right side of the LCD monitor, this button pulls up the Playback settings
menu in Playback mode.![]()

Set Button:
Located just beneath the Menu button, this button confirms menu selections in
the Playback menu. When the Playback menu is dismissed, pressing the Set button
alternates between single image and index display mode.![]()

Up and Down Arrow Buttons: Located on the right
side of the Menu and Set buttons, these buttons navigate through captured images
and through the Playback menu.
Camera Modes and Menus![]()
Record Mode: Accessed by turning
the mode dial to the Record position (either 1 or 2), this mode sets up the
camera to record images in one of four exposure modes. The secondary Record
position does the same but also enables an automatic Quick View feature which
displays the just-captured image on the LCD monitor for eight seconds, as soon
as it has been saved to the memory card. The following exposure modes are
available in both Record modes:
Playback Mode: Accessed by turning the mode dial to the Play position, this mode allows you to review captured images. Pressing the Menu button calls up the following settings menu:
 cumbersome external terminator.
 Image Storage and Interface
The RD 3000 utilizes
CompactFlash cards for image storage, which come in a variety of sizes from
eight to 64MB. The card slot accommodates Type II CompactFlash cards, which
means the RD 3000 can handle not only larger semiconductor-based cards, but
IBM's 340 megabyte Microdrive as well. The Microdrive makes it practical to used
the camera's uncompressed TIFF "super fine" format if you wish, allowing 44
images per card. Of course, the fine-quality JPEG option really introduces very
little in the way of artifacts, and gives the Microdrive a capacity of
approximately 217 images, a very healthy number.![]()
A small light next to the card slot indicates whether or
not the card is in use. The caution is to not open the slot when the light is on
because the camera is writing to the card. Individual images can be write
protected through the Playback menu, which protects them from accidental
deletion (except from card formatting). All images are saved at 1984 x 1360
resolution with Super (TIFF), Fine, Normal and Economy quality settings. The
Counter button on top of the camera lets you know how much space is available on
the CompactFlash card when pressed in record mode. As we noted earlier, we
really like that the camera displays remaining capacity in megabytes, as well as
images remaining at the currently selected quality setting. Additionally,
through the Playback settings menu, you can see all the card's information
(total amount of space on the card, amount of space remaining, number of
recorded frames and the number of available frames for each quality setting).
This is particularly useful for gauging your shooting.![]()
Following are the compression ratios for
each quality setting and the number of possible images for a 64MB card:![]()
|
(64 MB card) |
| |
|
|
Compression | |
| Uncompressed Quality |
|
|
| Fine Quality |
|
|
| Normal Quality |
|
|
| Economy Quality |
|
|
 The RD
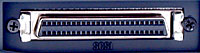
3000 can interface to a host computer via a SCSI-II interface, and a SCSI cable
is included in the box with the camera. The provided Digital Desktop software package provides a user
interface through which you can download images and control the camera. We
measured transfer times for a 7.9 megabyte image file of 23.8 seconds,
a data transfer rate of 333.67 kilobytes per second. This is quite fast for a
digital camera, but slower than we expected for a SCSI interface. (Some USB-interfaced
cameras are faster.) Overall, unless you have a compelling need to actually control the
camera from the host computer, we strongly recommend that you simply purchase a
USB or parallel-port card reader, and download images directly from the card, rather
than via the camera's SCSI interface.
The RD
3000 can interface to a host computer via a SCSI-II interface, and a SCSI cable
is included in the box with the camera. The provided Digital Desktop software package provides a user
interface through which you can download images and control the camera. We
measured transfer times for a 7.9 megabyte image file of 23.8 seconds,
a data transfer rate of 333.67 kilobytes per second. This is quite fast for a
digital camera, but slower than we expected for a SCSI interface. (Some USB-interfaced
cameras are faster.) Overall, unless you have a compelling need to actually control the
camera from the host computer, we strongly recommend that you simply purchase a
USB or parallel-port card reader, and download images directly from the card, rather
than via the camera's SCSI interface.
Video Out
 US models of the RD 3000 are compliant with the NTSC video
format (we assume European models are set up for PAL). By connecting to a television
set, you can review captured images or record them to video tape. The camera's
LCD panel automatically turns off once connected to the television.
US models of the RD 3000 are compliant with the NTSC video
format (we assume European models are set up for PAL). By connecting to a television
set, you can review captured images or record them to video tape. The camera's
LCD panel automatically turns off once connected to the television.
Power
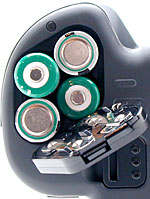 The RD 3000 utilizes four standard AA Ni-MH or Ni-Cd batteries
for power. Although the LCD monitor is barely used in Record mode, the RD 3000
goes through batteries pretty quickly under continuous shooting conditions.
(On the other hand, the camera's power consumption when turned on but not being
actively used for picture-taking is virtually nil: You can leave it powered-up
for hours with no fear of draining your batteries. Overall though, we definitely
suggest keeping a couple freshly charged sets of spares around for those times
when the AC adapter is inconvenient. A small battery power indicator is displayed
in the status display panel briefly when the camera is powered up, letting you
know approximately how much power is left. Additionally, the internal clock
uses a CR2025 3V lithium battery. The AC adapter is supplied with the camera,
but the battery charger and rechargeable batteries are sold as accessories (and
are included in some "bundles" with the camera).
The RD 3000 utilizes four standard AA Ni-MH or Ni-Cd batteries
for power. Although the LCD monitor is barely used in Record mode, the RD 3000
goes through batteries pretty quickly under continuous shooting conditions.
(On the other hand, the camera's power consumption when turned on but not being
actively used for picture-taking is virtually nil: You can leave it powered-up
for hours with no fear of draining your batteries. Overall though, we definitely
suggest keeping a couple freshly charged sets of spares around for those times
when the AC adapter is inconvenient. A small battery power indicator is displayed
in the status display panel briefly when the camera is powered up, letting you
know approximately how much power is left. Additionally, the internal clock
uses a CR2025 3V lithium battery. The AC adapter is supplied with the camera,
but the battery charger and rechargeable batteries are sold as accessories (and
are included in some "bundles" with the camera).
Included Software
| |
|
|
As noted above, the RD 3000 features a SCSI interface for connecting to a computer.
An accompanying software CD holds the Digita Desktop software package, provided
in English, French and German and compatible with Windows 95, 98 and NT 4.0
and Macintosh OS 7.6.1 to 8.6. The Digita Desktop allows you to download images
from the camera and organize them into folders and groups which can be played
back in a slideshow format. There's also a nice sprinkling of correction tools
that allow you to crop, lighten, rotate, etc. A variety of filters are available
separately, to give you more creative options for manipulating your images.
Test Results
In keeping with our standard
policy, our comments here are rather condensed, summarizing our key findings:
For a full commentary on each of the test images, see the RD 3000's "pictures" page.
As with all
Imaging Resource camera tests, we encourage you to let your own eyes be the
judge of how well the devices performed: Explore the images on the pictures page, to see how well the RD 3000
performed, and how its images compare to other cameras you may be considering
buying.
We found the RD 3000 to be a very interesting camera: It clearly
isn't a camera aimed at the casual shooter, but rather at the professional
photographer, and probably one doing studio work. As such, some of its
characteristics are different from what you might find on a consumer-oriented
product. The most salient of these is probably its color handling, which some
viewers will find to be undersaturated. On an objective scale, the color is in
fact undersaturated, but that may be a benefit in many situations: In
particular, the RD 3000 produced beautiful skin tones, with none of the
"hotness" many consumer digicams (and even high-end professional SLRs) tend to
produce: We could see the RD 3000 making an excellent camera for studio
portraits. Saturation adjustments in the computer using Photoshop(tm) can
significantly compensate for the lower overall saturation of the images in those
situations where you want the brighter color. By contrast, the problem of
over-saturation is not so easily dealt with, as detail is lost in high-contrast,
high-saturation subjects that can't be recovered once it's gone. Overall,
accurate color is the ultimate objective, but we'd generally take
under-saturation rather than over-saturation any day, if we had to
choose.
Where the RD 3000 really shone is in its unusually low image
noise, excellent shadow detail, and overall tonal range. We were consistently
impressed with the clean shadows in our test shots, and the amount of detail
preserved there. Resolution was also very good, and the camera is almost
entirely free of colored artifacts in areas of high spatial frequency and
detail. (Thanks to its two-chip CCD design.) We called the RD-3000's resolution
at about 750-800 lines per picture height in the horizontal direction, and 700
lines per picture height in the vertical direction. At in areas of very fine
parallel lines, we saw a slight checkerboard pattern, probably an effect of the
interpolation scheme used. This only appeared in our resolution test shots
though, and not in any of our "real" test subjects.
The RD-3000 did
exceptionally well in our low-light tests, in fact turning in about the best
performance to date (Mid-May, 2000) of any camera we've tested, including even
the Nikon D1 professional SLR. Color balance and noise were exceptionally good
all the way down to the lowest limits of our testing, a light level of only 1/16
of a foot-candle. (For comparison, typical city night scenes have about 1
foot-candle of illumination.)
Minolta's spec sheet for the camera rates
the through-the-lens "SLR" viewfinder of the RD 3000 at about 95% accuracy, but
we didn't find it to be that accurate, at least with the lens we had on our test
unit: Our own measurements showed about 85% frame coverage at wide angle, and
87% at telephoto. Not bad, but we'd like to see better, particularly on a
high-end SLR like the RD-3000.
Macro performance will be entirely
dependent on the lens you use with the camera, and the 22-80mm zoom we had with
our test unit didn't focus all that close. The minimum coverage area it could
achieve was only 5.95 x 4.08 inches (151.18 x 103.63 mm), not terribly
impressive by today's standards. On the other hand though, Minolta does sell a
purpose-built 50mm macro lens in its Vectis line that would undoubtedly do much
better.
At the bottom line, the RD 3000 offers detailed images with
exceptional tonal range and noise performance, albeit with somewhat muted color
saturation. Photographers opinions of it will probably depend a lot on their
approach to color: Fuji Velvia shooters (a very highly saturated transparency
film) will probably dislike its color. On the other hand, the significant body
of photographers generally fed up with todays infatuation with hyper-saturation
will probably breathe a sigh of relief, and buy it for its excellent tonal range
and understated color handling. Not a camera for everyone, but if you appreciate
a wide tonal range and subtle color, you'll find a lot to
like!
Conclusion
Given its bulk,
feature set and price, the RD 3000 clearly isn't a camera intended for the
casual picture-snapper. On the other hand, its options for interchangeable
lenses, excellent tonal range, and understated color handling make it well
suited for professional use, particularly for portraiture or other situations
where smooth skin tones, good shadow detail and low image noise are important.
Full manual exposure control, a very clean user interface (thanks to all those
buttons), and dual flash connections lend versatility that we think many serious
users will appreciate.
<<Dimage RD3000 Sample Images | Additional Resources and Other Links>>
Reader Comments!
Questions, comments or controversy on this product? Click
this link to see what other Imaging Resource readers have had to say about
the Minolta Dimage RD3000, or add comments of your own!