HP R927 Operation
Camera Operation
With only a handful of external camera controls and a well-organized LCD menu system, the Photosmart R927's user interface is straightforward and easy to grasp. The R927's efficiently laid out LCD menu system is easy to understand and relatively quick to navigate. Given the camera's straightforward setup and user-friendly design, most users should be able to operate the camera right out of the box, referring to the manual only for more complex operations.
Record Mode Display
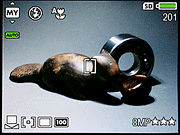 In record mode, the R927 displays an information overlay on the LCD screen which cannot be disabled. Information shown includes exposure mode (except in Auto mode), capture menu settings (if not default, including white balance, metering mode, ISO sensitivity, Adaptive Lighting function, color mode, saturation, contrast, sharpness, exposure bracketing, and date / time imprinting), exposure compensation (if a compensation adjustment has been made), image size and quality setting, flash status (except in Auto flash mode), burst mode, self timer, macro mode, manual focus, infinity focus, number of shots remaining on the memory card or internal memory, battery life remaining, and a set of focusing brackets. Aperture and shutter speed are reported when the Shutter button is halfway pressed. In Aperture Priority, Shutter Priority and Manual exposure modes, the currently selected aperture and shutter speed are always displayed. A live exposure meter is also shown in Manual exposure mode.
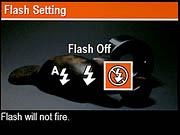 The dedicated flash button provides quick access to flash mode settings, which are Auto, On and Off. Slow flash synchronization is automatically enabled using one of the two Night scene modes, as well as in Shutter Priority and Manual exposure modes. There is no need for a red-eye reduction flash mode, as the R927 can remove red-eye from the image during processing.
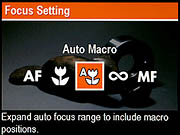 The focus button is similar, providing quick access to normal AF, Macro, Automatic Macro, Infinity and Manual Focus modes. Auto Macro expands the AF range to include macro distances, which can increase focusing time. In Manual Focus mode, the LCD screen displays an unmarked scale from macro to infinity with over 100 steps of adjustment, and the center of the screen is magnified to assist in determining critical focus.
 When the lens is at full telephoto and digital zoom is enabled, pressing the top-right side of the zoom controller invokes a frame indicating where the image will be cropped for digital zoom. The size of the image (in megapixels) bounded by the crop frame is also displayed. Maximum digital zoom is 8x and the crop can be as small as 0.1MP. The R927 does not have an interpolated digital zoom mode.
Playback Mode Display
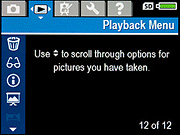
 In playback mode, the R927 displays the current image, a battery gauge, and an indication of the current image number and how many images are on the flash card or internal memory. A limited information display can be called up through the playback menu. For still images, this offers a display of the capture menu settings (if not default, including white balance, metering mode, ISO sensitivity, Adaptive Lighting function, color mode, saturation, contrast, sharpness, exposure bracketing and date / time imprinting), shutter speed, aperture, exposure compensation (if a compensation adjustment has been made), ISO sensitivity (duplicating the previous ISO icon if ISO was set manually), image file name, file size, macro mode, flash mode, image size and quality, and date. For movie files, the information display includes file name, file size, date, and clip length.
HP R927 Modes and Menus
Record Mode: This mode is accessed simply by turning the camera one. In Record mode, the camera can capture still images or videos with sound, with five groups of options (Capture, Playback, Design Gallery Menu, Setup and Help) available through the Record mode settings menu. The groups are arranged with a "tabbed" layout, allowing you to access Capture Menu, Playback Menu, Design Gallery Menu, Setup Menu or Help Menu items in any camera mode by paging between tabs. Options can either be cycled through on the menu screen with the left / right arrow buttons, or the OK button can be pressed to bring up a screen describing the specific option and allowing it to be altered, and all Capture Menu options also offer a Help screen describing them in more detail:
Playback Mode: This mode allows you to review captured images on the memory card, erase them, protect them, set them up for printing, etc. Pressing the Menu button in Playback mode displays the following options, and the other four menu groups (Capture, Design Gallery, Setup and Help) can be accessed via their own tabs.
Record Menu System: Accessed by pressing the Menu button in any record mode (some options are not available in all modes). Menus are tabbed across the top of the screen.
Capture Menu
 Shooting Mode: Lets you choose between 17 shooting modes: Auto, Landscape, Portrait, Theatre, Panorama (l.-r.), Panorama (r.-l.), Action, Night Portrait, Night Scenery, Beach, Snow, Sunset, Document, Aperture Priority, Shutter Priority, Manual, and My Mode. (Note: Subsequent Capture Menu screen shots were taken in My Mode. My Mode lets you save your own preferred settings for quick recall, and the R927 can be programmed to start-up in My Mode by default if so desired. All menu options are identical to the standard Capture Menu with the addition of My Mode Saved Settings and My Mode Help.)
 Self-Timer: Sets camera to take 1 or 2 time-delayed pictures.
- Red -Eye Removal: Automatically removes red eyes from images as they're taken.
- Exposure Compensation: Allows the exposure compensation to be adjusted from -3 to +3 exposure equivalents (EV) in 1/3 EV steps.
- Adaptive Lighting: Turns on or off Adaptive Lighting feature which automatically brightens dark areas of images. Settings are Low, High, and Off.
- Bracketing: Enables or disables the camera's automatic bracketing features, which captures three images with varying modifications . All three images are captured sequentially with a single press of the shutter button, and the LCD monitor remains blacked out from when the first shot is captured, until the last shot has been captured. With Adaptive Lighting Bracketing engaged, the camera takes three shots with differing ALT levels: off, low, and high. With Exposure Bracketing engaged, the camera takes three pictures with varying EV Compensation by 0.3 stops in each direction. With Color bracketing engaged, the camera takes three pictures in full color, B&W, and Sepia.
 Image Quality: Sets resolution and compression to manage file size needs. Settings are 8MP*** (Best), Normal (8MP**), 5MP **, 2MP**, VGA** and Custom.
- Video Quality: Sets resolution and frame rate to manage file size needs. Settings are Normal (VGA***), VGA**, QVGA*.
- Burst: Turns the burst mode on or off.
- White Balance: Adjusts the overall color balance of the scene. Options include Auto, Sun, Shade, Tungsten, Fluorescent, or Manual. The Manual white balance setting allows you to calibrate the white balance manually from a known white or neutral subject.
- Autofocus area: Sets the AF to Multi-Zone or Spot-zone modes.
- AE Metering: Specifies the metering system to use. Options include Average, Center-Weighted or Spot.
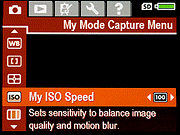 ISO Speed: Sets the camera's sensitivity to Auto, 100, 200 or 400 ISO equivalents.
- Saturation: Controls the level of image saturation, with choices of Low, Medium or High.
- Sharpness: Adjusts the in-camera image sharpening, with choices of Low, Medium or High.
- Contrast: Controls the level of image contrast, with choices of Low, Medium or High.
- Date & Time Imprint: As well as the date and time information that is always stored in the EXIF header of images, the R927 can also permanently record this information on the image itself, similarly to how 35mm point-and-shoot cameras can. This menu option allows you to opt to record the date and time information on the image if desired, with menu options being Off, Date Only, or Date & Time.
Playback Menu
 Delete: Delete one or more images.
- Image Advice: Analyzes an image and offers suggestions on how to improve future shots.
- Image Info: Lets you view image settings and properties.
- View Slideshow: Lets you play an automatic slideshow of images on the camera.
- Stitch Panorama: Lets you stitch panoramic segments together.
- Record Audio: Lets you attach an audio clip to an image.
- Move Images to Card: Lets you copy images from internal memory to flash memory card and vice versa.
Design Gallery Menu
 Apply Artistic Effects: Lets you apply a variety of artistic effects to captured images. The process is simple -- scroll through to an image you'd like to modify, hit the menu button and then toggle over to the Design Galley Menu. Move down to Apply Artistic Effects and hit ok and after a few seconds you'll be presented with 13 effects to choose from - Ink Dots, Cartoon, Watercolor, Center Focus, Posterize, Retro, Soft Glow, Vintage, Slimming, Sky Color, Ground Color, Kaleidoscope and Solarize.
- Modify Color: Lets you apply a variety of colors to captured images. The process is similar to Apply Artistic Effects and choices include: Black & White, Sepia, B&W Tints, Color Tints.
- Add Borders: Lets you apply a variety of borders to captured images. Choices include: Soft Edge, Inset Border, Torn Edge, Burned Edge, Spatter, Oval, Circle, Rectangle, Rounded Rectangle, Square.
- Remove Red Eyes: Will automatically correct red-eye captured images taken with a flash.
- Rotate: Will let you change the orientation of captured images.
- Crop: Lets you select and save parts of a captured images as a new file.
Setup Menu
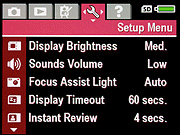 Display Brightness: Offers a three-step adjustment to the LCD brightness, trading off battery life for a more visible LCD display in bright ambient lighting conditions. Choices are Low, Medium, or High.
- Sounds Volume: Adjusts the volume of camera sounds, with options including High, Low or Off.
- Focus Assist Light: Enables or disables the bright orange focus assist LED located on the front of the camera. Options are Auto, which allows the camera to use the focus assist lamp when necessary, or Off, which prevents the focus assist lamp being used.
- Display Timeout: Automatically turns the display off to save on battery life at set intervals of 15 seconds, 30 seconds, 45 seconds, 60 seconds, and Never.
- Instant Review: Displays image on LCD after capture at set intervals of 1 second, 2 seconds, and 4 seconds, and Off.
- Digital Zoom: Enables and disables digital zoom.
 Date & Time: Sets the camera's internal calendar and clock.
- USB: Selects whether the camera should appear as a PTP imaging device or use the MSDC protocol to appear as a disk drive when connected to a computer via USB. Options are Digital Camera (PTP) or Disk Drive (MSDC).
- TV Configuration: Selects the video signal timing as either NTSC or PAL.
- Language: Changes the menu language to English, German, Spanish, French, Italian, Dutch, Portuguese, Swedish, Norwegian, Danish, Finnish, or Russian.
- Reset Settings: Resets some or all camera settings to those initially set at the factory. A subsequent Reset Menu offers a choice of Cancel or Yes (all settings except for Date & Time, Language, TV Configuration and USB Configuration are restored to defaults).
Help Menu
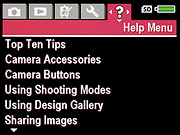 Top Ten Tips: Ten common tips to help you get the most from the camera.
- Camera Accessories: Describes available accessories for the Photosmart R927, what they do, and how to obtain them.
- Camera Buttons: Describes the function of every button on the camera. For some buttons, a full description of functionality is given; for others, a brief description is given and the user is referred to the manual for more details.
- Using Shooting Modes: Describes the various capture modes available on the camera, what they do, and when they should be used.
- Using Design Gallery: Describes the various artistic effects available on the camera, what they do, and when they should be used.
 Sharing Images: Describes how to setup and use the HP Photosmart Express function.
- Printing Images: Describes how to print images by directly connecting the camera to a PictBridge or compatible Photosmart printer.
- Recording Audio Clips: Describes how to record an audio clip or voice memo to be attached to an existing still image.
- Recording Video Clips: Describes how to record a video clip on the R927.
- Reviewing Images and Video: Describes how to view images and video clips that have been captured and are stored on the camera.
- Extracting Prints from Video: Describes how to select a single scene from video footage on the camera and save the image for sharing or printing.
 Deleting Images: Describes how to delete images and video clips from the camera, how to format the camera's internal memory or flash card, and how to undelete the last image (or group of panoramic images).
- Transferring Images: Describes how to transfer images from the camera to a desktop computer over the USB connection.
- Managing Batteries: Describes how to select, install, remove, and check on the camera's battery, and strategies for extending battery life.
- Getting Assistance: Describes where to go to obtain further assistance on using the camera.
- Camera Shortcuts: Describes some shortcuts that help make the camera easier to use.
- About...: Displays model, firmware version, bootloader version and serial number.
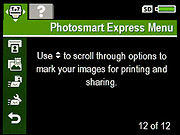
Photosmart Express Menu (Accessed through the Photosmart Express Button on top of the camera):
 Print: Marks image(s) for printing.
- Buy Prints Online: Marks image(s) to print using an online printing service.
- Share All Images: Manages marking all images to print or to send to a destination.
- Share Menu Setup: Adds new custom destination to the menu.
 Fujifilm GFX 50S Review
 Fujifilm X-T3 Review
 Olympus E-M5 III Review

Follow Imaging Resource