Canon PowerShot S110Canon updates their Digital ELPH with improved color, movie capture, and direct print capabilities!<<Executive Overview :(Previous) | (Next): Viewfinder>> Page 3:DesignReview First Posted: 5/24/2001 |
Design
The Canon PowerShot S110 has a very slick, high-tech design that is sure to draw attention -- especially for its small size and elegant style. The all-stainless steel body measures only 3.4 x 2.4 x 1.1 inches (87 x 57 x 26.9 mm) and weighs about 8 ounces with the battery and CompactFlash card installed. It has a brushed silver finish on all sides, accented by a wide band of etched hairlines encircling the retractable lens, and a polished silver tab that extends around the right side of the camera body onto the front panel. Canon has designed it in such a way that you can hang it from your neck as flashy *digital wear* or carry it around your wrist with the supplied nylon strap. It is also perfectly suited for carrying in a small pocket, fanny pack, or purse.
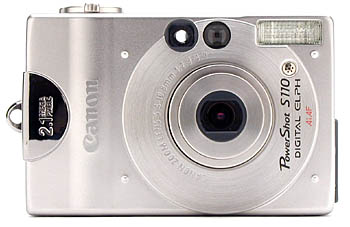
The retractable 2x zoom, 5.4-10.8mm lens (equivalent to a 35-70mm lens on a 35mm camera) is the focal point of the front panel, measuring about one-half inch when fully extended in the Shooting mode. Above the lens is a small viewfinder window and built-in flash, separated by a multipurpose lamp that serves as the autofocus assist light (to aid focusing in low-light situations), red-eye reduction lamp, and self-timer countdown indicator. Directly below the flash is a small microphone for recording audio clips with QuickTime movies. A slightly raised edge, with a silver Canon logo, runs vertically along the right side of the front panel, stratigically placed to serve as a finger grip.
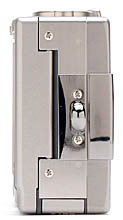
The right side of the camera has a large wrist strap attachment eyelet in the center, and a hinged plastic door that covers the CompactFlash memory slot compartment. The CompactFlash door opens by pushing down on the sliding CF Open button on the back.panel. We found it opens best by laying the camera face down while you slide the button, so the door swings open freely as soon as the latch is released. Of all the parts on the camera, this plastic door seemed most fragile, but the hinge is long enough (more than an inch) that it should be reliable.

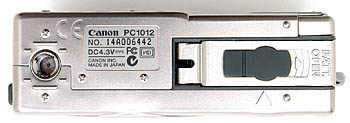
The left side of the camera houses the Digital / Audio / Video Out Terminal, which is protected by a very small, hinged rubber flap. Unlike most terminals we've seen, this one has only one port available for use with all three available connectors. The AV Cable (supplied with the camera) fans out to standard audio / video plugs for connecting to a TV or video player, and Canon's dedicated digital connector for the camera port. The USB interface cable (also supplied with the camera) has a standard USB connector on the computer end, and a dedicated digital connector for the camera. A third cable, supplied with the CP-10 Card Photo Printer when purchased separately, provides a direct interface between the camera and the printer so you can make instant credit card size prints from your images.
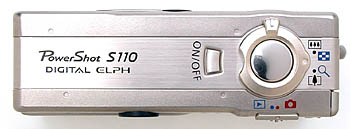
The S110's top panel has several controls clustered around the shutter button, including a Zoom lever ring that completely surrounds it. On the front of the Zoom ring, a large notched protrusion serves as the lever, which pushes toward the left side of the camera for a wide-angle zoom and pulls to the right side for telephoto. A marker, set at a 90-degree angle to the Zoom lever, indicates which direction you're zooming when you push or pull on the lever. In addition to operating the optical zoom, the Zoom lever also accesses the nine-image Index display in Playback mode (at the wide-angle position) and the 2x enlargement of an individual image display (at the telephoto position). To the left of the shutter button is the camera's On / Off button, which must be held down until you hear a beep to successfully power up the camera, and just behind the Shutter button, along the back edge of the camera, is a Mode switch for placing the camera in Record (left) or Playback (right) modes.
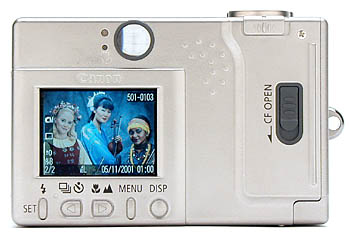
The remaining camera controls are on the back panel, along with the LCD monitor and optical viewfinder eyepiece. The 1.5-inch monitor is set in the lower left corner, with the optical viewfinder above and the sliding CompactFlash (CF) Open button on the right. The Mode selector switch sits in the top right corner of the back panel, though its setting icons (a blue "Playback" arrow and red "Shooting mode" camera symbol) can only be seen from above. The right side of the back panel is slightly raised as a natural grip ridge, with a semi-circle of small raised stubs to the left that provide an extra tactel grip for the thumb.
Controls lined up along the bottom of the LCD monitor include (left to right): Flash / Set, Drive / Self-Timer, Macro / Infinity Focus, Menu, and Display. The Drive button also serves as the left arrow key when scrolling through captured images or menu options, while the Macro button serves as the right arrow key. On the left side of the optical viewfinder eyepiece are two LED lamps that report camera status.
The S110 has a reasonably flat bottom panel, with a few minor ridges and indentations. The battery compartment door is on the far right side, and the threaded metal tripod mount is on the left. The separation between the two is sufficient to allow for quick battery changes while the camera is mounted on a tripod, particularly when used with a quick-release plate that allows you to take the camera off the tripod without unscrewing the mount. (The downside of this offset tripod mount though, is that the camera usually won't set level on the tripod head, requiring some compensation via the tilt adjustment of the tripod.) The battery compartment door is very long and narrow, a necessary design element to accommodate the small camera size and dedicated Lithium-Ion battery pack. The door opens by sliding it to the right with your thumb and pushing up on the right end as it extends over the edge of the camera body. Once inside the battery compartment, a light brown latch must be pulled to the right to insert or remove the battery pack. (All of these motions are fairly smooth and effortless once you become accustomed to them.)
Canon's optional AC Adapter Kit includes a DC coupler that slides into the battery compartment in place of the battery pack. The power adapter then connects to the coupler and the AC power cable. We strongly recommend investing in the AC adapter if you plan to spend a lot of time downloading images to your computer or making prints from the camera with Canon's CP-10 Card Printer.
Reader Comments! --> Visit our discussion forum for the Canon PowerShot S110!

Follow Imaging Resource: