Back
to Full Fuji FinePix S2 Pro Review
Back
to Full Fuji FinePix S2 Pro ReviewGo to Fuji FinePix S2 Pro Data Sheet
Go to Fuji FinePix S2 Pro Pictures Page
Up to Imaging Resource Cameras Page
Use your browser's "Back" button to return to the previous page, or the links at the top and bottom of this page to navigate to related information. If you have difficulty fitting the text on this page onto your printer output, simply resize your browser window to a narrower width and print again.
Remember us when it's time to buy!
Dave here: Have our reviews been helpful to you? (Is this article you're reading right now useful?) Preparing this level of information on as many products as we do is incredibly hard work, not to mention expensive. Things on the Internet may look like they're free, but they're not. (As a lot of big dot.com companies are finding out these days.) Somewhere, somebody has to pay to produce worthwhile content. YOU can help us though, by remembering us when it comes time to make your purchase. Would you consider coming back to our site and clicking-through to one of our advertisers to make your purchase? Every dollar you spend with one of our advertisers helps us directly (in affiliate fees) or indirectly (the advertiser will keep renewing their ad contract with us). To make it easy for you to support us, here's a URL you can visit, to see all our current advertisers, with links to click on that will register your visit to them as having come from our site. It's up to you where you buy, but Mike, Mike, Kim, Yazmin, Marti and I would be really grateful if you'd help us out by choosing one of our advertisers to purchase from.
Thank you for your support!
Dave Etchells, Founder & Publisher
Visit our "Buy Now" Page:
https://www.imaging-resource.com/buynow.htm
Back
to Full Fuji FinePix S2 Pro Review
Go to Fuji FinePix S2 Pro
Data Sheet
Go to Fuji FinePix S2 Pro
Pictures Page
Up to Imaging Resource Cameras
Page
Fuji FinePix S2 ProFuji updates their digital SLR with a 6 megapixel CCD, with the same excellent color... Review First Posted: 7/24/2002 |
|
 |
|
6.1 megapixel SuperCCD makes files as large as 4,256 x 2848 pixels |
|
|
Beautiful color, particularly good with skin tones | |
|
|
Excellent low light performance | |
|
|
Superb resolution |
|
|
|
Accepts most Nikon F mount lenses |
Manufacturer Overview
Fuji has long been a player in the digicam arena, creating a broad line of popular consumer-level models over the last couple of years. From the email I receive, it's apparent that they've been very successful in doing so, as I consistently note a "happy" tone from Fuji users that really stands out amid the flood of correspondence. Fuji has also been a player in the digital SLR market for quite a while now, dating back to their first D-SLR, the E2S several years ago. More recently, they introduced the S1 Pro almost two years ago, a unit based on Nikon's N60 consumer SLR. Using Fuji's SuperCCD sensor technology, the S1 Pro distinguished itself with high resolution and beautiful color, to the extent that it found a strong niche in the commercial portrait business. Its market popularity was further boosted by a selling price that was significantly lower than other D-SLR models available at that time.
Fuji now comes to market with the S2 Pro, an upgraded model based on a Nikon N80 body and equipped with the latest-generation 6.1 megapixel SuperCCD. This time around though, the competitive landscape is quite different, with both Nikon and Canon offering full-function 6 megapixel SLRs for about the same price as the S2. (Actually, both are slightly less expensive.) Many observers have wondered how well Fuji will be able to compete with Nikon and Canon, now that prices are more comparable between the three companies' products. Read the full review below for the results of my testing, but I can say at the outset that it looks like the S2 will be a strong contender!
High Points
Executive Overview
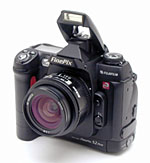
Based on the Nikon N80 film camera body, Fujifilm's new FinePix S2 Pro digital SLR camera is a welcome addition to the prosumer digicam marketplace, Joining Canon's D60 and Nikon's own D100 in the sub-$3,000 D-SLR class. Its familiar 35mm styling includes the ability to accept Nikon's F series lenses, happy news for any Nikon photographer with an extensive lens collection. Measuring 5.6 x 5.2 x 3.1 inches (141.5 x 131 x 79.5 millimeters), the S2 is just slightly larger than competing models from Nikon and Canon. Weighing in at 26.8 ounces (760 g) without the lens, you'll definitely want to take advantage of the accompanying neck strap, but the heft is not at all excessive for a SLR.
As with the S1 Pro before it, the biggest buzz about the S2 is its CCD. Using the Fuji-developed "SuperCCD" honeycomb sensor pattern, it actually carries 6.17 million active sensor elements, which are used to produce either 6.1 or 12.1 (!) megapixel final file sizes. Fuji has happily moved away from their earlier practice of reporting their SuperCCD cameras' resolutions based on the higher, interpolated figure, but it's important to note that the interpolated file size does indeed capture (slight) additional image information relative to the smaller "native" image size. This is because the diagonal arrangement of the honeycomb-shaped SuperCCD pixels requires a roughly 1.4x interpolation to extract the maximum image information when converting to the rectilinear pixel array of a standard image file. (Just for the record, all single-sensor digicams interpolate, it's just a matter of how and to what degree.) As you'll see later in this review, there is indeed some justification to using the S2's interpolated file size when you're looking for maximum detail in your images. It's clearly not a 12 megapixel camera, but just as clearly delivers slightly more detail than competing 6 megapixel designs.
One of the benefits of SLR digicams like the S2 Pro is the TTL (through the lens) optical viewfinder, which gives you a more accurate representation of what the camera is seeing than do ordinary viewfinders with separate optics. The S2's viewfinder includes a small information readout at the bottom of the screen that reports aperture, shutter speed, focus, etc. I found the optical viewfinder of the S2 Pro to be pretty accurate, showing roughly 96% of the final field of view, slightly better than average among SLRs I've tested. A 1.8 inch color LCD monitor on the back panel displays an image preview, complete with histogram functions, and also reviews captured images when in Playback mode. The downside of the SLR design though, is that the LCD monitor can't provide a "live" viewfinder display as on non-SLR digicams. Optically, the S2 features a lens mount that accommodates most of the Nikon F series lenses, although advanced metering modes only work with more recent lenses that are equipped with internal CPUs. A focus switch on the front of the camera allows you to change between continuous autofocus, single-shot autofocus, or manual focusing modes.
The S2 provides a great deal of exposure control, with a wide variety of exposure modes and adjustments available. The main exposure modes include Programmed, Aperture Priority, Shutter Priority and Manual. In Programmed mode, the camera controls the shutter and aperture settings, but the user can select from a range of equivalent exposure settings and also adjust the exposure compensation from -3 to +3 EV in 1/2 EV increments. (One of my few substantive quibbles with the S2's capabilities: I'd really like to see 1/3 EV steps on the exposure compensation adjustment.) Aperture and Shutter Priority modes allow the user to select the named exposure variable (aperture or shutter) while the camera selects the other one. Aperture settings will vary with each lens used, but shutter speeds range from 30 to 1/4,000 seconds, plus a "bulb" mode for even longer exposure times. Of course, Manual exposure mode gives the user control over both exposure variables simultaneously. A continuous shooting mode lets you capture up to 7 shots in rapid sequence, at a rate of roughly 2 frames/second.
The S2 provides a wide array of other exposure controls through the function buttons and the small monochrome LCD data readout on its rear panel. White balance can be set to Auto, Sunny, Shade, Fluorescent 1, Fluorescent 2, Fluorescent 3, Incandescent, Custom1, or Custom 2 values. ("Custom" is a manual preset option in which you use a white reference card to set the white balance for the current lighting conditions.) The camera's light sensitivity can also be adjusted, with available settings of ISO 100, 160, 200, 400, 800 and 1600 ISO equivalents. Color, tone and sharpness settings can also be adjusted through the Function menus, and exposure metering options include 10-zone matrix, center-weighted, and spot metering. The inclusion of the smaller LCD data readout for the Function menus on the rear panel and the top LCD panel for exposure settings is very helpful for saving battery power, as you can change nearly all of the exposure settings without resorting to the larger LCD monitor.
For flash photography, the S2 features a pop-up flash as well as a hot shoe for connecting a more powerful external flash unit. The built-in flash works in several modes, including Auto, On, Off, Anti Redeye, Anti Redeye with Slow Sync, normal Slow Sync, and Rear-Curtain Sync. In Self-Timer mode, a self-timer counts down from two to twenty seconds before firing the shutter, flashing the AF assist light on the front of the camera during the countdown.
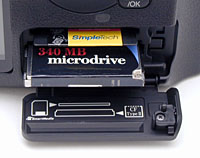
Another great design elements on the S2 is the memory card slot, which accommodates both CompactFlash Type I and II as well as SmartMedia memory cards. This definitely increases your memory card options, and enables you to use the IBM MicroDrive CompactFlash cards, now available in sizes as large as 1 gigabyte. The S2 has two interface ports for connecting to a host computer, USB or FireWire (IEEE 1394). Appropriate cables accompany the camera, as well as a software CD loaded with Adobe Photoshop Elements, USB drivers for Windows 2000, 98, XP, and Macintosh, Fujifilm FinePix Viewer, a Raw file converter package, and Apple QuickTime 5.0. The Fujifilm software lets you connect the camera to the computer and download or browse images, while the Photoshop Elements application provides basic image editing and correction tools.
US models of the S2 come with an NTSC video output cable for connecting to a television set, and I assume that European models will be equipped for PAL timing. For power, the S2 utilizes four AA batteries(NiMH rechargeable highly recommended) as well as two CR123A lithium batteries, with an AC adapter and battery charger available as accessories. In my tests, battery life was really excellent, although the CR123A lithium cells can be rather quickly depleted if you use the flash a lot. (The AA cells run the bulk of camera functions, while the lithium cells run the flash.)
Overall, the S2 provides all the manual exposure control you need, with the flexibility of both automatic and programmed modes. The incredible range of available lenses, useful color and tone adjustments, histogram functions, and all-around excellent color make it suitable for both advanced amateurs and professional photographers. Professional action shooters will bemoan the relatively slow two frame per second continuous-shooting speed, but the camera is dramatically faster than any consumer-level digicam I've tested, and is roughly competitive in this respect with similarly-priced digital SLRs from other manufacturers. In addition to the excellent color, the high resolution and delicate rendering of fine detail delivered by the S2's SuperCCD sensor are particularly impressive. Overall, a very strong contender in the 6 megapixel digital SLR derby.
Design
Built on a Nikon N80 camera body, Fuji's new FinePix S2 Pro obviously has a lot in common with popular Nikon SLRs in terms of both looks and operation. This is Fuji's second digital SLR, an update of the earlier S1 Pro, which was built on an N60 Nikon body. The S2 Pro handles a lot like the N80 Nikon it's built on, the main difference being a bit more heft from the set of 4 AA cells across the bottom of the camera. The S2 accommodates an array of Nikkor lenses in its Nikon "F" lens mount, a feature that will doubtless attract many current Nikon users. Measuring 5.6 x 5.2 x 3.1 inches (141.5 x 131 x 79.5 millimeters), and weighing 26.8 ounces (760 grams) without batteries or lens, the S2's bulk is in line with other digital SLRs, although slightly larger than either the Nikon D100 or Canon D60.
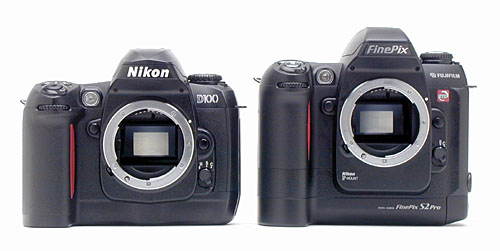
The S2 will most naturally be compared to the Nikon D100, given the similarities in price, size, and specifications between the two. With the batteries loaded but no lens attached, the S2 weighs in at 880 grams, slightly heavier than the D100, which weighs in at 790. The S2 is also a bit taller, due to the battery compartment across the bottom. The two cameras have a surprisingly similar balance, the S2's center of gravity located just slightly further from the handgrip than that of the D100. (I say "surprising" because I'd expected the S2 to have much more weight to the left of the handgrip, given that its AA batteries extend across the entire bottom of the camera, while the battery pack of the D100 is contained in the handgrip.)

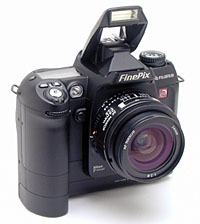
The front of the S2 holds the Nikon F lens mount, the most prominent feature on the front panel. To the right of the lens are the lens release button and Focus Mode switch. On the other side of the camera, a sub-command dial projects slightly from the top of the handgrip, and you can also see the Shutter button and Power switch as they angle down from the top of the camera. Nestled between the lens and handgrip are the Depth of Field Preview button and AF assist lamp.

On the left side of the camera (as viewed from the back) are a variety of connection jacks, including the Flash Sync, Video Out, IEEE 1394, USB, and DC In jacks. The DC In, Video Out, and USB jacks are protected by a flexible plastic flap, that flips open to reveal the jacks. The IEEE 1394 jack has a similar cover, and both flaps remain tethered to the camera when opened. By contrast, the flash sync socket (a standard PC-contact type) is protected by a tiny plastic cap that screws into place. (These little screw-on sync socket covers are found on many cameras, and I dislike all of them - They're too finicky to remove if they were tightened down securely when last used, and are just way too easy to lose. No knocks against Fuji, it's actually a Nikon body, but I do wish the industry could come up with a better solution for protecting sync sockets.)

The battery compartment is located at the bottom of the camera, unlocking with a flip and twist of the latch you can see at the bottom of the photo above. Once unlocked, the battery holder slides out from the compartment to reveal four AA-type batteries. (This is the main battery compartment, see the description of the camera's bottom below for a view of the secondary compartment housing a pair of CR-123 lithium cells.) Also on this side of the camera is one of the eyelets for attaching the neck strap.

The opposite side of the camera is bare except for the second neck strap eyelet .

On the S2's top panel are a variety of camera controls, as well as a small status display panel, external flash hot shoe, and the pop-up flash compartment. On the left of the top panel are the Mode dial and the Release Mode Switch (under the Mode Dial, controlling single exposure, motor drive, self-timer, and double-exposure shutter release options). Controls on the right side of the top panel include exposure compensation, flash exposure compensation, and LCD illuminator buttons, as well as the Shutter button and Power switch.
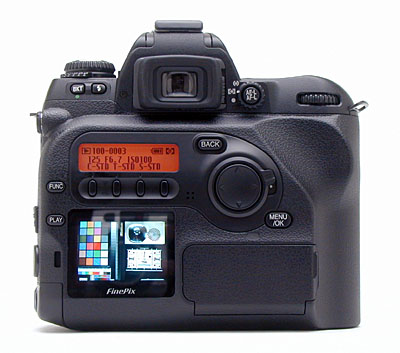
The S2's back panel holds the remaining camera controls, as well as the optical viewfinder eyepiece and LCD monitor. The optical viewfinder features a diopter adjustment, to adjust the optics for eyeglass wearers. Another small LCD data panel just to the left and below the viewfinder turns the four buttons below it into "soft" buttons, each serving multiple functions as governed by the data panel. A Four-Way Arrow rocker pad serves multiple functions, and sits just to the right of the camera's tiny microphone grille. The memory card compartment is below the Four-Way Arrow rocker pad, hidden behind a locking cover. (One of my few gripes with the S2's design: I found the latch on this cover quite awkward to use - You have to press the latch down while simultaneously pulling the cover outward.) Inside the compartment are SmartMedia and CompactFlash card slots, the latter of which accommodates IBM's MicroDrives as well.

The S2's ribbed bottom panel features a tripod mount centered beneath the lens, and a second battery compartment which holds the CR-123 lithium batteries that power the camera's flash.
The "SuperCCD"
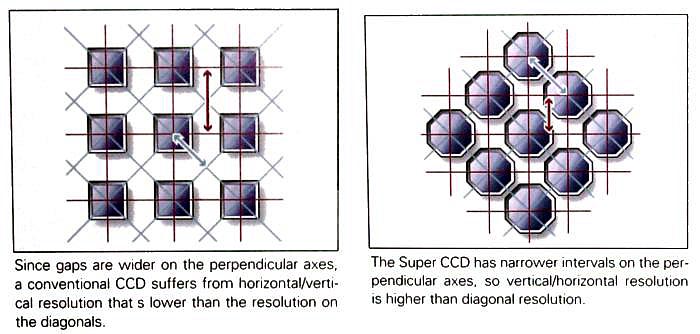
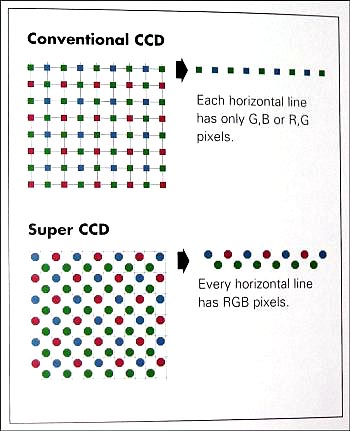
We first reported on Fuji's patented "SuperCCD" technology almost a year ago, when it was announce to the public at Fall Comdex '99. Since then, SuperCCD technology has been the source of some controversy, not the least of which is due to Fuji's claims that it's unique sensor geometry permits more image interpolation than does the rectilinear layout of conventional CCDs. (And, just to be clear, all single-sensor/single-shot color digicams use some degree of interpolation to produce their pictures.) There are two major differences between Fuji's SuperCCD technology and conventional configurations: 1) SuperCCD uses an octagonal cell layout that increases the amount of light-sensitive surface area in every cell, and 2) The SuperCCD rows and columns overlap slightly and are rotated 45 degrees. This theoretically improves resolution (at least somewhat) over a conventional sensor with a rectilinear layout.
For clarification on the Super CCD technology, here's a repeat of the information we published as part of our Fall '99 Comdex coverage (where the Super CCD was first announced).
According to Fuji, the SuperCCD's layout offers an effective resolution some 60% better than a standard CCD, as well as 130% better sensitivity, dynamic range and signal/noise ratio, 50% better color reproduction and significantly better power consumption (assuming that a SuperCCD with 40% fewer pixels can match the resolution of a standard CCD). The logical question is - how can simply changing the shape and orientation of the photodiodes in a SuperCCD produce such a dramatic improvement in image quality? Borrowing heavily from Fuji's own explanation, here's a quick summary of the reasons:

Viewfinder
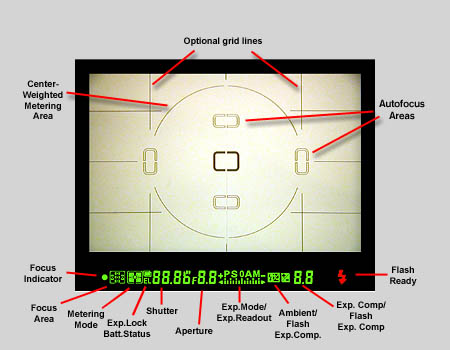
Like other SLRs, the S2 Pro's optical viewfinder looks out through the lens. (The LCD monitor is used only for image playback and menu system access.) A sliding diopter adjustment control to the right of the eyepiece adjusts the focusing of the viewfinder optics to accommodate eyeglass wearers, and the viewfinder's "eyepoint" is also high enough that you can see the full viewfinder frame even while wearing fairly thick eyeglass lenses. An illuminated display in the viewfinder gives detailed exposure and camera status information, including focus area indicators, shutter speed, aperture, exposure mode, metering, AE lock, exposure and flash compensation, frame counter, ready light, and five sets of focus brackets. When activated, the view also includes an alignment grid, useful for lining up difficult shots. A large circular outline in the center of the view indicates the Center-Weighted metering area. The optional grid (enabled via Custom Menu setting number 2) and focus area indicators can be set to illuminate briefly when the shutter button is half-pressed, through Custom Menu setting number 3. The shot below shows the viewfinder display, with all segments of the readout illuminated. (Alert readers will notice that the S2's viewfinder display is almost identical to that of Nikon's D100 SLR.)
Like virtually all other digital SLRs, the LCD panel on the S2 doesn't function as a viewfinder. It does provide both normal and zoomed playback of previously captured images, as well as a histogram overlay, as shown below. (The S2s histogram overlay is unique in my experience in that it shows not only overall brightness values, but separate histograms for the red, green, and blue channels of the image separately.)
 The
LCD monitor on most digital SLRs also serves to display information about the
captured images as well. - There's generally an optional information overlay
that lists various exposure parameters (shutter speed, aperture, ISO, image
size, etc) for the displayed image. On the S2, this function is handled by the
rear-panel LCD data readout just above the main LCD monitor screen. Two screens
of information there show image file number, date and time of capture, image
compression level and resolution, white balance setting, shutter speed and aperture,
ISO, and the settings for color, tone, and sharpening. I really liked what this
data readout panel did for the S2's user interface overall, and particularly
enjoyed being able to see the exposure information without it interfering with
my viewing of the displayed image.
The
LCD monitor on most digital SLRs also serves to display information about the
captured images as well. - There's generally an optional information overlay
that lists various exposure parameters (shutter speed, aperture, ISO, image
size, etc) for the displayed image. On the S2, this function is handled by the
rear-panel LCD data readout just above the main LCD monitor screen. Two screens
of information there show image file number, date and time of capture, image
compression level and resolution, white balance setting, shutter speed and aperture,
ISO, and the settings for color, tone, and sharpening. I really liked what this
data readout panel did for the S2's user interface overall, and particularly
enjoyed being able to see the exposure information without it interfering with
my viewing of the displayed image.
 A
display feature that I missed on the S2's image playback was a "blinking
highlights" mode. Histogram displays as shown above are useful for determining
overall exposure, and the S2's addition of RGB histograms is a nice touch. Histogram
displays are virtually useless though, if you have relatively small areas of
strong highlights that you don't want to blow out. If only a relatively small
area is affected, you won't be able to see the tiny peak that corresponds to
it on the histogram plot. To address this issue, several digicam manufacturers
offer a display mode in which highlights that are either blowing out or in danger
of doing so "blink" in the display, flipping between white and black.
This sort of display makes it immediately obvious anytime you're in danger of
losing highlight detail, and I sorely missed it on the S2 Pro.
A
display feature that I missed on the S2's image playback was a "blinking
highlights" mode. Histogram displays as shown above are useful for determining
overall exposure, and the S2's addition of RGB histograms is a nice touch. Histogram
displays are virtually useless though, if you have relatively small areas of
strong highlights that you don't want to blow out. If only a relatively small
area is affected, you won't be able to see the tiny peak that corresponds to
it on the histogram plot. To address this issue, several digicam manufacturers
offer a display mode in which highlights that are either blowing out or in danger
of doing so "blink" in the display, flipping between white and black.
This sort of display makes it immediately obvious anytime you're in danger of
losing highlight detail, and I sorely missed it on the S2 Pro.
 The
zoomed playback option on the S2 Pro deserves particular mention, given the
range of magnification it offers. At maximum magnification, you can easily see
down to the pixel level in captured images, allowing pretty precise evaluation
of focus and depth of field. (I'd like to see this level of magnification as
a standard feature on all digicams, but particularly on D-SLRs, whose users
are more likely to be interested in precise depth of field evaluation.)
The
zoomed playback option on the S2 Pro deserves particular mention, given the
range of magnification it offers. At maximum magnification, you can easily see
down to the pixel level in captured images, allowing pretty precise evaluation
of focus and depth of field. (I'd like to see this level of magnification as
a standard feature on all digicams, but particularly on D-SLRs, whose users
are more likely to be interested in precise depth of field evaluation.)
Optics
(Readers comparing the S2 to the Nikon D100 will find that the cameras are virtually identical in their optics and autofocus. In reviewing the two cameras, I didn't find any significant areas in which the operation of the two cameras differed in this regard. It's possible that there are differences in autofocus performance, but I don't have the facilities to measure AF performance quantitatively.)
The S2 is equipped with a Nikon "F" type lens mount, which fits a
wide range of Nikkor lenses (the user manual has a full list of compatible lens
types, reproduced below). The S2's lens mount includes both mechanical AF coupling
for older lenses, and AF electrical contacts for the latest AF-IF or AF-S Nikkor
lenses with internal focus motors. With few exceptions, you can use the S2 Pro
with any F Mount Nikkor lens ever made. (A very important exception to
this is that old, "non-AI" lenses which used a connecting bayonet
to convey aperture information to the camera body are very definitely not
compatible!Using such a lens could result in damage to the S2's body. -
And thanks to reader James Clemons for pointing out my oversight in not mentioning
this earlier!)
As with the Nikon N80 camera body on which it's based, functions and exposure
modes available with a given lens will vary greatly with the lens type. More
recent Nikkor lenses (the D- or G-type models) include a microchip that communicates
focal-distance information to the camera. Lenses without the microchip won't
support the 3D Matrix metering mode. Here's a table giving a brief idea of the
functionality available with different Nikkor lens types (abstracted from the
S2's manual).
|
Modes ->
|
Focusing Mode | Exposure Mode | Metering Mode | |||||
|
|
Auto Focus | Manual with electronic rangefinder | Manual | Any mode Other than M | M | 3D 10-segment | 10-segment | Center weighted, Spot *1 |
|
Nikkor lenses with built-in CPU*2
|
||||||||
| D-type, G-type AF lenses, AF-S, AF-I *3 | O | O | O | O | O | O | - | O |
| PC micro 85 mm f/2.8D *4 | - | O*5 | O | - | O | O | - | O |
| AF-I Teleconverter | O*7 | O*7 | O | O | O | O | - | O |
| Non-D/G type AF Nikkor (excluding lenses for F3AF) | O | O | O | O | O | - | O | O |
| Ai-P Nikkor | - | O*8 | O | O | O | - | O | O |
|
Non-CPU Nikkor*9
|
||||||||
| Ai-S, Ai Series E lenses, modified AI Nikkor | - | O*8 | O | - | O*10 | - | - | - |
| Medical 120 mm f/4 | - | O | O | - | O*11 | - | - | - |
| Reflex lenses | - | - | O | - | O*10 | - | - | - |
| PC Nikkor | - | O*5 | O | - | O*10 | - | - | - |
| Ai-S, AI Teleconverter | - | O*7 | O | - | O*10 | - | - | - |
| Bellows PB-6 (used with K ring 1, 3, 4 or 5) *12 | - | O*7 | O | - | O*10 | - | - | - |
| Auto close-up rings (PK-11A, 12, 13 and PN-11) | - | O*7 | O | - | O*10 | - | - | - |
|
Key:
|
|
| O : | Usable |
| - : | Not usable |
| *1 | Spot metering area can be shifted with focus area selector |
| *2 | IX Nikkor lenses cannot be attached.. |
| *3 | This camera is compatible with the Vibration Reduction function of the VR Nikkor lens. |
| *4 | The camera's light metering modes and flash control functions do not operate correctly when camera movements are performed (both shift and tilt) or when the aperture is set to any setting other than fully open. |
| *5 | Only possible when camera shift or tilt are not performed. |
| *6 | Compatible with AF-S and AF-I Nikkor except AF-S 17-35mm f/2.8 D I-ED and AF-S 28-70mm f/2.8D IF-ED. |
| *7 | With maximum effective aperture of f/5.6 or faster. |
| *8 | With maximum aperture of f/5.6 or faster. |
| *9 | Some lenses/accessories cannot be mounted on this camera. |
| *10 | With the exposure mode set to M. Note that the exposure meter cannot be used. |
|
*11
|
With exposure mode set to Manual and shutter speed set to 1/125 sec. or slower but the meter cannot be used. |
|
*12
|
Attach the PB-6 vertically (PB-6 can be set to horizontal position after attaching.) |
|
•
|
AS-15 must be attached in combination with Medical-Nikkor 200 mm f/5.6 for the lens to fire flash. |
|
•
|
Reprocopy Outfit PF-4 can be attached in combination with Camera Holder PA-4. |
Lenses that cannot be used: (Caution, do not attempt to forcibly mount or damage to the camera could result!)
| Lenses other than Nikkor lenses with a built-in CPU that cannot be used |
The lenses other than Nikkor lenses with a built-in CPU listed below cannot be used with this camera. Any attempt to forcibly mount one of these lenses on the camera could damage the camera and lens.
|
A release button just to the right of the lens mounting flange unlocks the lens so that it can be rotated and removed from the mount. Below the release button is a Focus Selector switch, which sets focus control to Single Servo, Continuous Servo, or Manual modes. In Single Servo mode, focus is set just once, whenever the Shutter button is halfway pressed. Continuous Servo mode adjusts the focus continuously, as long as the Shutter button is pressed. Manual lets you control focus by turning the focus ring on the lens. In Manual focus mode, a focus indicator appears in the optical viewfinder (a green dot, on the left-hand side of the viewfinder readout), letting you know when the camera thinks the focus is set properly.
One important difference between Single and Continuous Servo modes affects the shutter release: In Single Servo mode, the shutter won't release unless the lens is focused. (Focus Priority) In Continuous Servo mode however, the camera will fire regardless of the state of focus. (Release Priority) If you want to be sure that the camera is focused when you snap the picture, use Single Servo mode. Use Continuous Servo for moving subjects, and/or times when the instant of shutter release is more important to you than sharp focus.
The AF Area Mode option on the rear-panel data readout/button panel lets you select between Single Area and Dynamic Area by hitting the "FUNC" key and then the second of the programmable "soft keys" under the data display. The Dynamic Area autofocus mode also offers a closest-subject focus priority option. Both focus modes are capable of responding to any of five individual focus areas, as indicated in the viewfinder by sets of brackets arranged top, bottom, left, right, and center. (See the illustration of the viewfinder display in the preceding section of this review.)
Single Area AF simply means that the camera judges focus based on a single, manually-selected focus area. (Focus areas can be selected by pressing the arrow keys on the 4-way controller on the camera's rear panel.) Dynamic AF employs all five of the autofocus brackets, or areas. Autofocus behavior in Dynamic AF mode is further controlled by CSM menu options 7 and 8, which enable closest-subject AF priority in single and continuous autofocus modes respectively. Normally, Dynamic AF mode begins by focusing on a given AF area, selected by the user from among the five available. If the subject then moves to a different part of the frame, the camera will automatically switch to a new AF point to follow it. In closest-subject priority mode though, the camera itself selects the initial AF point corresponding to the portion of the subject that's closest to the camera. Once the subject is acquired, the camera tracks it as in normal Dynamic AF operation. (Note that no focus area brackets are illuminated in the viewfinder with this mode and on their own cameras, Nikon states that this mode doesn't work well with telephoto lenses or poorly lit subjects. Fuji's manual doesn't caution against telephoto lenses or dim subjects, but it seems safe to assume that the S2 Pro would be subject to the same limitations as the N80 it's based on.)
As noted, in Single Area AF mode, you can change the primary focus area by unlocking the focus area selector (the Four-Way controller on the camera's rear panel) and then shifting the focus area using the up, down, right, or left arrow keys. You can lock the focus area selection by turning the switch back to the lock position. By default, the S2 Pro does not "wrap" the focus area selector as you scroll between focus areas. Through the CSM menu though, you can opt for a "Wrap" function. What this means is that if you press the right arrow key again, after the right focus area is already selected, the selection will immediately jump to the left focus area. The same thing happens when moving the focus area selection vertically as well.
There are two methods by which you can lock focus on the S2. The first is to half-press the shutter button to lock the focus, placing your subject in the selected focus area, halfway pressing the Shutter button, then realigning the composition and firing the shutter. (By default, this also locks exposure, but you can disable the exposure lock on shutter half-press via CSM option 5.) Alternatively, when using Single Servo AF, you can press the AE-L/AF-L button to lock focus (and exposure too, unless the button is set for focus-only via CSM option 9). Keeping this button pressed will lock focus and/or exposure, even if the Shutter button is released. This lets you recompose the photograph without keeping your finger on the Shutter button, but on the AE-L/AF-L button instead. (Reducing the chance that you'll accidentally trip the shutter when you don't intend to.)
There are several options available for the AE-L/AF-L button, which can be set via CSM option 9. You can program it to lock either focus or exposure separately, or both together (the default). You can also change its operation so a single press locks and holds the exposure setting. (No need to keep the button pressed down.) Finally, you can set the AE/AF lock button so it alone controls the autofocus system, meaning the autofocus won't actuate when the shutter button is half-pressed, but only when the AE/AF lock button is pressed instead.
Autofocus Speed
I mention AF speed because it's the topic of frequent questions from my readers, although I confess to having no quantitative way to measure it. I'm also hampered somewhat in my assessment by not having other D-SLRs close at hand to do direct comparisons with. I also need to point out that AF speed will vary greatly with the lens being used. All that said, the S2 Pro's AF speed seemed "average" to me, overall very much equivalent to what I experienced with Nikon's own D100 model. I did most of my shooting with Nikon's 24-85mm f/3.5-4.5 G-series AF-S Nikkor lens. This is one of their "silent" AF lenses, with an internal motor, and as such is a fairly fast-operating lens. Switching rapidly between distant subjects and ones near the closest focusing distance, my subjective sense was that it took about a half-second to achieve focus. Traversing smaller distances, the focus lock was much faster.
With a moving subject (Charlotte the Wonder Dog), and the camera set in Continuous Servo focusing mode, I felt that the S2 consistently lagging the subject a little. This was an entirely unscientific test, but I had the distinct impression that the lens/camera combination could have been faster. (I'd guess that Charlotte was moving about 10-12 mph towards me, at a distance of around 15 feet when I was snapping the picture. - The most sharply-focused area seemed to be a foot or so behind her under those conditions.) This performance seemed to be about the same or possibly slightly better than the Nikon D100, but not as fast as I remembered the D1x/D1h being. (Take this with a large grain of salt though, this wasn't any kind of a controlled test, and my memory is far from perfect.)
Low Light Focusing
The S2 sports a bright (!) incandescent autofocus-assist light on its front, between the hand grip and the lens mount. By default, this light will illuminate whenever the ambient light level is too low for the camera to focus well without it. The light is bright enough that the S2 can focus in total darkness out to a good 10 feet (3 meters) or so. (This is Fuji's spec for the camera, and it agrees well with my own casual testing.) With the AF assist light disabled, the camera can focus down to light levels of about 1/8-1/4 foot-candle (0.13-0.26 lux) with an f/3.5 lens. CSM menu option 15 lets you disable the AF illuminator lamp, for more candid shooting.
Exposure
The S2 provides typical SLR exposure control, with an automatic programmed exposure mode as well as the normal manual and semi-manual modes. (The extensive selection of preset "Vari Program" modes from the S1 have been dropped.) The camera's exposure mode is controlled by the mode dial on the top of the camera body, which features Full Auto, Programmed Auto, Shutter Priority, Aperture Priority, and Manual modes. In Programmed exposure mode, the camera judges the appropriate exposure for the situation, but you can opt to select from a variety of equivalent exposure settings as well as adjust the exposure compensation. In Programmed exposure mode, rotating the main command dial back and forth will adjust the exposure settings to use larger or smaller lens apertures, with the camera adjusting the shutter speed to maintain the same overall exposure. I personally find this more convenient than the normal aperture or shutter priority modes, since I don't have to worry whether the particular aperture or shutter speed I've chosen is outside the range at which the camera can achieve an adequate exposure. In Programmed mode, the camera restricts the range of aperture/shutter combinations to guarantee a good exposure. Aperture Priority and Shutter Priority are pretty self-explanatory, each allowing the user to control either the aperture (which depends on the lens in use) or the shutter speed (from 30 to 1/4,000 seconds) while the camera selects the most appropriate corresponding value. As you might expect, the Manual exposure mode gives the user total control over the both aperture and shutter speed.
As noted, shutter times in Manual or Shutter Priority modes extend from 30 to 1/4,000 seconds. In Programmed and Aperture Priority modes, the maximum shutter time seems to be restricted to 15 seconds. (At least, that's the longest exposure I managed to achieve, with the camera in a pitch-dark room.) In Manual mode, CSM option 6 can be used to enable bulb exposure operation, in which the camera's shutter remains open as long as the shutter button is depressed.
While the S2 permits very long shutter speeds, I was surprised to find that it doesn't appear to incorporate a "dark frame subtraction" noise-reduction system, as found in most D-SLRs and high-end consumer digicams. I say this because the camera begins recording the captured image to the memory card the moment the shutter closes. That said, there's evidently some sort of noise reduction processing going on in the SuperCCD sensor, because even very long exposures are amazingly "clean," with virtually no "hot pixels." (I was quite impressed by the S2's low light capabilities.)
One mild disappointment in the S2's operation though, was that its metering system has trouble accurately metering exposure longer than 2-3 seconds. In a very dark room, where a 30 second manually-set exposure at ISO 200 produced a slightly underexposed image, the camera's AE system selected an exposure time of only three seconds in Programmed mode. I didn't test to determine the lower limit at which the S2's exposure metering gave out, but it seemed to work fine at levels a good three stops darker than normal city streetlighting. Thus, you should plan on using a good-quality external exposure meter if you need to do a lot of shooting in extremely dark conditions, but the built-in meter should work fine for normal indoor shots and city night scenes. (It nailed a three-second exposure at ISO 200 and f/3.5, which corresponds to a level of about 1/8 foot-candle or 0.13 lux. - Interestingly, the S2's manual seems to indicate that the exposure program bottoms out at a two second exposure time, even though my test unit went down to 3 seconds.)
Exposure compensation on the S2 can be adjusted from -3.0 to +3.0 EV (an wider than average range) in 1/2 EV increments by pressing the +/- button on the camera's top panel and rotating the main command dial. This adjustment is only available with the Programmed, Shutter Priority, Aperture Priority and Manual exposure modes. Wait a minute, you say, what does "exposure compensation" mean if you're in manual exposure mode? You're controlling all the exposure parameters, so what's to compensate? It turns out that the S2 gives you an analog exposure readout in the viewfinder when in manual mode, showing whether the camera thinks you're exposing correctly or not. The exposure compensation setting in manual mode affects this exposure-feedback display, biasing it to indicate "correct" exposure when the exposure is actually high or low by the amount that you've dialed-in. Slick!
For the most part, I really liked the controls on the S2, but one area that I really felt needed improvement was the step size on the exposure compensation adjustment. The S2 has a 1/2 EV unit step size on its exposure compensation control, and there doesn't appear to be any option for switching to the 1/3 EV steps used by most other digicams. The 1/2 EV adjustment step is apparently a holdover from the N80 film body, and frankly is too large for exacting work with a digital camera. Film (even transparency film) has a wider exposure latitude than do the sensors on digital cameras. Exposure adjustments of 1/2 EV are thus fine for film work, but can make it difficult to set exposure precisely enough on a digital camera. I'd say if there was a single firmware enhancement I'd like to see Fuji make to the S2, it would be an option for 1/3 EV exposure compensation increments.
ISO sensitivity on the S2 Pro ranges from 100 to 1600, in steps of 100, 160, 200, 400, 800, and 1600. The user manual cautions about image noise at ISO settings higher than 400, but I thought the images were generally fairly clean. Looking at the numbers quantitatively and comparing between the S2 and Nikon's D100, I found that luminance noise between the two cameras was fairly close at ISO 200 (and the S2 slightly lower at its ISO 100 setting than the D100 at its minimum of ISO 200), but that the S2 showed 20-40% more noise in the individual red, green, and blue color channels. At ISO 1600, the results were odd, in that the S2 beat the D100 by about 5% in the luminance noise figure, but still had higher noise in the color channels by anywhere from 30-55%. So overall, the S2 and D100 are pretty close to each other in terms of luminance noise, but the S2 has somewhat higher chroma noise.
As mentioned earlier, an Auto-Exposure Lock function button lets you lock the camera's exposure settings for a certain area of your subject (instead of using a half-press of the shutter button to lock both exposure and focus). You simply point the camera at the part of the subject you want metered, hold down the AE-L/AF-L button and then recompose the shot. For the best/most predictable results, you should set the camera's metering mode to center-weighted or spot when using the AE lock function. (I'll discuss these metering modes in more detail in just a bit.) This decoupling of exposure and focus lock is a handy feature offered by most pro SLRs, but generally lacking in consumer-level digicams. By default, the AE-L/AF-L button locks both exposure and focus. CSM menu 9 offers a range of options relating to the AE-L/AF-L button. In addition to the default dual AE/AF lock, you can set it instead to lock just exposure, just focus, or to "latch" the exposure lock when it's pressed. When the AE button is set to latch exposure, you don't have to hold the button down to maintain the exposure setting: Press it once, and the exposure will remain locked until you either trip the shutter, or press the AE-L/AF-L button again. Finally, a fifth option lets you decouple the autofocus system from the shutter button. The "AF Operation" setting forces the camera's autofocus system to only operate when the AE-L/AF-L button is pressed.
Independent of the AE-L/AF-L button's functioning, you can separately control whether exposure locks when you half-press the shutter button. CSM menu screen 5 lets you disable the shutter-based AE lock. When this function is disabled, the camera will continue to adjust its exposure settings regardless of whether the shutter button is half-pressed or not. (The focus will still lock unless it also is decoupled by CSM option 9 as just described, but the exposure will be allowed to change.) With the function enabled, the exposure settings will be set whenever you half-press the shutter button, and will remain the same until the shutter is fired or the button released. NOTE that the S2's shutter button AE lock is disabled by default. (Most digicams lock exposure when the shutter is half-pressed, so you need to be aware of this when you first start shooting with the S2.)
The Self-Timer button on top of the camera activates the self-timer mode, which counts down from two, five, 10, or 20 seconds after the shutter button is pressed before firing the shutter. The AF Assist light on the front of the camera blinks during the countdown.
The Function Buttons
 Many
of the S2's exposure options are controlled through the series of function buttons
on the camera's back panel, just beneath the small LCD display and above the
larger LCD monitor. This is the same arrangement as appeared on the earlier
S1 Pro, and I've found it to be one of the best camera interfaces I've yet encountered
for setting common camera operating parameters. I really like the way the functions
are immediately available, without having to delve into layers of menu structure
to find the feature I'm looking for. The function buttons are "soft buttons",
whose behavior are set by the contents of the LCD display above them. The FUNC
button just to the left of the row of soft buttons controls which function menu
is displayed in the LCD. The first press of the FUNC button displays the basic
exposure function menu, featuring white balance, autofocus mode, image quality
and size settings.
Many
of the S2's exposure options are controlled through the series of function buttons
on the camera's back panel, just beneath the small LCD display and above the
larger LCD monitor. This is the same arrangement as appeared on the earlier
S1 Pro, and I've found it to be one of the best camera interfaces I've yet encountered
for setting common camera operating parameters. I really like the way the functions
are immediately available, without having to delve into layers of menu structure
to find the feature I'm looking for. The function buttons are "soft buttons",
whose behavior are set by the contents of the LCD display above them. The FUNC
button just to the left of the row of soft buttons controls which function menu
is displayed in the LCD. The first press of the FUNC button displays the basic
exposure function menu, featuring white balance, autofocus mode, image quality
and size settings.
The second press of the Function button displays the next menu, which adjusts color, tone, and sharpness, and also lets you lock the function buttons so you won't inadvertently change a setting if you happen to bump the button panel while carrying the camera.
White Balance Options
The S2 Pro offers a wider than average range of white balance settings. Options include Auto, two separate Custom ("manual") settings, Sunny, Shade, three Fluorescent settings (Daylight, Warm White, Cool White), and Incandescent. The Incandescent option seems to be adjusted for 3200K studio lights (as you'd expect on a pro-oriented camera), so it doesn't fully compensate for the very warm cast of typical household incandescent bulbs. The Custom settings adjust the white balance to match specific lighting, based on a reference white card. To balance the color for a new light source, each Custom setting must be changed through the Record settings menu. I'd prefer to change the setting just by selecting the Custom white balance option, instead of having to access the LCD menu, but it's nice that the camera remembers the setting for you, without forcing you to choose a new setting every time you enter Custom white balance mode.
Tone, Color, and Sharpness Options
The S2's tone and color saturation variations are nicely balanced to give a useful range of control. (That is, the "high" color option isn't overly garish, and the "org" (original) setting gives nicely understated colors that aren't too flat. Options for tone (contrast) are STD (standard), HARD (high contrast), or ORG (original (?) - a lower contrast setting). Color options are STD (standard), HIGH (high contrast), ORG (original - a slightly lower saturation), and B/W (black and white). Sharpness options are STD (standard), HARD (higher in-camera sharpening) and OFF (no in-camera sharpening). As with color and tone, the sharpness options seem to cover a good range of variation. In particular, the OFF position produces files that respond beautifully to unsharp masking in Photoshop. (I found that setting Photoshop's unsharp masking operator to 300% and 0.4 pixel radius (on the 6 megapixel file size) produced astonishing amounts of very finely rendered detail.)
Flash
 The
S2offers both a built-in, pop-up flash and a hot shoe for connecting an external
flash unit when more flash power is needed. (The external flash option seems
to be able to work with a majority of Nikon dedicated flash units (unlike Nikon's
own D-series cameras, which require special models of the SB-28 or SB-80). It
isn't clear though, how well they'd work in TTL (through the lens) metering
mode, given the different reflectance of the CCD than the conventional films
that the N80 body's flash sensor is calibrated for. I found no problems in my
own limited testing of the flash function, but my tests were far from comprehensive.
The built-in flash has seven operating modes: Auto, On, Off, Anti Red-Eye, Slow
Synchronization with Anti Redeye, Slow Synchronization, and Rear-Curtain Sync.
All of the flash modes are controlled by the Flash button at the top of the
camera's rear panel, and each is pretty self-explanatory. The Auto setting lets
the camera judge when to use the flash, while the On setting fires the flash
with every exposure and the Off setting disables the flash entirely (you can
also close the flash compartment to disable the flash). Anti Redeye (equivalent
to Redeye Reduction mode on other digicams) fires a small pre-flash before firing
the full flash, to avoid the annoying Redeye Effect. Slow Synchronization works
with a slower shutter speed to illuminate the subject and also allow more ambient
light into the image. Likewise, Slow Synchronization with Anti Redeye just combines
the two modes for night portraits. Finally, Rear-Curtain Sync fires the flash
at the end of long exposures, so any "motion trails" will appear
behind moving subjects, rather than seeming to proceed in front of them.
The top mounted hot shoe should accommodate most Nikon Speedlights, as well
as other third party flash units designed for Nikon compatibility. Check the
manual for more specific information.
The
S2offers both a built-in, pop-up flash and a hot shoe for connecting an external
flash unit when more flash power is needed. (The external flash option seems
to be able to work with a majority of Nikon dedicated flash units (unlike Nikon's
own D-series cameras, which require special models of the SB-28 or SB-80). It
isn't clear though, how well they'd work in TTL (through the lens) metering
mode, given the different reflectance of the CCD than the conventional films
that the N80 body's flash sensor is calibrated for. I found no problems in my
own limited testing of the flash function, but my tests were far from comprehensive.
The built-in flash has seven operating modes: Auto, On, Off, Anti Red-Eye, Slow
Synchronization with Anti Redeye, Slow Synchronization, and Rear-Curtain Sync.
All of the flash modes are controlled by the Flash button at the top of the
camera's rear panel, and each is pretty self-explanatory. The Auto setting lets
the camera judge when to use the flash, while the On setting fires the flash
with every exposure and the Off setting disables the flash entirely (you can
also close the flash compartment to disable the flash). Anti Redeye (equivalent
to Redeye Reduction mode on other digicams) fires a small pre-flash before firing
the full flash, to avoid the annoying Redeye Effect. Slow Synchronization works
with a slower shutter speed to illuminate the subject and also allow more ambient
light into the image. Likewise, Slow Synchronization with Anti Redeye just combines
the two modes for night portraits. Finally, Rear-Curtain Sync fires the flash
at the end of long exposures, so any "motion trails" will appear
behind moving subjects, rather than seeming to proceed in front of them.
The top mounted hot shoe should accommodate most Nikon Speedlights, as well
as other third party flash units designed for Nikon compatibility. Check the
manual for more specific information.
Effective Flash Range (from S2 Manual):
| ISO |
|
|
| Guide Number (feet) |
|
|
| f-stop (aperture) |
|
|
|
|
(3.3 - 10.7 ft.) |
(9.8 - 19.9 ft.) |
|
|
(2.3 - 8.1 ft.) |
(7.5 - 16.3 ft.) |
|
|
(2.0 - 5.5 ft.) |
(6.5 - 11.4 ft.) |
|
|
(2.0 - 14.1 ft.) |
(2.6 - 7.5 ft.) |
|
|
|
(2.0 - 5.2 ft.) |
When I tested the original S1, I found that its flash didn't throttle down very well for nearby subjects. By comparison, the S2 did quite well in this regard at lower ISO settings, and only began to have problems throttling down at ISOs of 800 and above. The S2's internal flash has a guide number of 12 meters at ISO 100, and a maximum flash sync speed of 1/125 second. (The latter is somewhat slow by modern standards.)
I confess to being somewhat surprised by how well the S2 did with flash exposures, given the significant difference in reflectivity of CCDs as compared to film. Many SLRs offering TTL (through the lens) flash metering rely on the light reflected from the film surface to gauge the flash exposure while the shutter is open. Because CCD sensors have very different reflectance characteristics than photo film, these cameras tend to overexpose flash pictures by 1 to 1.5 f-stops. I was therefore somewhat surprised when I discovered that the S1's flash actually did a pretty good job of getting the exposure right, as long as I was within the acceptable working distance. (As noted above though, my testing of the S2's flash operation was far from comprehensive.)
As noted, the S2 also has an external flash hot shoe, just behind the pop-up flash compartment. The hot shoe accommodates Nikon accessory strobes, as well as a wide range of third party flashes. The range of flash sync modes remains available for compatible flash units. Different Nikon speedlights offer different features when used on the S2 with different lenses. Rather than try to reproduce the large table from the S2's manual here, I'll just note again that the S2 doesn't seem to need the special "DX" flash types required by Nikon's own digital SLRs. Chances therefore are good that whatever Nikon speedlight you happen to already own should work on the S2 much as it does on your film-based SLRs.
3D Matrix Flash Metering
I had the production-level S2 review sample for a relatively short period of time, and so didn't get to do as much shooting with it as I'd have liked. In particular, I didn't have much opportunity to play with the fill flash, a particularly powerful feature of Nikon SLRs, on which the S2 is based. Nikon makes much of their "3D Matrix" flash metering, with good reason: The "3D" aspect of the Nikon metering system is that it uses subject distance information from the lens (only available with lenses that contain CPUs) to guide its exposure decisions. This is particularly key with flash exposures, because flash illumination falls off quite strongly as the subject gets further from the camera. I've had excellent results using fill flash with other Nikon bodies, and my limited experience with the S2 in this area seemed to confirm that its fill flash capabilities followed the Nikon heritage as well. By no means take this as a blanket endorsement of the S2's flash capabilities - I'd need to do a lot more testing under a wide variety of circumstances before I could do that. Nonetheless, the S2's flash worked very well in the shots I took with it.
Metering
The S2 offers three separate metering modes, selected via a small ring surrounding the AE-L/AF-L button on the camera's rear panel. The 10-zone multi-pattern metering divides the image into ten zones, which are then measured and analyzed to determine the best exposure for the full image. Alternatively, the S2's center-weighted metering system averages values from a broad area in the center of the image to determine the exposure. Finally, the Spot Metering option determines the exposure by metering a roughly 4mm diameter area in the viewfinder (approximately 2% of the image area). The spot metering area shifts to follow the selected focus area. (When the camera is in closest-subject priority dynamic autofocus mode though, the spot metering area always remains in the center of the shot.)
Multiple Exposure Mode
You can enable multiple exposures on the S2, through the Release Mode switch on the left side of the its top panel. This lets you make multiple exposures on one frame. It's just like exposing the same frame of 35mm film without advancing the film, either to brighten the exposure or to create the effect of a multiple exposure. This is a little surprising to find on a digital camera (although it was also present on the S1), and I suspect that any serious work of this sort would be better done in the computer, rather than in the camera itself. It does have a huge advantage over similar modes in film-based cameras, in that you can immediately see the results of your multi-exposure on the LCD screen, rather than waiting for the film to come back from developing. Overall, an entertaining option, but one I don't think will find a lot of application.
Preview Mode
Through the Record settings menu, you can enable a Preview mode which provides a powerful tool for checking your exposure. When set to Auto Record, the image is previewed but automatically recorded. However, under the Manual Record setting, the image is still previewed, but must be confirmed before saving to memory. Once in Preview mode, the function menu (smaller rear LCD display) allows you to save or delete the image, as well as display a histogram or check the color. The histogram function button actually toggles between the Master histogram (showing the distribution of brightness values in the image) and the individual histograms for the red, green, and blue channels. This gives you a good idea of the distribution of tonal values across the image and whether it's under or over exposed. In Preview Mode, the Color function displays two reference bars, one of gray tones and the other of the standard color range, which help you evaluate the color and tonal values of your image for proper exposure.
Shutter Lag and Cycle Times
When you press the shutter release on a camera, there's usually a lag time or delay before the shutter actually fires. This time allows the autofocus and autoexposure mechanisms time to do their work and can amount to a fairly long delay in some situations. Since this number is rarely reported on, and can significantly affect the picture taking experience, I now routinely measure it, using a custom test system I built for the purpose, accurate to 0.001 seconds.
|
|
|||
|
|
Slow Card |
Fast Card |
|
| Power On -> First shot |
|
|
About average, slower than some D-SLRs.
|
| Shutdown |
|
|
"Shutdown" can be zero if card isn't writing,
as no lens retraction to wait for. Longest time shown is when camera
is clearing buffer full of TIFF files, until card can be removed.
|
| Play to Record, first shot |
|
|
No more delay from play to record than minimum shutter
lag in record mode. Very fast.
|
| Record to play (max/min res) |
|
|
Average review speed.
|
| Shutter lag, full autofocus |
|
|
Will depend on lens being used, how far the focus has
to traverse from prior shot. Time shown is minimum time with the 24-85
zoom I tested with. (Seems like a fairly fast AF system. although)
|
| Shutter lag, manual focus |
|
|
Average speed (1/2 the speed of the D100)
|
| Shutter lag, prefocus |
|
|
Slower than competing D-SLRs. (60% slower than D100)
|
| Cycle time, large/fine files |
(more tests pending) |
|
Buffer is 7-9 frames long, then speed drops to second
number shown. Fastest post-buffer-fill cycle time is with SmartMedia.
(Faster than any CF card I tried.) Lexar 12x card was 3.44 sec, Mr.
Flash (slow) card was.
|
| Cycle time, small/basic files |
|
|
Quite fast. Buffer capacity not affected by file size.
(Same 7-9 shot capacity whether large or small image sizes.)
|
| Cycle time, TIFF files |
Buff clear 540(!) sec |
Buff clear 173 sec |
TIFF mode files are enormous (37 MB), take a long
time to write. Buffer gives 0.59 sec cycle time for first 7-9 shots,
but buffer clearing can be ineffably slow with a slow card. Faster card
is up to 3x faster. (Couldn't measure post-buffer cycle time on SmartMedia
card, because 128Meg max size was too small to exhaust the buffer.)
|
| Cycle time, RAW files |
|
|
|
| Continuous mode, large files |
|
(1.69 fps) |
2.88 frames/second for first 4-6 frames at max res,
until buffer fills. Then takes time indicated by second number for buffer
to clear. (Faster card is 1.8x as fast on buffer overruns.) Small/basic
files show nearly identical behavior, but run length is 9 shots before
buffer fills.
|
I had to cut short my performance testing of the S2 due to a business trip, but I'll try to come back and fill-in the blanks shortly. Even in my limited testing, two things were apparent. First, the S2 isn't as fast as the Nikon D100, particularly when it comes to shutter lag. While still drastically faster than any consumer-level digicam, the manual focus and prefocus shutter lag of the S2 Pro is fully 60% longer than that of the D100. Cycle times were somewhat longer as well. The second thing that became apparent is that memory cards can make a huge difference in the buffer-clearing speed of the S2. (Although if you stay within the limits of the 7-shot buffer, you won't see any performance difference with a faster card.) Interestingly, SmartMedia cards are by far the fastest, but their limited capacity could be an issue on a camera with the S2's file sizes. A fast Lexar card emptied the buffer fully 3x faster than a slow "Mr. Flash" card. The S2 also seems to be finicky about which cards it will work with: A 512 MB SimpleTech card that I've used as a standard "fast card" in many of my previous digicam tests wouldn't work at all in the S2.
I'll report more on timing and performance shortly...
Operation and User Interface
The S2 Pro's user interface is unusually straightforward, though the Function buttons and their changing uses may take a few moments to get accustomed to. With a camera design familiar to the previous S1 and 35mm SLR Nikon N80, the S2 Pro should make existing Nikon users immediately comfortable with the control layout and the general feel of the camera. The use of the Mode dial to change the exposure mode and the combination of the Command wheel and control buttons make camera operation very quick and efficient. With the majority of the exposure options adjustable through the smaller rear panel LCD display and the associated "soft" buttons, you aren't reliant on a cumbersome LCD menu for common setting changes. The rear-panel data readout and soft buttons really make a noticeable difference in the S2's ease of use - I'd like to see more manufacturers adopt this kind of interface.

Shutter Button: Positioned on the top right side of the camera, this
button is encircled by the Power dial. Halfway pressing the Shutter button sets
focus and exposure, and a full press fires the shutter.
Power Dial: Surrounding the Shutter button, this rotary control turns the camera on and off.
![]()
+/- Button: Located just behind and to the left of the Shutter button,
this button adjusts the exposure compensation from -3.0 to +3.0 exposure equivalents
(EV) in half-step increments, in the Programmed, Aperture Priority, Shutter
Priority and Manual exposure modes. (In Manual mode, it biases the in-viewfinder
exposure display by the corresponding amount.)
Flash +/- Button: Adjacent to the +/- button behind the Shutter button, this button adjusts the intensity of the built-in flash, from -3.0 to +1.0 EV in half-step increments.

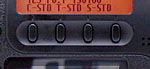
LCD Illuminator Button: This button sits to the right of the small LCD status display panel on top of the camera and illuminates the display panel when pressed. (It controls the backlight for both the top and rear LCD data readouts.)
Sub-Command Dial: Positioned on the front of the camera, at the top of the hand grip, this dial controls a multitude of functions when turned while pressing another control button. In Manual and Aperture Priority exposure modes, this dial adjusts the lens aperture setting.

Main Command Dial: Located directly to the right of the AE Lock button, right under your right thumb as you grip the camera, this dial changes camera settings when turned while holding down a control button.
Depth of Field Check Button: Nestled between the lens and the hand grip on the front panel, this button stops down the lens to the specified aperture setting, so that you can check the approximate depth of field through the viewfinder.

Pop-Up Flash Release Button: Protruding slightly from the side of the pop-up flash compartment, this button releases the pop-up flash into its operating position.

Lens Release Button: Situated to the right of the lens mount (when looking at the front of the camera), this button unlocks the lens so that it can be turned and released from the mount.

Focus Mode Switch: Also located to the right of the lens mount, this switch selects between Single, Continuous, and Manual focus modes.
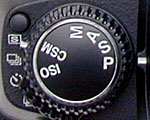
Exposure Mode Dial: Resting on top of the Release Mode dial, on the left side of the camera's top panel, this notched dial sets the camera's exposure mode and accesses two adjustment modes, with the following choices:
Release Mode Dial: Just beneath the Exposure Mode dial, this dial accesses the camera's Single Shot, Continuous Shooting, Self-Timer, and Multiple Exposure modes.
Release Mode Dial Lock Button: This small black button sits beside the Release Mode Dial, and unlocks the dial for turning when held down.

AE/AF Lock Button: Positioned to the right of the viewfinder eyepiece on the back panel, this button lets the user lock the exposure and/or focus on a certain area of the subject by centering the part of the subject in question, holding down the button, then reframing the subject to the original composition. For proper operation, this function should be used with the camera's exposure system set to either center-weighted or spot metering.
Metering Selector Dial: Encircling the AE/AF Lock button on the back panel, this dial sets the camera's metering mode to Center-Weighted, Matrix, or Spot.
![]()
Dioptric Adjustment Lever: Tucked on the right side of the optical viewfinder eyepiece, this sliding lever adjusts the optical viewfinder to accommodate eyeglass wearers.
Synchro Mode Button: To the left of the viewfinder eyepiece, this button cycles through the flash synchro modes, which include Front Curtain Synchro, Red-Eye Reduction, Redeye Reduction with Slow Synchro, Slow Synchro, and Rear Curtain Synchro.
Auto Exposure Bracketing Button: On the left side of the Synchro Mode button, this button activates the Auto Exposure Bracketing mode when pressed while turning the Main Command dial. Pressing this button while turning the Subcommand dial sets the number of exposures in the series.
Back Button: Directly beneath the right corner of the viewfinder eyepiece, this button backs out of menu selections.

Four-Way Arrow Rocker Button: This button sits in the center right side of the rear panel and features one arrow in each cardinal direction. In both Record and Playback setup menus, this button navigates through menu options. In Playback mode, the left and right arrow buttons scroll through captured images while the up and down arrows zoom in and out of images (up to 19x, depending on the original image size).
Four-Way Arrow Rocker Button Lock Switch: On the right side of the rocker button, a tab projects from a ring that surrounds the rocker. This switch locks the rocker control so that it doesn't make any changes if accidentally pressed.
![]()
Menu / OK Button: Just above the memory card slot, this button accesses the setup menu in both Record and Playback modes, and executes selected menu options.
![]()
Function Button: Located on the far left of the back panel, above and to the left of the LCD monitor, this button changes the function display in the LCD display above the four function buttons, letting the user access a wider range of settings in both Record and Playback modes. (See menu options detailed below.)
Variable Function Buttons: Arranged horizontally between the small LCD display and the larger LCD monitor on the back panel, these buttons correspond to the functions displayed above them, allowing the user to adjust various camera settings just by pressing a couple of buttons, rather than having to dig through a long series of LCD menu screens. These are one of the biggest ease-of-use features of the S2, making it relatively quick and easy to access a number of camera modes and functions.
![]()
Play Button: Directly beneath the Function button, this button puts the camera in Playback mode and displays the most recently captured image on the LCD. A second press returns the camera to Record mode. (The camera returns to Record mode immediately whenever the shutter release button is half-pressed, so you never really need to hit the Play button a second time.
Camera Modes and Menus
Because the Record settings menu remains the same in each of the exposure modes, I'll go through the exposure modes individually and then list the settings menu options. Each of the exposure modes are accessed by turning the mode dial, while the Playback mode is entered by pressing the Play button on the camera's back panel.
![]() Manual Exposure
Mode: Lets the user set both the shutter speed and aperture values, as well
as control other exposure variables such as ISO and exposure compensation.
Manual Exposure
Mode: Lets the user set both the shutter speed and aperture values, as well
as control other exposure variables such as ISO and exposure compensation.
![]() Aperture Priority:
The user selects the desired lens aperture setting while the camera selects
the most appropriate corresponding shutter speed. As with Manual exposure mode,
all of the other exposure settings are available.
Aperture Priority:
The user selects the desired lens aperture setting while the camera selects
the most appropriate corresponding shutter speed. As with Manual exposure mode,
all of the other exposure settings are available.
![]() Shutter Speed
Priority: The converse of Aperture Priority mode, this mode lets the user
choose the shutter speed while the camera decides which aperture setting to
use. All other exposure controls are available.
Shutter Speed
Priority: The converse of Aperture Priority mode, this mode lets the user
choose the shutter speed while the camera decides which aperture setting to
use. All other exposure controls are available.
![]() Programmed Auto:
In this mode, the camera selects both the shutter speed and aperture settings.
However, the user may select from a variety of shutter speed and aperture setting
combinations that produce the same exposure, by turning the function wheel.
(I like this mode a lot, it does what you'd normally use Aperture or Shutter
priority for with less hassle.) Exposure compensation adjustment is also available.
Programmed Auto:
In this mode, the camera selects both the shutter speed and aperture settings.
However, the user may select from a variety of shutter speed and aperture setting
combinations that produce the same exposure, by turning the function wheel.
(I like this mode a lot, it does what you'd normally use Aperture or Shutter
priority for with less hassle.) Exposure compensation adjustment is also available.
 Record
Mode Function Menu One: This menu appears on the rear-panel LCD data readout
when the Function button is pressed once in any record mode, this menu offers
the following settings. (Each setting is controlled by the "soft key"
button below the corresponding entry on the LCD data readout as shown at right.)
Record
Mode Function Menu One: This menu appears on the rear-panel LCD data readout
when the Function button is pressed once in any record mode, this menu offers
the following settings. (Each setting is controlled by the "soft key"
button below the corresponding entry on the LCD data readout as shown at right.)

Record Mode Function Menu Two: This menu is displayed by pressing the Function button a second time in any record mode.
 Record
Mode Setup Menu: Pressing the Menu button in Record mode displays the Setup
menu on the large LCD monitor on the camera's rear panel. This menu lets you
adjust the following camera settings:
Record
Mode Setup Menu: Pressing the Menu button in Record mode displays the Setup
menu on the large LCD monitor on the camera's rear panel. This menu lets you
adjust the following camera settings:
 Playback
Mode: Playback mode is accessed by pressing the Play button on the camera's
rear panel. The last image captured is automatically displayed on the LCD monitor
upon entering Playback mode. Captured images can be reviewed by pressing the
left or right arrows on the Four-Way Arrow Rocker button. The up and down arrow
buttons allow you to digitally enlarge a captured image for closer inspection.
Pressing the FUNC button alternates the data readout display between two screens,
show above right.
Playback
Mode: Playback mode is accessed by pressing the Play button on the camera's
rear panel. The last image captured is automatically displayed on the LCD monitor
upon entering Playback mode. Captured images can be reviewed by pressing the
left or right arrows on the Four-Way Arrow Rocker button. The up and down arrow
buttons allow you to digitally enlarge a captured image for closer inspection.
Pressing the FUNC button alternates the data readout display between two screens,
show above right.
 Playback
Mode Function Menu: The Playback Function menu is entered by pressing the
Function button while in Playback mode, and the menu is displayed in the small
rear LCD panel.
Playback
Mode Function Menu: The Playback Function menu is entered by pressing the
Function button while in Playback mode, and the menu is displayed in the small
rear LCD panel.
Playback
Mode Setup Menu: Pressing the Menu button while in Playback mode brings
up the following Setup menu on the large LCD screen:
 Image
Storage and Interface
Image
Storage and Interface
The S2 can accommodate CompactFlash Type I and II as well as SmartMedia memory cards for image storage, but ships without any memory card in its packaging. This makes sense, as most users will want to purchase their own memory cards (if they don't already have a few from previous cameras they've owned), and there's no sense in adding the cost of a big memory card onto the cost of the basic camera. The camera can also accept IBM's MicroDrives, currently available in sizes up to 1GB, with even larger units on the horizon. (The S2 is also a great platform for the somewhat power-hungry MicroDrive, thanks to its low power consumption. - An S2 with a MicroDrive will consume less power than many D-SLRs with conventional flash cards in them.) The media card slot location on the rear panel is convenient for changing memory cards while mounted to a tripod, and the slot is protected by a hinged, plastic door that flips in and out of place. The memory card slot cover is one of my minor design gripes with the S2 though: I found the latch & cover design quite cumbersome to operate.
SmartMedia cards can be write protected by placing a small write protection sticker in the designated area on the card. Stickers must be clean to work and can only be used once. CompactFlash cards cannot be write protected, but images on the card can be individually protected through the Playback menu. Through this same menu, images can also be set up for printing on a DPOF (Digital Print Order Format) device. Three image sizes are available to choose from, 4256x2848, 3024 x 2016, 2304 x 1536 or 1440 x 960, with Hi (uncompressed TIFF), Fine, or Normal JPEG compression levels. Under the Record setup menu, you can choose between TIFF-RGB or CCD RAW formats.
The S2 Pro has both USB and FireWire computer interface ports for connection to a host computer. I didn't receive a USB cable with my eval unit, but I did test the FireWire download speed to my G4 PowerMac. FireWire was definitely fast, but perhaps not as much so as I'd have expected. (Possibly limited by the memory card bandwidth?) I clocked a FireWire download at 1.115 Megabytes/second. (That's about twice as fast as the fastest USB cameras I've tested to date.
Lost Images? - Download this image-recovery program so you'll have it when
you need it...
Since we're talking about memory and image storage, this would be a good time
to mention the following: I get a ton of email from readers who've lost photos
due to a corrupted memory card. It's tragic when it happens, there are few things
more precious than photo memories. Corrupted memory cards can happen with any
card type and any camera manufacturer, nobody's immune. "Stuff happens,"
as they say. A surprising number of "lost" images can be recovered
with an inexpensive, easy to use piece of software though. Given the amount
of email I've gotten on the topic, I now include this paragraph in all my digicam
reviews. The program you need is called PhotoRescue, by DataRescue SA. Read
our review of it if you'd like, but download the program now,
so you'll have it. It doesn't cost a penny until you need it, and even then
it's only $29, with a money back guarantee. So download PhotoRescue for
Windows or PhotoRescue for
Mac while you're thinking of it. (While you're at it, download the PDF
manual and quickstart
guide as well.) Stash the file in a safe place and it'll be there when you need
it. Trust me, needing this is not a matter of if, but when... PhotoRescue
is about the best and easiest tool for recovering digital photos I've seen.
(Disclosure: IR gets a small commission from sales of the product, but I'd highly
recommend the program even if we didn't.) OK, now back to our regularly
scheduled review...
Video Out
 The
US version of the S2 includes a video out jack and connection cable, offering
NTSC-formatted video output. I assume that European models support PAL timing
and is accompanied by the appropriate cable. Connecting the video output provides
a signal to an external device, without disabling the internal LCD display screen.
All images that would normally appear on the LCD are also routed to the external
video display so that the television screen becomes an enlarged version of the
LCD monitor and can be used for image playback and preview.
The
US version of the S2 includes a video out jack and connection cable, offering
NTSC-formatted video output. I assume that European models support PAL timing
and is accompanied by the appropriate cable. Connecting the video output provides
a signal to an external device, without disabling the internal LCD display screen.
All images that would normally appear on the LCD are also routed to the external
video display so that the television screen becomes an enlarged version of the
LCD monitor and can be used for image playback and preview.
 For
power, the S2 uses four AA rechargeable NiMH batteries and two CR123A lithium
batteries. The AA cells power the digital parts of the camera, while the lithium
cells run the camera functions such as autofocus, shutter and flash. From my
own experience, I can say that, in addition to the normal extra set of NiMH
AA cells, you'll definitely want to pack along a spare set of CR123A's: After
several days of intense shooting, I was puzzled by the cameras sudden lack of
response, and somewhat confusing error messages in the top LCD readout. It turned
out that LOTS of autofocus operation plus a goodly dose of flash exposures had
drained the lithium cells. The camera can run solely from the AA cells
though, if you can get by without the flash. - I'd really like to see a setup
that would do away with the second set of batteries, but the good news is that
AA battery life is really excellent.
For
power, the S2 uses four AA rechargeable NiMH batteries and two CR123A lithium
batteries. The AA cells power the digital parts of the camera, while the lithium
cells run the camera functions such as autofocus, shutter and flash. From my
own experience, I can say that, in addition to the normal extra set of NiMH
AA cells, you'll definitely want to pack along a spare set of CR123A's: After
several days of intense shooting, I was puzzled by the cameras sudden lack of
response, and somewhat confusing error messages in the top LCD readout. It turned
out that LOTS of autofocus operation plus a goodly dose of flash exposures had
drained the lithium cells. The camera can run solely from the AA cells
though, if you can get by without the flash. - I'd really like to see a setup
that would do away with the second set of batteries, but the good news is that
AA battery life is really excellent.
An external AC adapter is available as an accessory and plugs into the DC port on the left side of the camera, which is covered by a small, flexible plastic flap. I should mention that the ability to almost completely rely on the smaller LCD panels for changing camera settings is a tremendous power saver. There's also an Auto Off feature that lets you set the camera to turn itself off after a brief period of inactivity. Bottom line, keep an extra set or two of Lithium cells on hand at all times, but you should be able to shoot all day on a single set of high-capacity NiMH AAs. Here's my usual table with power consumption in various operating modes and projected runtimes for each based on high-capacity NiMH AAs.
|
|
at 5v |
Runtime, 4x1600 mAh AA batteries |
| Capture Mode, w/LCD |
|
n/a |
| Capture Mode, no LCD |
|
700 |
| Half-pressed shutter w/LCD |
|
n/a |
| Half-pressed w/o LCD |
|
575 |
| Memory Write (transient) |
|
n/a |
| Flash Recharge (transient) |
|
n/a |
| Image Playback |
|
238 |
These power numbers are very low for a high-end digicam, in part because there is no mode where both the CCD and LCD are active at the same time. The combination of no LCD viewfinder and accurate optical one means that you should be able to stay away from the power-hungry color LCD screen most of the time. If you're able to do that, the 132 mA operating power is very low, and a good set of high-capacity NiMH AA cells should last for a good 10 hours+ of nonstop (and non-LCD) operation. Even in playback mode, worst case run time should be nearly 4 hours. Very nice!
Included Software
| |
|
|
The S2 is accompanied by both USB and FireWire cables for connection to a PC or Mac. Included software CD offer Adobe Photoshop Elements, USB drivers, Fuji's FinePix Viewer, a raw file converter, VideoImpression, and Apple QuickTime 5.0. Fuji's software provides the basics for downloading and browsing images, while Photoshop Elements provides good image-manipulation capability. I applaud Fuji for including software for converting the RAW image files to other formats in the box, at no added charge, although I haven't had a chance to test it yet, as the box with my eval unit in it was missing the software CD.
In the Box
The Fuji S2 Pro ships to the US market with the following items in the box. (Note that overseas models may have very different complements of software and accessories.)
Test Results
In keeping with my standard policy, my comments here are rather condensed, summarizing my key findings. For a full commentary on each of my standard test images, see the Fuji S2 Pros "pictures" page. (The comments on the pictures page really go quite a bit beyond the condensed listing below- If you're seriously interested in the camera, you owe it to yourself to read them.)
As with all Imaging Resource camera tests, I encourage you to let your own eyes be the judge of how well the devices performed. Explore the images on the pictures page, to see how well the S2 Pro performed, and how its images compare to other cameras you may be considering buying.
Overall, the S2 turned in a superb performance, really surprising me with how well it did against the very stiff competition from Nikon's D100 and Canon's D60. The first thing I observed in studying its photos was that it sports the same beautiful color as its predecessor, the S1 Pro. The S1 was renowned for its excellent color, and particularly for its handling of skin tones. The S2 seems to continue that tradition, with genuinely beautiful color across a wide range of subjects and shooting conditions.
While the S2's color was very good, I'd more or less expected that, given the past performance of the S1. I was probably most surprised by the S2's resolution, which went a good bit beyond what I'd been expecting. In the past I've found that Fuji's SuperCCD sensors do indeed deliver a bit more resolution than conventional CCDs of similar pixel count, but the difference was never dramatic. In the S2 though, the SuperCCD seems to have really hit its stride, as I felt that the S2 Pro delivered noticeably more resolution than either the D100 or D60. To some extent, this may be splitting hairs: All three cameras produce very sharp, film-like images, but the S2 Pro seems to go a bit beyond. A note though: To obtain the best results, you'll need to work in the largest (interpolated) file size, and leave the internal sharpening turned off. - Sharpen post-exposure in Photoshop to extract the maximum amount of detail.
Another minor surprise was how well the S2 Pro did in low light conditions. This was particularly impressive, in that the camera doesn't use a conventional "dark frame" noise reduction approach. - There's thus no additional delay imposed between successive shots, even when working with very long shutter times (30 seconds plus). This could be a significant advantage for shooters working under very limited available light.
Image noise on the S2 Pro was quite interesting: It exhibited lower luminance noise than the D100, although it showed more noise in the individual color channels. - This is likely the result of a conscious choice by Fuji's engineers, opting to permit more chroma noise (which is generally less visible to the eye) to achieve lower luminance noise. Overall noise was quite low regardless.
I really liked the S2 Pro's tonality, as I felt it was less prone to losing highlight detail than some of its august competition. This conclusion wasn't the result of any formal dynamic range measurements, but rather simply an impression drawn from a good bit of shooting, and close examination of the resulting photos.
I do have one significant gripe about the S2 Pro though: Apparently as a holdover from the film-based N80 body it's built upon, its exposure compensation adjustment has rather coarse 1/2 EV steps. These compare to the 1/3 EV steps that are almost universally employed in digicams from consumer to professional models. In my experience, being limited to 1/2 EV exposure steps makes it difficult to achieve spot-on exposure, resulting in frequent (if minor) over- or underexposure. If I could make only one change to the S2 Pro's design, it would be to include an option to select either 1/2 or 1/3 EV exposure steps.
All in all, the S2 Pro proved to be an exceptionally strong contender in the 6 megapixel Digital SLR category. If you're considering purchasing a D-SLR, you owe it to yourself to give the S2 Pro a close look. (Particularly if you already own a kit of Nikon lenses.)
Conclusion
Fuji's original S1 Pro did well partly due to its beautiful color rendering, and partly due to a price that was thousands of dollars less than other D-SLRs at the time of its introduction. A lot of people (myself included) have questioned whether Fuji could stay in the game with Canon and Nikon's competing models actually selling for a bit less than the S2. I confess that I approached the camera with more than a little skepticism, expecting it to come up short after the wonderful experience I'd had with the Nikon D100 just before it. I was thus somewhat surprised by how much I ended up liking the S2. Its color is indeed every bit as accurate and (more to the point) as pleasing as the S1 before it, and I was genuinely amazed by its resolution and how delicately it rendered fine detail. I didn't like its body style quite as much as the D100's, but the differences are relatively slight. I really liked its user interface design, with the small rear-panel data readout and "soft buttons" below it, but this is very much a personal preference that others may not share.
What's clear though, is that Fuji has crafted a very strong entry in the 6 megapixel D-SLR category, and are very much still in the game. Fuji had a strong market for the S1 among commercial portrait and wedding shooters, thanks to the excellent handling of skin tones. The S2 will likely continue to lead that market, but will find many other happy homes as well. Kudos to Fuji for another well-executed entry in the D-SLR race!
<<FinePix S2 Pro Sample Images | Additional Resources and Other Links>>
Reader Comments!
Questions, comments or controversy on this product? Click
this link to see what other Imaging Resource readers have had to say about
the Fuji FinePix S2 Pro, or add comments of your own!