Canon S3 IS Design
 The Canon PowerShot S3 IS's all-plastic body has a solid feel, and has a healthy heft that helps you hold the camera steady. Measuring 4.46 x 3.07 x 2.97 inches (113.4 x 78 x 75.5 millimeters), the S3 IS definitely won't fit into your shirt pocket. It may find its way into larger coat pockets, but most likely will be worn around your neck with the included neck strap. Weighing 18.55 ounces (526 grams) including batteries and SD card, it isn't at all uncomfortable to carry. The gun metal gray body echoes the visual style of an SLR camera, and should be both sophisticated and simple enough for any age group or user level. The color, the Mode dial options, and the functions assigned to the buttons on the back are the only differences between the PowerShot S3 IS and the S2 IS designs.
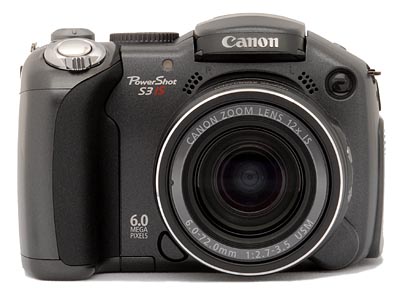
The Canon PowerShot S3 IS's front panel features the telescoping 12x image-stabilized zoom lens, which projects one and one eighth inch further when fully extended. Also on the front panel are the pop-up flash, red-eye reduction lamp (a lamp that doubles as a self-timer and tally lamp), and a bright green AF assist beam. Flanking the lens are the grilles for the stereo microphones. On the lower right side of the lens (as viewed from the rear) is a small button that releases the ring around the lens barrel. Removing the ring reveals a bayonet-style mounting area that allows you to attach a lens adapter for extended telephoto, wide angle, or macro capabilities. The Canon S3 IS's hand grip, created by the battery compartment, protrudes from the front panel as well.
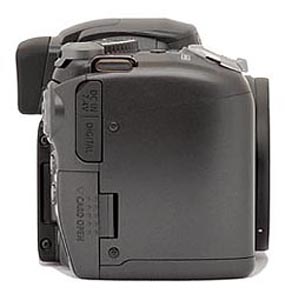
On the right side of the Canon PowerShot S3 IS (as viewed from the rear) is the SD card slot, covered by a hinged, plastic door. The door slides toward the back panel before springing opening outward. At the top of the right side are the USB port, DC in jack (both covered by a rubber door), and an eyelet for attaching the neck strap.
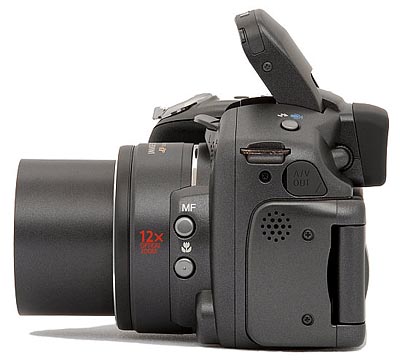
The opposite side of the PowerShot S3 IS has the grille for the camera's small speaker, the A/V Out port, and the second neck strap eyelet. On the side of the lens casing are the Manual Focus and Macro mode (including Super Macro) buttons.
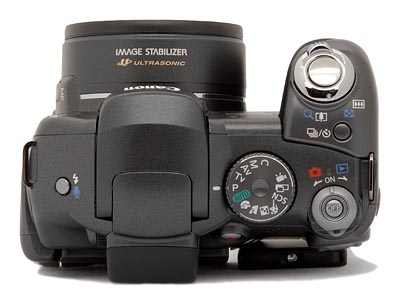
The Canon S3 IS's top panel features a number of controls located on either side of the pop-up flash. To the right of the flash is a Mode dial with 13 shooting positions divided into three basic categories: Auto Exposure, Image Zone, and Creative Zone. The Shutter button is located at the front edge of the grip, with the Zoom lever surrounding it. Behind that is the Continuous/Self Timer button. An Off button to turn off the camera's power is on the right side of the Mode dial. The Off button is surrounded by a Mode lever with a locking release button to prevent accidentally activating the camera in either Record or Playback mode; pushing the release button (which happens naturally when you actuate the control with your thumb) and turning the lever counter-clockwise sets the camera to Record mode, while turning it clockwise sets the camera to Playback mode. Directly above the Power button is a Power/Mode Indicator LED, which lights orange, green, or yellow when the PowerShot S3 IS is powered on to indicate the current mode (Record, Playback, or PC Connection respectively). To the left of the pop-up flash is the Flash/Mic button.
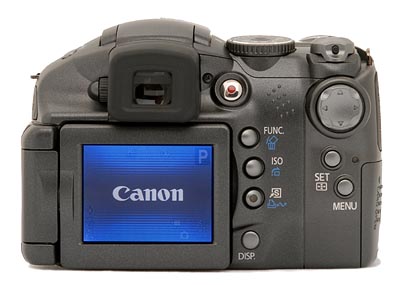
The rest of the exposure controls are located on the Canon PowerShot S3 IS's rear panel, along with the electronic optical viewfinder and flip-out, rotating LCD monitor. The LCD monitor lifts off of the rear panel to face forward, can swivel 270 degrees to face several viewing angles, and can be closed against the rear panel with the LCD facing inward to offer protection against accidental knocks or scratches. The electronic optical viewfinder, activated by pressing the Display button in Record mode or turning the LCD to face inward against the camera body in any mode, duplicates what would otherwise be shown on the articulated LCD monitor. At the top right corner is a four-way multi-controller that navigates settings menus, pressing up, down, left, and right. Below the multi-controller are the Set (which functions as an OK button when menus are displayed or the AF Frame Selector in Record mode) and Menu buttons. To the right of the LCD monitor are the Function/Erase, ISO/JUMP, Shortcut/Print, and Display buttons. To the right of the electronic optical viewfinder is the Movie button, which begins recording movies regardless of mode (pressing it in Playback mode returns you first to Record mode, and another press is required to start recording). On the other side of the viewfinder is a Diopter Adjustment Dial.
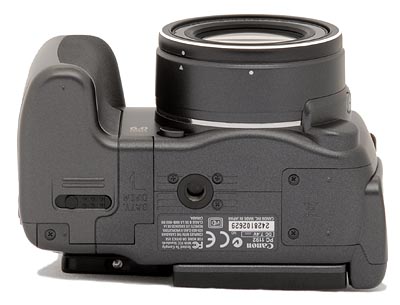
The Canon PowerShot S3 IS's bottom panel is reasonably flat, with a sliding door to access the battery compartment and a threaded plastic tripod mount at about the center of the body but not centered on the lens. Because the battery door and tripod mount are so close to one another, it would be difficult to make quick battery changes while working with a tripod, but doable for small tripod heads. On the other hand, Canon's AC adapter plugs into the right side of the camera. Thus, for studio use, there's a convenient way to get power to the camera while on a tripod. The location of the SD card door on the side of the PowerShot S3 IS is also conducive to use on a tripod.
Canon S3 IS External Controls

Shutter Button: Resting in the center of the Canon PowerShot S3 IS's Zoom lever, this button sets focus and exposure when halfway pressed, and fires the shutter when fully pressed.
Zoom Lever (see previous image): Surrounding the Shutter button on the top panel, this lever controls the optical and digital zoom while in Record mode. In Playback mode (when not using the playback zoom), the "W" side displays a nine-image index display of all images on the memory card, and accesses a "Jump" function that lets you scroll through index display screens quickly. Alternatively, the "T" position enlarges the currently displayed image as much as 10x, so that you can check on fine details.
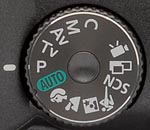
Mode Dial: Also on the Canon PowerShot S3 IS's top panel, this large, notched dial is used to select the camera's shooting modes. Canon divides these functions into three categories: Auto, Image Zone, and Creative Zone. The options are as follows:
 Auto: The Canon S3 IS controls everything about the exposure, except for Flash and Macro modes, and image size and quality settings.
- Creative Zone
 Program AE (P): Places the camera in control of shutter speed and lens aperture, while you maintain control over everything else (i.e., white balance, ISO, metering, exposure compensation, flash, etc.). Available shutter speeds range from one second to 1/3,200 second.
 Shutter-Speed Priority AE (Tv): Allows you to control the shutter speed settings from 1/3,200 to 15 seconds, while the camera controls the aperture. All other exposure settings are available. (Note that the maximum 1/3,200 shutter speed is only available when the lens is at its maximum wide-angle setting.)
 Aperture Priority AE (Av): Allows you to set the lens aperture from f/2.7 to f/8.0, while the camera controls the shutter speed. The maximum aperture depends on the zoom setting, ranging from f/2.7 at the wide angle end to f/3.5 at the telephoto position. In this mode, you maintain control over all other exposure variables. Maximum exposure time in Aperture Priority mode is one second. Maximum possible shutter speed varies with the aperture chosen:
Available Shutter Speeds Focal Length Aperture Shutter Speed Maximum
Wide Anglef/2.7-3.5 to 1/1,600 f/4.0-5.0 to 1/2,000 f/5.6-7.1 to 1/2,500 f/8.0 to 1/3,200 Maximum
Telephotof/3.5-4.5 to 1/1,600 f/5.0-6.3 to 1/2,000 f/7.1-8.0 to 1/2,500  Manual (M): Provides complete control over all exposure settings, including shutter speed and lens aperture. As with aperture-priority mode, the maximum aperture varies with the zoom setting from f/2.7 to f/3.7. The fastest shutter speed varies with the aperture and zoom setting (see chart).
 Custom (C): This position recalls exposure settings previously-saved via the Menu system.
- Image Zone
 Portrait: Uses a large aperture setting to blur the background while keeping the primary subject in sharp focus.
 Landscape: Employs a small aperture setting to keep both the background and foreground in focus. (May use a slower shutter speed, so a tripod is recommended.)
 Night Scene: Uses slower shutter speeds to capture ambient light and flash to illuminate the main subject. The Red-Eye Reduction mode can be enabled to reduce Red-Eye in night portraits.
 Sports: Sets the camera to shoot in Continuous mode with Autofocus to capture moving subjects.
 SCN: Special Scene Mode: Accesses specially tuned exposure modes for the specific situations outlined below. The left/right arrows on the multi-controller step through the following choices:
- Foliage: For trees, leaves and flowers, this mode enhances colors, making them more vibrant.
- Snow: Compensates for bright snowy backgrounds, holding detail in the snow while properly exposing the main subject and eliminating the bluish tint common in snow shots.
- Beach: Similar to snow mode, compensates for brightly lit backgrounds where sand and water dominate the scene.
- Fireworks: Optimized for night skies speckled with fireworks.
- Color Accent: Retains only the color specified in the LCD monitor while rendering all the others in black and white.
- Color Swap: Transforms the color specified in the LCD monitor to any selected color.
- Night Snapshot: Fires a flash to illuminate and freeze the foreground, while leaving the shutter open just a little longer to capture more of the ambient light in the background, while still making the scene look like a night scene.
- Indoor: Biases the exposure for common indoor lighting situations, automatically adjusting between fluorescent and tungsten light sources. The camera attempts to use flash as little as possible in this mode to allow for a more natural appearance.
 Stitch-Assist: Records a series of images, either horizontally, vertically, or clockwise in an array of two by two images, which can be "stitched" together into one large image or panorama on a computer.
 Movie: Records as much as one hour of AVI-formatted moving images with sound per clip (depending on memory card space), at either 640 x 480 or 320 x 240 pixels, with frame rates of approximately either 15 or 30 frames per second. You can also record at 320 x 240 with 60 fps. Maximum recording size is 1GB.

Off Button: To the right of the Mode dial, in the center of the Mode Lever, this button turns the camera off.
Mode Lever (see previous image): Surrounding the Off button, this lever turns the camera on (if it is currently off), and sets it to either Record (counter-clockwise) or Playback (clockwise) modes, depending on which direction it is turned. The Mode Lever has a locking release button to prevent accidentally changing modes or turning the camera on, which must be pushed inward before the dial can be turned.

Flash/Sound Memo Button: When the Flash is manually deployed (there is no pop-up function), this button sets the flash operating mode, cycling through the available options with each press. Depending on whether the Red-Eye Reduction Function is set to On or Off, the options are either Auto with Red-Eye Reduction and Flash On with Red-Eye Reduction or Auto and Flash On. The Flash Off setting is achieved by closing the flash.
In Playback mode, this button calls up the Sound Memo Panel, allowing sound memos to be recorded to accompany images.

Continuous/Self Timer Button: Sets the camera's drive mode, cycling through the available options with each press. Depending on whether the Self-timer Function is set to 10 or 2 seconds or Custom, the options are: Single, Continuous Shooting, ten second Self-timer, two second Self-timer, and Custom Self-timer.

Multi-Controller Rocker Button: This four-way rocker button can be pressed left, right, up, or down to navigate through settings menus. In Playback mode, the left and right buttons scroll through captured images. When an image has been enlarged, all four arrows pan within the view.

Diopter Adjustment Dial: Directly to the left of the electronic optical viewfinder, this dial is used to adjust the dioptric correction of the viewfinder, accommodating eyeglass wearers.

Movie Button: Directly to the right of the electronic optical viewfinder, this button instead of the shutter button starts and stops movie recording. In Movie mode, the shutter button can be used to capture full-size still images (the movie scene blanks and the shutter sound is recorded during exposure -- which can't be disabled).

Function/Erase Button: Directly below the Movie button, this button displays the following Function menu while in Record mode:
 Exposure Compensation: Increases or decreases the exposure from -2 to +2 exposure equivalents (EV) in one-third-step increments. Not available in Manual mode, since the user controls the exposure variables directly there.
- White Balance: Controls the color balance of images. Options are Auto, Daylight, Cloudy, Tungsten, Fluorescent, Fluorescent H, Flash, and Custom (manual setting).
- My Colors: Enables Vivid Color, Neutral Color, Sepia, Black-and-White, Positive Film, Lighter Skin Tone, Darker Skin Tone, Vivid Blue, Vivid Green, Vivid Red, or Custom picture effects. The Custom effect tweaks Contrast, Sharpness and Saturation as well as Red, Green, Blue, and Skin Tone balance using a slider with five steps.
- Bracketing: Enables the camera's automatic bracketing function, with choices of Automatic Exposure Bracketing or Focus Bracketing. Automatic Exposure Bracketing captures three images with bracketing of up to 2.0EV between shots, adjustable in 1/3EV steps. Focus Bracketing captures three images with three arbitrary bracketing step sizes available (Small, Medium or Large steps). Automatic Exposure Bracketing is not available in Manual exposure mode, since you're controlling the exposure settings directly.
- Flash Output: When the Mode Dial is set to Program or one of the Scene modes, or in Shutter or Aperture Priority mode with the Flash Adjust Function set to Auto, offers +/- 2.0EV of Flash Exposure Compensation in 1/3EV steps. When the camera is in Shutter or Aperture Priority modes and the Flash Adjust Function is set to Manual, adjusts the overall flash intensity in three steps from Low to Full. When the camera is in Manual mode, Manual flash output is the only option available.
- Metering: Sets the Metering mode to Evaluative, Center-Weighted Averaging, or Spot. When set to Spot, the metering area depends on the Spot AE Point function, and sets the Spot point either in the center of the frame, or to the location of the AF point.
- Movie Quality: Sets the resolution and frame rate for recording movies. Options are approximately equivalent to 15 or 30 frames per second. The five Movie options are 640 x 480 at 30 fps or 15 fps, and 320 x 240 at 60 fps, 30 fps, or 15 fps. (Because this is a movie/still camera, both Movie options and Still resolution are shown on the same Function screen.)
- Resolution: Specifies the image resolution and quality settings. Still image resolutions are 2,816 x 2,112 (L), 2,272 x 1,704 (M1), 1,600 x 1,200 (M2), 640 x 480 (S), and 2,816 x 1,584 (W) pixels. Quality options (activated by pressing the Set button) are Superfine, Fine, and Normal.
In Playback mode, this button displays the single-image erase menu.

ISO/Jump Button: Below the Function/Erase button, this button cycles through the ISO options in Record mode, which include ISO Auto, ISO High (allows higher ISOs than Auto), 80, 100, 200, 400, and 800.
In Playback mode, this calls up the Jump Bar, allowing you to move through images stored on the card very rapidly with the Left or Right arrows on the Multi-Controller Rocker button. Once the Jump Bar is displayed, you can use the Up or Down arrows to cycle through a variety of options, namely Jump 10 images, Jump 100 images, Jump Shot Date, and Jump to Movie. This is a very handy set of options, particularly Jump to Shot Date, which displays the number of images it found taken on each date, and Jump to Movie, which is very handy for finding scattered movie files buried among dozens of still images.

Shortcut/Print-Share Button: Below the Metering/Microphone button, in Record mode this button allows you to call up a frequently used function, and can be assigned via the Setup menu to Still Resolution, Movie Recording Size, or Frame Rate, Metering System, White Balance, My Colors, Image Stabilizer, AE Lock, AF Lock, Display Off, and Create New Folder.
When connected to a PictBridge-compatible printer, this button glows blue and pressing it initiates the print function. When connected to a Windows computer running Canon's software package, this button also glows blue, and pressing it initiates an automatic transfer of the camera's images to the computer.

Display Button: Below the Shortcut/Jump button, this button controls the information and image display modes in Record and Playback modes, and switches between the LCD monitor and electronic optical viewfinder in Record mode only.

Set/AF Frame Selector Button: Directly below the Multi-Controller Rocker button, this button confirms menu selections. It also allows you to adjust the location of the camera's autofocus point. Pressing it in Record mode highlights the AF frame in green on the LCD or electronic optical viewfinder, allowing the location of the AF area to be adjusted with the Multi-Controller Rocker button. A second press locks in the new location of the AF point, indicated by the color of the AF frame returning to white.
When in Manual Focus mode, this button tells the camera to search for autofocus lock near the currently set manual focus distance. (Another uncommon but handy feature.)

Menu Button: Underneath the Set/AF Frame Selector Button, this button calls up the settings menu in Record and Playback modes. It also dismisses the menu screen and backs out of menu selections.

MF Button: On the left side of the lens (as viewed from the rear), this button enables or disables Manual focus mode. Manual focus is set by holding down the Manual Focus button while pressing the Up or Down arrows on the Multi-Controller Rocker button, and if the MF-Point Zoom function is set, a small window showing an enlarged view of the center of the image is shown on the LCD or electronic optical viewfinder while the Manual Focus button is held down.

Macro Button: Underneath the MF Button, this button enables or disables both Macro Modes. Pressed once, the button enables Macro mode, which focuses in the 3.9 inch to 1.8 foot range. When Super Macro mode is enabled by holding the button down, the S3 IS can focus down almost to the front element of its lens. Both Macro modes function at wide angle only.
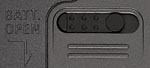
Battery Compartment Latch: Nestled in the center of the battery compartment door on the bottom of the camera, this sliding switch unlocks the door, so it can slide forward and open.

Lens Ring Release Button: Tucked under the lens on the camera's front panel, this button releases the lens ring. Once unlocked, the lens ring can then be turned and removed to accommodate accessory lens kits.
 Fujifilm GFX 50S Review
 Fujifilm X-T3 Review
 Olympus E-M5 III Review

Follow Imaging Resource