Back
to Full Canon PowerShot S40 Review
Back
to Full Canon PowerShot S40 ReviewGo to Canon PowerShot S40 Data Sheet
Go to Canon PowerShot S40 Pictures Page
Up to Imaging Resource Cameras Page
Use your browser's "Back" button to return to the previous page, or the links at the top and bottom of this page to navigate to related information. If you have difficulty fitting the text on this page onto your printer output, simply resize your browser window to a narrower width and print again.
Remember us when it's time to buy!
Dave here: Have our reviews been helpful to you? (Is this article you're reading right now useful?) Preparing this level of information on as many products as we do is incredibly hard work, not to mention expensive. Things on the Internet may look like they're free, but they're not. (As a lot of big dot.com companies are finding out these days.) Somewhere, somebody has to pay to produce worthwhile content. YOU can help us though, by remembering us when it comes time to make your purchase. Would you consider coming back to our site and clicking-through to one of our advertisers to make your purchase? Every dollar you spend with one of our advertisers helps us directly (in affiliate fees) or indirectly (the advertiser will keep renewing their ad contract with us). To make it easy for you to support us, here's a URL you can visit, to see all our current advertisers, with links to click on that will register your visit to them as having come from our site. It's up to you where you buy, but Mike, Mike, Kim, Yazmin, Marti and I would be really grateful if you'd help us out by choosing one of our advertisers to purchase from.
Thank you for your support!
Dave Etchells, Founder & Publisher
Visit our "Buy Now" Page:
https://www.imaging-resource.com/buynow.htm
Back
to Full Canon PowerShot S40 Review
Go to Canon PowerShot S40
Data Sheet
Go to Canon PowerShot S40
Pictures Page
Up to Imaging Resource Cameras
Page
Canon PowerShot S40A new shape, sleek design, direct support for a Canon inkjet printer, and four megapixels of resolution! Review First Posted: 10/1/2001 |
|
 |
|
4 Megapixel CCD delivers 2272 x 1704 pixel images |
|
|
3x optical zoom lens covers 35-105mm equivalent range | |
|
|
Nice mix of high-end features, easy usability | |
|
|
Beautiful, rugged, compact design |
Introduction
(NOTE: This camera is virtually identical to the Canon PowerShot S40, except for the sensor resolution. Thus, this preview is almost identical to the one for the S40. The only significant differences are some of the timing and (obviously) file sizes, etc. There may well be some differences in the image characteristics (tone and color) though, so stay tuned for our test results once we receive units we can share the photos from!)
Canon U.S.A. has long been a strong contender in the film and digital camera markets, well-known for its high-quality optics, technical innovations, and aggressive product development. Since the beginning of this year (2001), Canon has released a full complement of new digital cameras, all designed and engineered to live up to Canon's competitive standards. On the high end, the PowerShot Pro90 IS incorporates a 3.34-megapixel CCD, 10X optical zoom lens with image stabilization, and 12 EOS-based shooting modes. The PowerShot G2, the 4-megapixel upgrade to Canon's popular G1 model, is an SLR style prosumer model that features Canon's popular rotating LCD monitor, an external hot shoe, and broad range of automatic and manual exposure and shooting functions. Among Canon's consumer introductions are two new point-and-shoot digicams for the amateur market -- the PowerShot A10 and A20 -- identical except for their 1.3- and 2.1-megapixel CCDs, respectively. Canon also came through with two new ELPHs -- the 2.1-megapixel PowerShot S300, with a retractable 3x zoom lens, and more recently, the PowerShot S110, with the same high-quality chip, but a shorter 2x zoom lens.
The 3.2-megapixel PowerShot S30, released concurrently with its companion model, the 4-megapixel PowerShot S40, is a point-and-shoot style digital camera that incorporates many of the G2 features, but in a more compact, portable format. Like the G2, the S30 has an impressive range of automatic and manual exposure controls, a 3x optical zoom lens, JPEG and RAW file formats, and in-camera adjustment of image contrast, sharpness, and color saturation. In addition to these features, the S30 also offers expanded ISO options, an additional metering mode, and the first direct-to-inkjet printer connection, enabling the user to make prints not only to the Canon C-10 Photo Card Printer, but also to the company's newest inkjet ("bubble-jet" in Canon's terminology) printer, the S820D. Priced competitively at a MSRP of $699, the PowerShot S30 is sure to be a popular choice among business users, prosumer photographers, advanced amateurs, and even beginning photographers who want a high-quality digital camera that delivers large, sharp, colorful picture files.
High Points
Executive Overview
The moment you pick up the Canon PowerShot S40, you feel like you're handling a well-built, high-quality digital camera. The size and style are reminiscent of a point-and-shoot model, though it offers 4 megapixels(!) of resolution and a wide range of shooting options -- from fully manual operation to programmed, automatic, and several preset exposures. The telescoping 3x zoom lens is made of Canon's high-quality optical glass, protected by a clamshell sliding lens cover that blends almost seamlessly into the camera's front panel. As with the majority of Canon's high-end digicams, primary functions are accessed via external controls, providing quick and easy adjustments to flash, exposure compensation, white balance settings, manual focus, and light metering modes. This combination of compact design, sturdy construction, and flexible exposure options makes this camera a real pleasure to work with, and a great value for the $799 list price.
The S40's sleek-looking, steel-gray body is made of high-impact polycarbonate, entirely surrounded with brushed and anodized aluminum body panels. Measuring only 4.4 x 2.3 x 1.7 inches (112 x 58 x 42mm) with the lens retracted, and weighing just 11.5 ounces (310.5 grams) with the battery and storage card installed, the S40 is only a little longer and heavier than the"ultra-compact" S110 Digital Elph. Sliding open the protective lens cover powers on the camera, automatically activating the lens and placing the camera in Shooting mode. When sliding closed, the cover stops just short of the lens barrel, giving it time to retract and shut down before you can close the cover completely (preventing the dreaded "bumped lens" syndrome). Rather than incorporating the playback mode on the camera's main Mode dial, the S40 has a Replay switch that doubles as a quick-review button. At any time you can switch to playback mode and scroll through captured images, and then quickly return to the Shooting mode without having to change the Mode dial. (You can also use this switch to access the Replay mode without opening the lens cover.) While the S40 has too many external controls to cluster them all on the right side of the camera, you'll find it suitable for one-handed operation in most situations. The S40 is small enough to fit into a coat pocket or purse, and comes with a 0.25-inch braided nylon wrist strap for added convenience.
The camera features an eye-level "real image" optical viewfinder that zooms along with the 3x lens and features a central autofocus / exposure target for composing images. Two LEDs on the left side of the viewfinder report the camera's ready status. When the camera is powered on in most Shooting modes, the 1.8-inch LCD monitor briefly displays camera settings and then turns itself off. It can be reactivated by pressing the Display button, which cycles through: Screen on with image only, screen on with image and settings, and screen off. Depending on the Shooting mode, the LCD reports the flash setting, drive mode, metering mode, image size and quality, and the number of frames remaining. Additional functions are shown as they are enabled and battery status is only displayed when power is low.
The 7- 21mm zoom lens (equivalent to 34-102mm on a 35mm camera) offers both manual and automatic focus control. Manual focus mode is accessed by holding down the MF button on the left side of the monitor and toggling the up and down arrows on the Multicontroller pad in the upper right corner of the camera's back panel. A vertical scale on the LCD monitor shows the focus distance in meters and feet when manual focus is active. The S40 also offers three selectable AF Frames, which can be selected using the Multicontroller. Focus ranges from 2.7 feet (80cm) to infinity in normal mode, and from 3.9 inches to 2.7 feet (10 to 80cm) in Macro mode. The 3.6x Digital Zoom can be turned on in the Record menu, then activated by zooming past the maximum optical telephoto range with the camera's Zoom lever. (Remember that because digital zoom only enlarges the center portion of the CCD image, it compromises the image quality by reducing resolution.)
The S40 provides as much or as little exposure control as you want. All exposure modes are accessed by turning the Mode dial on top of the camera. Canon has divided the dial into three exposure types: Auto, Creative Zone, and Image Zone. Shooting in Auto mode puts the camera in charge of everything except the Flash and Macro modes. Exposure modes in the Creative Zone include: Program AE (P), Shutter Speed-Priority AE (Tv), Aperture-Priority AE (Av), and Manual Exposure (M). Program AE lets the camera choose the aperture and shutter speed settings, but gives you control over all other exposure options. Aperture and Shutter Speed Priority modes allow you to set one exposure variable (aperture or shutter speed) while the camera chooses the best corresponding variable. Manual mode gives you full control over all exposure controls. (The camera's aperture can be set from f/2.8 to f/8.0, and the shutter speed ranges from 1/1,500 to 15 seconds.)
Exposure modes in the Image Zone include: Portrait, Landscape, Night Scene, Fast Shutter Speed, Slow Shutter Speed, Color Effects, Stitch Assist, and Movie. Portrait, Night Scene, and Landscape all make automatic camera adjustments to optimize settings for specified shooting conditions. The Portrait mode uses a large aperture setting to focus on the subject, while maintaining an out-of-focus background. Landscape mode slows the shutter speed and maximizes depth of field with a small aperture setting. Night Scene mode illuminates your subject with flash and uses a slow shutter speed to evenly expose the background. Color Effects offers a choice of Vivid or Neutral color, Sepia tone, or Black-and-White shooting modes. The Stitch-Assist mode is Canon's answer to panorama shooting, in which multiple, overlapping images can be captured horizontally, vertically, or in a clockwise grouping. Images are then "stitched" together on a computer using Canon's bundled PhotoStitch software. Movie mode allows you to capture up to 30 seconds (320 x 240 pixels) or 120 seconds (160 x 120 pixels) of moving images and sound at approximately 15 frames per second.
The S40's specific exposure controls, most of which are accessed through the camera's external control buttons, are quite extensive. They include a White Balance setting with seven options: Auto, Daylight, Cloudy, Tungsten, Fluorescent, Fluorescent H (daylight), Flash, and Custom; adjustable ISO sensitivities from Auto to 50, 100, 200, 400 and 800 (a Record menu item); Exposure Compensation from -2 to +2 EV, in one-third-step increments; Auto Exposure Bracketing (AEB) from -2 to +2 EV in one-third-step increments (a total of three exposures); and a choice of Evaluative Light Metering, Center-Weighted Averaging, and Spot (AE) Point metering modes. The S40's built-in flash offers five operating modes (Auto; Red-Eye Reduction, Auto; Red-Eye Reduction, Normal; Flash On; or Flash Off) and Flash Exposure Compensation from -2 to +2 EV in one-third-step increments. The Flash Exposure (FE) Lock function allows you to lock the flash exposure setting for one specific subject in the frame.
Other special shooting modes include: Macro, which allows you to photograph subjects within a range of 3.9 inches to 2.7 feet (10 to 80cm) at the maximum wide-angle setting, and from 1 to 2.7 feet (30 to 80cm) at maximum telephoto. There are two Continuous Shooting modes. Standard Continuous Shooting captures multiple, successive still images, at about 2.5 frames per second, providing enough time to display each image briefly after it is captured. High Speed Continuous Shooting captures images at 1.5 frames per second, as long as you hold down the shutter release. (The number of images and actual shot-to-shot speed depend on several factors, including the amount of memory remaining on the flash card.)
In Replay mode, the LCD monitor provides a full-frame display of captured images, which you can view individually or as an index of nine thumbnail images simultaneously. The optical Zoom lever (marked by magnifying glasses) doubles as a Digital Enlargement button, which allows you to enlarge captured images by 2.5X and 5X for closer inspection, and the arrow keys permit you to move around the enlarged images to pinpoint important details. By pressing the Light Metering / Audio button, you can record up to 60 seconds of sound with individual images.
Depressing the Display button one time in Replay mode brings up information about the captured image, including the file name, date and time it was recorded, compression, resolution, and what number it is in the sequence of captured images. Another press of the Display button brings up a thumbnail view of the image with detailed information such as the shooting mode, aperture, f/'stop, exposure compensation, and metering mode. In addition, the screen shows a histogram next to the image to indicate the distribution of tonal values.
Images are saved onto CompactFlash Type I or II memory cards, with possible image resolutions of 2,272 x 1,704; 1,600 x 1,200; 1,024 x 768; 640 x 480 pixels; (movies are saved at 320 x 240 or 160 x 120 pixels). Three JPEG compression levels are available, as well as a RAW data file format, which results in a higher quality image compression. (Canon software is required to process RAW images.) A USB cable is provided for speedy connection to PC or Macintosh computers, and two software CDs offer an impressive selection of utilities. Canon's own Digital Camera software package includes ZoomBrowser EX (Win) and ImageBrowser (Mac) for downloading and organizing images, and processing RAW files; PhotoRecord (Win) and ImageBrowser for printing images; PhotoStitch for merging panoramic images captured in Stitch-Assist mode, and a unique application that allows you to operate the camera remotely through your computer (RemoteCapture 1.1). RemoteCapture not only controls the shutter, but also provides a histogram of the subject so that you can check the exposure. ArcSoft PhotoImpression and VideoImpression are provided for editing images and movies.
US and Japanese models come with an NTSC cable for connecting to a television (European models are equipped for the PAL standard). Power is supplied by a rechargeable NB-2L lithium battery which comes with a charger. An optional AC power adapter is available as a separate accessory.
Overall, we liked the PowerShot S40 quite a lot. It offers the extensive exposure control we're accustomed to seeing in much larger digicams, with the benefit of a reasonably slim, portable camera body. Its varying levels of exposure control are great for novices who want to learn camera functions incrementally, but will also keep more advanced photographers satisfied. Though we've delayed running our standard image quality tests until we receive a shipping version of the camera, we were impressed with the color, clarity, and sharpness of the photos we viewed. The anticipated high quality, plus loads of great features, will make the S40 a versatile, user-friendly digital camera that should appeal to a wide variety of consumers.
Design
Similar in shape and style to a high-quality point-and-shoot 35mm film camera,
the PowerShot S40 measures 4.4 x 2.3 x 1.7 inches (112 x 58 x 42mm) and weighs
approximately 11.5 ounces (310.5 grams) with the battery and storage card installed.
It has a sturdy, dark gray polycarbonate body, covered by sturdy brushed and anodized
aluminum body panels. The overall result is a very solid-feeling camera that exudes
an air of quality and refinement. The sliding clamshell cover adds an attractive
accent to a very sleek, streamlined design. While the S40 is a bit too long and
heavy for a shirt pocket, it should fit easily into a large coat pocket or purse,
and the quarter-inch wrist strap makes toting it around very convenient.
The longer body style of the S40 is part of what we found so attractive about the camera. A bit more length makes the camera easier to grip than some of the smaller models on the market, yet the relatively slim profile means it scan still slip into a pocket. (Make that a sturdy pocket, as the camera's weight is more than you'd want bouncing around in a shirt pocket.) Canon has indicated that this design is one likely to appear in other cameras, and even migrate to their film camera line, and we think this will prove wise. We expect the S40's form factor to be very popular with consumers.

The front of the camera includes a telescoping 3x zoom lens, optical viewfinder window, and a light emitter lamp that serves multiple purposes, including autofocus assist, red-eye reduction, and the self-timer countdown. All of these items are covered by the sliding lens cover when it's closed. The built-in flash is positioned in the upper right corner of the front panel (viewed from the front), and the lens cover doubles as finger grip when opened. (Although we'd like to see some sort of a ridge on the cover, right about where the "Canon" logo appears. - In our hands, that's about where our fingers fell when we gripped the unit, meaning a ridge there would help provide a secure grip.)

It's often hard to tell how big a camera is in our product photos, when the
camera appears by itself. To help get a sense of the scale of the Canon, we've
shot the photo above, with a memory card propped in front of it.
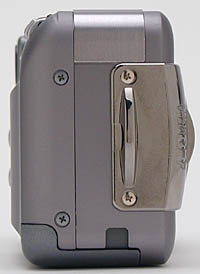
On the right side of the camera (as viewed from the back) is a single metal eyelet for attaching the nylon wrist strap. A small indentation at the very bottom of the camera on this side marks a sliding hatch that provides access for the AC power adapter cable.

The opposite side of the camera has a soft rubber terminal cover that lifts up in two steps: The top pulls back to reveal the A/V Out and Digital jacks, and the bottom pulls out further so the cover can swing out of the way to make connections.

The S40's top panel features a Mode dial on the right, with 12 Shooting positions divided into three basic categories: Auto Exposure, Image Zone, and Creative Zones. The Shutter button is located to the right of the Mode dial, and a Zoom button is located in front of it. On the left side of the top panel is a microphone for recording audio with movies and a speaker that plays back the recorded sound.

The majority of the exposure controls are located on the camera's back panel, along with the optical viewfinder and LCD monitor. The eye-level optical viewfinder features two LED lamps that report camera status. To the left of the viewfinder are the Macro / Jump and Flash / Index buttons. To the right is a sliding Replay button that can be used to review captured images at any time -- when the lens cover is closed and the camera powered off, or when the camera is turned on in one of the 12 Shooting modes. Next to the Review button is a cylindrical-shaped, five-way Multicontroller that operates similarly to the round arrow pads found on other digital cameras. The left and right arrows press down on either end in a conventional manner, while the up and down buttons operate by rotating the cylinder up and down. Pushing down on the center accesses the Set button.

Other camera controls on the back panel include the Menu and Display buttons on the right of the LCD monitor, and on the left side are the EV button (Exposure Compensation / White Balance / Auto Exposure / Flash Exposure Compensation), Manual Focus / Delete button, and Light Metering / Audio button. The EV control is by far the most complicated of the group; however, since each of its functions is related to exposure, they all use a -2 to +2 unit indicator bar to make adjustments (with the exception of the white balance menu bar, which gives you a choice of seven light-quality options). Exposure compensation is activated with one press of the button; white balance is activated by pressing the button twice, and so on. Like many digicam models, the dual-function buttons perform their first functions in capture mode and their second functions in playback mode. The Light Metering / Audio button allows you to choose between Evaluative Light Metering, Center-Weighted Averaging, and Spot (AE) Point metering modes. In Replay mode, pressing this button enables you to record up to 60 seconds of sound with individual images.
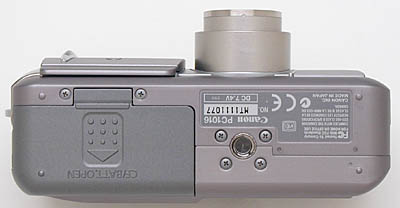
The S40's bottom panel is reasonably flat, with a sliding door to access the CompactFlash and battery compartments and a threaded metal tripod mount on its left (on the right in the photo above). The tripod mount is positioned slightly off-center, directly below the lens, making it easier to properly frame shots for panoramic series. Because the battery door and tripod mount are so close to one another, it would be difficult to make quick battery changes while working with a tripod, something we always look at. On the other hand, Canon's AC adapter uses a "dummy battery" design, with the cord exiting from a small opening on the camera's righthand side. - Thus, for studio use, there's a convenient way to get power to the camera while on a tripod.
 Viewfinder
The S40 features both an eye-level optical viewfinder and a 1.8-inch LCD monitor on the back panel for image composition. The real-image optical viewfinder zooms along with the lens (except in Digital Telephoto mode, which requires the LCD monitor), and displays a set of brackets in the center of its screen. Two LED lights next to viewfinder report the camera's status during certain operations. For example, when you depress the Shutter button halfway, a steady green light (on top) indicates that the camera is ready to record and / or the battery charge is complete; a flashing green light indicates that an image is either being written to, read from, or erased from the CompactFlash card; a steady orange light (on top) indicates that the camera is ready to record and / or the battery is adequately charged for use with flash; and a flashing orange light indicates a camera-shake warning (i.e. the shutter speed is too slow to handhold), or the battery is charging. The lower LED light glows yellow when the camera is set in Macro or Manual focus modes.
 Measuring 1.8-inches diagonally, Canon's low-temperature, polycrystalline silicon, TFT, color LCD monitor briefly displays camera settings when the camera is powered on, and then turns itself off. It can be reactivated by pressing the Display button -- once to show the image without settings, and twice to show the image with settings. Depending on the Shooting mode, the LCD reports the flash setting, drive mode, metering mode, image size and quality, and the number of frames remaining. Additional functions are shown as they are enabled and battery status is only displayed when power is low. A third press of the Display button cancels both displays.
 In Replay mode, the LCD monitor provides a full-frame display of captured images, which you can view individually by scrolling left or right with the arrow buttons on the Multicontroller. Depressing the Flash / Index button brings up a thumbnail index display of nine images at a time, which you can also scroll through with the arrow buttons. The Zoom lever doubles as a Digital Enlargement button (marked by magnifying glasses), which allows you to enlarge an image to 2.5X or 5X its normal size on the screen. The arrow keys permit you to move around the enlarged image and check fine details.
 Depressing the Display button one time in Replay mode brings up information about the captured image, including the file name, date and time it was recorded, compression, resolution, and what number it is in the sequence of captured images. Another press of the Display button brings up a thumbnail view of the image with detailed information such as the shooting mode, aperture, f/'stop, exposure compensation, and metering mode. In addition, the screen shows a histogram next to the image to indicate the distribution of tonal values. Besides the histogram display (and actually much more useful), any blown-out highlights in the image will blink from white to black and back again, letting you see exactly where detail has been lost. (We particularly like this form of display, applaud Canon for including it, and hope we see even more manufacturers adopt it in the future.)
 Optics
The S40 features a built-in, 3x, 7.1 - 21.3mm zoom lens (equivalent to a 35-105mm lens on a 35mm camera). When the lens cover is opened, the camera is powered on, and the lens telescopes out from the camera body into its operating position. It retracts again when the camera is shut off. Focus can be automatically or manually controlled, with a range of 2.7 feet (80cm) to infinity in normal mode. Macro mode features a focus range of 3.9 inches to 2.7 feet (10 to 80cm) in wide-angle mode and 1 to 2.7 feet (30 to 80cm) in telephoto mode. The aperture adjusts automatically or manually, with an f/2.8 to f/8.0 range, depending on the zoom setting. (The f/2.8 aperture is only available when the lens is at its wide angle setting. In telephoto mode, the maximum aperture is a rather miserly f/4.9.)
 In
the manual exposure modes (e.g., all modes but Auto), the S40 offers a manual
focus option. Manual focus is activated by depressing the Manual Focus (MF)
button on the left side of the back panel. As it's held down, a distance indicator
appears on the LCD monitor, providing a reference scale for focusing. The up
and down arrows of the Multicontroller are used to focus on the subject in the
monitor (the top of the scale represents infinity).The LCD scale is marked numerically
with both meters and feet. At the same time, a small window appears in the center
of the viewfinder, showing an enlarged view of the center of the frame. This
helps greatly in determining when you've reached optimum focus. The through-the-lens
(TTL) autofocus system operates in either continuous or single mode, controlling
whether the autofocus mechanism works continually, adjusting focus as the image
changes in the viewfinder, or sets focus only when the shutter button is depressed
halfway.
In
the manual exposure modes (e.g., all modes but Auto), the S40 offers a manual
focus option. Manual focus is activated by depressing the Manual Focus (MF)
button on the left side of the back panel. As it's held down, a distance indicator
appears on the LCD monitor, providing a reference scale for focusing. The up
and down arrows of the Multicontroller are used to focus on the subject in the
monitor (the top of the scale represents infinity).The LCD scale is marked numerically
with both meters and feet. At the same time, a small window appears in the center
of the viewfinder, showing an enlarged view of the center of the frame. This
helps greatly in determining when you've reached optimum focus. The through-the-lens
(TTL) autofocus system operates in either continuous or single mode, controlling
whether the autofocus mechanism works continually, adjusting focus as the image
changes in the viewfinder, or sets focus only when the shutter button is depressed
halfway.
 The
S40 offers three AF Frames, left, right, and center. In Auto mode, the camera
chooses which of the three to use for focusing, based on which has a subject
closest to the camera that it can get a good focus lock on. Alternatively, you
can tell it to only pay attention to the central frame, by pressing the Set
button of the Multicontroller. In the various manual exposure modes, you can
optionally select which AF frame is used via the Multicontroller. Pressing the
right or left arrow buttons on the Multicontroller moves the green highlight
between the AF frames, selecting which will be used for focusing. A green highlight
around the edge of the frames indicates that the image is focused. A yellow
highlight indicates that the camera is having trouble focusing. In dim subject
lighting requires it, a very bright white LED autofocus assist light on the
front of the camera automatically illuminates whenever autofocus is active.
The
S40 offers three AF Frames, left, right, and center. In Auto mode, the camera
chooses which of the three to use for focusing, based on which has a subject
closest to the camera that it can get a good focus lock on. Alternatively, you
can tell it to only pay attention to the central frame, by pressing the Set
button of the Multicontroller. In the various manual exposure modes, you can
optionally select which AF frame is used via the Multicontroller. Pressing the
right or left arrow buttons on the Multicontroller moves the green highlight
between the AF frames, selecting which will be used for focusing. A green highlight
around the edge of the frames indicates that the image is focused. A yellow
highlight indicates that the camera is having trouble focusing. In dim subject
lighting requires it, a very bright white LED autofocus assist light on the
front of the camera automatically illuminates whenever autofocus is active.
The 3.6x Digital Zoom must be enabled through the Record menu and activated by zooming past the maximum optical telephoto range with the Zoom lever. Once the Digital Zoom function is activated, press the Zoom lever to the right and hold it until it stops at maximum telephoto, then release the lever and press it toward the right again. Readers are warned that because digital zoom only enlarges the center portion of the CCD image, it compromises the image quality by reducing resolution and enlarging noise patterns. Digital Zoom is not available in the RAW file format.
|
Exposure
|
Shutter Priority mode puts you in control of the shutter speed setting (from 1/1,500 to 15 seconds), while the camera chooses a corresponding lens aperture. As with the Program AE mode, you maintain control over all other exposure options. Aperture Priority works along similar lines, except that you control the aperture (f/2.8 to f/8.0) and the camera chooses the best corresponding shutter speed. Both the shutter speed and aperture values are displayed on the LCD monitor. If the camera doesn't agree with the exposure settings you've selected, the LCD indicators will turn red, letting you know that either the aperture or shutter speed needs to be corrected.
A number of preset "scene" exposure modes are also available for shooting under special conditions. These modes preset a variety of camera options, letting complete novices get decent pictures in challenging situations without having to know all the ins and outs of the camera. Portrait mode uses a large aperture setting to reduce depth of field, resulting in blurred backgrounds and strong focal emphasis on the primary subject. Landscape mode uses a small aperture to keep both the foreground and background in sharp focus. A slow shutter speed is also common in Landscape mode, so it's recommended that you use a tripod.
Night Scene mode uses a slow shutter speed to capture the color and detail of any evening setting, along with a flash exposure to illuminate the primary subject in the foreground. When slow shutter speed and flash are used together, the overall scene is more evenly exposed. This mode can also be combined with the redeye reduction flash for portraits, or the flash can be turned off. Portrait subjects should be warned to stay still after the flash, until the shutter is closed.
Fast Shutter is provided for fast-moving subjects such as sporting events, and Slow Shutter is available for creating a sense of motion in fast-moving subjects. Fast shutter speeds stop action to maintain sharp focus on moving subjects, while slow shutter speeds tend to blur the subject because the shutter stays open longer to record the image. This last effect is particularly striking when used with swiftly moving water such as that found in water falls or streams.
Color Effects has been moved from the Record menu to the Mode dial on the PowerShot S40. The Color Effects setting provides a choice of four color options along the bottom of the LCD display, which are selected using the left and right arrow keys. These choices include Vivid color, Neutral color, Sepia tone, or Black-and-White. Effects are shown on the monitor so you can view the image before it taking the exposure..
A quick-review mode lets you quickly confirm the most recently recorded image. To access the Review mode, you simply push the Replay button under the Mode dial to the right to automatically switch to image playback. If you like, you can immediately erase the displayed image by pressing the Manual Focus / Delete button, which pulls up a small erase menu on the bottom of the monitor. A dialog appears on-screen, with the "Erase?" button highlighted. Press the "set" button on the Multicontroller to erase, or the right arrow and then the set button to return to normal playback. To return to Shooting mode, press the Replay button to the right a second time, or simply touch the shutter button.
Exposure compensation can be adjusted from –2 to +2 exposure values (EV), in one-third-step increments. The camera's metering system offers three operating modes -- Evaluative Light Metering, Center-Weighted Averaging, and Spot AE Point -- which are selected by pressing the Metering / Microphone button on the left side of the LCD monitor. Evaluative metering divides the image into several zones and determines the exposure based on the position of the subject, image brightness, ambient light, direct light, and backlighting. Center-weighted averaging is based on an averaged light reading of the overall scene, but places more emphasis on the center of the viewfinder or LCD monitor. Spot metering reads only a specific point in the viewfinder. Through the Record menu, you can choose a Center point to take the reading, or one of two additional AF Points corresponding to the AF Focus frames on either side of the center point.
Another high-end feature brought over from Canon's G2 is independent exposure lock. With most digicams, you can lock both focus and exposure by half-pressing and holding the shutter button prior to the shot itself. This can be very handy for off-center subjects. Sometimes though, you want to lock the focus on one part of the subject, but set the exposure based on a different part. On the S40, this is accomplished by half-pressing the shutter button (which will set both focus and exposure), and then subsequently pressing the sound/metering button at bottom left, to reset the exposure. Of particular note, this option also works for flash exposures, whenever the flash is enabled. Very slick.
The S40 offers seven White Balance modes, including Auto, Daylight, Cloudy, Tungsten, Fluorescent, Fluorescent H (daylight), Flash, and Custom. The Custom mode allows you to manually set the white balance by holding a white card in front of the camera and pressing the Metering / Audio button to set the value. ISO film speed equivalents are set in the Record menu, with a choice of Auto, 50, 100, 200, 400 ISO values. The higher the ISO setting, the more you can extend the camera's exposure range in low-light situations. Just keep in mind that higher ISO values have slightly lower quality levels, with increased image noise. Other manual exposure adjustments in the Record menu include: Image Contrast, Sharpness, and Saturation. These give you a little more creative control over your image processing.
 Flash
Flash
The S40's built-in flash operates in one of five modes: Auto, Red-Eye Reduction (Auto), Red-Eye Reduction (Flash On), Flash On, and Flash Off. The Auto mode enables the camera to determine when flash is necessary, based on existing exposure conditions. Flash On means that the flash fires with every exposure, regardless of lighting conditions, and Flash Off completely disables the flash. The two redeye reduction modes fire a small pre-flash before the full flash, to reduce the dreaded redeye effect in portraits. The difference between the two redeye modes is that the auto mode puts the camera in charge of when to use the flash, while the Flash On mode fires the flash with every exposure. All flash modes are accessed by pressing the Flash / Index button to the left of the optical viewfinder.
The flash exposure can be adjusted from -2 to +2 EV in one-third-step increments by the using the four-function Exposure Compensation button on the camera's back panel. (Depressing the button four times cycles to the Flash Compensation adjustment.) As mentioned earlier, you can also lock the Flash Exposure (FE) setting for a specific area of your subject, just as you would with a normal exposure. Simply center the portion of the subject you want to have metered and half-press the shutter button. Then, while still holding the shutter button down, press the Metering / Audio button to lock the flash exposure (an asterisk will appear at the bottom of the screen). The flash will fire a pre-flash to lock the exposure reading, then you can recompose your image and make the exposure with the FE lock in place. (Note: Pressing any other button after the Metering / Audio button will cancel the flash exposure lock.)
Canon rates the S40's flash effectiveness from 2.7 to 14.1 feet (0.8 to 4.3 meters) at maximum wide-angle and 2.7 - 8.2 feet (0.8 to 8.2 meters) at maximum telephoto. As our first evaluation unit was a prototype model, we did not test the flash range, but we did note that the flash significantly overexposed close-up images.
Auto Exposure Bracketing
The Auto Exposure Bracketing (AEB) mode is the third function controlled by the EV button on the camera's back panel. It automatically captures a series of three images, each at a different exposure setting. You can manually set the exposure variables in one-third-step increments, from -2 to +2 EV, by depressing the EV button three times to activate the mode and using the arrow buttons to choose the amount of variation between photos. Depress the Set button, then fully depress the Shutter button to start the series. The camera makes all three exposures with just one press of the Shutter button. This function cannot be used with flash photography. If the flash fires, only one image will be recorded.
Continuous Shooting
The S40 has two Continuous Shooting modes, which are accessed through the Drive sub-menu of the Record menu. Standard Continuous Shooting captures multiple, successive still images, at about 2.5 frames per second, providing enough time to display each image briefly after it is captured. High Speed Continuous Shooting captures images at 1.5 frames per second, as long as you hold down the shutter release. (The number of images and actual shot-to-shot speed depend on several factors, including the amount of memory remaining on the flash card.)
Movie Mode
The S40 also offers a Movie mode, which is accessed by turning the Mode dial on top of the camera to the miniature movie camera symbol (a camera will appear in the upper left corner of the LCD display). The AVI / Motion JPEG files are recorded at 320 x 240 or 160 x 120 pixels, at approximately 15 frames per second. Recording time is 30 seconds at the 320 x 240 resolution and 120 seconds at 160 x 120 resolution,, depending on the amount of memory available on the CompactFlash card. To begin recording, you simply press the shutter button all the way down and hold it there until the red circle in the upper right corner of the LCD appears. To end the recording, press the Shutter button again. The flashing green LED light next to the eye-level viewfinder indicates that the camera is storing the movie. When finished, you can view the recording by pushing the Replay button to the right and depressing the Set button. The camera will play back both moving images and sound. (Note that the recording options are largely preset in Movie mode: Image resolution, Self-Timer, Exposure Compensation, White Balance, and Macro and Manual focus are the only adjustable functions.)
Stitch-Assist Mode
The Stitch-Assist mode records a series of overlapping images to create horizontal or vertical panoramas, and 2 x 2-frame rectangular composites. A framing guideline for each format appears in the LCD monitor to help line up successive shots. For the panoramas, you can take as many images in a series as you want, enabling you to record a full 360-degree circle of the surrounding scenery. The 2 x 2 mode uses a series of only four images, starting from the top left corner and moving in a clockwise direction, to create a complete composite. You can then use Canon's PhotoStitch program to seamlessly combine the images in your computer.
Self-Timer Mode
The Self-Timer is set through the Drive sub-menu in the Record menu. When set to Self-Timer, the camera displays the standard self-timer icon (a clock counting down) in the LCD display, and depressing the Shutter button activates a 10-second or 2-second countdown (depending on the Drive mode selected), during which a bright blue lamp on the camera's front panel blinks, gaining speed in the last two seconds. If the camera's Beep function is turned on in the Setup menu, you will also hear the beep counting down.
Shutter Lag/Cycle Times
When you press the shutter release on a digital camera, there's usually a lag time before the shutter actually fires. This time allows the autofocus and autoexposure mechanisms to do their work and can amount to a significant delay in some situations. Since this number is rarely reported by manufacturers or reviewers, and can significantly affect the picture-taking experience, Imaging Resource now measures shutter lag and cycle times using a proprietary electronic test setup.
|
|
||
|
|
(secs) |
|
| Power On -> First shot |
|
Average to a bit faster than average.
|
| Shutdown |
|
Pretty fast. (This is time to retract lens. Allow longer if file being saved to card, before card can be removed.)
|
| Play to Record, first shot |
|
Pretty fast.
|
| Record to play |
|
Longer time is for max res JPEG, immediate switch to quick review. Middle time is for quick review, with camera already done saving image to card. Shortest time is for momentary auto preview directly following shutter release.
|
| Shutter lag, full autofocus |
|
Faster than average. (Average is 0.8-0.9) |
| Shutter lag, manual focus |
|
Faster than average. (Average is about 0.5) |
| Shutter lag, prefocus |
|
Blazingly fast. (Average is about 0.3) |
| Cycle time, large/fine files |
|
Very fast, max speed maintained for ~5 shots. (Large buffer.) Then slows to ~6.5 seconds between shots. |
| Cycle time, small/basic files |
|
Quite fast, buffer never seems to fill. |
| Cycle time, RAW files |
|
Very fast (!) for RAW files. First time is for first 3 shots, then longer time required for buffer to "drain" between shots. |
| Continuous mode |
(1.0 fps) |
First time is for first five shots, then slower after buffer is full. |
| Continuous mode, "H" mode |
(2.1 fps) |
First time is for first three shots, then slower after buffer is full. |
| Continuous mode, "H" mode (Small/Basic file size) |
(2.41 fps) |
Slightly faster in small/basic mode, but buffer length extends to 65 frames before you have to wait.
|
Overall, the S40 is a surprisingly fast camera, particularly so considering its 4 megapixel resolution. Shutter lag is about as good as it gets for consumer-level digicams, and shot to shot times are excellent. What's more, the camera apparently has a large buffer memory, as it can capture as many as 5 large/fine ("Superfine" in Canon's parlance) files at maximum speed without having to wait for the buffer to empty. Very impressive, this would be a great camera for people interested in capturing fast-paced action.
Operation and User Interface
The PowerShot S40's user interface is straightforward and should present a relatively short learning curve if you read over the Camera User Guide. We generally prefer to see external access to as many exposure controls as possible, and the S40 provides a fair amount of control without resorting to the LCD menu. The buttons are somewhat spread out, so you'll likely have to operate the camera with two hands when adjusting settings or using the Manual Focus, however, the Zoom and Multicontroller buttons are directly adjacent to the Shutter button, so you can easily shoot one-handed in most situations.

Shutter Button: Located on the right side of the camera's top panel, when the Shutter button is halfway depressed, it sets focus and exposure, and when fully depressed, it trips the shutter release. In Self-Timer mode, fully depressing the Shutter button triggers a 10- or 2-second countdown before the shutter is released.

Mode Dial: To the left of the Shutter button, this notched dial is used to select the camera's shooting modes. Canon divides these functions into three categories: Auto, Image Zone, and Creative Zone. The options are as follows:
![]()
Auto: The camera controls everything about the exposure, except for Flash and Macro modes, and image size and quality settings.
Creative Zone
Image Zone

Zoom Lever: Located in front of the Shutter button, the Zoom lever extends the lens to maximum telephoto range when pushed to the right, and returns the lens to maximum wide-angle when pushed to the left. When Digital Zoom is engaged, pushing the Zoom Lever past maximum telephoto starts the Digital Zoom. In Replay mode, the Zoom lever magnifies the on-screen image when pushed to the right and returns it to normal magnification when pushed to the left.

Replay Button: Beneath the Mode dial, the Replay button automatically puts the camera in Replay mode from any Shooting position. When the lens cover is closed, pushing the Replay button to the right turns on the camera in Replay mode. Pushing the button a second time turns off the Replay function.

Multicontroller: Located in the top right corner of the back panel, the Multicontroller operates similarly to the round arrow pads found on other digital cameras. The left and right arrows press down on either end in a conventional manner, while the up and down buttons operate by toggling the cylindrical-shaped control up and down. Pushing down on the center accesses the camera's Set button. We found the "set button" option a little hard to access sometimes, as the camera kept wanting to select an arrow direction instead. (We like the control and its location, but a little more work on its ergonomics would be a good idea.)

Menu Button: The top button on the right of the LCD monitor is the Menu button, which calls up the Record, Setup, My Camera, and Replay menus on the LCD display in all camera modes. A second press of the Menu button cancels the menu display.

Display Button: Just beneath the Menu button, the Display button controls the LCD monitor's display mode. In Record mode, this button turns on the image display with the first press, activates the information display with the second press, and cancels both with the third press. In Replay mode, the button cycles through the captured image information displays.

Macro / Jump Button: Left of the optical viewfinder is the Macro / Jump button, which accesses the Macro function when the camera is in Record mode. In Replay mode, it calls up the "jump bar." When the jump bar is displayed, the right and left arrow buttons jump either nine images forward or nine images backward.

Flash / Index Display Button: Positioned in the very top left corner of the back panel, this button cycles through the Red-Eye Reduction (Auto), Auto, Red-Eye Reduction (Flash On), Flash On, and Flash Off flash modes. In playback mode, this button displays up to nine images at a time, in a thumbnail index format, on the LCD screen.

Exposure Compensation (EV) Button: The top button on the left of the LCD menu, this four-function button scrolls through four shooting adjustments: Exposure Compensation, White Balance, Flash Exposure Compensation, and Auto Exposure Bracketing (AEB). When set on Exposure Compensation (press the button one time), you can use the right and left arrow buttons to control the exposure compensation from -2 to +2 EV in one-third-step increments. The White Balance setting (press two times) lets you choose the white balance value from Automatic, Daylight, Cloudy, Tungsten, Fluorescent, Fluorescent H, Flash, and Custom. Flash Exposure Compensation (press three times) works similarly to the standard exposure compensation function, by adjusting the flash intensity from -2 to +2 EV in one-third-step increments. Finally, the AEB mode allows you to take a series of three images at different exposure variations. (We particularly like the way the autoexposure bracketing and exposure compensation adjustments interact on-screen, showing you exactly what exposures will be taken, through the combination of the two controls.)

Manual Focus / Delete Button: Located beneath the EV button, the Manual Focus / Delete button activates the Manual Focus if held down in Record mode, while the up or down arrow on the Multicontroller is actuated. In Replay mode, this button is used to bring up the Delete menu on the LCD monitor.

Metering / Audio Button: Just below the Manual Focus / Delete Button button, this control places the camera in Evaluative Light Metering, Center-Weighted Averaging, and Spot AE Point metering modes when the camera is in Record mode. Pressing this button in Replay mode allows you to record up to 60 seconds of sound with individual images.
Record Menu (Red): With the exception of the Auto exposure mode, and most of the Image Zone exposure functions, the Record menu provides virtually the same options for all exposure modes. These menus are accessed by depressing the Menu button once while in Shooting mode. Following are the available settings, with notes as to which are not available in Auto mode:
 Resolution: Sets the image size to (L) 2,272 x 1,704, (M1) 1,600 x 1,200, (M2)1,024 x 768, or (S) 640 x 480-pixel resolution (still images); 320 x 240 or 160 x 120 pixels (movies).
Play Menu (Blue): This menu is only available in the Replay mode. It allows you to scroll through captured images; erase, protect, and rotate them; or set them up in a slide show or for printing on a DPOF compatible device. The Play menu offers the following selections:
 Protect: Write protects the currently displayed image from accidental deletion, except by card formatting.
Setup Menu (Orange): The Setup menu provides universal camera control options that remain the same in both Shooting and Replay modes, with the exception of shutter and speaker volume (see below). This menu is accessed by depressing the Menu button once and scrolling to the right with the Omni selector arrow pad. Following are the available settings:
 Beep: Turns the camera's Beep sound On or Off.
My Camera Menu (Blue): This menu allows you to customize certain camera functions, including the startup image, and startup, shutter, button, and self-timer sounds.
 Startup Image: Sets the startup image when you turn on the camera to: Black screen, Canon logo, Canon logo w / sunset, and Canon logo w / nature scene. You can also apply your own image using the Canon software.
 Image
Storage and Interface
Image
Storage and Interface
The Canon S40 uses CompactFlash memory cards for image storage, accommodating
both Type I and II card sizes. This means that the camera should also be able
to store images to an IBM MicroDrive for increased storage capacity (though the
User's Manual cautions that MicroDrives are more susceptible to vibrations and
shocks). A 16MB CompactFlash Type I memory card is supplied with the camera. Entire
CompactFlash cards cannot be write-protected, however, the S40's Play menu allows
you to write-protect individual image files, protecting them from accidental erasure,
unless the card is formatted.
Still images can be saved at one of four resolutions (2,272 x 1,704; 1,600 x 1,200; 1,024 x 768; 640 x 480 pixels), while movie images are recorded at 320 x 240 or 160 x 120 pixels. Still images also have three JPEG compression levels available: Superfine, Fine, and Normal, plus a RAW setting that records the image straight from the CCD, with no further processing. RAW images require the Canon ZoomBrowser or ImageBrowser software for processing on a computer. The benefit of the RAW data file format is that it compresses the image file without any loss of image quality.
A full complement of interface software comes with the S40, as does a USB cable for speedy connection to a PC or Macintosh computer. We clocked the S40's transfer speed at 440 kilobytes/second on our G4 PowerMac computer. This pretty fast, not the highest transfer speed we've tested, but faster than average.
Following are the approximate resolution / quality and compression ratios for a 16MB card (compression numbers are based on our own computations):
|
Resolution/Quality 16MB Memory Card |
|
|
|
|
|
| Full Resolution 2272x1704 | Images (Avg size) |
5 3.2 MB |
7 2.1 MB |
1.2 MB |
.6 MB |
| Approx. Compression |
3.6:1 (Lossless) |
5:1 |
|
|
|
| UXGA Resolution 1600x1200 | Images (Avg size) |
|
1.05 MB |
0.59 MB |
0.30 MB |
| Approx. Compression |
|
|
|
|
|
|
|
Images (Avg size) |
|
0.60 MB |
0.34 MB |
0.18 MB |
| Approx. Compression |
|
|
|
|
|
|
|
Images (Avg size) |
|
0.27 MB |
0.16 MB |
0.95 MB |
| Approx. Compression |
|
|
|
|
|
![]() One
of the first things any new digicam owner will need is a larger memory card
for their camera: The cards shipped with the units by the manufacturers should
really be considered only "starter" cards, you'll definitely want a higher
capacity card immediately. - Probably at least a 32 megabyte card for a 1.3
or 2 megapixel camera, 64 megabytes or more for a 3, 4, or 5 megapixel one.
(The nice thing about memory cards is you'll be able to use whatever you buy
now with your next camera too, whenever you upgrade.) To help you shop for
a good deal on memory cards that fit the (camera name here), we've put together
a little memory locater, with links to our price-comparison engine: Just click
on the "Memory Wizard" button above to go to the (manufacturer name here)
memory finder, select your camera model , and click the shopping cart icon
next to the card size you're interested in. You'll see a list of matching
entries from the price-comparison database. Pick a vendor & order away! (Pretty
cool, huh?)
One
of the first things any new digicam owner will need is a larger memory card
for their camera: The cards shipped with the units by the manufacturers should
really be considered only "starter" cards, you'll definitely want a higher
capacity card immediately. - Probably at least a 32 megabyte card for a 1.3
or 2 megapixel camera, 64 megabytes or more for a 3, 4, or 5 megapixel one.
(The nice thing about memory cards is you'll be able to use whatever you buy
now with your next camera too, whenever you upgrade.) To help you shop for
a good deal on memory cards that fit the (camera name here), we've put together
a little memory locater, with links to our price-comparison engine: Just click
on the "Memory Wizard" button above to go to the (manufacturer name here)
memory finder, select your camera model , and click the shopping cart icon
next to the card size you're interested in. You'll see a list of matching
entries from the price-comparison database. Pick a vendor & order away! (Pretty
cool, huh?)
Lost Images? - Download this image-recovery program so you'll
have it when you need it...
Since we're talking about memory and image storage, this would be a good time
to mention the following: I get a ton of email from readers who've lost photos
due to a corrupted memory card. It's tragic when it happens, there are few
things more precious than photo memories. Corrupted memory cards can happen
with any card type and any camera manufacturer, nobody's immune. "Stuff
happens," as they say. A surprising number of "lost" images
can be recovered with an inexpensive, easy to use piece of software though.
Given the amount of email I've gotten on the topic, I now include this paragraph
in all my digicam reviews. The program you need is called PhotoRescue, by
DataRescue SA. Read our review of it if you'd like, but download the program now,
so you'll have it. It doesn't cost a penny until you need it, and even then
it's only $29, with a money back guarantee. So download PhotoRescue for
Windows or PhotoRescue for
Mac while you're thinking of it. (While you're at it, download the
PDF manual and quickstart
guide as well.) Stash the file in a safe place and it'll be there when you
need it. Trust me, needing this is not a matter of if, but when...
PhotoRescue is about the best and easiest tool for recovering digital
photos I've seen. (Disclosure: IR gets a small commission from sales of
the product, but I'd highly recommend the program even if we didn't.)
OK, now back to our regularly scheduled review...
Video Out
The S40 has a video-out port that supports the NTSC timing format on US and Japanese model televisions (the PAL standard is supported on European models). The video output can be used for reviewing previously recorded images or running slide shows from the camera. It also shows all three LCD menu screens, as well as the preview display from the LCD viewfinder.
The output cable is a true AV cable, as it fans out into two RCA jacks, one for video, and one for audio. Plugged into any video monitor (or TV with direct video and audio inputs), the audio capabilities of the S40 make it a potentially effective portable presentation device.
 Power
Power
The S40 is powered by an internal Canon NB-2L rechargeable lithium-ion battery pack. The camera ships with one battery pack and charger. An AC Adapter Kit ACK700 is sold separately, with a power adapter, DC coupler, and power cord. A built-in rechargeable battery maintains the date, time, and other settings, drawing power from the main battery to recharge.
The camera has a Power Mode Indicator lamp directly to the left of the Replay button, which stays on as long as the camera is powered on. An orange light indicates Shooting mode, a green light indicates Replay or printer connection modes, and yellow indicates computer connection mode.
Because the S40 relies on its LCD display for viewing and selecting some of its settings, it can be somewhat of a drain on the power supply. Fortunately, the camera has an automatic shutdown mode to help conserve battery power, and you can control power consumption by reducing the amount of information displayed on the LCD monitor.
The proprietary battery connection prevented us from performing our usual power measurements on the S40, but we did run the camera continuously for about 75 minutes in its highest power-drain configuration, in capture mode with the LCD enabled.
Included Software
The Canon PowerShot S40 comes with an very nice complement of software on the included CD. Compatible with Windows (95, 98, NT 4.0, and 2000) and Macintosh operating systems, Canon Digital Camera 7.0 allows you to download images from the camera, process RAW data files, stitch together images shot in Stitch-Assist mode, set up images for printing, and operate the camera remotely from the computer. Bundled software packages include: ArcSoft PhotoImpression and VideoImpression for editing images and movies, Apple QuickTime 5.0, Canon ZoomBrowser EX (Win) and ImageBrowser (Mac) for downloading and organizing images and processing RAW files, PhotoRecord (Win) and ImageBrowser for printing images, PhotoStitch for merging panoramic images captured in Stitch-Assist mode, and a unique application that allows you to operate the camera remotely through your computer (RemoteCapture 1.1).
This last function is the most interesting of Canon's software offerings. The RemoteCapture software interface displays a preview window with the same image as that seen on the camera's LCD monitor, along with thumbnail views of already captured images, the number of shots available, a histogram of the preview window, a listing of exposure settings, and a set of control buttons that enable you to release the shutter, rotate the image, view the image, and delete the capture. There's also a "Comments" feature that allows you to add short notations to the image file. Unfortunately, you can't change the exposure settings through the software interface, but you do have access to the self-timer and an interval shooting mode through the File menu. The Interval shooting mode is only available through the RemoteCapture software (not on the camera), and sets the camera to record a series of images at set intervals, creating the effect of time-lapse photography.
Test Results
|
As with all Imaging Resource camera tests, we encourage you to let your own eyes be the judge of how well the devices performed. Explore the images on the pictures page, to see how well the S40 performed, and how its images compare to other cameras you may be considering buying.
The S40 performed very well throughout our testing, producing exceptional color and great image quality. The camera's White Balance system had no trouble with most of the light sources we used in our tests, as the Auto setting typically produced an accurate color balance. The Manual setting often produced nearly accurate results, but occasionally had a greenish color cast. The S40's Auto setting didn't do too well with the tough incandescent lighting of our no-flash Indoor Portrait test, but the Incandescent setting produced really excellent results, with just enough warmth to the image to convey that it was shot indoors. Color looked great on our Davebox target, with accurate saturation and hue in the large color blocks. The S40 distinguished the tough tonal variations of the Q60 target well, with good definition. Skin tones were just slightly magenta in our Outdoor and Indoor portraits, but the always-difficult blue flowers came out almost perfect, with just the faintest hints of purple appearing in their petals. Overall, the S40 did an excellent job with color.
The S40 also did a great job on our "laboratory" resolution test chart. It started showing (hints of) artifacts in the test patterns at resolutions as low as 700 lines per picture height, in both horizontal and vertical directions, but found "strong detail" out to at least 1,200 lines horizontally and 1100 lines vertically. "Extinction" of the target patterns didn't occur until about 1,400 lines.
Optical distortion on the S40 was about average at the wide-angle end ("average on digicams still being more than we'd like to see), where we measured an approximate 0.68 percent barrel distortion. The telephoto end fared much better, as we found only two pixels of barrel distortion. Chromatic aberration was moderately low, showing only about three or four pixels of faint coloration on either side of the target lines. (This distortion is visible as a very slight colored fringe around the objects at the edges of the field of view on the resolution target.) We did notice quite a bit of "coma" in the corners of the target image though, explaining the softness we observed in the corners of many of our other tests. Overall, we liked the low level of chromatic aberration and geometric distortion, but would really have liked to see less coma in the corners.
With exposure times as long as 15 seconds available, the S40 can capture bright images at very low light levels. In our own testing, the S40 captured bright, usable images at light levels as low as 1/16 foot-candle (0.67 lux) at the 100, 200, and 400 ISO settings, with great color and clarity. At ISO 50, the target is just a little dim at the 1/16 foot-candle light level, but the 1/8 foot-candle (1.3 lux) light level image is bright enough for use. Perhaps the biggest news though, is that the S40's Auto white balance setting produced almost perfect color, even at the 1/16 foot-candle light level, with virtually no color cast. (This is very unusual in our experience, most digicams' white balance systems really fall apart in very dim lighting.) The S40 automatically employs a noise reduction system for exposures longer than one second, which did an excellent job of controlling image noise, even at ISO 400. Though noise is visible at 400 ISO, the grain pattern is small, tight, and fairly inconspicuous. Overall, the S40 can capture very pleasing images at very low light levels, and its autofocus illuminator means it can focus in very dark conditions as well.
One of our biggest beefs against the S40 was that its optical viewfinder was very tight and inaccurate, showing only 77 percent of the final frame area at wide angle, and approximately 78 percent accuracy at telephoto. Our evaluation unit may have had a shifted CCD sensor, as images framed with the optical viewfinder were slanted toward the lower right corner. The LCD monitor proved to be very accurate though, showing about 97 percent of the frame at wide angle, and about 98 percent at telephoto. Since we generally prefer LCD monitors to be as close to 100 percent accuracy as possible, the S40 nearly meets our expectations. While the LCD viewfinder was very accurate, we'd like to see much higher accuracy in the optical viewfinder - We regard 85% frame coverage as a minimum for a digicam's optical viewfinder, and would really prefer 90% or better.
Apart from its optical viewfinder, the only category in which the S40 fell a little short was Macro shooting, where the camera performs a bit below average. The camera captured a minimum area of 4.29 x 3.22 inches (108.98 x 81.74 millimeters). However, resolution is high, with well-defined detail in the coins, brooch, and dollar bill. Color looks reasonably good, though the gray background has a magenta cast. We also noticed a fair amount of corner softness and some barrel distortion from the wide angle lens setting. The S40's flash also couldn't throttle down enough for the macro area, and overexposed the entire frame and lost most detail.
Overall, the PowerShot S40 performed exceptionally well throughout our testing.
Though we'd like to see improved macro shooting capabilities and a much more
accurate optical viewfinder, the S40 met or exceeded our expectations in nearly
every other category. The S40's low-light capture abilities are outstanding,
and the camera produces great color and image quality. We were very pleased
with the S40's performance.
Conclusion
When we first received a prototype unit to evaluate, we were immediately impressed
with the design and "build quality" of the S40: The PowerShot S40
fairly exudes quality, with a very pleasant heft and all-metal body panels.
The feature set is first rate, stopping just short of some of the high-end "enthusiast"
capabilities of the PowerShot G2. We would like to see somewhat longer battery
life, but shorter battery life is the first casualty of compact camera designs.
We applaud the excellent responsiveness of the S40, as we view sluggish response
to be one of the biggest remaining disappointments the general public still
experiences in making the transition from film to digital. We'd like to see
a more accurate optical viewfinder, better macro capabilities, and less coma
in the corners of the frame, but the picture quality the S40 delivers is really
exceptional. Color is accurate and well saturated, and the camera's white balance
system does an excellent job under a wide variety of lighting conditions. Overall,
an excellent camera for high-end consumers looking for a full-featured digicam
with great image quality. It's easy enough to operate in auto mode that most
anyone could be comfortable with it, yet it sports enough advanced features
(save only an external flash connection) to satisfy most enthusiasts. A great
camera, if not a cheap one: If it fits your budget, the PowerShot S40 should
make you happy!
<<PowerShot S40 Sample Images | Additional Resources and Other Links>>
Reader Comments!
Questions, comments or controversy on this product? Click
this link to see what other Imaging Resource readers have had to say about
the Canon PowerShot S40, or add comments of your own!