Back
to Full Minolta Dimage S404 Review
Back
to Full Minolta Dimage S404 ReviewGo to Minolta Dimage S404 Data Sheet
Go to Minolta Dimage S404 Pictures Page
Up to Imaging Resource Cameras Page
Use your browser's "Back" button to return to the previous page, or the links at the top and bottom of this page to navigate to related information. If you have difficulty fitting the text on this page onto your printer output, simply resize your browser window to a narrower width and print again.
Remember us when it's time to buy!
Dave here: Have our reviews been helpful to you? (Is this article you're reading right now useful?) Preparing this level of information on as many products as we do is incredibly hard work, not to mention expensive. Things on the Internet may look like they're free, but they're not. (As a lot of big dot.com companies are finding out these days.) Somewhere, somebody has to pay to produce worthwhile content. YOU can help us though, by remembering us when it comes time to make your purchase. Would you consider coming back to our site and clicking-through to one of our advertisers to make your purchase? Every dollar you spend with one of our advertisers helps us directly (in affiliate fees) or indirectly (the advertiser will keep renewing their ad contract with us). To make it easy for you to support us, here's a URL you can visit, to see all our current advertisers, with links to click on that will register your visit to them as having come from our site. It's up to you where you buy, but Mike, Mike, Kim, Yazmin, Marti and I would be really grateful if you'd help us out by choosing one of our advertisers to purchase from.
Thank you for your support!
Dave Etchells, Founder & Publisher
Visit our "Buy Now" Page:
https://www.imaging-resource.com/buynow.htm
Back
to Full Minolta Dimage S404 Review
Go to Minolta Dimage S404
Data Sheet
Go to Minolta Dimage S404
Pictures Page
Up to Imaging Resource Cameras
Page
Minolta Dimage S404Dimage technology and optics in a compact, stylish four megapixel design Review First Posted: 1/30/2002 |
|
 |
|
4-megapixel CCD delivers uninterpolated images up to 2,270 x 1,704 pixels |
|
|
High-resolution Minolta GT lens with 4x optical zoom (35-140mm equivalent focus range) | |
|
|
CxProcess image processing and Large Scale Integration image processing chip | |
|
|
12-bit Analog / Digital conversion for more than 4,000 levels per channel (Red, Green, Blue) |
First Look Only!
This review is based on a prototype model of the Dimage S404, and so includes no examples of photographs shot with the camera. I have performed some of my standard measurements on the camera though, so you'll find information on things like viewfinder accuracy, lens quality, cycle times and power consumption below. This is thus a pretty complete picture of camera operation and performance, but is lacking the all-important image quality information. I'll update this review (and remove this note) once I've managed to get my hands on a final production model that I can shoot a full set of test images with.
Manufacturer Overview
Minolta Corporation is a traditional camera manufacturer of long experience, making a slow but calculated entry into the digital marketplace. Like its popular line of 35mm SLRs, the Maxxum Series, Minolta's Dimage Digital Cameras are developing a reputation for innovative technology in light metering, exposure control, and compact autofocus lens design. In 1996, Minolta introduced the Dimage V, the first digital camera with a detachable lens that enabled users to preview pictures with the camera body in one hand, while holding the lens at a distance in the other. Eventually Minolta developed the EX1500, a modular digital camera used as the framework for an amazingly effective 3D capture system, developed in partnership with the software firm MetaCreations (renamed Viewpoint Corporation in Fall 2000). In addition to conventional and digital cameras, Minolta manufactures high-quality light meters, spectrophotometers, colorimeters, and an award-winning line of film scanners, including the Dimage Scan Elite, Scan Dual II, and Scan Multi II.
Spring 2001 marked the introduction of three new Dimage digicam models -- each representing a separate price point to appeal to different segments of the digital market. The Dimage 7, reviewed elsewhere on the site, is designed to appeal to serious photographers who want high resolution (5.24 megapixels), a long-range wide-angle-to-telephoto zoom lens (equivalent to 28-200mm), and a sophisticated user interface with extensive creative controls. The Dimage 5 is the midrange model, with the same sophisticated controls, but a smaller 3.34-megapixel CCD and shorter 35-250mm equivalent lens. Finally, the compact, autofocus Dimage S304, targeted for the amateur market, shared the same microprocessor and most of the same technology, but with a 3.34-megapixel lens and 4x zoom lens equivalent to a 35-140mm on a 35mm camera. Now, Minolta has updated the S304 design by adding a four megapixel CCD, calling this latest model the S404.
High Points
Executive Overview
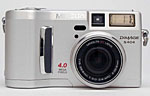
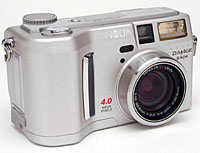
Improving on the already well-respected Dimage S304, Minolta has introduced the Dimage S404, featuring a larger, 4-megapixel CCD. The S404 incorporates the same great 4x optical zoom lens I was so impressed with in the S304 (Minolta has really distinguished itself with its digicam optics), and offers the exceptional exposure, tone, and color-adjustment flexibility that's the hallmark of the high end Dimage digicams. The S404 appears virtually identical to its predecessor, with an all-silver, slightly bulky (yet still fairly compact) metallic body. The camera's dimensions of 4.5 x 2.5 x 2.3 inches (113.5 x 64.5 x 58.5 millimeters) prevent it from fitting into most shirt pockets, though most coat pockets and purses should easily hold the camera. Weighing 15.0 ounces (430 grams) with batteries and CompactFlash card, the S404 has a pleasant heft: Not so light as to feel flimsy, not so heavy as to be unwieldy.
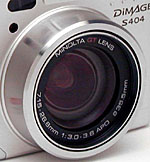
The S404 offers both a real-image optical viewfinder and a 1.8-inch color LCD monitor for composing images. In Playback mode, the LCD features an optional histogram display for checking exposure. The S404 uses a Minolta GT 4x lens, with a focal range from 7.15-28.6mm lens, the equivalent of a 35-140mm lens on a 35mm camera. Featuring a telescoping design, the lens extends outward from the camera body whenever powered on, and likewise retracts when not in use. In past reviews, I've found Minolta's GT lenses quite impressive, and the lens on the S404 seems to follow suit, with excellent sharpness, and unusually low distortion and chromatic aberration. A plastic lens cap protects the lens surface from scratches, and includes a tether that attaches it to the camera body to prevent accidental loss. The S404 allows both automatic and manual focus control, with a five-point selectable focus area for the autofocus system. A Full-Time AF option causes the camera to continually adjust the focus, allowing you to "track" moving subjects.
Exposure control is virtually identical to that on the S304, with the S404 offering a full Auto mode, as well as Program AE, Aperture Priority, and Manual exposure modes. A handful of preset "scene" modes set up the camera for specific shooting situations, and include Macro, Portrait, Landscape, Night, Text, and Text with Macro modes. Available aperture settings range from f/3.0 to f/8.0, depending on the lens zoom setting, while shutter speeds range from 1/1,000 to 4 seconds. A Bulb mode is available for longer exposures, as long as 15 seconds. The S404 has two metering modes, Spot and Multi-Segment (the latter of which divides the image into 270 sections). Exposure compensation is adjustable from -2 to +2 exposure equivalents (EV) in one-third step increments. There's also an Auto Exposure Bracketing mode, which captures three images at different exposure settings, useful when determining the best exposure is difficult.
The camera's ISO setting offers an Auto adjustment mode that varies the ISO as needed to suit the shooting conditions, as well as manually-set ISO equivalent settings of 64, 100, 200, and 400. White Balance can be set to one of six modes, including Auto, Daylight, Cloudy, Tungsten, Fluorescent, and Custom. The S404 also offers a wide range of image adjustment settings for Sharpness, Saturation, Color, and Contrast. A Self-Timer mode provides a 10-second countdown before the shutter fires, and also enables operation via the optional remote control accessory. There's also a Continuous Shooting mode, for capturing a rapid succession of images at fast intervals (as fast as 1.3 frames per second, according to Minolta's specs, which agreed well with my own measurements of about 1.25 frames/second) Particularly notable is that the S404 can capture up to 11 high-res, high-quality shots in a single burst. The S404's Movie mode captures moving images with sound, at a resolution of 320 x 240 pixels. Additionally, the S404's audio capabilities include a Voice Memo mode, which records five- or 15-second sound clips to accompany images.
Images can be saved as uncompressed TIFF files, or as JPEG files at one of three different compression levels. All images and movies are saved to CompactFlash Type I memory cards, and still images can be recorded at 2,272 x 1,704, 1,600 x 1,200, 1,280 x 960, or 640 x 480-pixel resolution sizes. A USB cable accompanies the camera, as well as a software CD loaded with Dimage Image Viewer, ArcSoft PhotoImpression, and USB drivers for both PC and Mac platforms. The S404 can be connected to a television set for image viewing and composition, via the NTSC video cable packaged with the camera (European models include a PAL cable instead). Four AA alkaline or NiMH batteries power the camera, and Minolta offers an AC adapter as a separate accessory. (Minolta's External High-Power Battery Pack Kit is also available, and uses a lithium-ion battery pack to power the camera.)
The S404's four megapixel CCD extends the S304's technology and features to parity with other high-end "prosumer" digicams. Full manual exposure control, 4x optical zoom, and flexible, creative image adjustment features give the S404 the flexibility demanded by many enthusiasts, while its full auto mode and several scene presets make it accessible for novices. From novices who want to start out with full automatic control and gradually step into more manual control, to more advanced consumers looking for high quality in a portable digicam, the S404 is a viable option for a wide range of users. (About the only true "enthusiast" feature it lacks is provision for an external flash unit.)
Design
With its all-silver, slightly bulky body design, the Minolta Dimage S404 looks
very similar to the preceding Dimage S304. The camera is reasonably compact despite
its thick body, and similar in size to many point-and-shoot film cameras (though
quite a bit too large to fit into a shirt pocket). Still, the S404 can be carried
in a large coat pocket or purse, though I'd recommend picking up a small camera
bag for better protection. A neck strap comes with the camera, allowing you more
freedom when carrying it outside of a bag. Size-wise, the S404 measures 4.5 x
2.5 x 2.3 inches (113.5 x 64.5 x 58.5 millimeters), and weighs approximately 15.0
ounces (430 grams - with batteries and CompactFlash card).
The S404 features a larger CCD than the preceding S304 model, offering a full four megapixels for capturing higher resolution images. Apart from the 4-megapixel CCD, the S404 offers the same 4x optical zoom and a high-quality Minolta GT lens I liked on the S304. Control layout remains similar to the S304, with a large Mode dial on top of the camera and a very informative status display panel that reports most camera settings. Now for our virtual "walk" around the camera:
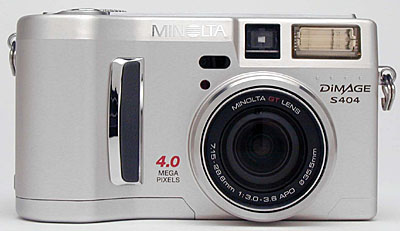
The front of the S404 features the lens barrel, flash, optical viewfinder window, remote-control receiver window (diagonally down to the left from the optical viewfinder window), and self-timer LED lamp. A small finger grip runs vertically along the inside edge of the hefty handgrip (which also houses the battery compartment), with a textured pad for your fingers to cling to as they wrap around the camera. The lens barrel protrudes from the camera body just slightly beyond the hand grip. When the camera is powered on, the lens telescopes out from the body about another three-quarters of an inch, into its operating position. Just below the flash window, a small series of raised bumps provide a grip surface for your left forefinger when holding the camera two-handed, but be careful not to block the flash window with your finger.
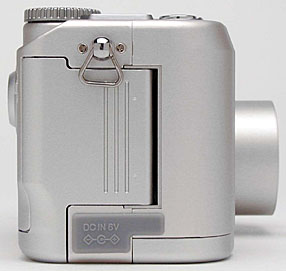
The CompactFlash slot takes up a large portion of the camera's right side (when looking from the back), leaving just enough room for the DC In slot and one of the neck strap attachment eyelets. The memory card slot door is released by a sliding latch on the back panel. Once released, the door pops open and reveals the card slot. Also inside the card slot are the A/V Out and USB connector jacks. One minor design gripe here is that the neck strap eyelet constantly dropped down in the way of either closing the compartment door or connecting the A/V cable. While not a a major concern, it was enough of a nuisance that I thought to briefly mention it. Just below the compartment is the DC In connector jack, protected by a flexible, rubbery flap that folds out of the way when the AC adapter cable is attached.
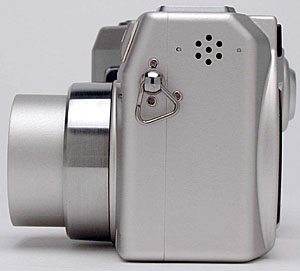
The opposite side of the S404 is fairly plain, featuring only the small speaker and the other neck strap eyelet.
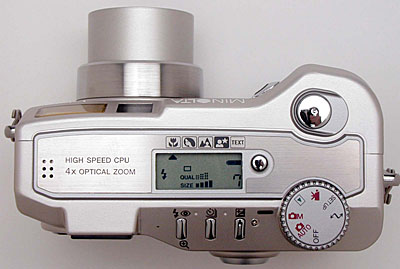
On top of the camera is a large status display panel, as well as the camera's microphone, Subject Program button, Shutter button, Mode dial, and a series of function buttons (angled down slightly, toward the back panel). The inclusion of the status display panel is very welcome, as it reports enough of the camera's basic settings to allow you to shoot without the LCD monitor active much of the time (and thus save on battery power).
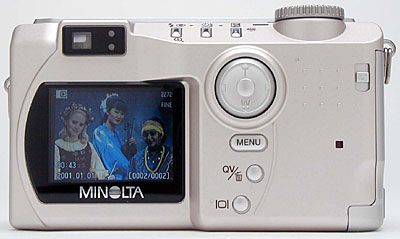
The remaining camera controls share the back panel with the 1.8-inch LCD monitor and optical viewfinder eyepiece. Just beside the viewfinder eyepiece are two LEDs which report a variety of camera information, such as when focus is set or the flash is charging. A series of raised bumps in the top right corner provides a grip for your right thumb as you hold the camera. Just below this small grip pad is a red LED that lights whenever the camera is accessing the memory card, warning you not to eject the card.
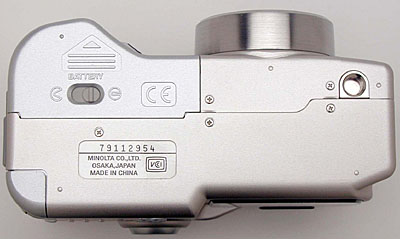
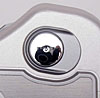
The S404's bottom panel is relatively smooth and flat, with just a few small protrusions. The battery compartment opens from beneath the camera, with a door that must be slid forward before opening. A small latch keeps the battery compartment from opening accidentally. The metal, threaded tripod mount is opposite the battery compartment, in almost the extreme right hand corner of the camera's bottom panel. This placement of the tripod mount makes the camera rather lopsided when it's mounted on a tripod, and horizontal alignment can sometimes be awkward as a result. The off-center tripod mount is also less than ideal for shooting images to be stitched into panoramas. Depending on the design of your particular tripod's mounting plate though, the off-center position of the tripod socket could provide enough room between it and the battery compartment hatch for you to change batteries without removing the camera from the tripod. (A handy feature I'm partial to, but that I'll admit is probably of little consequence to the average user.)
 Viewfinder
The S404 offers both a real-image optical viewfinder and a 1.8-inch TFT color LCD monitor for composing images. The real-image optical viewfinder zooms along with the lens, but doesn't show any digital enlargement when the digital zoom function is engaged. (This requires the LCD monitor to be active.) A pair of focus brackets appears in the center of the optical viewfinder display, delineating the autofocus area. Two LED lamps on the right side of the viewfinder eyepiece report the camera's current status. For example, the top LED glows orange when the flash is charged and ready to fire, or blinks when the flash is still charging. The bottom LED glows green when focus is set, or flashes to indicate a focusing problem.
 Occupying
the majority of the left side of the camera's back panel is the 1.8-inch LCD
monitor. The LCD monitor automatically turns on whenever the camera is powered
on, but can be disabled via the Display button just to the right of the panel
itself. One press of the Display button disables the on-screen information overlay
display, while a second press deactivates the LCD entirely (a third press reactivates
the LCD with the information display). Included in the information overlay display
is the current camera mode, flash mode, file size and quality settings, the
number of available images, and a set of focus brackets in the center of the
display. When shooting in Auto mode, the current shutter speed and aperture
settings appear in the lower portion of the LCD monitor whenever the Shutter
button is halfway pressed. (This information is present at all times in any
of the Manual modes.)
Occupying
the majority of the left side of the camera's back panel is the 1.8-inch LCD
monitor. The LCD monitor automatically turns on whenever the camera is powered
on, but can be disabled via the Display button just to the right of the panel
itself. One press of the Display button disables the on-screen information overlay
display, while a second press deactivates the LCD entirely (a third press reactivates
the LCD with the information display). Included in the information overlay display
is the current camera mode, flash mode, file size and quality settings, the
number of available images, and a set of focus brackets in the center of the
display. When shooting in Auto mode, the current shutter speed and aperture
settings appear in the lower portion of the LCD monitor whenever the Shutter
button is halfway pressed. (This information is present at all times in any
of the Manual modes.)
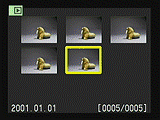 In
Playback mode, the Display button also controls the information display, turning
it on or off. In addition, the Display button allows you to access the nine-image
index display mode, as well as a histogram for checking the overall exposure
of the image. (A histogram graphs the tonal distribution of the image, showing
the complete tonal range captured and making it easy to see any over- or underexposure.)
Also in Playback mode, you can digitally enlarge the image as much as 3.5x,
by repeatedly pressing the Flash/Playback Zoom button.
In
Playback mode, the Display button also controls the information display, turning
it on or off. In addition, the Display button allows you to access the nine-image
index display mode, as well as a histogram for checking the overall exposure
of the image. (A histogram graphs the tonal distribution of the image, showing
the complete tonal range captured and making it easy to see any over- or underexposure.)
Also in Playback mode, you can digitally enlarge the image as much as 3.5x,
by repeatedly pressing the Flash/Playback Zoom button.
The S404's optical viewfinder is a bit tighter than average, showing between 81 and 83% of the final image area (the average among cameras I've tested is about 85%). The LCD viewfinder is quite accurate though, showing fully 98% of the final image area.
 Optics
Built into the S404 is a 4x Minolta GT, 7.15-28.6mm lens, the equivalent of a
35-140mm lens on a 35mm camera. A plastic lens cap protects the lens when not
in use, and features a small tether to attach it to the camera and prevent it
from being lost. When the camera powers on, the lens telescopes outwards about
three quarters of an inch, into its operating position. Two aperture settings
are available, with values of f/3.0 and f/6.7 when the lens is in its wide angle
position, and f/3.6 and f/8.0 when the lens is zoomed to its full telephoto setting.
(As is the case with essentially all digicam lenses, the effective aperture gets
smaller as the lens is zoomed towards its telephoto end.) The aperture settings
can be either automatically or manually controlled. Lens focus also features either
manual and automatic control, and ranges from 1.6 feet (0.5 meters) to infinity
in normal focusing mode. A distance readout appears on the LCD monitor in manual
focus mode, with the actual focus distance controlled by the up and down arrows
of the Four Way Arrow pad (pressing the center of the pad changes the operation
of the up and down arrows back to the optical zoom). Macro mode alters the focus
range for closer, smaller objects, focusing from 6.2 to 23 inches (0.16 to 0.6
meters). Macro coverage is about average among cameras I've tested, with a minimum
area of 2.7 x 3.6 inches (69 x 92 mm). Through the Setup menu, you can activate
a Full-Time AF mode, which adjusts the focus continuously instead of only when
the Shutter button is halfway pressed.
The S404's user interface shares the up and down arrow keys rather nicely between manual focusing and lens zoom control. In normal operation, the up/down positions of the rear-panel rocker control actuate the lens zoom mechanism. When you switch to manual focus mode though, the same controls actuate the focusing mechanism. Simply pressing the center of the rocker control toggles the function of the up/down arrows between the zoom and focus functions. Normally I'm not keen on camera functions sharing controls in this fashion, but it works pretty well in the case of the S404. It does mean though, that focus and zoom adjustments will end up being even slower and more deliberate than their already somewhat leisurely pace.
In autofocus mode, the S404 lets you change the AF area by pressing and holding the center of the Four Way Arrow pad. The AF Area Selection screen appears on the LCD monitor, with five available AF areas to choose from. The arrow keys navigate the area selections, and a half-press of the Shutter button (or a full press of the center of the Four Way Arrow pad confirms the area selection. Pressing and holding the center of the Four Way pad again returns you to the default wider-area focusing mode. (A minor design quibble here: The five spot-AF targets are all clustered rather closely in the center of the frame. A wider spacing would have been more useful in accommodating off-center subjects.)
In addition to the 4x optical zoom, the S404 also features a 2.2x digital zoom option (enabled through the settings menu). I always remind our readers that digital zoom significantly compromises image quality because all it does is crop and enlarge the central portion of the CCD image. Digital zoom always results in decreased resolution, and doesn't typically offer the same sharpness or clarity found with true optical zoom.
A series of filter threads inside the lip of the lens barrel accommodates lens conversion kits, which are available as separate accessories. Thus, you can extend the wide-angle, telephoto, or macro shooting capabilities of the S404. The filter threads are a rather odd size, 35.5mm according to the labeling on the front of the lens itself. You'll therefore most likely be constrained to using Minolta's own accessory lenses. I have to say that I'm also pretty surprised to find filter threads incorporated directly into the front element of a telescoping lens design: You should exercise extreme caution when using them, so as to not over-torque the delicate telescoping mechanism, nor overstress it by mounting a too-heavy accessory lens in this fashion.
Optical quality is an area where Minolta really seems to be making a name for themselves in the digicam arena. In common with those of other high-end Minolta digicams, the lens on the S404 is of noticeably higher than average quality. Despite its being a 4x design (as compared to the 3x of most digicams), the S404's lens shows less geometric distortion than is common for digicam lenses, with only 0.4% barrel distortion at wide angle, and 0.08% pincushion at telephoto. (Most lenses I've tested do pretty well at the telephoto end, but the average barrel distortion at wide angle is 0.8% or more. The S404's lens thus does very well in this respect.) The S404 also does very well with another bane of digicam performance, chromatic aberration. - This distortion shows up as colored fringes around high-contrast objects at the edges of images. The S404's lens seems to show almost none of this effect, and stays quite sharp into the corners as well. Finally, the S404 shows very good resolution, with artifacts beginning to appear in the resolution test image at about 750 lines per picture height, strong detail appearing to about 1150 lines, and "extinction" occurring at about 1300 lines.
Exposure
The S404 offers very flexible exposure control, with a range of exposure options
and special shooting modes available to choose from. The Mode dial sets the camera's
main operating mode, and includes both Auto and Manual record mode settings, referring
to the amount of exposure control available. In Auto mode, for example, the camera
remains in control of shutter speed and aperture settings, as well as the White
Balance, Color, Sharpness, Light Sensitivity (ISO), etc. The Manual record mode
setting provides the full range of exposure features, plus allows you to select
from Program, Aperture Priority, and Manual exposure control options. In Program
AE, the camera controls both shutter speed and aperture settings, while you maintain
control over Exposure Compensation, White Balance, Metering Mode, Contrast, etc.
Aperture Priority mode means that you control the lens aperture setting, while
the camera chooses the best corresponding shutter speed. Finally, Manual exposure
mode puts the user in charge of the exposure completely. Shutter speeds on the
S404 range from 1/1,000 to 4 seconds, with a Bulb setting allowing exposures as
long as 15 seconds.
Two exposure metering options are available through the settings menu in Manual record mode, Spot and Multi-Segment. Spot metering mode takes the exposure reading from a very small area in the center of the frame, and is useful with subjects that are much brighter or darker than the background. Alternatively, Multi-Segment metering divides the image into 270 areas which are measured separately for luminance and color. The resulting information is then combined with the distance reading from the camera's autofocus system to determine the best overall exposure. An Exposure Compensation button on top of the camera allows you to adjust the exposure from -2 to +2 exposure equivalents (EV) in one-third step increments. In situations where you're not sure what the best exposure is, the Auto Exposure Bracketing mode takes three images at different exposure settings in rapid succession. Activated by pressing the Drive Mode button until the Bracketing icon appears on the LCD monitor, this mode snaps one image at the normal exposure, one image overexposed slightly, and one underexposed slightly. Through the settings menu, you can set the exposure step for the bracketing to 0.3, 0.5, or 1.0 EV units.
White Balance can be set to Auto, Cloudy, Daylight, Tungsten, Fluorescent, or Custom to adjust the color response of the camera to match the ambient lighting. The Custom option bases the color balance on a white card held in front of the camera, and accommodates the widest range of lighting conditions at some cost of convenience. The S404 also provides an extensive array of image adjustment controls, including Sharpness, Saturation, Contrast, and Color (which offers Full Color and Black and White options). The S404 features an adjustable sensitivity setting, with an Auto mode as well as 64,100, 200, and 400 ISO equivalents.
 Flash
Flash
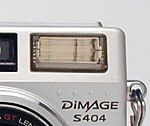
The S404 is equipped with a built-in flash unit, which operates in one of five modes: Auto, Fill, Flash Cancel, Auto with Red-Eye Reduction, and Fill with Red-Eye Reduction. The Flash button on top of the camera controls the flash mode, and the corresponding icon appears in the LCD monitor. Auto mode lets the camera choose when to fire the flash, based on existing light levels, while Fill mode fires the flash with every exposure (regardless of lighting conditions). Flash Cancel simply disables the flash. The two Red-Eye Reduction modes fire two small pre-flashes before the full flash, making the pupils of your subjects' eyes contract, reducing the red reflection from their eyes (known as the Red-Eye Effect). Minolta estimates the S404's flash as effective from 1.6 to 11.5 feet (0.5 to 3.5 meters). (I'll test the flash range once I receive a final production unit for testing.)
Self-Timer / Remote Control Mode
The Drive Mode button on top of the camera accesses the Self-Timer / Remote Control mode, as well as the Continuous Shooting and Auto Exposure Bracketing modes, when pressed sequentially. When set to the Self-Timer mode, the S404 provides a 10-second delay between the time the Shutter button is fully pressed and when the shutter actually opens. A small LED lamp on the front of the camera lights to indicate that the timer has started, and then blinks a couple of seconds before the shutter fires. This mode also works with the optional infrared remote control accessory, which allows you to control the camera from as far away as 16 feet (5 meters).
Continuous Shooting
Also accessed through the Drive Mode button, Continuous Shooting mode captures
a rapid succession of images for as long as the Shutter button is held down
(or as long as the memory card has available space). While shot-to-shot cycle
times will vary with the image resolution and quality settings chosen, the maximum
speed is approximately 1.3 frames per second. (I measured a production model
S404 at a frame rate of 1.25 frames/second, very close to Minolta's claimed
1.3 fps rating.)
Recording Movies and Sound
Through the Movie record mode (set via the Mode dial), the S404 records moving images with sound. Movies are recorded at a 320 x 240 frame size, although the actual "live" area is 284 x 211 pixels. While the manual seemed to indicate that movies longer than 60 seconds in duration could be recorded, our prototype unit was restricted to 60 seconds of recording time. Movie mode also works with the accessory remote control. Macro mode and Exposure Compensation are the only functions available in Movie mode. White balance and sensitivity default to automatic, and both flash and digital zoom are disabled. You can zoom the lens before you start recording, but once a movie is in progress, no further zoom adjustment is permitted. No specification is given by Minolta for the frame rate of the S404's movie recording mode.
Through the record settings menu, the S404 also allows you to record short clips of sound to accompany images. Voice Memo mode records either five or 15 seconds of audio per image.
Preset Scene Modes
The Subject Program button on top of the camera (adjacent to the status display panel) selects between a range of preset "Scene" shooting modes, including Macro, Portrait, Landscape, Night, Text, and Text with Macro. These modes optimize the camera for a range of common shooting conditions. As we discussed in the Optics section, Macro mode alters the focus range of the lens for closer, smaller subjects. In Macro mode, focus ranges from 6.2 to 23 inches (0.16 to 0.6 meters). Portrait mode employs a larger lens aperture setting, which reduces the depth of field, throwing the background out of focus to increase the prominence of the main subject. Alternatively, Landscape mode uses a smaller aperture setting, which keeps both the foreground and background in clear focus. The Night setting shifts the autoexposure system to prefer longer shutter speeds, producing brighter pictures. Night mode also synchronizes the flash for night portraits, balancing the exposure of the subject and the background. In Text mode, the S404 increases the contrast to accurately capture black text on top of a white background. Text with Macro mode works along similar lines, though it changes the focus range for the macro area.
Shutter Lag/Cycle Times
When you press the shutter release on a camera, there's usually a delay or lag
time before the shutter actually fires. This time is required for the autofocus
and autoexposure mechanisms time to do their work, and can amount to a fairly
long delay in some situations. Since this number is almost never reported on,
and can significantly affect the picture taking experience, I now routinely
measure it with a custom test system of my own design.
|
|
||
|
|
|
|
| Power On -> First shot |
|
About average for cameras with telescoping lenses. |
| Shutdown |
|
Also about average. |
| Play to Record, first shot |
|
Time between switching from play to record mode and capture of first image. Fairly fast. |
| Record to play |
|
Time to display maximum res/quality image when switching from record to play mode. |
| Shutter lag, full autofocus |
|
Faster than average |
| Shutter lag, continuous autofocus |
|
Little benefit for using continuous autofocus mode. |
| Shutter lag, manual focus |
|
Quite a bit faster than average. (Average is close to 0.5 seconds.) |
| Shutter lag, prefocus |
|
VERY fast - Most cameras have a lag in this mode of 0.3 seconds or so. |
| Cycle Time, normal mode |
|
Quite fast. Buffer memory holds ~9 large/fine shots, then cycle time stretches to ~5 seconds. Buffer takes about 19 seconds to clear completely. |
| Cycle Time, continuous mode |
(1.25 fps) |
Quite fast. The buffer is quite large, holding 11 large/fine images, then cycle time stretches to ~4.4 seconds. Buffer takes 22.5 seconds to clear completely with a fast memory card (Lexar 12x), 38 seconds with a slow one (Mr. Flash). |
The production model S404 performed almost identically to the prototype unit I originally tested, with the sole exception that the buffer memory on the production unit was almost twice as large. In my testing, the S404 appeared quite fast in all its operations. Shutter lag was noticeably shorter than most competing models, and shot to shot cycle times were quite fast as well. The S404 also appears to have an unusually large buffer memory, offering fast cycle times for up to 11 large/fine shots in sequence. (50 or more shots in small/basic resolution mode.) Overall, a pretty impressive performance, speed-wise.
Operation and User Interface
Though the combination of record modes, drive modes, and exposure modes may seem complicated at first, the S404's user interface is pretty straightforward once you get the hang of it. I liked the fact that most exposure options are controlled externally (that is, without resorting to the LCD menu system), via the Mode dial, Drive Mode button, and Subject Program button. You can also control the flash and Exposure Compensation externally, as well as the shutter speed and aperture when in Manual mode. The availability of the QuickView button makes checking just-captured images a snap, without having to change camera modes. Special exposure features are all adjustable through the LCD menu system, which is extensive but uncomplicated. Menu screens are set up as subject tabs, and are quickly navigated via the Four Way Arrow pad. The top status display panel is a definite plus, as it reports a lot of camera settings, enabling you to operate the camera with the LCD monitor disabled. (This saves a great deal of battery power.) You'll spend some time flipping through the instruction manual to understand the camera settings, but I don't think it'll take most users too long to get up and running.
Control Enumeration
Shutter Button: Located on top of the camera, this chrome button sets focus and exposure when halfway pressed. When fully pressed, this button fires the shutter.

Subject Program Button: Nestled next to the status display panel in a small recess, this button controls the Scene modes of the camera. Pressing it repeatedly cycles through the following modes:
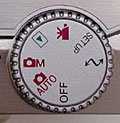
Mode Dial: This notched dial rests on top of the camera, on the right side. Turning the dial selects the camera's operating mode, with the following options available:

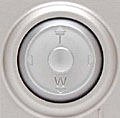
Flash Mode / Playback Zoom Button: The first button in a series on the angled portion of the top panel, this button controls the flash mode in any record mode (except for Movie), cycling between Auto, Fill, Flash Cancel, Auto Red-Eye Reduction, and Fill Red-Eye Reduction.
In Playback mode, this button controls the playback zoom feature, which magnifies the image as much as 3.5x. Pressing the button repeatedly cycles through 2x, 2.5x, 3.5x, and normal image displays.

Drive Mode Button: Directly to the right of the Flash Mode / Playback Zoom button, this button controls the camera's drive mode, cycling through the following:

Exposure Compensation Button: Directly to the left of the Mode dial, this button activates the Exposure Compensation feature in any record mode (except Manual exposure mode). In Manual exposure mode, pressing this button toggles the function of the Four Way Arrow Pad (see below) between setting shutter time or aperture.
Four Way Arrow Pad: The dominant control on the camera's back panel, this button features four arrows (one pointing in each cardinal direction). In any settings menu, these arrows navigate through menu options and screens. Pressing the center of the button confirms menu selections.
In any record mode, the up and down arrows control the optical and digital zoom. When manual focus is activated, the up and down arrows can control either the focus or the zoom. Pressing the center of the pad alternates between the optical zoom and manual focus options. In Manual and Aperture Priority exposure modes, the right and left buttons control exposure settings. Pressing and holding the center of the pad activates the AF Area Selection screen, allowing you to choose the autofocus area using the arrow keys.
In Playback mode, the right and left arrows scroll through captured images. Pressing the up arrow switches to a histogram display that also shows several exposure parameters for the image being viewed. Pressing the down arrow returns to normal playback display. When an image has been enlarged in playback mode, the four arrows let you scroll around the enlarged image.
![]()
Menu Button: Just beneath the Four Way Arrow pad, the Menu button activates the settings menu in any camera mode. Pressing this button also dismisses the menu screen.
![]()
Quick View / Erase Button: Below the Menu button, this button activates the Quick View image review mode when pressed in any record mode.
In Playback mode, this button activates the Erase menu, allowing you to erase the currently displayed image or selected images from the memory card.
![]()
Display Button: Adjacent to the lower right corner of the LCD monitor, this button controls the image and information display in any record mode as well as in Playback mode. In Record mode, pressing the button once removes the information display, while a second press shuts off the LCD monitor entirely. A third press activates the LCD monitor with the information display.
In Playback mode, this button also turns the information display on and off. This button also activates the nine-image index display.

Card Slot Release Latch: Situated in the top right corner of the back panel, just beside the CompactFlash compartment door, this latch releases and opens the compartment door.
Battery Latch: Hidden on the bottom panel of the camera, in the center of the battery compartment door, this latch locks and unlocks the battery compartment door.
Camera Modes and Menus
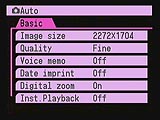 Auto: The first setting on the Mode dial (after the Off position), this mode allows the camera to capture still images. Exposure is controlled by the camera, as are white balance, color, metering, and ISO. The settings menu offers the following adjustment options:
Manual: Enables still image capture, though now with increased exposure options. Pressing the Menu button pulls up three screens of options.
 Basic
Basic
 Custom 1
 Custom 2
Playback Mode: Reviews all captured images and movies on the CompactFlash card. Users can view a histogram of each image, enlarge images as much as 3.5x, or view several images at a time in the nine-image index display mode. Pressing the Menu button offers the following options:
 Basic
Basic
 Custom 1
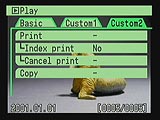 Custom 2
Movie Mode: Indicated by the movie camera icon on the Mode dial, this mode sets the camera for capturing moving images with sound. Movies are captured at the 320 x 240 resolution size, for approximately 60 seconds per movie. There is no settings menu available in this mode.
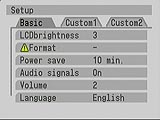
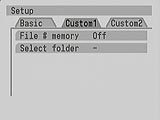
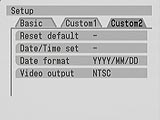
Setup Mode: Automatically displays the following Setup menu:
 Basic
Basic
 Custom 1
 Custom 2
PC Mode: The final option on the Mode dial (marked with a crooked arrow), this mode allows you to connect the camera to a computer and download images via the USB cable.
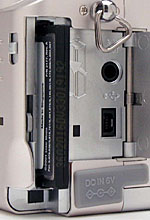 Image Storage and Interface
The S404 stores images to CompactFlash Type I memory cards, and a 16 megabyte
card ships with the unit. Accessory CompactFlash cards are available from a variety
of third parties with capacities as large as 640 MB, and will doubtless continue
their upward climb to even larger sizes as time goes on. While CompactFlash cards
cannot themselves be write-protected, the S404 offers a "Lock" function
through the Playback menu. Locked images cannot be erased or manipulated, but
formatting a CompactFlash card erases all files, even locked ones.
Four image sizes are available on the S404, including 2,272 x 1,704, 1,600 x 1,200, 1,280 x 960, or 640 x 480-pixel sizes. (Movies are captured at the 320 x 240-pixel resolution.) Images can be saved as uncompressed TIFF files, via the Superfine quality setting, or as compressed JPEG files (Fine, Normal, or Economy compression levels).
The table below shows the approximate number of images that can be stored to a 16 MB CompactFlash card at various size and quality levels, as well as their approximate compression levels.
|
Resolution/Quality 16MB Memory Card |
|
|
|
|
|
| Full Resolution 2270x1704 |
Images (Avg size) |
1 (11.6 MB) |
7 (2.13 MB) |
12 (1.26 MB) |
(780 KB) |
| Approx. Compression |
|
|
|
|
|
| High Resolution 1600x1200 |
Images (Avg size) |
(5.8 MB) |
(1.1 MB) |
(681 KB) |
(448 KB) |
| Approx. Compression |
|
|
|
|
|
| Standard Resolution 1280x960 |
Images (Avg size) |
(3.7 MB) |
(753 KB) |
(481 KB) |
(352 KB) |
| Approx. Compression |
|
|
|
|
|
|
Resolution 640x480 |
Images (Avg size) |
(922 KB) |
(332 KB) |
(248 KB) |
(202 KB) |
| Approx. Compression |
|
|
|
|
|
The S404 comes with a USB cable and interface software for downloading images to a computer. The camera is a storage-class USB device, automatically appearing on the computer's desktop under Mac OS 8.6 and later, and Windows Me, 2000, and XP. There's a lot of variation between USB devices in their transfer rates, and I was surprised to find the S404 at the lower end of the range. Connected to my G4 PowerMac, I clocked it at 53.0 seconds to transfer a 11,650K TIFF image, a transfer rate of only 220 KBytes/second. Given that some cameras can download files as fast as 600 KBytes/second, the S404 is rather slow by comparison. (Surprising, given how fast is image processing circuitry seems to be.) If you end up buying a really large memory card for your S404, you may want to consider also getting a fast external card reader for transferring images.(At 220 KB/second, it would take a bit over 19 minutes to download a full 256 MB memory card.)
Lost Images? - Download this image-recovery program so you'll have it when
you need it...
Since we're talking about memory and image storage, this would be a good time
to mention the following: I get a ton of email from readers who've lost photos
due to a corrupted memory card. It's tragic when it happens, there are few things
more precious than photo memories. Corrupted memory cards can happen with any
card type and any camera manufacturer, nobody's immune. "Stuff happens,"
as they say. A surprising number of "lost" images can be recovered
with an inexpensive, easy to use piece of software though. Given the amount
of email I've gotten on the topic, I now include this paragraph in all my digicam
reviews. The program you need is called PhotoRescue, by DataRescue SA. Read
our review of it if you'd like, but download the program now,
so you'll have it. It doesn't cost a penny until you need it, and even then
it's only $29, with a money back guarantee. So download PhotoRescue for
Windows or PhotoRescue for
Mac while you're thinking of it. (While you're at it, download the PDF
manual and quickstart
guide as well.) Stash the file in a safe place and it'll be there when you need
it. Trust me, needing this is not a matter of if, but when... PhotoRescue
is about the best and easiest tool for recovering digital photos I've seen.
(Disclosure: IR gets a small commission from sales of the product, but I'd highly
recommend the program even if we didn't.) OK, now back to our regularly
scheduled review...
Video Out
US and Japanese versions of the S404 include an NTSC video cable for connecting
to a television set. European models will doubtless include PAL-compatible cabling,
given the Video Mode option in the settings menu. All images that would normally
appear on the LCD are routed to the external video display so that the television
screen becomes an enlarged version of the LCD monitor and can be used both for
image playback and composition.
 Power
Power
The S404 utilizes four AA batteries for power, either alkaline or NiMH types. As always, I suggest picking up a couple of sets of rechargeable NiMH batteries, and keeping a spare set freshly charged at all times. A battery indicator in the status display panel reports the current charge level of the batteries. When battery power gets too low, a red battery icon flashes in the LCD monitor and the camera eventually shuts itself off. The S404 offers an Auto Power Save option through the Setup menu, which lets you specify how long the camera will wait without user input before shutting itself off. Additionally, the inclusion of the status display panel on top of the camera means that you can easily operate the camera with the LCD monitor switched off, as several camera settings are reported there. Working without the LCD monitor active greatly increases the operating time for a set of batteries. An AC adapter is available as a separate accessory, a useful addition for time-consuming tasks such as reviewing images or downloading them to a computer. Minolta also offers the External High-Power Battery Pack Kit (EBP-100) as a separate accessory. The kit contains a high-power lithium-ion batter pack and charger. (The lithium-ion battery should significantly increase the amount of operating time over AA batteries.)
As usual, I measured actual power consumption in various operating modes, and projected run times based on a set of 1600 mAh rechargeable NiMH batteries. The results of this testing appear in the table below.
|
|
(@ 6 v) |
(1600mAh, 4.8v 4 NiMH Cells) |
| Capture Mode, w/LCD |
|
|
| Capture Mode, no LCD |
|
|
| Half-pressed shutter w/LCD |
|
|
| Half-pressed w/o LCD |
|
|
| Memory Write (transient) |
|
|
| Flash Recharge (transient) |
|
|
| Image Playback |
|
|
In capture mode, with the LCD monitor active, battery life is a rather short 87 minutes, even with a set of high capacity NiMH rechargeable batteries. This improves to well over three hours of run time if the LCD is turned off. In playback mode, run time is a respectable two hours.
 About
Batteries
About
Batteries
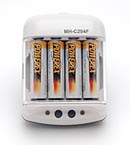
I've gotten so many emails about power issues for digicams, that I'm now inserting this standard notice in the reviews of all AA-powered cameras on our site: Don't even *think* about using alkaline AA batteries in a digicam! Despite their being packed in the box with many cameras, they simply don't have the juice to handle typical digicam demands. (Even the "high power" ones the battery manufacturers say are designed for devices like digital cameras.) Spend the $35-40 or so it takes to get a set (or two) of high-capacity NiMH rechargeable batteries and a good charger! The few dollars up front will save you literally hundreds of dollars in the long run, not to mention the hassle of wimpy batteries running out in the middle of the action. We suggest you buy two sets of batteries, so one can always be in the charger, ready to go, and so have two sets available for longer excursions. Good brands of batteries include Maha (my favorite), Rayovac, GP, and Kodak. Also, buy the highest capacity AAs the manufacturer makes, the few extra dollars for the extra capacity is usually well worth it. Getting a good charger is critical though, almost more so than buying good batteries. I recommend the Maha C-204F (see the photo at right), the charger we use the most in our own studio. - Read my review of it for all the details. Or, just click here to buy one, you won't regret it.
Included Software
Packaged with the S404 is a software CD containing the Dimage Image Viewer Utility,
ArcSoft PhotoImpression, and USB drivers, for both Windows and Macintosh platforms.
The Dimage Image Viewer Utility allows you to download images from the camera,
view them, and organize them. ArcSoft's PhotoImpression is a more broadly capable
program for editing and printing images.
Included Hardware
Included in the box are the following items:
Test Results
In keeping with our standard policy, our comments here are rather condensed,
summarizing our key findings. For a full commentary on each of the test images,
see the Dimage S404's "pictures" page.
As with all Imaging Resource camera tests, we encourage you to let your own eyes be the judge of how well the devices performed. Explore the images on the pictures page, to see how well the S404 performed, and how its images compare to other cameras you may be considering buying.
Like their other higher-end digicams (the S304 and Dimage 5 and 7), Minolta's Dimage S404 captures images in a color space with a broader color gamut than the conventional sRGB used by most digicams, and standardized on by most of the PC industry. The advantage of this is that the S404 can capture colors outside the range that most cameras can handle, by avoiding some of the limitations of the sRGB space, particularly in highly saturated reds and greens. The downside of this approach is that you need to process the camera's image files through Minolta's Dimage Viewer application to convert the color space to sRGB in order to get the best color rendering on most computer monitors and printers. This added step is an inconvenience that many serious photographers will gladly accept, but that most casual users won't want to be bothered with. On the other hand, casual users may find the S404's unaltered color perfectly acceptable. To help you decide what the impact of this issue might be in your own photography, I've taken the rather extreme step of converting all the images from the S404 to sRGB, and showing both sets of images on the pictures page. (I say this is a rather extreme step because it means that the S404 review takes up over 500 megabytes of disk space on our server, not something I can afford to do for every camera that happens along.) Looking at the thumbnails and sample images on the pictures page, it's clear that the sRGB conversion makes a difference, although the magnitude of that difference depends a fair bit on the color content of the particular subject. In at least one case (the outdoor portrait shot) I felt that the raw color from the camera was actually preferable. Overall though, you should plan on routinely running the S404's pictures through the Dimage Image Viewer utility, in order to get the best color. (Fortunately, the Image Viewer program can process files in batches, making it easier to run everything you shoot through it.)
Overall, the S404 produced good color throughout my testing, with generally appropriate saturation. The camera's White Balance system handled most of the test lighting well, and I usually chose the Manual setting as the most accurate, despite a slight yellow cast in some shots. In the tough Indoor Portrait (without flash), the S404's Manual white balance came out a little cool, while the Incandescent setting resulted in a slightly red image. Both were within an acceptable range though, and I ended up selecting the Incandescent version as the most natural-looking. The S404 performed nicely on the Davebox test target, accurately distinguishing between the tough tonal variations of the Q60 target and reproducing the large color blocks very well (though the exposure was a little bright). Skin tones were accurate in both Outdoor portraits, though the blue flowers in both the Indoor and Outdoor portraits were dark and quite purplish, a problem greatly aggravated when I converted these files to the sRGB space. (These blues seem to be a real problem for many digicams.).
The S404 performed well on the "laboratory" resolution test chart. It started showing artifacts in the test patterns at resolutions as low as 800 lines per picture height vertically and horizontally. Detail remained strong out to about 1,050 lines. "Extinction" of the target patterns occurred at about 1,250 lines.
The S404 had quite a bit of trouble with noise during the low-light test shooting, as images captured with the 200 and 400 ISO settings showed very high noise levels, and all of the shots taken with long exposure times showed quite a bit of "hot pixel" noise. I noticed that Minolta doesn't recommend shooting with the camera's Bulb exposure setting at 200 and 400 ISO, warning that image noise will be very high, and I can see why. Certainly, a noise-reduction system seems to be called for here. The camera did capture bright images at light levels as low as 1/16 foot-candle (0.067 lux) at the 200 and 400 ISO settings, but only as low as 1/4 foot-candle (2.7 lux) at the ISO 64 setting. (ISO 100 captured a bright image at 1/8 foot-candle, or 1.3 lux.) Color was slightly pinkish in most shots from the Auto white balance. The camera will do well at light levels equivalent to typical city night scenes, but you may want to consider software solutions to reduce the hot-pixel noise. (See Mike Chaney's Qimage Pro for a program that does a great job of removing hot pixels without disturbing the underlying picture information.)
The S404's optical viewfinder was rather tight, covering approximately 81 percent of the final frame area, at both wide angle and telephoto zoom settings. By contrast, the LD viewfinder was pretty accurate, showing between 95 and 99 percent of the final frame.
The S404's macro capabilities were average to slightly below average, as it captured a slightly large macro area of 4.3 x 3.2 inches (109 x 82 millimeters). Resolution was great, with a lot of fine detail in the coins, dollar bill, and brooch, and details were reasonably sharp (though I noticed some corner softness). Color balance was slightly warm, from the Auto white balance setting. The camera's flash throttled down very well for the macro area, producing just a tiny hot spot on the brooch and slight falloff in three corners of the frame.
With the exception of the very high noise levels in the low-light shots, I was quite satisfied with the S404's performance throughout my testing. Color is generally accurate with good saturation in most cases (provided you're willing to process the files through the Dimage Viewer utility), and resolution is high. A good noise-reduction system would dramatically improve the S404's low-light performance, but with an application like Qimage Pro, you could get usable images even under pretty dark conditions. All in all, quite a good job, particularly in light of the S404's very aggressive pricing.
Conclusion
Minolta's Dimage S404 clearly represents one of the better values in digital
cameras currently on the market. (This is being written in late April, 2002.)
With its 4-megapixel CCD, optional full manual exposure control, and variety
of shooting modes, it's a versatile camera well-suited to a wide range of users.
Novices will appreciate its fully automatic exposure mode, as well as its modest
assortment of preprogrammed "scene" modes. For more advanced users,
the S404 provides an unusually wide range of exposure and even color adjustments.
The 4x zoom lens offers a bit longer reach than the 3x zoom found on most of
its competition, as well as unusually sharp, clear images. (The lenses on Minolta's
high-end consumer digicams are really second to none, in my experience.) It's
a little power hungry running with the LCD on in capture mode, so my recommendation
of buying high-capacity NiMH batteries and a good charger goes double here,
run time is actually quite respectable with the LCD off. All in all, one of
the best bargains on the market for a full-featured four megapixel camera.
<<Dimage S404 Sample Images | Additional Resources and Other Links>>
Reader Comments!
Questions, comments or controversy on this product? Click
this link to see what other Imaging Resource readers have had to say about
the Minolta Dimage S404, or add comments of your own!