Canon PowerShot S5 IS Operation
Despite its sophisticated feature set, the Canon PowerShot S5 IS is relatively easy to use. Photographers familiar with this camera's predecessor, the S3 IS, will feel right at home since only minimal changes have been made to the newer model's controls. The S5 IS's external controls may appear overwhelming to those who are stepping up from a point-and-shoot camera but referencing the manual will help overcome any insecurities. Logical control layout and an easy-to navigate menu system will benefit both beginner and experienced photographers. Most camera functions are controlled externally, and a few of the external control buttons serve multiple functions. When you do need to enter the LCD menu system, navigation is straightforward. The Canon PowerShot S5 IS's external controls cut down on the amount of time spent searching menu screens, and I particularly like the "Function" menu, which became standard on Canon digicam models as of the 2003 model year. Combined with the instruction manual, the Canon S5 IS's user interface shouldn't take more than an hour to get comfortable with.
 Record Mode LCD Display: In Record mode, the PowerShot S5 IS's LCD reports various exposure settings, including camera modes, the resolution and quality settings, number of available images, a live histogram, etc. Half-pressing the Shutter button reports the aperture and shutter speed settings, in all modes except Manual. Pressing the Display button cycles through the available display modes, which are quite simple: no information, full information, or both of these in EVF mode. You can further customize what kind of information and guides appear on the display in the Custom Display submenu in Settings.
 Playback Mode LCD Display: In Playback mode, the LCD reports the image series number, resolution and quality setting, file name, and the date and time of image capture. Pressing the Canon S5 IS Display button once pulls up an enhanced information display, with a histogram for checking the exposure and general exposure details. A third press cancels the information overlay entirely. Unlike its behavior in Record mode, the Display button will not let you view images through the electronic optical viewfinder, although you can force the electronic viewfinder to be used by rotating the LCD monitor so that it is closed pointing towards the camera body. In Playback mode, pressing the zoom control in the wide-angle direction switches to a nine-up thumbnail display of previously captured images. Pressing it in the wide-angle direction a second time produces a "jump bar" at the bottom of the screen, which shows where the current group of nine thumbnails is relative to the total collection of images on the memory card, and that lets you jump through them nine images at a time. Toggling the zoom lever in the telephoto direction takes you back out of the thumbnail displays, and if continued beyond the point at which you see the full-sized image, zooms in on the image up to 10x, letting you check focusing and very fine details.
Canon PowerShot S5 IS Modes and Menus
![]() Auto: In the Auto mode, the camera chooses all exposure settings automatically for point-and-shoot simplicity. Users can select image size and quality settings, Auto, or High ISO, as well as Macro options.
Auto: In the Auto mode, the camera chooses all exposure settings automatically for point-and-shoot simplicity. Users can select image size and quality settings, Auto, or High ISO, as well as Macro options.
![]() Program: In the Program mode, the Canon S5 IS automatically selects the appropriate Aperture and Shutter Speed; all other settings can be changed manually.
Program: In the Program mode, the Canon S5 IS automatically selects the appropriate Aperture and Shutter Speed; all other settings can be changed manually.
![]() Shutter Speed Priority: You select the Shutter Speed and the camera automatically selects the corresponding Aperture.
Shutter Speed Priority: You select the Shutter Speed and the camera automatically selects the corresponding Aperture.
![]() Aperture Priority: When set to Aperture Priority, you select the Aperture and the camera automatically sets the complementary Shutter Speed for the selected f/stop.
Aperture Priority: When set to Aperture Priority, you select the Aperture and the camera automatically sets the complementary Shutter Speed for the selected f/stop.
![]() Manual: In Manual Exposure mode, you select the Shutter Speed and the Aperture. Exposure Compensation is disabled in this mode.
Manual: In Manual Exposure mode, you select the Shutter Speed and the Aperture. Exposure Compensation is disabled in this mode.
![]() Movie: This sets the camera to the movie mode to capture video clips.
Movie: This sets the camera to the movie mode to capture video clips.
![]() Custom: This option enables settings that you specify in the Menu system.
Custom: This option enables settings that you specify in the Menu system.
![]() Stitch Assist: Provides visual guidelines on the LCD to help align and shoot multiple individual images that can later be stitched together into a panorama.
Stitch Assist: Provides visual guidelines on the LCD to help align and shoot multiple individual images that can later be stitched together into a panorama.
![]() Scene Mode: Provides access to the Scene Mode menu and the following Scene modes: Night Scene, Indoor, Foliage, Snow, Beach, Fireworks, Aquarium, Color Accent (one color is retained while the rest of the image is recorded in black and white), Color Swap (a single color can be replaced by another color).
Scene Mode: Provides access to the Scene Mode menu and the following Scene modes: Night Scene, Indoor, Foliage, Snow, Beach, Fireworks, Aquarium, Color Accent (one color is retained while the rest of the image is recorded in black and white), Color Swap (a single color can be replaced by another color).
![]() Sports: Enables the camera's Continuous Shooting with Autofocus mode to capture action shots.
Sports: Enables the camera's Continuous Shooting with Autofocus mode to capture action shots.
![]() Night Snapshot: Sets a slow Shutter Speed and enables the Flash so that the flash illuminates the subjects closest to the camera while the background is well-exposed.
Night Snapshot: Sets a slow Shutter Speed and enables the Flash so that the flash illuminates the subjects closest to the camera while the background is well-exposed.
![]() Landscape: Uses a small Aperture setting to gain better depth-of-field so that the image appears in focus from near to far.
Landscape: Uses a small Aperture setting to gain better depth-of-field so that the image appears in focus from near to far.
![]() Portrait: Uses a large Aperture setting for narrower depth-of-field so that the main subject is in focus while the background is blurred.
Portrait: Uses a large Aperture setting for narrower depth-of-field so that the main subject is in focus while the background is blurred.
Function Menu: In Record mode, the Function button provides direct access to the most-often changed settings:
 White Balance: Choose from Auto, Daylight, Cloudy, Tungsten, Fluorescent, Fluorescent H, Flash, and Custom (set manually).
- My Colors: Options are: Off, Vivid, Neutral, Sepia, Black & White, Positive Film, Lighter Skin Tone, Darker Skin Tone, Vivid Blue, Vivid Green, Vivid Red, Custom Color. Custom Color opens another menu to manually adjust Contrast, Sharpness, Saturation, Red, Green, Blue, Skin Tone up or down by two steps.
- Bracket: Choices include Auto Exposure and Autofocus Bracketing. When set to Auto Exposure Bracketing (not available in ) the camera will take three consecutive shots at different exposures; the bracketing amount can be set manually. Autofocus Bracketing also captures three consecutive images and can be set to include larger or smaller areas of focus.
- Flash Adjust: Adjusts the flash output of the on-board or external flash.
- Metering: Choose the exposure metering mode from Evaluative, Center Weighted Average, or Spot.
- Movie Quality: Options include resolution and frame rate combinations, i.e., 640 x 480 at 30 frames per second; 640 x 480 at 30 frames per second long play; 320 x 240 at 60 frames per second; 320 x 240 at 30 frames per second. The amount of available recording time for each is displayed when scrolling through the options.
- Resolution: Select the image resolution and quality (compression) settings. Image resolution options are: L (3264 x 2448), M1 (2592 x 1944), M2 (2048 x 1536), M3 (1600 x 1200), S (640 x 480), W (Wide 3264 x 1832). Quality (compression) settings are: Superfine, Fine, Normal.
Shooting Menus: The Canon PowerShot S5 IS has a three-tabbed menu system in Record mode: Record Menu, Setup Menu, and My Camera Menu:
Record Menu: Accessed by pressing the Menu button in Record mode. The submenus available in the Record menu (depending on selected shooting mode) are:
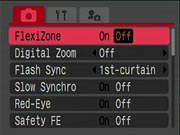 FlexiZone: Allows the AF frame to be moved manually to focus on off-center subjects. Note: Face Detection is not available when FlexiZone is turned to On in the Record Menu.
- Digital Zoom: Turns the Digital Zoom On or Off. Other options include 1.6x (57.6-691.2mm) and 2.0x (72-864mm) digital zoom settings, along with a Standard option that provides a combined optical/digital focal range of 36-1728mm.
- Flash Sync: Choose between First curtain (the flash fires when the shutter first opens) or Second curtain (just before the shutter closes).
- Slow Synchro: Allows slower shutter speeds when using flash.
- Flash Adjust: Available in Shutter- and Aperture Priority modes, you can choose to adjust the Flash output manually or automatically.
- Red-eye Turns the Red-eye Reduction mode on or off.
- Safety FE: This feature prevents blown highlights when shooting with flash in Program AE, Shutter- or Aperture-priority modes by automatically changing either the Aperture or Shutter Speed.
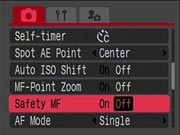 Self-Timer/Custom: Select the Delay (from 0-10 seconds, 15, 20, or 30 seconds) and the number of Shots (1-10) captured when using the Custom Self-Timer option.
- Spot AE Point: Elect whether to use the center of the frame or the selected AF point to determine the Spot metering reading.
- Safety Shift: A safety mechanism that automatically adjusts exposure when the selected Tv or Av setting will not deliver a well-exposed image.
- Auto ISO Shift: When enabled and the camera shake warning appears, the Direct Print/Shortcut button can be used to increase the ISO and, therefore, the Shutter Speed so the camera shake warning does not appear.
- MF-Point Zoom: When using Manual Focus, this feature magnifies the center of the image so you can more easily check accuracy of focus on the LCD.
- Safety MF: This feature allows the use of Autofocus to fine-tune the accuracy of Manual Focus.
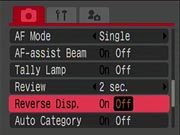 AF Mode: Choose between single or continuous autofocus.
- AF Assist Beam: Turns the AF Assist Beam On or Off. When On, the Beam helps the camera lock autofocus under low light conditions.
- Tally Lamp: Elect to have the Self-Timer/Tally Lamp blink when recording movies.
- Review: Determines the amount of time a recorded image remains on the LCD immediately after capture. Options are Off, 2-10 seconds, and Hold. The latter displays the image until the Shutter is pressed.
- Reverse Display: When enabled, this feature will reverse the image when the LCD is rotated to face toward the front of the camera.
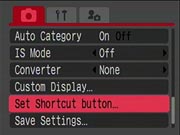 Auto Category: Elect whether images are automatically associated with categories, i.e., People.
- IS Mode: Choose between turning the Image Stabilization Off, Continuous, Shoot Only (activates when the Shutter is pressed), Panning (compensates for vertical movement only). If the Movie Mode is selected after any IS mode has been set, IS will automatically change to Continuous.
- Converter: Set to match optional Wide, Tele-converter or Close-up lenses.
- Custom Display: Select what types of information appears on the LCD and EVF when cycling through options via the Display button.
- Set Shortcut Button: Choose what function is activated when pressing the Shortcut button. Options include: Metering, Custom or preset White Balance, Digital Tele-Converter, AutoExposure Lock, Autofocus Lock, Display Off or it can be designated as Not Assigned.
- Save Settings: Saves the current settings of the Record and Function menus. These settings can be called up from the Custom mode option on the Mode Dial.
Setup Menu:
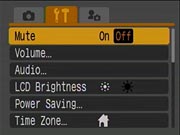 Mute: When On, this Mutes or disables all but the camera's warning sounds.
- Volume: Adjusts the volume of five different sounds: Start-up, Operation, Self-timer, Shutter and Playback.
- Audio: Adjusts the recording levels either manually or automatically and enables or disables the Wind Filter.
- LCD Brightness: Choose from one of two brightness (Normal or Bright) settings for the monitor.
- Power Saving: Determine whether or not the camera powers down after an extended period of non-use. Also, select how long--10/20/30 seconds or 1/2/3 minutes--before the LCD or EVF automatically powers off after non-use of the camera.
- Time Zone: Select Home (local) and World (vacation) time zones.
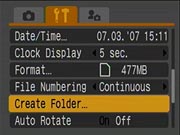 Date/Time: Select the date and time, which will be adjusted automatically when switching between Home and World time zones.
- Clock Display: Designate how long the clock/date/time are displayed when pressing the Shooting Mode/Self-Timer button. Options include: 0-5 seconds; 10/20/30 seconds or 1/2/3 minutes.
- Format: This Formats the media card and erases all data. A low level format option is available and is best used if the media card shows signs of slowing when reading/writing data.
- File Numbering: Choose whether file names are numbered consecutively regardless of media card used or automatically reset to start from 0001.
- Create New Folder: Choose to create a new folder manually or have one automatically created daily, by day of the week or monthly. The time at which folders are automatically created can also be set.
 Auto Rotate: Automatically rotates an image to its correct orientation so you don't have to adjust the LCD or camera to view the image right side up.
- Distance Units: Choose the measurement used for Manual Focus between meters/centimeters or feet/inches.
- Language: Select what language is used in menus and other display information.
- Video System: Set the Video format to either NTSC (for U.S.) or PAL.
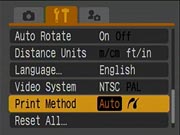
- Print Method: When connecting the camera directly to a printer, use the Auto connection or the other icon if printing a borderless image shot in Wide mode.
- Reset All: Resets all options to the factory default settings.
My Camera Menu:
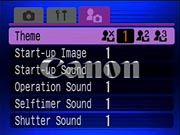 Theme: Choose theme for each My Camera setting including none (black screen), the Canon logo with a blue background, the Canon logo with a sunset background and a photograph of a bird.
- Start-Up Image: Select a start-up image to be displayed when the camera is turned on or off from the above listed options. Your own image can be substituted using Canon software.
- Start-Up Sound: Selects a start-up sound that plays when you the camera is powered on. Options include no sound, one of two musical tones and a chirping bird. You can substitute your own sound using Canon software.
- Operation Sound: Choose a sound that plays whenever any button other than the shutter button is pressed.
- Self-Timer Sound: Select the sound played 2 seconds before the shutter is released in the Self-Timer mode as a warning that the picture is about to be taken.
- Shutter Sound: Select the sound played when the shutter button is pressed.
- My Camera Menu Contents: Shows any custom sounds or images that have been registered in My Camera. This sub-menu is not available unless sounds/images have been added.
Playback Menu:. To access this menu, switch the camera to Playback and press the Menu button. The tabbed Menu provides access to Play and Print menus, in addition to the same Setup and My Camera menus available in the Record Menu.
Play Menu:
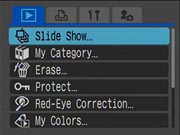 Slide Show: Automatically plays back images in a slide show. In addition to setting timing and transitions, you can choose the images to be played according to the following criteria: all images on the memory card, images from a specific date, images pre-assigned to a category, images in a single folder or images that have been assigned to one of 3 custom groups. .
- My Category: Allows you to tag or associate images to one of several categories including, people, scenery and events. .
- Erase: Erases all or manually selected images on a memory card. Images can also be erased selectively by date, category or folder. Protected images (see below) will not be erased unless/until they are "un"-protected.
- Protect: Applies or removes a tag that protects the image from being changed or deleted except when the card is reformatted. Protection can be applied to individual images, all images on a card or selectively by date, category or folder.
- Red-Eye Correction: Automatically or manually correct red-eye on a recorded image.
- My Colors: Applies My Colors effects to still images and movies.
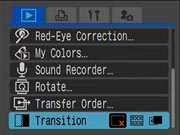 Sound Recorder: Records sound only for up to 2 hours without taking a picture. Sound quality is adjustable.
- Rotate: Manually rotate the image in 90 degree increments. The change in rotation may not transfer to your computer unless you use a software program that recognizes the tag that indicates the change in orientation.
- Transfer Order: Selects and marks images for transfer from camera to computer.
- Transition: Selects the transition from image to image when reviewing photos in Playback. Choices include none, dark-to-light fade, and the direction from which the image moves onto the screen.
Print Menu:
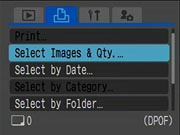 Print: Sends tagged images to the printer.
- Select Images & Quantity: Selects images for printing and the number of prints to be output for each image.
- Select by Date: Selects images and configure print settings by date.
- Select by Category: Selects images and configures print settings by category.
- Select by Folder: Selects images and configures print settings by folder.
- Select All Images: Selects all images on a memory card and configures print settings for them.
- Clear All Selections: Clears all print settings from the images.
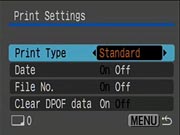 Print Settings: Displays a menu for various print setting options:
- Print Type: Select a Standard print (one image per page) or an Index print of multiple images on a page or both.
- Date: This on/off option allows you to choose whether or not to have the date and time printed on the image(s).
- File Number: This on/off option allows you to choose whether or not the file number is printed on the image(s).
- Clear DPOF Data: This on/off option allows you to chose whether or not the DPOF (printing settings) are cleared from the images once they are printed.
 Fujifilm GFX 50S Review
 Fujifilm X-T3 Review
 Olympus E-M5 III Review

Follow Imaging Resource