 Back
to Full Fuji FinePix S7000 Review
Back
to Full Fuji FinePix S7000 ReviewGo to Fuji FinePix S7000 Data Sheet
Go to Fuji FinePix S7000 Pictures Page
Up to Imaging Resource Cameras Page
Use your browser's "Back" button to return to the previous page, or the links at the top and bottom of this page to navigate to related information. If you have difficulty fitting the text on this page onto your printer output, simply resize your browser window to a narrower width and print again.
Remember us when it's time to buy!
Dave here: Have our reviews been helpful to you? (Is this article you're reading right now useful?) Preparing this level of information on as many products as we do is incredibly hard work, not to mention expensive. Things on the Internet may look like they're free, but they're not. (As a lot of big dot.com companies are finding out these days.) Somewhere, somebody has to pay to produce worthwhile content. YOU can help us though, by remembering us when it comes time to make your purchase. Would you consider coming back to our site and clicking-through to one of our advertisers to make your purchase? Every dollar you spend with one of our advertisers helps us directly (in affiliate fees) or indirectly (the advertiser will keep renewing their ad contract with us). To make it easy for you to support us, here's a URL you can visit, to see all our current advertisers, with links to click on that will register your visit to them as having come from our site. It's up to you where you buy, but Mike, Mike, Kim, Yazmin, Marti and I would be really grateful if you'd help us out by choosing one of our advertisers to purchase from.
Thank you for your support!
Dave Etchells, Founder & Publisher
Visit our "Buy Now" Page:
https://www.imaging-resource.com/buynow.htm
Back
to Full Fuji FinePix S7000 Review
Go to Fuji FinePix S7000
Data Sheet
Go to Fuji FinePix S7000
Pictures Page
Up to Imaging Resource Cameras
Page
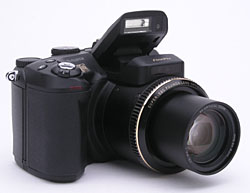
Fuji FinePix S7000Fuji's latest electronic SLR offers a larger, 6.3-megapixel CCD that interpolates to 12.3 megapixels - one of the highest resolution consumer models we've tested to date! Review First Posted: 01/16/2004 |
|
 | | 6.3-megapixel Super CCD HR produces 4,048 x 3,040-pixel images. (Interpolated to 12.3 megapixels.) |
| | 6x Fujinon optical zoom lens equivalent to 35-210mm lens on a 35mm camera. | |
| | Powerful flash effective to 27.9 feet (8.5 meters). | |
| | Accepts xD-Picture Cards, IBM Microdrive | |
| | Super high-resolution electronic optical viewfinder, with 235,000 pixels. |
Manufacturer Overview
Fujifilm has become one of the major players in the digital camera field, and has made major strides in the marketplace. Their strengths heretofore have been in the categories of "stylish sub-compact" and "entry-level zoom" cameras, their very popular FinePix 6800 and FinePix 2600 models being exemplary of their offerings in these areas. They seem to be gaining ground in the "enthusiast" category as well though, as evidenced by their highly popular FinePix 6900, which sold far beyond Fuji's expectations in late 2001.
After a bit of a gap following the sellout of the 6900, Fuji's came back with a new offering for the enthusiast crowd, the FinePix S602 Zoom. The S602 Zoom built upon many of the popular features of the 6900 (like the 6x optical zoom lens), but offered improved color fidelity and reduced image noise as well as enhanced shooting speed. The camera added support for both SmartMedia and CompactFlash memory cards (including IBM Microdrives), and offered significantly improved white balance when dealing with the incandescent lighting so common in the US. The S602 also sported some genuinely unusual features, including an amazing 640 x 480, 30 frames/second motion capture mode, special high-ISO modes (to ISO 1600) that cleverly traded resolution for lower image noise, and a couple of exceptionally handy motor-drive modes.
Because of the S602 Zoom's high popularity among the enthusiast ranks, Fuji upped the ante and released the FinePix S7000. Offering many of the same great capabilities of the S602 model, the S7000 now boasts the highest resolution of a consumer level digicam that we've seen to date with its 6.3 megapixel Super CCD HR that interpolates to 12.3 megapixels. The camera also features an extensive flash range, and a higher resolution electronic optical viewfinder. With the same great exposure features, autofocus options, and performance as the S602, the S7000 is sure to be a hit.
High Points
The big news on the S7000 is its Super CCD HR, which produces high-quality, interpolated images as large as 4,048 x 3,040 pixels (12.3 megapixels). That's higher than any consumer-level camera currently out on the market. A few other improvements over the S602 Zoom include an extremely long flash range, extending to an amazing 27.9 feet (8.5 meters) at the full wide angle setting. Additionally, the camera's electronic optical viewfinder (EVF) has a much higher-resolution display, offering 235,000 pixels. (As a comparison, the S602 Zoom's display offered 180,000 pixels (800 x 225), which isn't too shabby either.) Mimicking higher-end 35mm cameras, the S7000 also features a socket on the Shutter button for attaching a cable release. This is a useful tool when taking long exposures, as you can remotely release the shutter without risking any vibration. Like the S602 Zoom, the S7000 offers Pixel-Mixing Technology for high-quality VGA-resolution movies at an astonishing 30 frame/second frame rate, and a High-Definition Color Processor for more accurate color, in addition to an excellent range of exposure features.
The S7000 features a well designed, retractable lens with a removable, plastic lens cap that attaches to the camera body and protects the lens surface. The same threads that hold the lens cap in place also accept an accessory lens adapter, allowing a variety of front-element add-on lenses to be used with the camera. Most camera control is accomplished via external controls, so there's less reliance on the LCD menu system than would be the case otherwise. Because the S7000 uses an electronic viewfinder (EVF) system though, you can't conserve battery power by turning off the LCD screen. (Although the eye level EVF does consume less power than the rear-panel LCD.) Though the control layout may seem daunting to the uninitiated, I actually found it quite intuitive after shooting with the camera for a while. I found I could access commonly-used shooting controls very quickly, thanks to an interface design that let me avoid the LCD menu system most of the time.
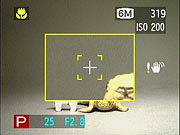
As just mentioned, the S7000 has both an "electronic" optical viewfinder and a larger rear-panel LCD monitor for framing shots. The electronic optical viewfinder is actually a miniaturized (0.44 inches) version of the larger LCD, and shows the same information displays. An EVF / LCD button switches the viewfinder display between the two monitors, so that only one is active at a time. As an eyeglass wearer, I appreciated both the inclusion of a dioptric adjustment on the EVF, and its relatively high eyepoint, which made it easy to use with my glasses on. With 235,000 pixels, the EVF on the S7000 is also much easier on the eyes when it comes to viewing finer details and menu screens. The 1.8-inch color LCD monitor also has a very sharp display, with some useful focus enlargement options in record mode, and a histogram display.
The Super EBC Fujinon 6x zoom lens (35-210mm equivalent) offers an aperture range from f/2.8-f/8, manually and automatically adjustable. Focus ranges from 1.6 feet (50 centimeters) to infinity in normal AF mode, and from 3.9 inches to 2.6 feet (10 to 80 centimeters) in Macro mode. A Super Macro mode focuses from 0.4 to 7.9 inches, or from 1 to 20 centimeters, about the closest macro range I've seen on a digicam, matched by only a small handful of models. The camera's autofocus system operates in either Single or Continuous AF modes, with an adjustable AF area. (See my later discussion of the S7000's autofocus under the Optics section of this review.) A focus switch on the left side of the camera goes between Single AF, Continuous AF, and Manual focus modes, and the focus ring around the end of the lens barrel adjusts the manual focus. The One-Touch AF button quickly snaps the image into focus in manual mode, letting you tweak the focus from there, while a Focus Check button enlarges the center of the frame 2x to help with manual focusing. (Overall, the S7000 has some of the best focusing options I've yet seen in a prosumer-level digicam, although I do wish it had a numerical distance readout.) In addition to the impressive 6x optical zoom, the S7000 also offers as much as 3.2x digital zoom, though as always, image quality decreases with digital enlargement.
The S7000 offers a wide range of exposure control, from full Auto to full Manual modes. A Power / Mode dial sets the camera to either Record or Playback modes, while the Exposure Mode dial on top of the camera features Manual, Aperture Priority, Shutter Priority, Program AE, Auto, Scene Program, and Movie exposure modes. Scene Program offers a handful of preset shooting modes, including Portrait, Landscape, Sports, and Night Scene. Shutter speeds range from 1/10,000 to 15 seconds in full Manual mode, with a Bulb setting for arbitrary exposures up to 15 seconds, but the range decreases to 1/2,000 to 1/4 second in Auto and Scene Program modes (three seconds in Night Scene mode), and 1/1,000 to three seconds in Shutter Priority, Aperture Priority, and Program modes.
In all exposure modes except for Auto, Scene Program, and Manual, Exposure Compensation is adjustable from -2 to +2 exposure equivalents (EV) in one-third-step increments. By default, the S7000 uses a 64-zone, multi-segment metering system, but Average and Spot metering modes are available through the settings menu. An AE Lock button locks the exposure reading independently of focus. Through the Drive menu, an Auto Exposure Bracketing function snaps a series of three images at different exposure settings, which can vary by 1/3, 1/2, or one full EV step (set through the menu system). In any of the manual exposure modes, the camera's ISO sensitivity setting offers Auto, 200, 400, and 800 ISO equivalents (though the 800 setting automatically limits the resolution to three megapixels or less). White Balance choices include Auto, Daylight, Shade, Daylight Fluorescent, Warm White Fluorescent, Cool White Fluorescent, Incandescent, and two Custom (manual) settings. You can also adjust image sharpness, and a Self-Timer mode offers two- and 10-second countdowns. The camera's built-in, pop-up flash operates in Auto, Forced On, Forced Off, Red-Eye Reduction, Slow-Synchro, and Red-Eye Reduction Slow-Synchro modes. An external flash hot shoe with a single contact accommodates a more powerful flash unit, but the S7000 also features an adjustment to increase the flexibility of its onboard flash.
Three Continuous Shooting modes are available through the Drive menu: Top-5 Frame, Final-5 Frame, and Long-Period Continuous Shooting. The Long-Period Continuous Shooting mode is only available in Auto exposure mode, and forces the resolution to 3.0 megapixels or less, but allows very long sequences of images to be captured. The Final-5 frame continuous mode is unusual, in that the camera begins acquiring images continuously when you press the Shutter button, and then saves the last five it shot before you released the shutter. This is great for capturing fleeting moments in sports and other fast-moving situations. Just hold down the Shutter button, then release it as soon as the event has occurred.
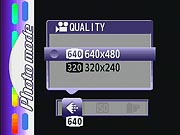
In Playback mode, a Voice Memo option records as much as 30 seconds of sound to accompany still images, great for more lively captions. The S7000's Movie mode offers 640 x 480- and 320 x 240-pixel resolutions, and records for as long as the memory card has available space, at a full 30 frames/second. For more creative shooting, the S7000's Multiple Exposure mode overlaps as many exposures as you like, producing a double-exposure effect.
Images are stored on either xD-Picture Cards or CompactFlash type II memory cards (a 16MB xD-Picture Card comes with the camera), as the S7000 has dual memory card slots. The camera also accommodates the IBM Microdrive, but since it uses the FAT16 file system, it can't access more than 2GB on the latest solid-state and Microdrive cards which are reaching capacities as high as four gigabytes (six gigabyte and higher cards are well on their way). Quality choices include two JPEG compression levels, and an uncompressed RAW option. An included A/V cable lets you connect to a television set for image playback and composition, and a USB cable provides high speed connection to a computer (The included Windows-only PictureHello software makes the S7000 into a webcam). The software CD that comes with the camera, also includes Fuji's FinePix Viewer software for image downloading, and ImageMixer for creating CD albums, as well as a RAW converter for processing the RAW format files. Power for the S7000 is provided by four AA-type alkaline or NiMH batteries, and a set of alkaline batteries comes with the camera. As always, I strongly recommend picking up a couple of sets of high-capacity rechargeable batteries and charger. An AC adapter is available as a separate accessory.
Design
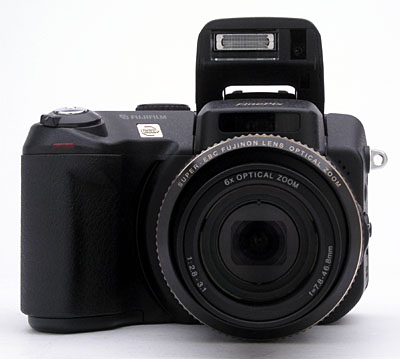
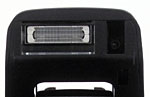
The 6x f/2.8-3.1 zoom lens dominates the front view of the camera, leaving room only for the hefty handgrip. The lens telescopes out an additional 2.5 inches or so from the camera body whenever the camera is powered on, doing so reasonably quickly (especially considering the distance it has to travel). A ribbed focus ring surrounds the end of the lens barrel, adjusting focus when the camera is put into manual focus mode. Just above the lens is the passive AF sensor, which uses ambient infrared light to help gauge focus. The handgrip is large enough to provide a firm hold, with a leather-like texture that provides good traction for your fingers as they wrap around the camera. At the top of the hand-grip is a small LED indicator for the camera's self-timer function. Hidden behind the lens and beneath the flash compartment (on the right side when looking from the front) are three small holes for the tiny microphone used to record audio.

The camera's top panel hosts a number of controls, as well as the pop-up flash compartment and external flash hot shoe. An Exposure Mode dial and Command wheel sit side-by-side on the far right, with the Drive, Flash, and Exposure Compensation buttons closer to the front. A Mode switch controls the main operating mode and encircles the silver Shutter button, which features a screw mount for a cable release.
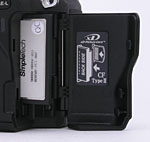
On the right side of the camera (as viewed from the rear) is one of the neck strap attachments, as well as the memory card compartment. A locking plastic door protects the card compartment, which has one slot for xD-Picture Cards and one for CompactFlash Type II memory cards (compatible with the IBM Microdrive).
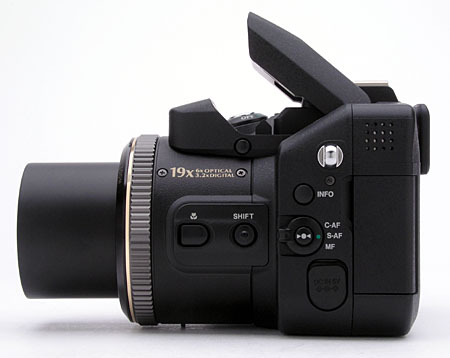
The opposite side of the camera is more feature-laden, with a number of control buttons, the other neck strap attachment, speaker, and two connector compartments. Controls include Macro, Shift, and Info buttons, as well as a Focus switch and One-Touch AF button (nestled inside the focus switch). The DC In connector jack sits beneath a flexible, rubbery flap. The main connector compartment holds the USB and A/V Out jacks, protected by a plastic door that snaps shut securely. Also visible on this side of the camera is a tiny flash release button, just beneath the flash compartment.
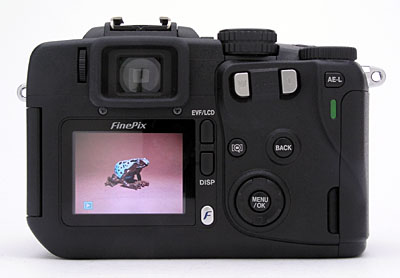
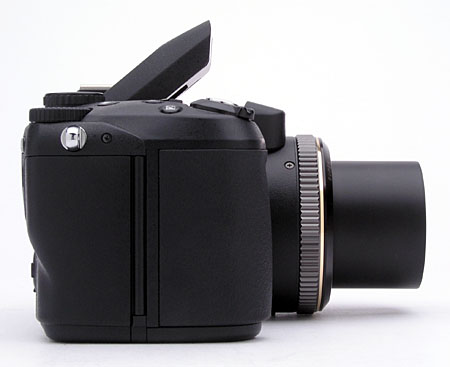
The rest of the camera controls are on the back panel, sharing the space with the electronic viewfinder eyepiece and LCD monitor. A small diopter adjustment dial adjusts the electronic viewfinder for eyeglass wearers, and a firm rubber eyecup surrounds the viewfinder eyepiece. Zoom controls, a Four-Way Arrow pad with central Menu / OK button, EVF / LCD button, display button, and focus check button dot the back panel. A small LED lamp next to the memory compartment door (on the right side) lights whenever the camera is accessing the memory card, indicating that you shouldn't open the compartment door. (This LED also lights when the flash is charging, or there's a problem with the camera.) A new button on the S7000 that wasn't included on the S602 model (but has since been on many other FinePix models), is the FinePix button next to the lower right corner of the LCD display. This accesses more commonly-used functions like resolution, sensitivity, and color settings (without you having to cycle through the main LCD menu options).
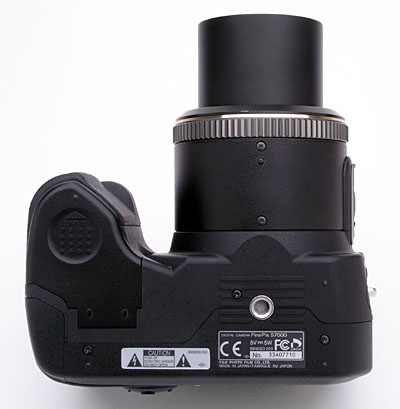
The S7000's bottom panel is nice and flat, with a metal tripod mount centered beneath the lens. While the tripod mount is centered on the axis of the lens, it's quite a ways back from the lens' optical center, so you'll still need a special tripod head for seamless panoramic shots. While becoming more common on prosumer digicams, I still applaud Fuji for their use of a metal tripod socket, rather than the cheaper but less rugged plastic. Also on the bottom panel is the battery compartment, with a plastic door that slides out before opening.
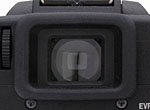 The S7000 offers an "electronic" optical viewfinder, essentially a smaller
version of the 1.8-inch LCD monitor that's viewed through the camera's eyepiece.
The 0.44-inch optical viewfinder display has the same detailed information display
as the larger LCD monitor, complete with exposure information such as aperture
and shutter speed. In a nice upgrade from the previous 602, the micro-LCD used
in the S7000's EVF offers very high resolution at a whopping 235,000 pixels. This
makes it much more useful for focusing, particularly in conjunction with the 2x
focus-assist magnification feature. The added resolution is also welcome when
it comes to reading menu items. A firm but resilient eyecup surrounds the viewfinder
eyepiece, and shouldn't cause any problems for eyeglass wearers, given the S7000's
fairly high eyepoint. A diopter adjustment dial on the left side of the eyepiece
adjusts the focus of the display across a fairly wide range, so most eyeglass
wearers should be well accommodated. (By way of reference, my own vision is a
myopic 20/180 or so, and the dioptric adjustment just manages to accommodate my
unaided eyes at the "nearsighted" end of its range.) An EVF/LCD button
on the back panel switches the display between the viewfinder eyepiece and the
larger LCD monitor.
The S7000 offers an "electronic" optical viewfinder, essentially a smaller
version of the 1.8-inch LCD monitor that's viewed through the camera's eyepiece.
The 0.44-inch optical viewfinder display has the same detailed information display
as the larger LCD monitor, complete with exposure information such as aperture
and shutter speed. In a nice upgrade from the previous 602, the micro-LCD used
in the S7000's EVF offers very high resolution at a whopping 235,000 pixels. This
makes it much more useful for focusing, particularly in conjunction with the 2x
focus-assist magnification feature. The added resolution is also welcome when
it comes to reading menu items. A firm but resilient eyecup surrounds the viewfinder
eyepiece, and shouldn't cause any problems for eyeglass wearers, given the S7000's
fairly high eyepoint. A diopter adjustment dial on the left side of the eyepiece
adjusts the focus of the display across a fairly wide range, so most eyeglass
wearers should be well accommodated. (By way of reference, my own vision is a
myopic 20/180 or so, and the dioptric adjustment just manages to accommodate my
unaided eyes at the "nearsighted" end of its range.) An EVF/LCD button
on the back panel switches the display between the viewfinder eyepiece and the
larger LCD monitor.
 The
1.8-inch, low temperature TFT LCD monitor comes on automatically when
the camera is turned on, but goes to sleep quickly if the camera remains
inactive. A display button just below the EVF/LCD button controls the
level of information displayed on both viewfinders. The first press
enables the information display, while the second pulls up an alignment
grid that divides the image area into thirds, both horizontally and
vertically. A third press of the button cancels both the information
display and alignment grid, providing a full view of the subject area.
For a quick rundown of the exposure settings, a press of the Info button
on the side of the camera reports various menu settings, as well as
shows a small live histogram display. (The histogram is only available
in the Single AF mode.)
The
1.8-inch, low temperature TFT LCD monitor comes on automatically when
the camera is turned on, but goes to sleep quickly if the camera remains
inactive. A display button just below the EVF/LCD button controls the
level of information displayed on both viewfinders. The first press
enables the information display, while the second pulls up an alignment
grid that divides the image area into thirds, both horizontally and
vertically. A third press of the button cancels both the information
display and alignment grid, providing a full view of the subject area.
For a quick rundown of the exposure settings, a press of the Info button
on the side of the camera reports various menu settings, as well as
shows a small live histogram display. (The histogram is only available
in the Single AF mode.)
 In
Playback mode, the Info button shows a histogram of a captured image, and
reports exposure information as well, though the display reverts to normal
shortly after you release the button. Also in Playback mode, the Display button
enables the nine-image index display mode.
In
Playback mode, the Info button shows a histogram of a captured image, and
reports exposure information as well, though the display reverts to normal
shortly after you release the button. Also in Playback mode, the Display button
enables the nine-image index display mode.
Activated through the Setup menu, an Image Review function automatically displays
the last captured image on the LCD monitor as it's being recorded to the
memory card. The Preview option lets you delete the image before it's saved.
An interesting feature here is that Preview mode lets you enlarge the captured
image and double-check framing or exposure details (using the zoom control
to enlarge and the arrow keys to move the view). If you're not happy with
the shot, simply erase it and start again. Preview mode also lets you select
specific images from a series to record, such as those from one of the Continuous
Shooting modes. You can thus save memory card space by keeping only the frames
you want.
 Another
useful feature on the S7000 is the Focus Check button (just to the right of
the LCD monitor), which enlarges the central portion of the image on the LCD
display 2x. This makes manual focusing quite a bit easier, as you can clearly
see the finer details as they sharpen.
Another
useful feature on the S7000 is the Focus Check button (just to the right of
the LCD monitor), which enlarges the central portion of the image on the LCD
display 2x. This makes manual focusing quite a bit easier, as you can clearly
see the finer details as they sharpen.
The S7000's electronic viewfinder system is very accurate,
showing 99+ percent of the final frame area at both wide angle and telephoto
zoom settings. (The lower measurement line was just barely cut off at the
telephoto setting, but accuracy was still pretty good.) The LCD monitor is
also very accurate, since it shows the same view, just on a larger screen.
Given that I like LCD monitors to be as close to 100 percent accuracy as
possible, the S7000's LCD monitor is essentially perfect in this regard.
| Free Photo Lessons | |
|
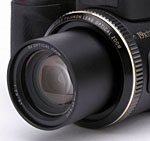 The S7000 is equipped with a high quality, Super EBC Fujinon 6x zoom lens, with a 35mm equivalent range of 35-210mm. (A moderate wide angle to a pretty decent telephoto.) Aperture ranges from f/2.8 (f/3.1 with the lens at its telephoto position) to f/8, and is manually and automatically adjustable. Focus ranges from 1.6 feet (50 centimeters) to infinity in normal AF mode, and from 3.9 inches to 2.6 feet (10 to 80 centimeters) in Macro mode. A "Super Macro" mode focuses from 0.4 to 7.9 inches (1 to 20 centimeters), one of the closest macro ranges I've seen on a digicam. In Super Macro mode, the S7000 captures an area of only 1.30 x 0.97 inches (33 x 25 millimeters). Both macro modes are accessed via the Macro button on the left side of the camera.
 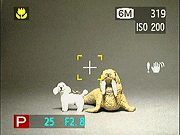 The S7000's autofocus system operates in either Single or Continuous modes, set by turning the Focus switch on the side of the camera. Single AF mode adjusts the focus only when the Shutter button is halfway pressed. Alternatively, Continuous AF mode continuously adjusts focus, without the Shutter button being pressed. This is useful for moving subjects, and reduces the shutter lag slightly so you can grab faster shots. The S7000's Record menu offers an AF mode setting, which controls the AF area. Options are Area, Center, and Multi. In Area mode, you can change the autofocus area simply by holding down the One Touch AF button (in the center of the focus switch on the side of the camera) and using the arrow keys to move the focus target on the LCD screen. The Multi setting puts the camera back in charge of the AF area, selecting the area corresponding to the closest portion of the subject. Center mode simply focuses from the center of the screen.
The camera's manual focus options lets you adjust focus by turning the ribbed focus ring at the end of the lens barrel. A pair of arrows appears on the LCD display, indicating the direction of adjustment needed, with a solid circle in the middle indicating sharp focus. Though the camera doesn't feature a distance readout for the manual focus, you can use the Focus Check button to enlarge the center of the frame 2x and determine when focus is sharp. A nice touch on S7000 is that you can use the camera's AF system to set an approximate focus even when you're focusing manually, simply by pressing the One Touch AF button in the center of the manual/auto focus selector switch. This lets you get a quick approximation of your final focus, then make fine adjustments manually.
Despite its size, the lens on the S7000 telescopes into position pretty quickly whenever the camera is turned on. (The time from startup to the first picture captured is only 3.2 seconds.) A removable plastic lens cap protects the lens surface when not in use, and comes with a small strap to attach it to the camera body and prevent it from being lost. Fuji also provides a lens cap holder, which attaches to the neck strap. Two zoom buttons in the upper right corner of the rear panel control both optical and digital zoom. The 3.2x digital zoom feature increases the S7000's capabilities up to 19.2x, and is accessed by zooming past the optical zoom range with the telephoto zoom button. The amount of digital enlargement is reported in the LCD display. As with any "digital zoom" function, remember that image quality suffers from the enlargement, with sharpness decreasing in direct proportion to the degree of digital zoom. Also keep in mind that in an (intelligent) effort to preserve image quality, the amount of digital zoom available on the S7000 varies with the resolution setting. For example, no digital zoom is available at the 12.3-megapixel resolution. At 6.0 megapixels, maximum digital enlargement is 1.4x, while the amount of digital zoom increases to 2x at the 3.0-megapixel setting. At 2.0 megapixels, 2.53x zoom is available, reserving the full 3.2x zoom for the 1.0-megapixel setting.
The S7000's lens barrel has a set of 55mm filter threads, which accommodate Fuji's accessory lens kits, which includes an adapter barrel that holds the accessory lenses out in front of the furthest extension of the S7000's telescoping lens assembly. In order for it to focus correctly, you need to tell the camera when you're using accessory optics, by selecting the Adapter option on the Setup menu. Fuji also offers an adapter ring that accommodates a series of lens filters.
Optical distortion on the S7000 is less than average at the wide-angle end, where I measured approximately 0.5 percent barrel distortion with the lens set to its widest-angle setting. The telephoto end was a fair bit worse though, as I measured 0.7 percent pincushion distortion there. Chromatic aberration is a little high, showing approximately eight or more pixels of coloration on either side of the target lines. (This distortion is visible as a very slight colored fringe around the objects at the edges of the field of view on the resolution target.)
Exposure
| Free Photo Lessons | |
|
 To further speed access to key controls, Fuji included a Shift button, which provides shortcuts to several menu options, including metering mode, white balance, self-timer, and LCD brightness. (The available shortcut controls are shown in the screen shot at right.) You can control these functions by pressing Shift along with another button, sometimes rotating the Command wheel to make a particular selection. As a memory aid, pressing and holding the Shift button brings up a display showing which combinations control what. In normal operation though, you don't have to wait for that display to appear, just press the appropriate combination, make your selection, and continue with your shooting. It'll take a little memory work to learn which buttons control what in this "shortcut mode," but it'll be time well spent, as the shortcuts do let you navigate these key camera options much more quickly.
A Power / Mode switch on top of the camera puts the S7000 into either Record or Playback modes, with an Off setting that completely powers down the camera. Once in Record mode, the main exposure modes are all accessed via the Exposure Mode dial, with options of Set, Manual, Aperture Priority, Shutter Priority, Program AE, Auto, Scene Program, and Movie. The Set position displays a camera settings menu, which I'll detail further on. In full Auto exposure mode, the camera controls all aspects of the exposure, leaving you in charge of zoom, flash mode, and any special drive settings. Scene Program mode offers a handful of preset shooting modes, set up for specific situations. Turning the Command wheel next to the Exposure Mode dial cycles through Portrait, Landscape, Sports, and Night Scene modes.
The remaining exposure modes on the dial offer a range of manual control options. Program AE lets the camera control shutter speed and aperture, but gives you control over all other exposure variables. A nice feature here is that rotating the Command wheel cycles through a range of equivalent exposure settings, letting you choose between wider apertures and faster shutter speeds or the opposite. (A nice touch, since this is often what you're trying to accomplish when you'd otherwise drop into Aperture or Shutter Priority mode.) Aperture and Shutter Priority modes both offer limited control, letting you adjust either the lens aperture or shutter speed while the camera picks the best value of the other variable. In both modes, turning the Command wheel adjusts the setting you're controlling. An exposure readout on the LCD reports whether the resulting shot will be under- or overexposed, giving you a chance to change the setting. Finally, Manual exposure mode offers total exposure control, letting you select both aperture and shutter speed together. In all exposure modes other than Auto, Scene Program, and Manual, the Exposure Compensation adjustment lightens or darkens the overall image from -2 to +2 exposure equivalents (EV) in one-third-step increments.
Exposure times range from 1/2,000 to 1/4 second in Auto and Scene Modes (three seconds in Night mode), while Programmed AE, Aperture Priority and Shutter Priority modes range from 1/1,000 to three seconds. Conversely, Manual mode increases the range to include exposure times from 1/10,000 to 15 seconds, and a Bulb setting (for arbitrary exposures up to 15 seconds). Turning the Command wheel alone in Manual mode sets shutter speed, while holding down the Exposure Compensation button and turning the wheel adjusts the aperture setting.
By default, the S7000 uses a multi-segment metering system, which bases the exposure on readings taken from 64 zones throughout the frame. The camera also offers Average and Spot metering modes, accessible through the settings menu. Average metering reads the entire scene and bases the overall exposure on the average value. Alternatively, Spot metering bases the exposure on a reading from the very center of the frame (good for off-center or high contrast subjects). The AE Lock button lets you lock the exposure for a specific part of your subject, by aiming the camera to center the area you want to base exposure on in the viewfinder, and then pressing the button until the AE Lock icon appears on the LCD display. The exposure will remain locked until the AE Lock button is pressed again or the Shutter button is fully pressed and released. While you can achieve much the same effect with most cameras by half-pressing and holding the Shutter button prior to the exposure, that approach has the sometimes undesired side effect of also locking focus. You may not need it often, but when you do, a separate AE Lock control is invaluable.
If you're not sure of the exact exposure to use, an Auto Exposure Bracketing function snaps a series of three images at different exposure settings, making it easier to get a good exposure in critical shooting conditions. You can set the exposure step size for these series through the Record menu. The camera captures one image at the normal exposure, one slightly underexposed, and one slightly overexposed.
In any of the non-automatic exposure modes, the camera's ISO sensitivity setting can be adjusted to 200 or 400, regardless of the resolution setting. Selecting the 800 ISO equivalent forces the camera's resolution to 3.0 megapixels because this ISO value relies upon Fuji's Pixel Data Coupling, which combines data from groups of four pixels at a time. (Image quality is automatically set to Normal at both high sensitivity settings.) In Auto exposure mode, the ISO options include Auto, 400, or 800. (The Auto setting adjusts the sensitivity from 160 to 800 automatically).
The S7000 has a full range of color balance settings, adjusted through the White Balance option. Choices include Auto, Custom 1, Custom 2, Daylight, Shade, Daylight Fluorescent, Warm White Fluorescent, Cool White Fluorescent, and Incandescent settings. The two Custom settings are manual adjustments, and base the white balance on a white card placed in front of the camera. These settings are saved in the camera's memory, allowing you to recall either the Custom 1 or Custom 2 setting at any time. (Having two separate custom white balance settings can be very handy if you're shooting in an environment with mixed lighting.) In addition to white balance, a Sharpness adjustment lets you control the in-camera sharpening, offering Hard, Normal, and Soft adjustment settings. A Color adjustment lets you record images in Standard Color, Black-and-White monochrome, or Chrome. The Chrome option raises contrast and saturation for more vivid images.
For delayed exposures, the S7000's Self-Timer mode offers two- and 10-second countdowns between the time the Shutter button is fully pressed and when the shutter actually fires. The 10-second option gives you time to compose the shot, then run around in front of the camera to get into your own pictures. The two-second self-timer option is very handy when you have the camera propped on a tripod or other support for a long exposure, and don't want the pressure of your finger on the Shutter button to jostle it. With the short self-timer option, you can prop the camera, trip the timer, and the shutter will release a couple of seconds later, after any vibrations have died down. A useful feature!
Flash
 The built-in, pop-up flash on the S7000 has one of the longest operating ranges I've seen on a digicam, effective to 27.9 feet (8.5 meters) at full wide angle. (At telephoto, the flash is effective to 25.9 feet (7.9 meters). The flash operates in one of six modes, all accessed by turning the Command wheel while pressing the Flash button on top of the camera. Modes include Auto (lightning bolt icon with an "A"), Red-Eye Reduction (eyeball icon), Forced On (lightning bolt), Forced Off (lightning bolt with a slash), Slow-Synchro (lightning bolt with an "S"), and Slow-synchro with Red-Eye Reduction (eyeball with "Slow" beneath it). Auto, Forced On, and Forced Off are pretty self-explanatory. Red-eye Reduction means that the camera fires a small pre-flash before the full flash, to reduce the occurrence of the Red-eye Effect. The Slow-Synchro modes combine the flash with a slow shutter speed and are good for night subjects because they allow more ambient light into the image. (This helps avoid the common syndrome of a ghastly white subject in front of a pitch-dark background so common in flash shots from low-end cameras.) A small release button on the left side of the flash (as viewed from the back) releases the flash from its compartment. Note that the flash must be popped up in order to change its operating mode. A brightness adjustment accessed through the settings menu increases or decreases the overall flash power from -0.6 to +0.6 EV in one-third-step increments. This is handy for balancing flash exposure with light coming from other sources in the scene, although I'd really like to see it extend further toward negative exposure compensation, for those times when you really want only a subtle fill-light.
The external flash hot shoe on top of the camera features a single contact, and hosts a range of Fuji and third-party flash units, apparently synchronizing to shutter speeds as fast as 1/1,000-second. The internal and external flash units cannot operate together, so the pop-up flash should be closed when an external flash is in use.
Movie and Sound Recording
The S7000's Movie mode captures moving images with sound at either VGA (640 x 480 pixels) or QVGA (320 x 240 pixels) resolutions. Full VGA resolution movies are big news in and of themselves, but when you add the fact that the S7000 will acquire them at a full 30 frames per second it's even more remarkable. Not enough? Consider that it can also grab VGA-resolution movies at 30 fps without a gap, up to the full capacity of the memory card! (No buffer limitations, but you do have to have a very fast memory card to keep up with the high data rate.) It's still not a digital video recorder, and the files you end up with are really huge, but this is breakthrough technology in anybody's book. Movie recording stops and starts with a full press of the Shutter button, and a timer appears in the LCD monitor to report the available recording time. Most of the exposure features are adjustable in Movie mode, with the exception of flash, digital zoom, and the high-speed still-capture shooting options.
Voice Memo Mode
Accessed via the Playback menu, a Voice Memo mode lets you record short sound clips to accompany already-recorded still images. Voice captions can last as long as 30 seconds. When activated, Voice Memo mode begins recording audio immediately, with a recording indication on the LCD screen.
Continuous Shooting
The S7000 offers a range of high-speed shooting modes, all selected by holding down the Drive Mode button and turning the Command wheel. The available modes are called Top-5 Frame, Auto Bracketing (discussed above), Final-5 Frame, and Long-Period Continuous Shooting.
Perhaps the most interesting of the continuous modes are the ones called Top-5 Frame and Final-5 Frame. Top-5 Frame captures five consecutive frames at intervals as quick as 0.2 seconds, depending on the file size and quality settings. After the series is captured, all images are displayed at the bottom of the LCD screen as thumbnails while they are being recorded to the memory card. Final-5 Frame mode captures as many as 25 frames at the same five fps frame rate while the Shutter button is held down. The camera then records the last five frames of the series, recording what happened just before you released the shutter button. Final-5 Frame mode is thus especially handy for capturing fleeting moments. If you're like me, you always recognize the perfect expression on your child's face or the perfect pose by your pet a fraction of a second after it's gone. With the Final-5 Frame feature, I can finally capture all those previously-missed moments, since the camera effectively reaches back in time to grab what I was looking at up to a second before I released the shutter button.
For more extended rapid-fire shooting, Long-Period Continuous Shooting mode works only in Auto exposure mode, and automatically sets the image resolution to 3.0-megapixels (though the mode also works with the 2.0- and 1.0-megapixel settings). What you gain though, is the ability to capture a maximum of 40 frames at intervals as short as one second. As with the Movie mode though, you do need a fast memory card to get the best performance from Long-Period Continuous Shooting mode.
Multi-Exposure Mode
A Multi-Exposure mode lets you overlay images in the same file, for a double-exposure effect. Activated through the settings menu, Multi-Exposure mode continuously overlays exposures until you tell it to stop, merging each new image with the one (itself possibly also a composite) already in memory. A preview screen appears after each shot, so that you can check the effect. You can also opt to return to the previous version of the image (before your last exposure) and start over from there. I'm honestly not sure what use this might be, as it seems easier to do this (with more control to boot) in an image-editing program. It's there if you want it though.
Shutter Lag/Cycle Times
When you press the shutter release on a camera, there's usually a
delay or lag time before the shutter actually fires. This is the time required
by the autofocus and autoexposure mechanisms to do their work, and can amount
to a fairly long delay in some situations. Since this number is almost never
reported on, and can significantly affect the picture taking experience,
I routinely measure it with a custom test setup I built for the purpose.
(Crystal-controlled, with a resolution of 0.001 second.) The table below
shows the numbers I collected for the FinePix S7000.
| | ||
| | | |
| Power On -> First shot | | Time from power on to first shot captured. About average for a camera with a telescoping lens. |
| Shutdown | | Time to retract lens. About average to a bit slower than average. |
| Play to Record, first shot | | Fairly fast. |
| Record to play (max/min res) | | A little slow for highest-resolution files. |
| Shutter lag, full autofocus | | First time is with lens set at wide angle, second time is with lens set to telephoto. Slightly faster than average. (Average is 0.8 - 1.0 seconds.) |
| Shutter lag, continuous autofocus | 0.76 | As is generally the case with cameras I've tested, continuous autofocus doesn't improve the shutter lag at all. |
| Shutter lag, manual focus | | A little on the slow side for this class of camera. |
| Shutter lag, prefocus | | About average these days, although many high-end models are faster. |
| Cycle Time, CF card, max/min res | | Almost identical speed between large and small images, main difference is in number that can fit in the buffer - Four or five shots for the largest files, essentially unlimited for the smallest ones. With large files, after 4-5 shots, the cycle time increases to 2.8 seconds. The buffer clears in about 15 seconds with a fast memory card (Lexar 256MB 24x WA.) |
| Cycle Time, xD card, max/min res | 1.23/1.21 | The S7000 really seems to prefer xD memory cards: The cycle time is almost identical between xD and CF cards, but the xD cards write much faster, with the result that buffer capacity stretches to roughly 11 shots for the largest files, and the buffer clears in only 5-6 seconds, vs the roughly 15 seconds with a fast CF card. |
| Cycle Time, RAW file format, CF card | 1.24/7.67 | Interval between first two shots is 1.24 seconds, but stretches to 7.67 for subsequent RAW-format images |
| Cycle Time, RAW file format, xD card | 1.48/3.43 | Interval between first two shots is 1.48 seconds, but stretches to 3.43 seconds for all subsequent ones. (Odd that the initial interval is longer than with CF cards, but the subsequent shots happen much faster.) |
| Cycle Time, Top/Final 5 continuous mode, max/min res. | 0.31 (3.3 fps) | Very fast for five shots, and "Final 5" mode is very handy for catching fast action. After buffer is full with large/fine images, it takes 12.6 seconds to clear with an xD card, 21 seconds with a fast CF card. With low-resolution images, the buffer clears in about 7 seconds with both xD and CF cards. |
| Cycle Time, "long continuous" mode | (1.11 fps) | Camera writes to memory card continuously while shooting, so you can capture up to 40 large/fine frames this fast before needing to stop. Buffer clears almost immediately (a second or so), after which you can shoot another series of 40 images. |
The S7000 is a fairly fast camera overall, although it falls a little short of the earlier S602 in terms of shutter lag. While the S7000's shutter lag is just about average though, it does still have very good cycle time performance, and its high-speed continuous modes are quite fast indeed. My favorite feature is the "Final 5" continuous mode, which shoots frames continuously while the shutter is held down, but then only records the last five captured before you released the shutter button. This helps compensate for the photographer's reaction time, actually recording images beginning a second or so before he/she reacted to the subject. The standout for the S7000 is how quickly it can record its RAW-formatted files to xD cards, the 3.43 seconds required between shots in RAW mode (after the two-shot buffer is filled) being better than most competing models.
I was surprised to find a significant difference in performance between xD and CF cards: The S7000 cycled much faster for raw-format files with xD cards, and showed both greater buffer depth and greatly reduced buffer clearing times as well. - This was consistent across several CF cards I tested, including the fairly fast Lexar 256 MB, 24x "WA" card I used to gather the numbers shown above.

Shutter Button
Located on the top panel in the center of the Power / Mode dial, this silver
button sets autofocus and exposure when halfway pressed and fires the shutter
when fully pressed. If the self-timer is activated, a full press of the Shutter
button triggers the two- or 10-second countdown. A screw mount in the center
of the button accommodates a mechanical cable release, useful with Bulb exposures
or any time you don't want to risk camera shake from pressing the Shutter
button.
Power / Mode Dial
Surrounding the Shutter button on the top panel, this dial controls the camera's power, and selects either Record or Playback operating modes.

Exposure Compensation Button
Just behind the Power / Mode dial on the top panel, this button lets you adjust the exposure compensation from -2 to +2 EV units in one-third-step increments, by pressing it while simultaneously turning the Command wheel (except in Manual, Scene Program, and Auto modes). In Manual exposure mode, this same set of actions adjusts the lens aperture setting from f/2.8 to f/8.

Flash Button
Just to the right of the Exposure Compensation button, this button sets the onboard flash mode. If the pop-up flash is released to its operating position, pressing this button displays the on-screen flash menu. Holding the button down while turning the Command wheel selects Auto, Red-Eye Reduction, Forced On, Forced Off, Slow-Synchro, or Red-Eye Reduction Slow-Synchro modes.
![]()
Drive Mode Button
Directly behind the Flash button, pressing this button displays the on-screen Drive menu. Turning the Command wheel with the Drive Mode button held down selects Single Exposure, Top-5 Frame, Auto Bracketing, Final-5 Frame, and Long-Period Continuous Shooting modes (the latter in Auto mode only).
Command Wheel
Located in the far lower right corner of the top panel, behind the Drive Mode button, this ribbed black wheel adjusts various camera settings when turned while pressing a control button. In Manual mode, turning this wheel with no control button pressed sets the shutter speed. In Aperture and Shutter Priority modes, turning the wheel adjusts the corresponding exposure setting (aperture or shutter speed, respectively), while in Program AE mode, turning the wheel selects between a range of equivalent exposure settings. (This last lets you bias the camera's exposure system to prefer larger or smaller apertures, giving you some degree of control over depth of field and shutter speed, while still maintaining automatic exposure control.) In Scene Program mode, turning the wheel selects the Scene setting.
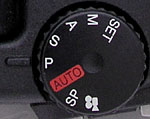
Exposure Mode Dial
Directly to the left of the Command wheel, this large, ribbed dial controls the camera's exposure mode, offering the following selections:
![]()
AEL Button
Positioned in the top right corner of the rear panel, this button locks the exposure setting until pressed again or until the Shutter button is fully pressed and released.
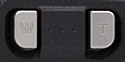
Zoom Buttons (Playback Zoom Control)
Directly to the left of the AEL button, these buttons control the optical and digital telephoto when the camera is in Record mode. In Playback mode, the buttons zoom the LCD view in and out of captured images, enlarging details.

Back Button
Beneath the "T" button of the Zoom controls, this button backs out of menu selections without making any changes. It can also be used to quickly exit from some camera functions. (Such as enlarged playback of images.)

Focus Check Button
To the left of the Back button, this button enlarges the center portion of the frame on the LCD monitor by about 2x, making it easier to see the results of manual focus adjustments.

EVF / LCD Button
Adjacent to the top right corner of the LCD monitor, this button switches the viewfinder and playback displays between the electronic viewfinder eyepiece and LCD monitor.

Display Button
Directly below the EVF / LCD button, this button cycles through the information display options in both Playback and Record modes. In Record mode, one of the optional displays includes an alignment grid that divides up the image area into thirds, horizontally and vertically. (This is very handy for lining up the camera with objects in the scene, to insure that your photos are square and level.) In Playback mode, the display button also activates a nine-image index display mode.

FinePix Button
Beneath the Display button, this silver button calls up the FinePix menu,
with the following options:
 Record
Mode:
Record
Mode:
 Movie
Mode:
Movie
Mode:
 Playback
Mode:
Playback
Mode:

Four-Way Arrow Pad
Located beneath the Focus Check and Back buttons on the back panel, this multi-directional button toggles up and down or left and right, with an arrow in each direction. In any settings menu, the arrow keys navigate through menu options and selections.
In Playback mode, the right and left arrows scroll through captured images on the memory card. When an image has been enlarged in Playback or in Preview mode, all four arrows move around within the enlarged view.
Menu / OK Button
Tucked in the center of the Four-Way Arrow pad, this button calls up the settings menu in any mode (except for Set mode, which displays the Setup menu immediately upon entering that mode). This button also acts as the "OK" to confirm menu changes.
![]()
Diopter Adjustment Dial
Just on the left side of the optical viewfinder eyepiece, this dial adjusts the focus of the viewfinder to accommodate near- or farsighted users.
![]()
Pop-Up Flash Release Button
Nestled on the left side of the camera, just beneath the pop-up flash compartment, this button releases the flash, allowing it to spring open its operating position.

Macro Button
Located the furthest forward on the camera lens (and marked with the standard Macro flower icon), this button cycles through Normal AF, Macro, and Super Macro modes when pressed repeatedly.

Shift Button
Directly to the right of the Macro button, this button displays shortcuts to menu functions in Record mode.
![]()
Info Button
Just beneath the neck strap eyelet on the left side of the camera, this button displays exposure and camera information in both Record and Playback modes. In Record mode, it lists the current exposure settings, as well as a small histogram (in Single AF mode only). In Playback mode, it shows a histogram of the captured image, as well as the exposure settings used to capture it, when held down.

Focus Switch
Below the Info button, this switch sets focus to Manual, Single AF, or Continuous AF modes.
One-Push AF Button
Centered inside the Focus switch, this button momentarily triggers the autofocus system to quickly adjust the focus when you're in manual focus mode. (This is very handy for getting the focus "in the ballpark" before fine-tuning it manually.)
MF Adjustment Ring
Encircling the end of the lens barrel, this notched ring adjusts the focus when the camera is in manual focus mode.
Movie Mode
Records short movie clips with sound. The actual amount of recording time varies with the resolution setting and amount of memory card space, but recording will continue until either the Shutter button is pressed again or the memory card runs out of space. Limited exposure controls are available, though there are no menu options.
Scene Program Mode
Offers a selection of preset "scene" shooting modes, for capturing good images in specific shooting situations. Available scene types are Portrait, Landscape, Sports, and Night Scene. Limited exposure controls are available, though the camera controls most settings.
Auto Exposure Mode
Gives the camera control of all exposure parameters, although the user still can adjust flash mode, Drive mode, file size and quality settings, and zoom.
Program AE Exposure Mode
Returns most of the exposure control to the user, although the camera remains in charge of aperture and shutter speed values. Turning the Command wheel selects a range of equivalent aperture/shutter speed combinations though.
Shutter Priority Exposure Mode
Gives the user control over shutter speed (from 1/1,000 to three seconds), while the camera selects the best aperture value. All other exposure options are available.
Aperture Priority Exposure Mode
Similar to Shutter Priority mode, only now the user controls the aperture setting (from f/2.8 at wide angle or f3.1 at telephoto to f/8) while the camera selects the shutter speed. All exposure options are available.
Manual Exposure Mode
Gives the user complete control over exposure parameters, including aperture and shutter speed. The shutter speed range expands to include times from 1/10,000 to 15 seconds. All exposure options are adjustable, but exposure compensation is disabled since there's no automatic exposure selection to adjust.
Set Mode
Displays the camera's settings menu, described below.
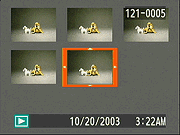
Playback Mode
This mode lets you scroll through captured images and movies, view a nine-image index display, zoom into a captured image to inspect it more closely, delete unwanted images, and set up images for printing on DPOF compatible devices.
Record Menu
Accessed by pressing the Menu button in any of the Record modes. Not all options
will be available in all exposure modes.
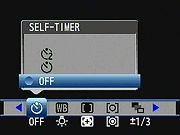 Self-Timer:
Sets the Self-Timer to Off, two, or ten seconds.
Self-Timer:
Sets the Self-Timer to Off, two, or ten seconds.
Playback Menu: Accessed by pressing the Menu button in Playback mode.
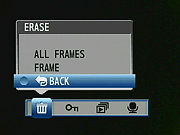 Erase:
Deletes either all frames or the current frame from the memory card,
also has an option to cancel.
Erase:
Deletes either all frames or the current frame from the memory card,
also has an option to cancel.
Setup Menu: The following menu options appear when entering Set mode:
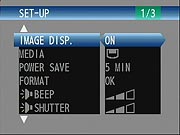 Image
Display: Turns the instant image review function off, or sets it
to Preview mode.
Image
Display: Turns the instant image review function off, or sets it
to Preview mode.
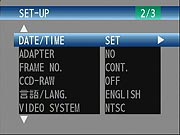 Date/Time:
Sets the camera's internal clock and calendar.
Date/Time:
Sets the camera's internal clock and calendar.
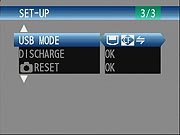 USB
Mode: Sets up the USB connection to operate in DSC, PC CAM or PictBridge
modes. DSC is the standard mode for downloading images. PC CAM lets
the camera work as a web cam when connected to a computer, using the
Windows-only PictureHello software included with the camera. PictBridge
mode lets the camera be connected directly to compatible printers, to
print images without the need for a computer.
USB
Mode: Sets up the USB connection to operate in DSC, PC CAM or PictBridge
modes. DSC is the standard mode for downloading images. PC CAM lets
the camera work as a web cam when connected to a computer, using the
Windows-only PictureHello software included with the camera. PictBridge
mode lets the camera be connected directly to compatible printers, to
print images without the need for a computer.
 Image
Storage and Interface
Image
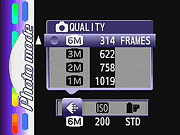
Storage and InterfaceThe LCD display reports the number of available images at the current resolution/quality setting, so you always have an idea of the remaining image capacity. The table below shows the number of images of each size that can be stored on an average 64MB memory card (vs the puny 16 MB card included in the box), and the approximate level of JPEG compression used for each. (Note that this is NOT the size card shipped with the unit, but rather a typical and fairly useful size many owners may end up using. Divide the image capacities shown by four, and you'll see why I say you really have to plan on buying an extra card or cards with the camera: The included 16MB card really isn't very useful with files this large.)
NOTE: While it has a large, Type II CompactFlash card slot, the S7000 does NOT support the FAT32 file system, so it will only work with memory cards 2GB in size or smaller.
| Resolution/Quality 16MB Memory Card |
|
|
|
|
| Full Resolution 4,048 x 3,040 |
Images (Avg size) |
4 16 MB |
12 5.3 MB |
26 2.5 MB |
| Approx. Compression |
2.3:1 | 7:1 | 15:1 | |
| High Resolution 2,848 x 2,136 |
Images (Avg size) |
- | 42 1.5 MB |
- |
| Approx. Compression |
- | 7:1 | - | |
| Standard
Resolution 2,016 x 1,512 |
Images (Avg size) |
|
780 KB |
|
| Approx. Compression |
|
|
|
|
| Resolution 1,600 x 1,200 |
Images (Avg size) |
|
|
634 KB |
| Approx. Compression |
|
|
|
|
| Resolution 1,280 x 960 |
Images (Avg size) |
|
|
467 KB |
| Approx. Compression |
|
|
|
|
As you would expect, the memory card should never be removed while the camera is in operation to avoid damaging the media. An LED lamp next to the memory card compartment lights when the camera is accessing the card. A steady orange light indicates that the camera is writing to the card, while a flashing orange and green light means that the camera is writing to the card, but is ready to capture another image. A blinking red light indicates a problem with the card.
The S7000's Playback menu offers write-protection for individual images or all images on the card, preventing files from being accidentally erased or manipulated. The Erase menu option under the Playback menu lets you erase individual or all images while in Playback mode. (Note that formatting a memory card erases all files on the card, even those with protection.)
A USB cable and software CD accompany the camera, for connection to a computer. Like many USB-equipped cameras these days, the S7000 is a "storage class" USB device, meaning that it will show up on the desktop of Mac OS 8.6 and higher machines, as well as those of Windows Me, XP, and 2000 computers, without having to load driver software. This is a really handy feature, since it makes it a lot easier to connect the camera to computers other than your own, without having to worry about special driver software, etc. Thanks to its SuperCCD technology, the S7000 can also function as a "webcam," streaming video imagery over the USB connection to a host running the appropriate software. It also supports the PictBridge standard, allowing the camera to be connected directly to PictBridge-compatible printers, and prints made without the need for a computer.
Power
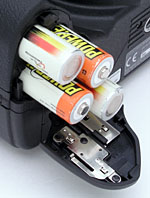 The S7000 uses four AA-type batteries
for power, and comes with a set of single-use alkaline batteries. As you'd expect,
the increased power capacity provided by high-capacity NiMH AA cells brings
some clear benefits in terms of extended operating times. As always, I strongly
recommend buying a few sets of high-capacity NiMH AA cells and a good charger,
and always keeping a freshly charged set on hand as spares. You can read my
battery test results here,
or see this
article for a review of my favorite charger.
The S7000 uses four AA-type batteries
for power, and comes with a set of single-use alkaline batteries. As you'd expect,
the increased power capacity provided by high-capacity NiMH AA cells brings
some clear benefits in terms of extended operating times. As always, I strongly
recommend buying a few sets of high-capacity NiMH AA cells and a good charger,
and always keeping a freshly charged set on hand as spares. You can read my
battery test results here,
or see this
article for a review of my favorite charger.
An AC adapter is available as a separate accessory, handy when downloading images or reviewing captured files, essential / mandatory if you plan to use the S7000 as a webcam. An Auto Power Off function shuts off the camera automatically after either two or five minutes of inactivity (adjusted through the Setup menu), but can be disabled if you want to keep the camera ready all the time, at the obvious cost of shorter battery life. The table below details power consumption in various operating modes. (Note that the numbers in this table are based on the use of NiMH AA cells with 1600 mAh capacity, to maintain compatibility with earlier reviews. Actual run times will depend on the capacity of the batteries you use. Modern NiMH cells have true capacities of 2000 mAh or more, so you could see battery life 25% or more higher than shown here.)
| | (@ 5 v) | (1600mAh, 4.8v 4 NiMH Cells) |
| Capture Mode, w/LCD | | |
| Capture Mode, EVF | | |
| Capture Mode, "sleeping" | | |
| Half-pressed shutter w/LCD | | |
| Half-pressed w/EVF | | |
| Memory Write (transient) | | |
| Flash Recharge (transient) | | |
| Image Playback | | |
The S7000 offers very good run time, particularly if you use the latest high-capacity NiMH cells to power it. (Worst-case run time with true 2000 mAh cells would be a bit over 3.3 hours, very good indeed.) I still recommend purchasing a second set of rechargeable batteries, and always keeping one set topped-off via a trickle charger, to avoid the Murphy's Law problem of batteries failing exactly when you most need them. As noted above, see my battery shootout article, for the latest test results of various NiMH cells under actual load conditions.
Included Software
Packaged with the S7000 is a software CD containing Fuji's "Software for FinePix (version 4.1b)," compatible with Windows 98 / 2000 / Me / XP and Macintosh OS 8.6 to OS X. In addition to USB drivers, the software package includes FinePix Viewer for organizing files, and ImageMixer for creating CD albums. There's also a RAW file converter. Windows users can take advantage of the Picture Hello application, which turns the S7000 into a webcam.
Included Hardware
Included in the box are the following items:
As with all Imaging Resource camera tests, we encourage you to let your own eyes be the judge of how well the devices performed. Explore the images on the pictures page, to see how well the S7000 performed, and how its images compare to other cameras you may be considering buying.
Not sure which camera to buy? Let your eyes be the ultimate judge! Visit our Comparometer(tm) to compare images from the S7000 with those from other cameras you may be considering. The proof is in the pictures, so let your own eyes decide which you like best!
The S7000's biggest limitation for low light shooting was its autofocus system, which only functioned down to a bit less than 1 foot-candle of illumination. The electronic viewfinder is also somewhat limited, in that it can produce a usable display down to only about 1/8 foot-candle. (And it only brightens enough to be usable at that light level when the shutter button is half-pressed.)
Conclusion
I previously thought that Fuji had hit a home run in the enthusiast category with the S602 Zoom, and so was eagerly awaiting the S7000. While the S7000 does indeed offer exceptional resolution and detail, and some very nice continuous modes, its shutter lag is a bit longer than that of the S602, and its photos are plagued by higher than average levels of image noise. In many cases, the image noise is severe enough that subtle subject detail is lost, eliminating much of the advantage of the higher-resolution sensor. A lot of this is likely due to the S7000's rather high minimum ISO setting of 200 - Most competing models offer minimum ISOs of 100 or even 50, which results in much lower noise levels. I felt that the S7000's color wasn't quite up to the level of the earlier S602 as well, although it was pleasing enough in most circumstances. Overall, I think Fuji just missed a home run with this camera, as there's a lot to like, including a high-resolution and very accurate EVF, a very powerful flash unit, a good lens, and some nice shooting options for action photographers. If Fuji could have kept the color and shutter response of the S602, and just boosted the resolution, the S7000 would have been a standout success. As it is, I suspect that many potential users will be put off by the its image noise levels, limiting its acceptance in the market.
Free Photo Lessons

Learn how to take stunning photos with simple pro lighting tips, in our free Photo School area!
appears to be yet another excellent contender in the digicam marketplace. Putting together a range of key features in a very appealing package, Fuji increased the resolution to 12.3 megapixels (6.3 megapixels uninterpolated), improved the EVF display, included a more powerful flash unit, and made a few other useful adjustments. The S7000 will meet the needs of many enthusiast photographers with its healthy exposure options, while offering enough automatic controls for novices to take advantage of and feel comfortable with.
<<S7000 Sample Images | Additional Resources and Other Links>>
Reader Comments!
Questions, comments or controversy on this product? Click
this link to see what other Imaging Resource readers have had to say about
the Fuji FinePix S7000, or add comments of your own!
