Canon SD700 Design
 Since it is the flagship Digital ELPH, the SD700 IS should understandably have the best design of the line, and it does not disappoint. Though the SD630 has a larger LCD screen (3 inches compared to 2.5 inches) the SD700 IS is the more stylish overall, with a curving tri-colored body -- brushed silver, beige satin, and black gloss -- that's as pleasing to look at as it is to hold. The SD700 IS is not the slimmest camera on the market, but at 3.56 x 2.22 x 1.04 inches with its lens retracted it has no problem fitting in to most pants pockets. Its smooth, curved design also makes it virtually snag-proof. With the battery, the camera weighs in at a respectable 6.77 ounces (192 grams).
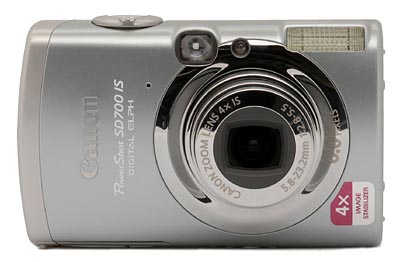
The front of the Canon SD700 IS has a smooth, modernized ELPH-like look with the lens slightly off-center to the right, and both the viewfinder and flash just above it. The front of the camera is primarily composed of brushed silver, but there is a lip of a beige satin metallic material on the slightly curved right front side. A light emitter, next to the optical viewfinder, serves multiple purposes, including autofocus assist, red-eye reduction, and the self-timer countdown. The camera's telescoping 4x lens moves into place quickly (though a little slower than the 3x zoom on the SD600) projecting just under an inch from the front of the camera when powered on. It retracts fully within the camera when switched off to maintain a smooth profile. To the left of the lens is a tiny hole for the camera's microphone. No finger-grip is provided on the PowerShot SD700 IS but the change in placement of the mode dial so that it's embedded in the corner of the rear of the camera, provides an open spot to put your thumb.
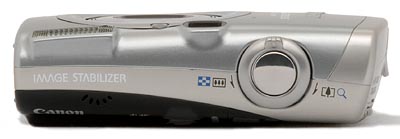
The Shutter button and Zoom ring are located at the right of the camera's top which is framed by a series of sloping corners. The left side of the top of the camera slopes slightly in a wedge-shaped pattern further emphasized by a strip of lacquered black material that discreetly hides the camera's speaker.
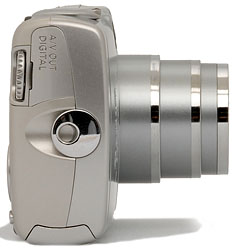
On the right side of the PowerShot SD600 (as viewed from the rear) are the AV Out and USB ports, concealed by a hinged, plastic door that lifts upward to reveal the ports. The door features a metallic finish, and fits very snugly back into place with a gentle press. Below the door is the wrist strap attachment eyelet which does not protrude, giving it smooth profile that prevents snagging in pockets. Behind the door you can see and operate the edge of the mode dial.
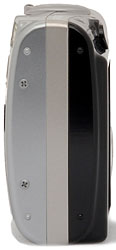
The opposite side of the PowerShot SD700 IS is basically bare, with only a couple of screws visible, plus four tiny protrusions in the corners that let the camera stand vertically on its end. When looking at this side of the camera you can clearly see the three different colored materials the chassis is made out of.
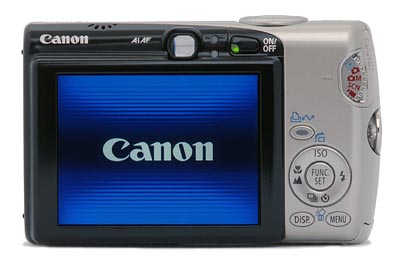
The remaining camera controls are on the PowerShot SD700 IS' rear panel, along with the optical and LCD viewfinders. The LCD monitor is 2.5 inches diagonally, which a year ago would've been considered large for a subcompact camera but now is only average. Directly in the middle above the LCD is camera's tiny optical viewfinder. Two LED lamps next to the viewfinder report camera status, lighting to indicate when focus is set or the flash is fully charged. To the right of the viewfinder is the newly designed oblong-shaped On/Off button which I found to be very responsive and easy to operate though not so easy that it would accidentally turn on in my pocket. Embedded in the right corner of the rear of the camera is the small mode dial. As mentioned previously, because the mode dial has been moved, there is now an open spot on the back to rest your thumb on when operating the camera. In the past, your thumb would typically rest directly on top of the dial. Below the open space for your thumb is the Print / Share button, which features a blue LED in the center that lights when the camera is ready to print or transfer images, and blinks when either is in process. A four-way control ring incorporates most of the quick settings, with the outside buttons handling both navigation and items like Macro, ISO, and Flash modes. The Function button nestles in the middle of the ring, also serving as the Set button for making menu selections. Below this arrangement are the tiny Display and Menu buttons.
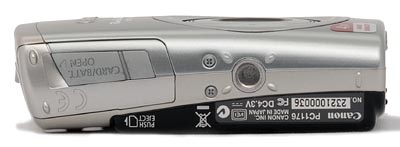
The camera features a sloping bottom panel that mimics the wedge-shape of the top panel and holds the metal tripod mount and the battery / memory card compartment. The tripod socket is centered under the lens, good for panorama shooting. Inside the battery / memory card compartment, the battery and SD memory card slots line up side by side. A small spring-loaded latch ensures the battery won't accidentally fall out when you open the compartment cover. Unfortunately the tripod mount is also right alongside the battery / card compartment door, so you have to remove the camera from a tripod if the battery life or flash card space is exhausted (although in fairness, this is hardly a camera you'll shoot in a studio with anyway).
Canon SD700 External Controls

Shutter Button: Located on the top panel, this button sets focus and exposure when halfway pressed and fires the shutter when fully pressed. If the Self-Timer is activated, a full press of the Shutter button triggers the countdown.
Zoom Ring (see image above): Surrounding the Shutter button on the camera's top panel, this ring controls the optical and digital zoom in any record mode. In Playback mode, the wide-angle end activates first a nine-image index display, and then a "jump" mode that allows you to page through screens of nine thumbnails at once. The telephoto setting zooms in on captured images for closer inspection of fine details.
![]()
Power Button: Under the focusing ring on the back of the camera, this newly designed oblong-shaped button turns the camera on or off. A green LED in the lower left corner of the button illuminates whenever the camera is powered on.
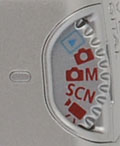
Mode Dial: Embedded in the corner of the bevelled edge of the rear of the camera, the SD700 IS' small mode dial controls the camera's operating mode, offering the following selections:
- Playback Mode: Replays captured images and movies, with options for image management and printing.
- Still Record Mode: Sets the camera for still image capture, with varying exposure options available through the Function menu.
- Manual Mode: Allows you to select some settings yourself such as exposure compensation, white balance, my color, or ISO speed.
- Scene Mode: Allows you to select from up to 16 pre-set scene modes.
- Movie Mode: Allows you to select from five movie modes.

Print/Share Button: The Print/Share button is used for activating uploads to Windows computers or connections to a variety of compatible printers, including those complying to the PictBridge standard. The button glows blue when ready to print or transfer images, and flashes blue when printing or transferring images.
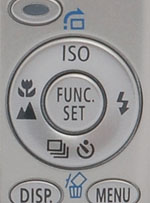
Four-Way Ring Selector: This four-way rocker ring is located to the bottom right of the PowerShot SD700 IS' LCD monitor and serves multiple functions. In any Settings menu, the ring navigates through menu selections depending on which section is pressed. The top part of the ring cycles through ISO speeds from Auto to 80, 100, 200, 400, or 800 ISO equivalents. The left side controls Macro and Infinity focus modes, and cycles back around to the normal AF mode. The right side accesses the camera's flash modes, cycling through Automatic, Red-Eye Reduction, Forced On, Forced On with Red-Eye Reduction, Forced Off, and Slow-Sync settings. Finally, the bottom part of the ring activates the Self-Timer and Continuous Shooting modes, or returns to the normal exposure mode.
In Playback mode, the up section calls the Jump menu, and the bottom section calls the Delete menu, while the right and left sides scroll through captured images and movie files. When you zoom in on an image, all four sides pan the view.
Function / Set Button (see image above): Occupying the center of the four-way control ring, this control activates the Function menu in any record mode, and confirms selections once any menu has been invoked. When used to activate the Function menu, the following options are available (not all options being available in all modes):
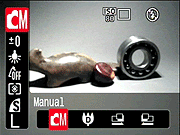 Shooting Mode: Selects among these shooting modes: Auto, Manual, Digital Macro, and Stitch Assist.
- Exposure Compensation: Increases or decreases the exposure from -2 to +2 exposure equivalents (EV) in one-third-step increments.
- Long Shutter: Accesses longer shutter times, with thirteen steps from one to 15 seconds. (Only appears when enabled through the Record menu, and is accessed by pressing the Menu button while the Exposure Compensation option is highlighted.)
- White Balance: Controls the color balance of images. Options are Auto, Daylight, Cloudy, Tungsten, Fluorescent, Fluorescent H, and Custom (manual setting).
- My Colors: Enables Vivid Color (high color saturation), Neutral Color (low color saturation), Sepia, Black-and-White, Positive Film, Lighter Skin Tone, Darker Skin Tone, Vivid Blue, Vivid Green, Vivid Red, or Custom Color; or disables My Colors altogether.
- Metering: Sets the camera's metering mode to Evaluative, Center-Weighted, or Spot.
- Compression: Sets the JPEG compression to Superfine, Fine, or Normal.
- Resolution: Specifies the image resolution. Still image resolutions are 2816 x 2112, 2272 x 1704, 1,600 x 1,200, and 640 x 480 pixels; a Postcard mode also takes the resolution to 1,600 x 1,200 and locks the resolution to Fine; a date stamp can be printed on the image in this mode, and the top and bottom of the screen are greyed out when you half-press the Shutter button, showing the portions of the image that won't fit on a 4x6 postcard. A Widescreen mode shoots in 16:9 format at 2816 x 1584 with portions not recorded left black. This mode is for playback on widescreen televisions or printing on wide paper. Movie resolutions are 640 x 480, 320 x 240, and 160 x 120 pixels.
![]()
Display Button: Lower left of the Four-way rocker ring, this button cycles through the LCD image and information displays and in Record mode includes an LCD Off state for power saving when desired. In Playback mode, this button cycles through the image only, information display, and info display with histogram modes.

Menu Button: Lower right of the Four-way nav controls, this button accesses the LCD menu system in both Record and Playback modes.
 Fujifilm GFX 50S Review
 Fujifilm X-T3 Review
 Olympus E-M5 III Review

Follow Imaging Resource