Olympus SP-550 UZ Operation
With few buttons to remember to look for, apart from the obvious ones, and a well-organized menu system that puts every function within a few key presses, the Olympus SP-550 UZ was very easy to learn. Just press the Power button and select a Record mode with the Mode dial. If you need anything you don't see on the Arrow pad (Exposure Compensation, Flash modes, Macro modes, Self-Timer), press the Menu button to find it. Or just switch to Guide mode and let the camera show you. And for quick access to common options you might change between shots, just press the OK/Function button.
 Record Mode Display: The Olympus SP-550 UZ's Record mode screen always shows an information overlay that displays the Record mode, Flash mode, ISO, Image Quality, stabilization setting, exposure information, and estimated shots remaining on the memory card, among other camera and exposure settings. A battery icon also briefly displays in the upper left corner, reporting the approximate charge level. Pressing the Display/Guide button cancels the information overlay except for the focus brackets. A third press returns the information display with an alignment grid, while the fourth enables a live histogram display (which replaces the pixel dimensions in the information overlay).
 Playback Mode Display: In Playback mode, you can choose to have more or less image information shown in the overlay display; but regardless of the amount chosen, the overlay disappears after a few seconds of not touching the controls, so you can always (eventually) see just the photo itself. Using the Olympus SP-550 UZ's zoom control, you can zoom out to a thumbnail display showing four, nine, 16, or 25 images at once, a calendar view, or zoom in up to 10x to check fine details or focus.
Olympus SP-550 UZ Modes and Menus
Auto Exposure Mode: Accessed by turning the Olympus SP-550 UZ's Mode dial to the Auto position, this mode puts the camera in charge of the full exposure, with the user only able to adjust zoom, flash, and image quality and size settings.Program AE Mode: A simple "P" marks this mode on the Mode dial. Here, the camera maintains control over the actual exposure, while the user can adjust all other settings.
Aperture Priority Mode: The letter "A" indicates this mode on the Mode dial, which puts the user in control of the aperture setting, while the camera selects the most appropriate corresponding shutter speed.
Shutter Priority Mode: Opposite of Aperture Priority mode, this mode puts the user in charge of the shutter speed, while the camera selects the best aperture setting.
Manual Mode: Marked with an "M" on the Mode dial, this mode puts the user fully in control of all camera settings.
My Mode: This mode allows the user to register a set of custom camera settings, for quick recall later.
Guide Mode: This mode displays common problems like "Shooting into backlight" and steps you through the optimum settings.
Scene Mode: Indicated by the word "Scene" on the Mode dial, this mode provides access to no less than 24 preset Scene modes. Each choice is accompanied by an example photograph and an explanation of the mode's purpose (rather than show all of them at right, we're showing the first five as an example). Choices are: Portrait, Landscape, Landscape & Portrait, Sport, Night Scene, Night & Portrait, Indoor, Candle, Self-Portrait, Available Light, Sunset, Fireworks, Cuisine, Behind Glass, Documents, Auction, Shoot & Select1, Shoot & Select2, Beach, Snow, Underwater Wide1, Underwater Wide2, and Underwater Macro.
Movie Mode: A small icon of a movie camera indicates this mode on the Mode dial. Movie mode records moving images with sound, for as long as the internal memory or memory card has available space.
Playback Mode: The Playback symbol on the Mode dial indicates the camera's review mode, which displays images and movies. Images can be set up for printing, enlarged, viewed in an index or calendar display, or resized.
Record Menu: When the Menu button is pressed in any Record mode, the SP-550 displays its Top Menu with Camera Menu at the center, Image Quality above it, Reset to the left, Setup to the right, Silent Mode below Setup and Scene below Camera Menu. However, not all menu options are available in all modes. Pressing the OK/Function button instead of the Menu button brings up a quick menu of basic Record mode options like White Balance, ISO, Drive, and Metering.
- Camera Menu: Displays the following options:
 White Balance: Adjusts the overall color balance of the image, to suit the light source. Options are Auto, Custom, and Presets of Daylight, Cloudy, Incandescent, Fluorescent 1, Fluorescent 2, and Fluorescent 3.
- ISO: Adjusts the camera's light sensitivity. ISO equivalents are Auto, High ISO Auto, 50, 100, 200, 400, 800, 1,600, and 3,200 or 5,000 at 2,048 x 1,536 without digital zoom.
- Drive: Sets the camera's drive mode to Single Shot, Continuous, Hi Speed 1 Continuous, Hi Speed 2 at 15 fps, AF to adjust the focus at each frame, BKT to bracket exposure for each frame with focus and white balance locked at the first frame.
- Metering Mode: Chooses between Digital ESP (default) and Spot modes. Spot metering reads the exposure from the very center of the frame (identified by a cross hair target on the monitor). Spot metering is handy for backlit subjects, or any time the subject and background have very different brightness levels. Digital ESP mode reads the entire frame to determine exposure.
- Fine Zoom: Allows the camera to zoom up to 27x by combining optical zoom and image cropping.
 Digital Zoom: Allows the camera to zoom up to 100x by combining optical zoom and digital zoom. In Movie mode, it's limited to 54x.
- AF Mode: Sets the AF mode to iESP, Spot or Area mode (in which you move the spot to the area to want to be focused).
- Focus Mode: Selects between Auto Focus or Manual Focus with an enlarged focus area in the center of the screen.
- Fulltime AF: When activated, the camera focuses all the time, not just when you press the Shutter button halfway.
- AF Predict: When activated, pressing the Shutter button halfway engages predictive focusing except in either Macro mode.
 AF Illuminator: Turns on the autofocus illuminator to help find focus when you half press the Shutter button.
- Image Stabilizer: Activates digital image stabilization when the Shutter button is half pressed.
- Flash Power: Adjusts flash output from -2.0 EV to +2.0 EV in one-third step increments.
- Synchro: Options include Synch1 to fire the flash as soon as the shutter fully opens (commonly called front curtain synch) and Synch2 to fire the flash just before the shutter closes (rear curtain).
- Flash: Option In activates the built-in flash while Slave controls an external flash synched to the camera with 1 to 10 emission levels.
 Sound Recording: Enables a four second sound recording for a short caption to accompany an image file.
- Panorama: Activates the camera's Panorama shooting mode.
- White Balance Compensation: Adjusts white balance in seven increments in both the Red and Blue directions (warmer or cooler).
- Sharpness: Adjusts the sharpness of the image from -5 to 5 in whole increments.
- Contrast: Adjusts the contrast of the image from -5 to 5 in whole increments.
 Saturation: Adjusts the saturation of the image from -5 to 5 in whole increments.
- Noise Reduction: When on, shooting takes twice as long as usual, locking the shutter during the process. Active only when the shutter speed is slower than half a second.
- Timelapse: Activates timelapse shooting with from 2 to 99 shots and 1 to 99 one-minute intervals.
- Conversion Lens: When on, this setting tells the camera an optional conversion lens has been attached.
- Movie Sound: Toggles sound recording for movies on or off. When on, image stabilization is not available.
 Image Quality: Offers RAW (3,072 x 2,304), SHQ (3,072 x 2,304), HQ (3,072 x 2,304), SQ1 (2,560 x 1,920, 3,204 x 1,728, or 2,048 x 1,536 at High or Normal compression settings), SQ2 (1,600 x 1,200, 1,280 x 960, 1,024 x 768, or 640 x 480 at High or Normal compression settings), and 16:9 (1,920 x 1,080) still image resolutions. Movie resolutions are 640 x 480 and 320 x 240, either of which can be recorded at 30 or 15 frames per second.
- Reset: Resets all camera settings to their defaults except Setup and My mode.
- Setup: Accesses the Setup menu.
- Silent Mode: Sets all of the camera's audible signals on or off.
- SCN: Accesses the Scene menu in Scene mode.
Playback Menu: As with the Record menu, the Top Menu with nine options appears when pressing the Menu button, before accessing the main Playback menu. The central Playback Menu option is the starting point, surrounded by the other options which vary depending on whether a still or movie is displayed. We list them here from top to bottom and left to right:
- Slide Show: Enables an automated slide show of the captured images. Options include:
- BGM: This option toggles Background Music on or off.
- Type: This option selects the Transition among Normal or Scroll/Fader (Slide, Zoom Down, Zoom Up, Checkerboard, Blinds, Swivel, or Random).
- Edit: Offers a few image editing tools, as follows:
 RAW Data Edit: Saves a RAW image as a JPEG after you select the Image Quality, White Balance, White Balance Adjustment, Sharpness, Contrast, and Saturation.
- Resize: Changes the resolution to a smaller size, and allows you to save the smaller image as a separate file.
- Redeye Fix: Automatically removes any redeye from a captured image.
- Black & White: Converts the image to black and white monotone.
- Sepia: Converts the image to sepia monotone.
- Frame: Allows you to select a digital "frame" and save a separate image file with the selected border.
- Label: Similar to the frame function, this option lets you select from a range of preset image titles (like Congratulations, Happy Birthday, Good Luck) to apply to the image, then save the titled image as a separate file.
- Calendar: This option associates a captured image file with a calendar format, saving the layout as a new file.
- Layout: Allows you to select among a variety of layouts for a proofsheet of your images.
- Brightness: Adjusts the overall brightness of an image.
- Saturation: Adjusts the color saturation of the image.
- Print Order: Sets the number of prints and date information for images you'd like to print.
- Calendar: This function lets playback images in a calendar format, organized by the date the images were recorded.
- Playback Menu:
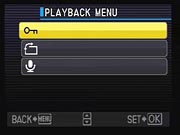 Protect: Write-protects the current image (or removes protection), preventing it from being deleted or manipulated in any way except with card formatting.
- Rotate: Rotates the image 90 degrees clockwise or counterclockwise.
- Sound Recording: Lets you record a short audio clip to accompany a captured image.
- Index Play: (Movie files only.) Begins movie playback from the select frame displayed in index format.
- Setup: Accesses the main Setup menu.
- Index: Lets you view nine images on the screen at the same time.
- Erase: Displays the single image erase menu.
- Silent Mode: Sets all of the camera's audible signals on or off.
- Movie Play: (Movie files only.) Plays the selected movie.
- Index: (Movie files only.) Shortcut to the Index function for Movie files, this function lets you select and save nine frames from a movie file as an index-style image.
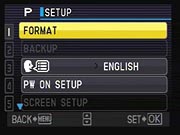 Format: Formats the internal memory or xD-Picture Card, erasing all files (even protected ones).
- Backup: Copies images from the internal memory to an xD-Picture Card.
- Menu Language: Selects the language for the LCD menu display.
- Power On Setup: Controls whether an image and sound are played on startup.
- Screen Setup: This option lets you register a captured image as the startup screen.
 Beep: Adjusts the volume of the beep sound played when a button is pressed.
- Warning Volume: Adjusts the volume of the camera's warning sound.
- Shutter Sound: Selects the type of sound and volume of the shutter noise.
- Volume: Controls the playback volume.
- Record View: Activates an instant image review function, or disables it.
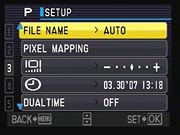 File Name: Resets file naming with each new memory card, or continues the numbering from card to card.
- Pixel Mapping: Runs a self-check of the camera's CCD. Olympus recommends only running this function once a year.
- Monitor Brightness: Adjusts the brightness of the monitor.
- Date and Time: Sets the camera's internal clock and calendar.
- Dual Time: Sets the date and time for another time zone, so you can track time at home versus local time while traveling.
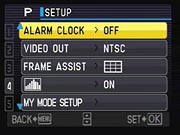 Alarm Clock: You can set an alarm to occur either one time only, or daily.
- Video Out: Sets the timing of the video output signal to either NTSC or PAL.
- Frame Assist: Sets either the grid or crossbars as composition guides or disable them.
- Histogram: Displays a live histogram in Record modes or highlights clipped tones on the image itself.
- My Mode Setup: Save or restore up to four sets of settings.
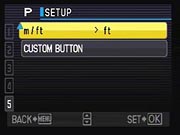 m/ft: Sets the measurement unit used manual focus to meters or feet.
- Custom Button: Assigns a function to the Image Stabilization/Custom button.
 Fujifilm GFX 50S Review
 Fujifilm X-T3 Review
 Olympus E-M5 III Review

Follow Imaging Resource