Sony Cyber-shot DSC-V1A no-excuses "enthusiast" camera from Sony: 5 megapixels, 4x zoom, fast AF, and features galore<<V1 Photo Gallery! :(Previous) | (Next): Print-Friendly Review Version>> V1 Sample ImagesReview First Posted: 04/18/2003, Updated: 7/1/2003 |
Digital Cameras - Sony Cyber-Shot DSC-V1 Test Images
| I've begun including links in our reviews to a Thumber-generated index page for the test shots. The Thumber data includes a host of information on the images, including shutter speed, ISO setting, compression setting, etc. Rather than clutter the page below with *all* that detail, we're posting the Thumber index so only those interested in the information need wade through it! |
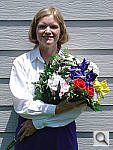
| Outdoor Portrait:
Excellent job, with great resolution, detail, and color. The extreme tonal range of this image makes it a tough shot for many digicams, which is precisely why I set it up this way, and why I shoot it with no fill flash or reflector to open the shadows. The object is to hold both highlight and shadow detail without producing a "flat" picture with muddy colors, and the DSC-V1 performed very well. The shot at right was taken with a +0.3 EV exposure compensation adjustment, which brightened the midtones, though at the expense of some highlight detail. I chose the Auto white balance as the most accurate overall, though the Daylight setting produced similar results, but just a hint cooler. The Manual setting produced a much warmer cast. Marti's skin tones look about right, perhaps just slightly pale, and the blue flowers in the bouquet are almost perfect. This is a very difficult blue for many digicams to get right, and the V1 does produce purplish tints here, as well as a slightly dark hue, but the flowers still look pretty good. (For reference, the flowers are a light navy blue with just hints of purple.) The V1 handles the strong reds and greens in the image quite well, keeping saturation in check in the bright red flowers. Resolution is excellent, with a lot of fine detail visible throughout the frame, even in the shadows. Details are also quite sharp, and image noise in the shadows is low. An excellent job all around. To view the entire exposure series from zero to +0.7 EV, see files V1OUTAP0.HTM through V1OUTAP2.HTM on the thumbnail index page. Contrast Series:
Saturation Series:
|
|||||||||||||||||||||||||||||||||||||||||||||||||
|
Excellent resolution and detail. In terms of exposure and color, results here are similar to the wider shot above. The V1's 4x zoom lens helps prevent distortion of Marti's features, which is important in close-up shots like this. Detail is outstanding, with sharp details in Marti's face and hair (you can almost count the pores in her skin!). The shot at right was taken at the default exposure setting, which produced a nicely balanced exposure with only the strongest highlights blown out on the white shirt. Shadow detail is again strong, with low noise, and details are super sharp. Again, skin tones are just about right, but seem slightly cool-toned to my eyes. To view the entire exposure series from -0.3 to +0.7 EV, see files V1FACM1.HTM through V1FACP2.HTM on the thumbnail index page. |
|||||||||||||||||||||||||||||||||||||||||||||||||
Good intensity and coverage with the built-in flash at the High intensity setting, with good color, though a stronger blue tint with the Slow-Sync setting. The V1's built-in flash illuminates the subject evenly here, but is slightly dim at the Normal flash intensity level. A better exposure was obtained by boosting the intensity to the High setting, though overall lighting became slightly more harsh with stronger shadows on the back wall. Color looks pretty good, with a nearly accurate white value on Marti's shirt, despite slightly cool tints in the shadows. The background incandescent lighting creates an orange cast on the back wall as well, which is also on Marti's hair and in some areas of the shirt. I also shot with the camera's Slow-Sync flash mode, and again found the best results at the High intensity setting. The orange cast fades to a warm, yellowish cast, and flash illumination is much more even, thanks to the slightly longer exposure. Additionally, light coming from the flash results in stronger blue tints. The shots below show the results of the two different flash exposure settings with each of the flash options I tried (normal, and Slow Sync):
|
|||||||||||||||||||||||||||||||||||||||||||||||||
Very good color with the Manual white balance option, average positive exposure compensation required. This shot is always a very tough test of a camera's white balance capability, given the strong, yellowish color cast of the household incandescent bulbs used for the lighting. Both the V1's Auto and Incandescent white balance options had trouble here, and produced warm color balances. However, the Manual setting produced nearly accurate results, just with a very slight warm cast. (Actually, this is about the coloring I'd prefer for this shot, as it retains some of the look of the original room lighting.) Marti's skin tone is just a little warm, but still pretty good. The blue flowers in the bouquet have a strong purple tint, which is a common problem among digicams under this light source. The best exposure was obtained with a +1.0 EV exposure compensation adjustment, which is typical for this shot. ISO Series:
|
|||||||||||||||||||||||||||||||||||||||||||||||||
Good color at all three white balance settings, though Manual is most accurate, and great resolution and detail. The V1's Manual white balance setting produced the best overall results here, with the most accurate white value on the house trim. That said, both the Auto and Daylight settings produced nice results as well. Resolution is very high, as the V1 picks up a lot of detail in the tree limbs and shrubbery. The V1's 5.0-megapixel CCD is actually starting to stretch the limits of this poster as a test target. Though the poster was made from a 500MB scan of a 4x5 negative shot with a tack-sharp lens, the V1 extracts nearly all the detail that's to be found here. Details are also fairly sharp, from corner to corner. I shot with a +0.3 EV exposure compensation adjustment, as the camera's default setting produced slight underexposures here. (Very odd, this almost never happens, makes me wonder what was going on with the V1's exposure metering.) |
|||||||||||||||||||||||||||||||||||||||||||||||||
|
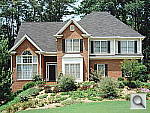
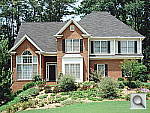
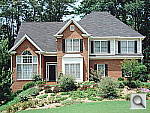
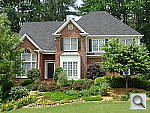
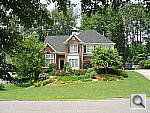
Excellent resolution and detail, with a good dynamic range. This image is shot at infinity to test far-field lens performance. NOTE that this image cannot be directly compared to the other "house" shot, which is a poster, shot in the studio. The rendering of detail in the poster will be very different than in this shot, and color values (and even the presence or absence of leaves on the trees!) will vary in this subject as the seasons progress. In general though, you can evaluate detail in the bricks, shingles and window detail, and in the tree branches against the sky. Compression artifacts are most likely to show in the trim along the edge of the roof, in the bricks, or in the relatively "flat" areas in the windows. This is my ultimate "resolution shot," given the infinite range of detail in a natural scene like this, and the V1 does an excellent job. Detail is very strong in the tree limbs over the roof, as well as the fine foliage in front of the house, with excellent definition in the leaf patterns. In-camera sharpening does a good job here as well. There's only a slight hint of softness in the top left corner of the frame. The camera picks up pretty good detail in the bright white paint surrounding the bay window, though some of the more subtle details are lost, a trouble spot for many digicams. However, detail is very strong in the shadow area above the front door, showing a pretty good dynamic range. Overall color looks good, though the greens are a bit oversaturated with a yellow cast to them. Exposure is about right. The table below shows a standard resolution and quality series, followed by ISO and sharpness series. Resolution Series:
Sharpness Series:
Contrast Series:
Saturation Series:
Effects Series:
|
|||||||||||||||||||||||||||||||||||||||||||||||||
|
Lens Zoom Range Better than average 4x zoom range. I routinely shoot this series of images to show the field of view for each camera, with the lens at full wide angle, at maximum telephoto (4x, in this case), and at full telephoto with the digital zoom enabled. The V1's lens is equivalent to a 34-136mm zoom on a 35mm camera. That corresponds to a moderate wide angle to a pretty substantial telephoto. Following are the results at each zoom setting.
|
|||||||||||||||||||||||||||||||||||||||||||||||||
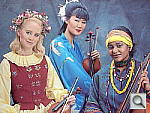
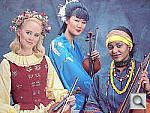
Good overall color, with good resolution and detail as well. This shot is often a tough test for digicams, as the abundance of blue in the composition frequently tricks white balance systems into producing a warm color balance. I felt that the V1's Auto white balance setting did the best job here. As the Daylight and Manual settings seemed a hint too cool. The blue background has very slight purplish tints that aren't in the original image, but the blue robe looks nearly right (though with slight purple tints in the shadows). Resolution is very high, with great detail in the embroidery of the blue robe. Because the original data file for this poster was only 20MB, cameras like the V1 are definitely capable of showing more detail than the poster has in it. Exposure was again slightly dim at the default setting, so I shot the images at right with a +0.3 EV exposure compensation adjustment. |
|||||||||||||||||||||||||||||||||||||||||||||||||
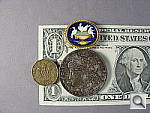
Good performance, with great resolution and color. The V1 turned in about an average performance in the macro category, capturing an average-sized minimum area of 4.45 x 3.34 inches (113 x 85 millimeters). Resolution is very high, with strong detail in the dollar bill, coins, and brooch. Details are also quite sharp, with only slight softness in the corners. Color is good from the Auto white balance setting, and exposure is about right. The V1's flash almost throttles down for the macro area, though there's a hot spot in the top center of the frame, and a slight shadow in the bottom two corners. |
|||||||||||||||||||||||||||||||||||||||||||||||||
Slight underexposure at the default setting, but very good color and dynamic range. The V1's Auto white balance option produced the best color here, despite a very slight yellow tint in the mini-resolution target and large, white color block. The Manual white balance also produced very good results, though slightly greenish, and the Daylight setting resulted in a warmer cast. Exposure was slightly dim at the default setting, so I shot with a +0.3 EV exposure compensation adjustment. Thus, the V1 just barely distinguishes the subtle tonal variations of the Q60 target. Colors are bright and vibrant in the large color blocks, and well-saturated. The shadow area of the charcoal briquettes has very strong detail, with low noise, and the last steps of both gray scales are barely distinguishable. Contrast Series:
Saturation Series:
|
|||||||||||||||||||||||||||||||||||||||||||||||||
|
Low-Light Tests Really excellent low-light performance, with low noise, and accurate framing and focusing in total darkness. The V1 really does a great job at low light photography. Its full manual exposure control and maximum exposure time of 30 seconds are its basic strengths, but the infrared-based Night Framing and Hologram Autofocus options are the icing on the cake. The V1 produced clear, bright, usable images down to the 1/16 foot-candle (0.67 lux) limit of my test, with good color at all four ISO settings. The V1's Noise Reduction system does a great job of controlling image noise as well. Even at ISO 800, noise is low compared to many other digicams. Color was good for the most part, though at the 1/8 foot-candle (1.3 lux) light level, the color balance shifted blue at all four ISO settings. (Though it went back to a warmer cast at the 1/16 foot-candle light level.) Still, an excellent job overall. The table below shows the best exposure I was able to obtain for each of a range of illumination levels at each ISO setting. Images in this table (like all my sample photos) are untouched, exactly as they came from the camera.
|
|||||||||||||||||||||||||||||||||||||||||||||||||
|
Flash Range Test A powerful flash, only a little falloff at the 14 foot limit of our test. In my testing, the V1's flash illuminated the test target all the way out to 14 feet, without any significant decrease in intensity. Flash power was uniform throughout the series, at the Normal intensity setting, although slightly dim - I perhaps should have used the "High" setting, but the camera should have gotten the exposure right on its own. Below is the flash range series, with distances from eight to 14 feet from the target.
|
|||||||||||||||||||||||||||||||||||||||||||||||||
|
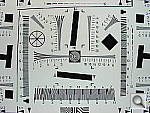
ISO-12233 (WG-18) Resolution Test Very high resolution, 1,250 lines of "strong detail." Very high barrel distortion, however, and higher than average pincushion as well. The V1 performed very well on the "laboratory" resolution test chart. It started showing artifacts in the test patterns at resolutions only as low as 800 lines per picture height, in both horizontal and vertical directions, but they were very subtle at that point. I found "strong detail" out to at least 1,250 lines horizontally, 1,200 vertically. "Extinction" of the target patterns didn't occur until about 1,700 lines. A really impressive performance. Optical distortion on the V1 is about average at the wide-angle end, where I measured approximately 0.8 percent barrel distortion. The telephoto end fared a little better, as I measured 0.35 percent pincushion distortion there. Both numbers are within the average range among cameras I've tested, although the pincushion value pushes the envelope a little. - But then, most digicams with lower pincushion distortion also have a shorter 3x optical zoom ratio. Chromatic aberration seemed a little higher than average to me, with fairly bright coloration on either side of the resolution target lines. (This distortion is visible as a very slight colored fringe around the objects at the edges of the field of view on the resolution target.) The images were unusually sharp from corner to corner though, with only a little softening in the extreme corners at maximum telephoto, and the aforementioned chromatic aberration at wide angle. - Overall, corner to corner sharpness was much better than average. Resolution Series, Wide Angle
Resolution Test, Telephoto
Sharpness Series
|
|||||||||||||||||||||||||||||||||||||||||||||||||
|
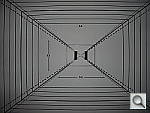
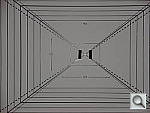
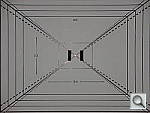
Viewfinder Accuracy/Flash Uniformity Excellent accuracy from the LCD monitor, though the optical viewfinder is tight. The V1's optical viewfinder proved to be a little tight, showing approximately 79 percent frame accuracy at wide angle, and approximately 86 percent at telephoto. (The average is 85%, which is still too tight, IMHO.) Images framed with the optical viewfinder were also shifted toward the right side. At telephoto, the right edge of the framing guidelines were just cut off. The LCD monitor proved much more accurate, showing about 99+ percent frame accuracy at both lens settings. Given that I like LCD monitors to be as close to 100 percent accuracy as possible, the V1's LCD monitor is essentially perfect in that regard. Flash distribution is fairly even at wide angle, with just a little falloff at the corners and edges of the frame. At telephoto, flash distribution is even more uniform.
|
|||||||||||||||||||||||||||||||||||||||||||||||||


Follow Imaging Resource: