Kodak EasyShare V603 Operation
True to its EasyShare name, the Kodak V603 has a very user-friendly interface with limited control options that keeps camera operation simple. The camera's automatic systems do an excellent job of capturing good-looking photos, with a well-rounded range of preset shooting modes to handle a wide range of scenes. The LCD menu system is short and simple to navigate, and the plain-English descriptions of menu items are a welcome change from the too-common cryptic icons on so many other cameras. The flat mode buttons across the top panel let you change camera modes quickly, and once again, plain-English descriptions flashed along the top of the LCD screen make operation straightforward for even rank beginners. Given the simple interface and limited controls, you should be able to snap images right away, with hardly a glance at the manual. Though for more advanced functions, it shouldn't take more than a half an hour or so to get the gist of things.
Record-Mode Display
 Depending on the exposure mode, the Kodak V603's LCD display shows the center autofocus area along with currently-selected options for image size/quality, macro and flash mode, exposure compensation, the number of images of the current size and quality that can be stored in the remaining space on the memory card. Pressing the Display button once in a record mode cancels the information display, while a second press brings back the information display with an alignment grid. Another press adds a small live histogram.
Playback-Mode Display
 In Playback mode, you can use the Kodak EasyShare V603's Zoom lever to zoom in or out on an image, with a maximum enlargement of 8x. A thumbnail display of the images on the card is also available, through the camera's Playback menu (or you can press the Down arrow). The Display button offers a more detailed information display, reporting the file name, folder name, date and time, and image size with a small histogram for checking the overall exposure of the image. The display can also be canceled entirely.
Kodak EasyShare V603 Modes and Menus
Auto/Scene Mode: Accessed by turning the camera on or toggling the Auto/Scene button, this mode enables the camera's still photo capture functions, toggling between Auto and Scene modes.
Movie Mode: This mode enables the camera's movie capture functions.
Favorites Mode: In this mode, any images that have previously been designated as "favorites" and copied to internal memory are displayed. You can opt to view images in a slide show or index format, or view exposure information for individual images.
Auto Record Menu: The following menu items appear whenever the Menu button is pressed in any Record mode. However, not all menu options are available in all modes.
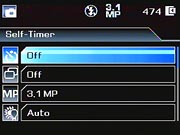 Self-Timer: Sets the Self-Timer option for 10 seconds, two seconds, off, or two-shot mode.
- Burst: Enables or disables the camera's Burst photography mode, for capturing a rapid series of images at three frames per second.
- Picture Size: Sets the resolution for still images. Choices are 6.0 MP (2,832 x 2,128), 5.3 MP (3:2) (2,832 x 1,888 pixels), 4.0 MP (2,304 x 1,728 pixels), 3.1 MP (2,048 x 1,536 pixels), or 1.8 MP (1,568 x 1,168 pixels).
- White Balance: Sets the color balance to Auto, Daylight, Tungsten, Fluorescent, or Open Shade settings.
 ISO Speed: Sets the sensitivity to Auto (ISOs 80 to 160),
or to 80, 100, 200, 400, or 800 equivalent settings. (ISO 800 is only available
at the 1.8 MP resolution.)
ISO Speed: Sets the sensitivity to Auto (ISOs 80 to 160),
or to 80, 100, 200, 400, or 800 equivalent settings. (ISO 800 is only available
at the 1.8 MP resolution.)
- Color Mode: Allows you to record images in High, Natural, or Low Color, or in Black and White or Sepia tones.
- Sharpness: Controls the in-camera sharpening, with options of High, Normal, or Low.
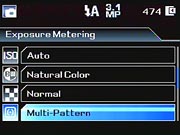
- Exposure Metering: Designates the camera's metering mode as Multi-Pattern, Center-Weighted, or Center-Spot.
 AF
Control: Sets the autofocus to Continuous or Single modes.
AF
Control: Sets the autofocus to Continuous or Single modes.
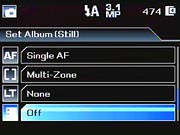
- Focus Zone: Controls where the camera's AF system determines focus from. Choices are Multi-Zone and Center-Zone.
- Long Time Exposure: Accesses longer exposure times, from 0.5 to eight seconds.
- Set Album (Still): The Kodak V603 lets you set up albums through its interface software on a computer. If albums have been set up and downloaded to the camera, you can associate images with an album as they are recorded.
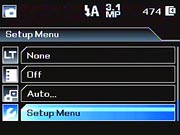 Image Storage: Dictates where images are stored, either in the
32MB internal memory or SD card. If Auto is selected, the camera automatically
stores images to a memory card if one is present.
Image Storage: Dictates where images are stored, either in the
32MB internal memory or SD card. If Auto is selected, the camera automatically
stores images to a memory card if one is present.
- Setup Menu: Accesses the Setup menu (see below).
Movie Menu: Some of the same options are available as in Record mode, but with a few differences:
- Self-Timer: Offers two and 10-second Self-Timer shutter delay modes.
- Video Size: Sets the pixel resolution for Movie mode. Choices are 320 x 240 or 640 x 480 pixels, with a 640 x 480 (long play) option.
- Set Album (Video): The Kodak V603 lets you set up albums through its interface software on a computer. If albums have been set up and downloaded to the camera, you can associate movie files with an album as they are recorded.
- AF Control (Video): Sets the autofocus to Continuous or Single modes.
- Video Length: Sets whether movie times are Continuous, or limited to 5, 15, or 30 seconds per recording.
- Image Stabilizer: Turns the Image Stabilizer On or Off. If On, the camera attempts to compensate for minor blurring from camera movement.
- Image Storage: Dictates where movie files are stored, either in the 32MB internal memory or SD card. If Auto is selected, the camera automatically stores files to a memory card if one is present.
- Setup Menu: Accesses the Setup menu (see below).
Playback Menu:
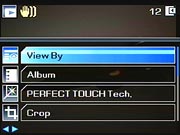 View
By: Selects between All, Date, and Album for image display.
View
By: Selects between All, Date, and Album for image display.- Album: Adds images to an image album, created on a computer with the camera's interface software.
- Perfect Touch: Lets you automatically enhance an image and save it as a separate image file, replace the original or cancel the operation. The original and the edited image are displayed side by side so you can evaluate the enhancement.
- Crop: Lets you crop an image and save it as a separate image file.
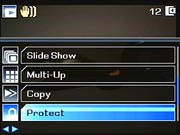 Slide
Show: Enables a slide show of captured images, with user-adjustable
intervals between images.You can also set the show to Loop, or set the Transition
style.
Slide
Show: Enables a slide show of captured images, with user-adjustable
intervals between images.You can also set the show to Loop, or set the Transition
style. - Multi-Up: Enables a index display of images on the memory card or stored in the internal memory.
- Copy: Copies files from the internal memory to the SD card, or the reverse.
- Protect: Write-protects the displayed image, preventing it from being accidentally erased or manipulated (except via memory or card formatting). Also removes protection.
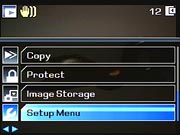 Image Storage: Selects between the internal memory or the SD card
for image storage.
Image Storage: Selects between the internal memory or the SD card
for image storage.- Setup Menu: Displays the same settings as under the Record menu.
- Return: Returns to the previous menu display.
- Camera Sounds: Designates the camera's operating sounds. Individual choices can be set for Theme, Power On, Focus Lock, Shutter, Self-Timer and Error. Theme and Individual. Available themes include Secret Agent, Jazz Lounge, the Default, or None. The remaining options let you select a different option among those for that specific sound.
- Sound Volume: Sets the volume to Low, Medium, or High, or turns sound off.
- LCD Brightness: Sets the LCD's brightness to either High Power or Power Save.
- LCD Dimmer: Sets the LCD's timer to dim after 30, 20, or 10 seconds or disables LCD Dimming.
- Auto Power Off: Specifies the period of inactivity before the camera shuts itself off. Choices are 1, 3, 5, or 10 minutes.
- Date & Time: Sets the camera's internal clock and calendar.
- Video Out: Specifies PAL or NTSC as the Video Out signal.
- Photo Frame: Sets the Photo Frame Dock 2 settings for image display. Options are Interval (between slide show frames), Loop, Transition (between slide show frames), Image Source (Album, Internal or Favorites), and Run Time.
- Orientation Sensor: Controls the camera's orientation sensor, which detects when the camera is held vertically. Vertical-format images captured when the Orientation Sensor is enabled are rotated to their correct orientation on-screen when they're played back.)
- Red-Eye Pre-Flash: If activated, this function fires the Red-Eye pre-flash before the full flash.
- Date Stamp: Specifies whether the date and time of image capture are imprinted on the image. You can choose a display format as well.
- Video Date Display: Like the Date Stamp option above, imprints the date and time on video files, with a choice of display formats.
- Blur Warning: Turns on the camera's blur warning, or disables it. If on, the camera displays the shaking hand icon during quickview, with a range of colors to indicate the level of blur. For example, a green hand indicates that the picture is sharp enough for a good 4x6-inch print. Yellow shows that the image may be sharp enough for 4x6-inch prints, or that sharpness hasn't been determined. (In other words, check the image on a computer before printing.) A red icon means that the picture is not sharp enough for a 4x6-inch print. White indicates that the camera is still assessing the image file.
- Language: Sets the menu language to one of 19 languages.
- Format: Formats the SD memory card or internal memory.
- About: Displays the camera's firmware information.
 Fujifilm GFX 50S Review
 Fujifilm X-T3 Review
 Olympus E-M5 III Review

Follow Imaging Resource