Canon Rebel XTi Controls
Control Enumeration, Top Panel Controls
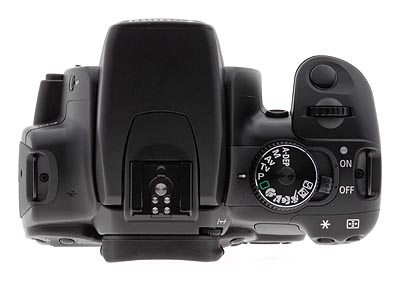

Power Switch: Jutting out to the right from underneath the Mode dial on top of the camera, this switch turns the camera on or off.
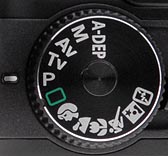
Mode Dial: Positioned on the right side of the camera's top panel, this dial sets the exposure mode. Exposure modes are divided into three zones: Image, Basic, and Creative. The Image Zone encompasses the Flash Off, Night Portrait, Sports, Close-Up (macro), Landscape, and Portrait exposure modes (what most companies call "Scene" modes), while the Basic zone includes all of the same plus the Full Automatic mode. Finally, the Creative Zone refers to the Program AE, Shutter Speed Priority AE, Aperture Priority AE, Manual, and Auto Depth of Field Priority AE exposure modes.

Main Dial: Resting on top of the camera on the right side (as viewed from the back), this ribbed wheel adjusts some of the camera's basic settings. In Aperture-Priority and Shutter-Priority modes, this dial sets the lens aperture or shutter speed. In Manual mode, the dial sets the shutter speed, but switches to controlling the aperture when the +/- button on the back of the camera is pressed. In Program AE mode, turning this dial selects between a range of equivalent exposure settings. When turned while pressing a control button (such as the Drive Mode or Exposure Compensation buttons), this dial adjusts the selected setting.

Shutter Button: Located on top of the right hand grip in front
of the Main dial, this button fires the shutter when fully pressed, and sets
focus and exposure when halfway pressed in all but Manual exposure mode. (In
Manual exposure mode, it causes the exposure readout to show how much over-
or under-exposed the camera thinks the photo would be, based on the aperture
and shutter speed settings you've chosen.)
Control Enumeration, Front Controls
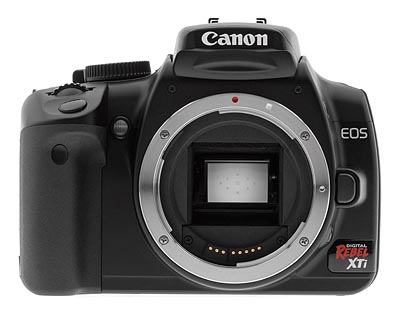

Lens Release Button: Located on the front of the camera, this rectangular button located just to the right of the lens mount unlocks the lens from the mount when pressed. The lens can then be removed by rotating it about 45 degrees to disengage the bayonet mounting flanges.
Control Enumeration, Left Side Controls

![]()
Flash Button: Located on the left side of the prism housing, above the lens release button and just below the pop-up flash compartment, this button releases the pop-up flash into its operating position when the camera is on. (The pop-up flash is electronically activated, so it cannot be raised when the camera is turned off.)
![]()
Depth of Field Preview Button: Positioned on the side of the
lens mount housing, just beneath the lens release button, this button lets you
preview the depth of field by stopping down the lens aperture to the current
setting in any of the Creative Zone exposure modes. (Like most modern SLRs,
the Canon Digital Rebel XTi normally focuses and meters with the lens wide open,
stopping down to the selected aperture just as the picture is being taken.)
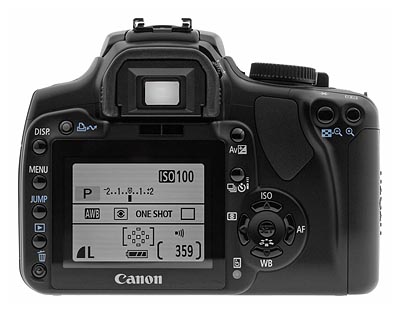
Control Enumeration, Back Panel Controls
![]()
Diopter Adjustment Dial: Located outside the top right corner
of the viewfinder eyepiece, this dial adjusts the optical viewfinder's focus
to accommodate eyeglass wearers, across an unusually wide range of -3 to +1
diopter.

AV/Exposure Compensation Button: Next to the top right corner of the
LCD monitor, this button lets you adjust the exposure compensation from -2 to
+2 EV in one-third or one-half-step increments when pressed while turning the
Main dial (whether it uses 1/2 or 1/3 is set in Custom Function 06). In Manual
exposure mode, pressing this button and turning the Main dial adjusts the aperture
setting.

Drive Mode Button: Just below the AV/Exposure Compensation button, this button brings up the options, and you must use either the Main Dial or the left and right arrows to adjust. Options are Single Shooting, Continuous Shooting, and Self-Timer drive modes.

AE / FE / Index/ Reduce Button: In the top right corner of the rear panel, marked with an asterisk, this button locks the exposure until the Shutter button is pressed. (You can customize the locking operation of this button through the Custom Functions menu.) When pressed while the flash is activated, this button locks the flash exposure, signaling the camera to fire a small pre-flash to measure the exposure before locking it. (This decoupling of exposure lock from autofocusing is a very useful "pro" feature seldom seen on lower-end cameras.)
In Playback mode, this button calls up a nine-image index display of the captured images on the memory card. If a captured image has been enlarged, this button "zooms" back out from the enlarged view.
![]()
Focus Area Selector/Magnify Button: Just beside the AE / FE button,
this button allows you to choose the focus area manually or automatically in
Program AE, Shutter-Priority AE, Aperture-Priority AE, or Manual Exposure modes.
Pressing the button and rotating the Main dial cycles through an automatic setting,
or your choice of nine manually-selected focus areas. The automatic setting
selects the active focus point(s) based on the position of the subject within
the frame, and its proximity to the nine focusing points (shown as nine small
boxes arranged in a diamond pattern in the viewfinder).
In Playback mode, pressing this button magnifies the captured image from 1.5 to 10x.
![]()
Direct Print Button: Just above the top left corner of the LCD display, this button accesses the camera's Direct Print feature, for printing images directly from the memory card when the camera is connected to a compatible printer. (The Direct Print menu only appears when connected to a PictBridge-compatible printer. When connected to a Canon printer, the print options are considerably expanded.)
![]()
Display Button: The first button in a series lining the left
side of the LCD monitor, this button controls the information display on the
LCD monitor in shooting mode, turning it on or off.
In Playback mode, this button cycles through the available display modes from the image only, to limited information, to a thumbnail display with full exposure information, histogram, and blinking highlights.

Menu Button: Below the Display button, this button accesses the XTi's
LCD-based operating menu in all modes. Pressing the Menu button a second time
cancels the menu display. (This button also backs out of menu changes.)
![]()
Jump Button: Directly below the Menu button, this button allows you to jump 10 or 100 frames forward or backward, or by shot date, when viewing images in Playback mode. Once pressed, a jump bar appears in the LCD screen, and jumping is controlled by pressing the right or left arrow keys. You can select the jump length (10, 100, or date) by using the up/down buttons. The Jump button is active only in Playback mode.
![]()
Play Button: Next in line beneath the Jump button, this button
puts the camera into Playback mode, regardless of the Mode dial setting. (Pressing
the right and left arrow keys in this mode scrolls through captured images.)
Playback mode can be canceled by hitting the Play button again, or by touching
the Shutter button. (The Rebel XTi is a "shooting priority" camera.
It's always ready to shoot a picture, regardless of its current mode. Simply
pressing the Shutter button returns it immediately to capture mode.)
![]()
Erase Button: The final button in the series lining the left
side of the LCD monitor, this button accesses the Erase menu, which allows you
to erase the current image or all images on the card (except for protected ones).
There is also an option to cancel. The Erase function works in Playback mode
and Quick Review mode only.

Cross Keys (Four-Way Arrow Pad): To the right of the LCD monitor on the camera's
back panel, this four-button keypad features arrows in each main direction.
As the camera's main navigational tool, the keypad selects various camera settings
and menu options while in an LCD menu screen.
In Record mode, the up arrow key brings up the ISO menu item, which can be adjusted by either turning the Main dial or using the up and down arrows. The down arrow key opens the white balance menu item, which is adjusted in the same way. In similar fashion, the right arrow controls the AF mode, while the left arrow adjusts the metering mode.
In Playback mode, the right and left arrow keys scroll through captured images on the memory card. If an image has been enlarged, all four arrow keys pan the view of the enlarged image.
Set Button (see image above): Located in the center of the Four-Way Arrow pad, this button confirms menu selections and camera settings when using the LCD menu system. When pressed on its own, outside of a menu option or control option, the Set button displays the Picture Style menu, with choices for Standard, Portrait, Landscape, Neutral, Faithful, Monochrome, or three User Defined settings.
 Fujifilm GFX 50S Review
 Fujifilm X-T3 Review
 Olympus E-M5 III Review

Follow Imaging Resource