|
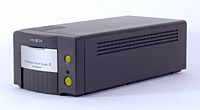
Minolta Dimage Dual III Film & Slide Scanner (Review first posted 10/29/2002) |
 |
 |
|
Excellent dynamic range, thanks to 16-bit A/D |
|
|
Scans 35mm and APS formats (APS with optional adapter) |
|
|
|
2820 dpi maximum resolution | |
|
|
8- or 16-bit scanning modes | |
|
|
Software-based "Dust Brush" and "Pixel Polish" for removing dust and auto-improving color & tone | |
|
|
Multi-sample scanning up to 8x for noise reduction in deep shadow areas. |
Overview
Minolta is a company with long experience in the world of film, and extensive digital expertise previously applied in the areas of office electronics and imaging (copiers & printers). While they got something of a slow start into digital photography, in the last year or so (beginning in early 2001), they've made major strides, achieving leadership with their high-end five-megapixel Dimage 7 prosumer camera and its offspring. In the scanner market, they've consistently produced models with good performance and value for the dollar.
With the introduction of their new Dimage Scan Dual III, Minolta has significantly raised the bar in "low-end" scanner performance. - I placed quotes around "low-end" though, because while the Dimage Scan Dual III (DSD-III for short) carries a low-end price tag, its performance is anything but. Carrying an introductory list price of $449 at its introduction, Minolta said that they expected it to sell in stores for well under $400. Considering its specifications and performance, this is a remarkable achievement, as it dramatically outstrips the capabilities of any competing scanners currently marketed anywhere near that price point.
Specifications for the DSD-III are quite similar to those of the higher-end Dimage Scan Elite II model introduced in early 2002, with 16-bit A/D conversion, optional multi-sample scanning, and a resolution of 2820 dpi. Perhaps the biggest difference between the two models is that the DSD-III lacks the advanced Digital ICE, ROC, and GEM features (technology licensed from Applied Science Fiction, providing dust/scratch removal, color recovery, and grain management) of the Elite II, replacing them with Minolta-developed software algorithms. While I found Minolta's Dust Brush software feature somewhat less effective than Digital ICE in eliminating dust and emulsion defects, the overall package is really an astonishing bargain for a fast, capable film scanner.
The Minolta Dimage Elite II film scanner competes in the midrange of the 35mm scanner market in terms of price, but has some impressive specifications, including 16 bit A/D conversion, and advanced features like Digital ICE, ROC, and GEM, and multi-sample scanning for noise reduction. With a current (April, 2002) street price of just under $700, the Dimage Scan Elite II offers unprecedented scanning capability and performance at a very attractive price.
High Points
- Supports both 35mm and APS film formats. (APS adapter is an optional accessory)
- 8- or 16-bit digitization.
- 2,820 dpi maximum resolution.
- One-pass scanning with trilinear RGB CCD sensor.
- User interface accommodates both beginners and experienced users.
- Three-wavelength, cold cathode fluorescent light source.
- Auto Dust Brush and Pixel Polish image processing for dust removal and color/tone enhancement.
- Up to 8x multi-sample scanning.
- Super-trivial "Easy Scan" software utility makes scanning easy for novices.
The Basics

I reviewed the original Dimage Scan Dual over three years go (August, 1999), but didn't go back to take a look at the intervening Dimage Scan Dual II model. The Dimage Scan Dual III is thus a rather dramatic upgrade from the last member of that lineage I looked at. In terms of features, the DSD-III is actually a much closer match to the recent Dimage Scan Elite II, a high-end desktop film scanner that I reviewed back in April 2002. Relative to the Dimage Scan Elite II, the DSD-III drops the former's dual USB/FireWire interface in favor of a fast USB 2.0 connection. It retains the DSE-II's 16-bit A/D converter, but exchanges Minolta's own software-based dust removal and color/tone correction technology from the Digital ICE, ROC, and GEM licensed from Applied Science Fiction for use in the DSE-II and other higher-end Minolta Scanners.
The Dual III is almost exactly the same size as the Elite II, though with a charcoal colored case. Dimensions are 5.7 x 3.9 x 12.6 inches (145 x 100 x 320 millimeters), and the unit weighs in at 3.3 pounds (1.5 kilograms). The standard unit ships equipped to scan 35mm film, and an optional adapter allows scanning of APS film.
The software CD shipped with the unit supports both Mac and Windows platforms, with standalone scanning applications for both, as well as a Photoshop acquire plug-in for the Mac, and TWAIN drivers for the PC. Mac OS versions 8.6 through OS X. On the PC platform, most recent Windows versions are supported, including 98, 98SE, 2000 Professional, Me, and XP.
Scanning resolution can be as high as 2,820 dpi, with an RGB trilinear CCD element that slides across the film in one pass. This produces maximum image sizes of 2,688 x 4,032 pixels for 35mm, or 1,920 x 3,328 pixels for APS.
Another important scanning parameter is "bit depth," a measure of both color accuracy and the maximum density range the scanner can recognize. The Dimage Scan Dual III is built around a 16 bit A/D, an exceptional spec in and of itself, although its absolute density performance is about equivalent to the best14-bit scanners I've tested in the past. (That is, very similar to that of the Dimage Scan Elite II.) Still, the level of shadow detail the DSD-III manages to extract from very dense slides and negatives is very impressive, particularly for such an inexpensive unit.
(Some of)The Details
The Dimage Scan Dual III is a very capable scanner, and scores big in the ease-of-use department. Since the scanner can handle both 35mm and APS film formats, it should appeal to a wide range of experience levels and anyone interested in digitally archiving film. I'll cover its features in detail further on, but thought it worth calling attention to a few of the Dimage Scan Dual III's key features at the top of the review. Overall, there's no question that it sets a high standard for scanners in this market segment. Here are a few of the key points:
2,820 dpi Resolution
The Dimage Scan Dual III has a very high scanning resolution, meaning you can see a lot of detail in its scans. Though several higher-end scanners (including Minolta's own Dimage Scan Multi Pro) offer scanning resolutions as high as 4,800 dpi, the Dimage Scan Dual III's 2,820-dpi resolution is excellent for 35mm film, offering the ability to create very high quality digital prints.
| Minolta's "Auto Dust Brush" dust-removal software | ||
| No Dust Brush | "Low" retouch setting | "High" retouch setting |
 |
 |
 |
| This is the original of a rather dusty 35mm slide. | The same slide, with Auto Dust Brush applied, but the "Retouch" setting adjusted to "Low." The effect is very subtle, with only a few of the dust specks gone. | Here's what I got with Dust Brush when I set the Retouch option to "High," for heavier Dust Brush processing. There's still some dirt there, but most of it has been removed, and what's left is much less apparent. |
Auto Dust Brush and Pixel Polish
New to the Dimage Scan Dual III are Minolta's Auto Dust Brush and Pixel Polish utilities, intended to replace the Digital ICE, ROC, and GEM we've seen on previous Dimage scanners. While Auto Dust Brush and Pixel Polish don't perfectly replace the Digital ICE technology, they do serve their purpose. Auto Dust Brush diminishes the effect of dust particles on the film's surface that refuse to be removed by cleaning cloths and brushes. In my testing, I found that it worked fairly well for removing dust specks from both negatives and slides, but had virtually no effect on scratches in the emulsion. (Digital ICE works very well for both dust and emulsion defects.) Scanning time does increase slightly when you use the Auto Dust Brush, and the tool is most effective on higher resolution scans. I was slightly surprised to find that the Auto Dust Brush setting applies to all frames being scanned in a given film holder. - I rather expected to be able to turn it on or off for individual frames.
Pixel Polish is Minolta's automatic color and tone correction tool, and like Auto Dust Brush is applied to all frames in the holder. Under the Auto option, the Dimage software automatically assesses the image and makes whatever corrections it deems necessary. On the other hand, a Custom option lets you choose from preset themes, such as "Underexposed," "Low Contrast," "Backlit," etc., to fix specific exposure problems. In my testing, Pixel Polish seemed to work very well with images that had a pure white somewhere within the frame that the scanner could use as a reference point. If there wasn't any such reference available, it tended to produce inaccurate results.
16 Bit/8x Multi-Sample Scanning
As I mentioned earlier, the Dimage Scan Dual III has a 16-bit A/D converter (digitizer). Theoretically, more bits of A/D translate into better dynamic range, although in practice dynamic range is often more limited by the analog circuitry and other parts of the signal processing chain. Still, all other factors being equal, I'd pick a 16-bit scanner over a 12-bit one any day of the week. When you have a high-resolution A/D though, one thing you can do to overcome image noise arising from the analog circuitry is to sample each pixel of the image multiple times and average the result. If you do things right, the noise level decreases in proportion to the square root of the number of samples you're averaging across. (That is, the noise should drop in half when you average four samples together, or by three quarters when you average 16 samples.) In real life, this approach works with varying degrees of success. The Dimage Scan Elite II has the same multi-sample averaging capability (although the DSE-II permits up to 16 samples to be averaged together, while the DSD-III has a maximum of 8 samples), and it works fairly well. You only really need it for extremely dense pieces of film (a good thing too, because it drastically slows the scanning process), but it does indeed make a difference for those "impossible" slides.
Scanner Optics & Light Path
Film scanners tend to take one of two approaches in their optical design, providing either fixed- or adjustable-focus internal lenses. The Dimage Scan Dual III, goes the adjustable-focus route, offering both automatic and manual focusing options. In its default operating mode, the scanner autofocuses before each scan, increasing the scan time, but insuring that the resulting images are sharp. (You can turn this function off in the Preferences menu, but leaving it on isn't too painful. - The scanner is pretty intelligent about when it chooses to focus, generally doing so only once each time the film holder changes position.) In my tests, I found that the manual focusing option (with its excellent and fast focus-feedback indicator) could routinely produce slightly sharper focus than the automatic system.
Normally, the scanner's autofocus system looks at the center of the frame to perform its focus adjustments. On the Dimage Scan Dual III, you can specify an exact point on the film you want it to adjust for, or the part of the film you want to base the manual adjustment on. These are very useful features, in that I've sometimes seen scanner autofocus systems outfoxed by low-contrast, or poorly-focused originals. In the case of severely curled film, you may opt for sharp focus in one part of the frame, at the cost of poorer focus elsewhere. The Dimage Scan Elite II accommodates such situations with the aforementioned option of specifying the point of focus.
 Optimum focus can be quite time-consuming to determine on a film scanner, particularly if you have to perform a full scan in between adjustments to evaluate the results of your tweaking. The DSD-III uses a "live feedback" system that I found to work quite well, at least when given a nice contrasty chunk of image to work with. When using manual focus, a black and white "thermometer bar" graphic appears in the focus window. The black bar shows a measure of how good the focus currently is, while the white bar shows the highest level that's been reached since you opened the window. This makes it very easy to adjust the focus back and forth until you find the optimum point. (With no tedious rescanning in between, a really excellent feature.) With other Minolta scanners using this interface, I've sometimes seen the focus indicator jump around quite a bit from click to click on the adjustment slider, but focus on the Elite II appeared to be pretty well-behaved. This focus-feedback system is a nice implementation I wish more scanner manufacturers would adopt!
I did have one quibble with Minolta's autofocus implementation on the DSD-III: When the "auto focus before scan" option is checked, the scanner does an autofocus operation before every frame of index scans too. I really don't think this is necessary, since the only function of an index scan is to let you know which photo is loaded into each slot of the film holder. Given the very low resolution of the index scans, there's really no need for focusing on each frame, and the time this takes is appreciable.
In common with other Minolta scanners I've tested, the DSD-III uses a special fluorescent light source, producing strong spectral peaks in the red, green, and blue portions of the spectrum. I've found that this diffuse illumination source produces somewhat "softer" scans than some other scanners. The resulting scans have less of a razors-edge on fine detail, but are also much more forgiving of film defects and film grain. A good analogy (for those old darkroom aficionados out there) would be the difference between condenser and diffusion enlargers. Condenser optics tend to produce more contrasty images, but at the cost of greatly enhanced film grain, while diffusion enlargers create a softer look. Interestingly though, just as with the Dimage Scan Elite II, I didn't feel that the DSD-III shared the slight softness of earlier Minolta scanners I've tested, as detail and film grain seemed quite sharply resolved across the scanning area. (Look at my test scans for yourself when I post them in a few days, and compare them to the results I obtained from other scanners you might be considering buying. This is a somewhat subjective evaluation. To my eye though, it seemed that the DSD-III produced noticeably sharper results than the original Dimage Scan Dual or Elite.)
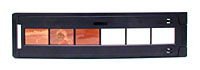
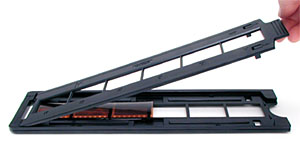
Film HandlingThe Dimage Scan Dual III appears to use the same structural plastic slide- and filmstrip-holders to position the film within the scanner throat as did the Elite II. You first place the media to be scanned into a holder, then insert the holder into the scanner. When you insert a holder into the scanner, it slides easily until it reaches a click-detent. Once it's been inserted to the detent, the transport mechanism pulls it into the scanner body, and moves it back and forth into position so that the CCD can scan each frame. During scanning, the film moves slowly past the trilinear CCD. (As opposed to the CCD moving while the film remains stationary.)
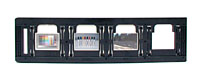
The filmstrip holder can accommodate strips of 35mm film up to six frames in length, and the slide holder up to four slides. An optional APS adapter is sold separately.
I found both holders (slide and 35mm film) to be very effective and easy to use, with a variety of small design tweaks that made them easier to work with.
The 35mm film strip adapter is made up of two pieces, a bottom film tray and a top pressure plate. You simply lift up the top pressure plate, position the film in the bottom tray (lining up frames with their indicated slots), and replace the top plate. The top pressure plate hooks into the bottom tray, then closes back down and latches, clamping the film flat.
This arrangement did a pretty good job of handling curled or damaged film, but film curled along its length was tricky to deal with because it would curl up quite high above the "tray" provided for it to lie in, while I was attempting to lower and fasten the lid. (The Dimage Scan Multi Pro's 35mm film holder had little lips to catch one edge of the film, which largely eliminated this problem. - The DSD-III's holder would have benefitted from the same design.) Two raised bumps just past the edge of the first frame slot stop the film from sliding, and make it easier to line up each frame with its slot.
Also constructed of heavy plastic, the slide holder features a single-unit design, similar to the holder used on the original Dimage Scan Elite. One edge of the holder has four open slots, where you can slip in individual slides. Two sets of pressure bars on either side of each slot hold the slide in place, automatically adjusting for a variety of slide mount thicknesses. The only problem came in trying to remove the slides, as it was a little difficult to slide them out without accidentally touching the image frame. Still, I like the single-unit holder (as opposed to a clamshell design), as it greatly simplifies the slide-loading process.
System Interface and Included Software
The Dimage Scan Dual III uses a USB 2.0 connection to the host computer, providing the high speed data transfer necessary to handle the large amounts of data the scanner can generate. (The USB 2.0 interface is backward-compatible with the USB 1.1 connections found on most current computers, but allows much higher data transfer rates when connected to a computer supporting the 2.0 standard.) Once connected to the computer, the DSD-III is controlled through either of two excellent software programs that I'll describe in greater detail below. As noted earlier, the scanner-control software takes the form of standalone applications on both the Mac and PC, as well as a Photoshop plug-in on the Mac, and a TWAIN component on the PC. A particular strength of the Dimage software is the extent to which it provides powerful controls for experienced users, while at the same time offering a simple interface for novices.
Performance
The Dimage Scan Dual III was surprisingly responsive for an inexpensive scanner, and in fact significantly outperformed the Dimage Scan Elite II in most areas. As of this writing, I've only worked with it on a PC, connected to the system via the USB cable, but I'll try to come back later to gather some data with it connected to a Macintosh machine. (Unfortunately, all my current computers support only the USB 1.1 standard, so it's possible that my numbers may not reflect the scanner's ultimate capability when connected via a USB 2.0-compliant interface.) Also, the DSD-III software spends a little time after the scanner is finished to process the images. The PC I used to test the scanner was my venerable old 350-MHz Pentium II machine, so you could expect greatly reduced processing times on more recent, faster computers. In some of the timings below, I've showed the scanning and processing time separately, so you can get an idea of how much speedup you might expect with a more capable computer.
One thing that speeds up the DSD-III's operation is that tonal and color adjustments are faithfully reflected onscreen in the prescan image, greatly reducing the number of prescans you need to do before undertaking the full-res scan itself. (Although I did find noticeable differences between the scanning application's display and how the images ultimately looked in Photoshop.) This speeds workflow quite a bit. The scanner is also fairly intelligent about when it needs to do perform an autofocus operation. It autofocuses for the first prescan of any frame, but after that will generally not refocus for subsequent prescans of the same frame. (For instance, if you're wanting to double-check a particularly severe tonal or color correction.) As for the scans themselves, the DSD-III is quite fast, and doesn't seem to spend quite as much time getting itself sorted out before each scan as many other devices I've tested.
So how does it do? Here's a table with timings from some of the scans I did.
| Scan Operation/Condition (35mm film) |
(USB) |
| Index scan, 6 frames, "Speed" preference Index scan, 6 frames, "Quality" preference |
61s 84s |
| First Prescan (does autofocus), Negative/Slide |
56s / 41s |
| Subsequent Prescans (no autofocus), Negative/Slide | 11s / 7s |
| 1,410 dpi scan (2,016 x 1,344) no AF, slide, scan/processing done. Same, color negative, time till processing done |
17s / 24s 28s |
| 1,410 dpi scan (2,016 x 1,344) no AF, slide, scan/processing done. Same, color negative, time till processing done |
51s / 57s 76s |
| 1,410 dpi scan (2,016 x 1,344), slide, with Auto Dust Brush (Times are for scan/processing done, total increases to 41 seconds with Pixel Polish enabled) |
17s / 35s |
| 2,820 dpi scan (4,032 x 2,688) no AF, slide, scan/processing done. Same, color negative, scan/processing done |
43s / 60s 44s / 63s |
| 2,820 dpi scan, 16-bit, 8x multi-sampling (Slide film) | 14m 19s |
I found the DSD-III to be slightly faster when scanning slides (color positives) than color negatives, although the differential wasn't nearly as great as I observed with the DSE-II. All scanning times were very fast, in the upper echelon of performance among scanners I've tested, regardless of price.
User Interface
This is now the fifth or sixth Minolta scanner I've reviewed, and I've liked Minolta's software from the start. The latest version is very similar to the last one, with the same streamlined user interface (though with a few updates for auto scanning and the Auto Dust brush tool). While I'd like a little more control in some areas, the software overall strikes an excellent balance between power and ease of use, and is one of my favorite scanning packages. The big news with the DSD-III though, is the addition of Minolta's new Easy Scan Utility.
Easy Scan Utility
Included as a separate, standalone application, the Easy Scan utility runs almost
like a typical "Wizard" application on a PC, guiding you step-by-step
through the scanning process. A set of directions instruct you to load the film,
choose the film type, select an image, make any automatic adjustments, pick
a usage (which determines the scan resolution), and finally, scan the image.
The utility is perfect when you have a batch of negatives or slides that require
little or no adjustment, as it greatly speeds up the scanning process. It's
also ideal for novices confused by the myriad options advanced scanning applications
offer for resolution and image adjustment. You'll still want to use the full
version of the software when you need maximum control over the scanning parameters,
but for many novice users, the Easy Scan utility is all they'll ever need. Here's
what the Easy Scan utility's user interface looks like:
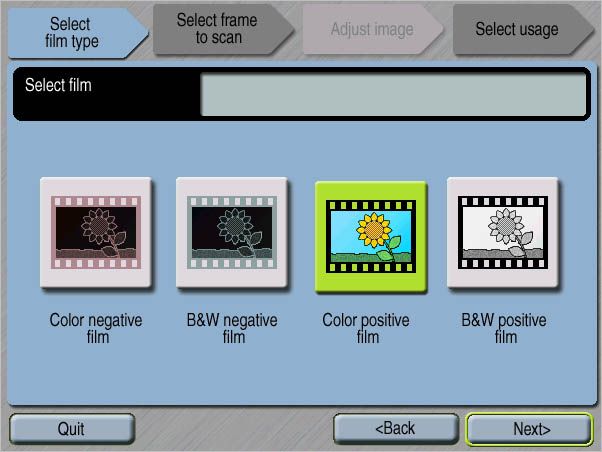
The first step in Easy Scan is to select your film type. Pretty self-explanatory...
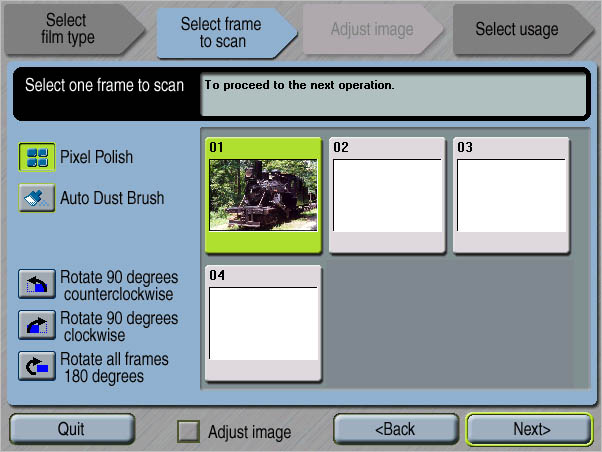
With the film type selected, the scanner will automatically generate an index scan, showing you all the available frames currently loaded into the film holder. (Here, I have just a single slide loaded into the 4-position slide holder.) You can rotate images as needed to get them facing right-side up, by clicking on the Rotate buttons at lower left. The buttons at upper left turn on the "Pixel Polish" automatic color/exposure adjustment feature, and the Auto Dust Brush dust-remover.
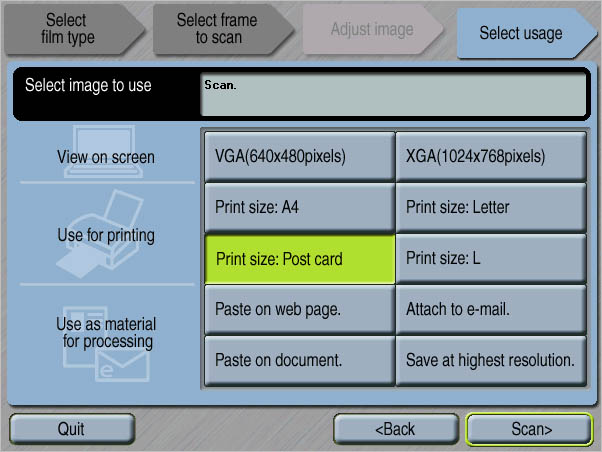
The last step is to choose the scan resolution, by telling the scanner what you want to use the image for. While it doesn't show in this screen shot, mousing over each of the buttons tells you what the pixel dimensions of the resulting scan will be.
That's it! When you click "Scan," the DSD-III will start up, scan your image, and prompt you for a file name and location to save it to. It literally couldn't be any easier than this, and the Pixel Polish option will at least get you in the ballpark of correct exposure and color settings for most images.
Dimage Scan Utility
When you need more control over the scanning parameters than that afforded by
the Easy Scan utility, the normal Dimage Scan utility can be used standalone,
or as a plug-in to Adobe Photoshop and Elements. (The scanner comes with a copy
of Adobe's excellent Elements image-manipulation program.) In either case, launching
the software displays the main screen, where all scanning actions take place.
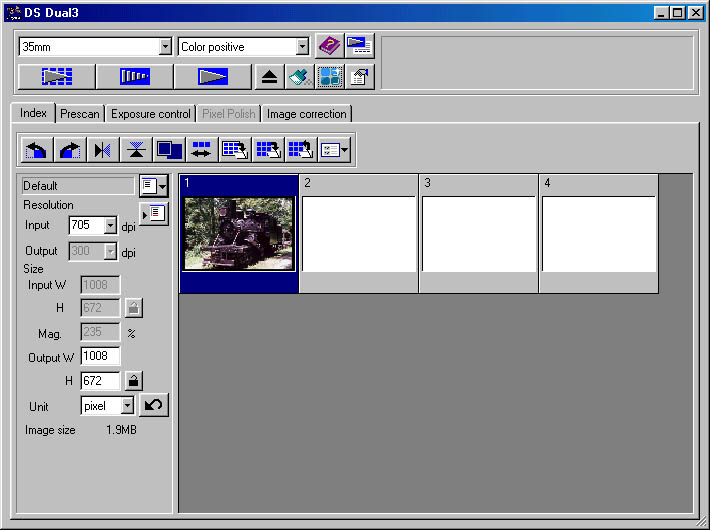
The main screen is divided into sections. Along the top of the screen are several control buttons and pulldown menus, while the bottom of the screen is divided into a preview area and utility window. A series of tabs above the preview area and utility window provide access to controls for different stages of the scanning process, and include Index, Prescan, Exposure Control, Pixel Polish, and Image Correction headings.
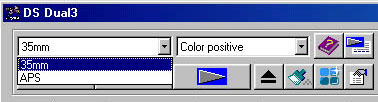
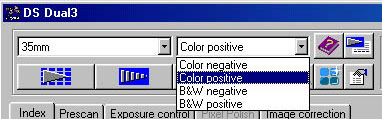
The top two pulldown menus set the film type and size, the first step in the scanning process. Two buttons are directly to the right of the Film Type pulldown menu. The first takes you to the help system, while the second take you to a series "Wizard" setup screens. The Wizard screens would require more space to display here than I want to take here, but they basically let you set up essentially every parameter available on the other screens shown below, and assign them to user-defined scan setups. You can then apply these setups arbitrarily to individual frames in the current film holder (the interface allows for up to 36 frames, to accommodate the optional APS adapter), and then batch-scan all the photos. Overall, a very slick interface for automating the scanning of batches of film.
Below this row of menus and buttons, a row of icon buttons provides access
to several scanner functions. These buttons appear as shown below:
![]()
- Index Prescan: Creates a thumbnail prescan of all images in the film adapter.
- Prescan: Prescans the selected thumbnail image, creating a larger preview display in the preview area.
- Scan: Performs the actual scan.
- Film Eject: Ejects the film adapter.
- Auto Dust Brush: Activates the "Auto Dust Brush" function, which removes dust specks from your scanned images. (Set the degree of dust-removal processing via the "Retouching Level" setting in the Preferences panel.)
- Pixel Polish: Activates the "Pixel Polish" software, to automatically correct the color and tone of your scans. Various options for this feature can be set via the Pixel Polish panel of the main control screen..
- Preferences: Takes you to a preferences screen, where you can adjust
a number of settings for both the scanner and the scanning software. (See
below for a full description of options available here.)
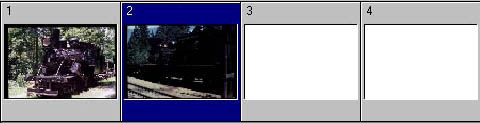
Index Tab
The Index tab lets you view thumbnail prescans of each individual image in the
35mm (or optional APS) film adapters. Pressing the Index Prescan button initiates
a rapid, very low-res prescan, after which each thumbnail is displayed in order
on the screen. You can select an individual image for scanning by clicking on
it, which highlights the frame with a black border. Below the index tabs is
a row of buttons which perform the following functions (from left to right):
![]()
- Rotate Left: Rotates the selected image 90 degrees counterclockwise.
- Rotate Right: Rotates the selected image 90 degrees clockwise.
- Flip Horizontal: Flips the image on a horizontal axis.
- Flip Vertical: Flips the image on a vertical axis.
- Fit to Window: Automatically sizes thumbnails to the utility window size.
- Reverse Frame Order: Reverses the order of the frames in the display.
- Save Index Image: Saves the index display as an image file.
- Save Index File: Saves the index as an index file.
- Load Index File: Loads a previously saved index.
Load Image Correction Job: Loads any previously saved image correction
settings files, and applies corrections to the selected image.
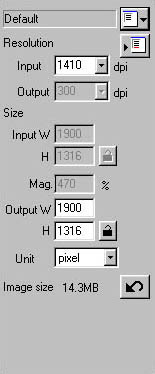 On
the left side of the Index tab is a window of image information. Here, you can
set the image resolution, import a settings file from another scan, and set
the output size. An Undo button in the bottom right corner removes the most
recent change.
On
the left side of the Index tab is a window of image information. Here, you can
set the image resolution, import a settings file from another scan, and set
the output size. An Undo button in the bottom right corner removes the most
recent change.
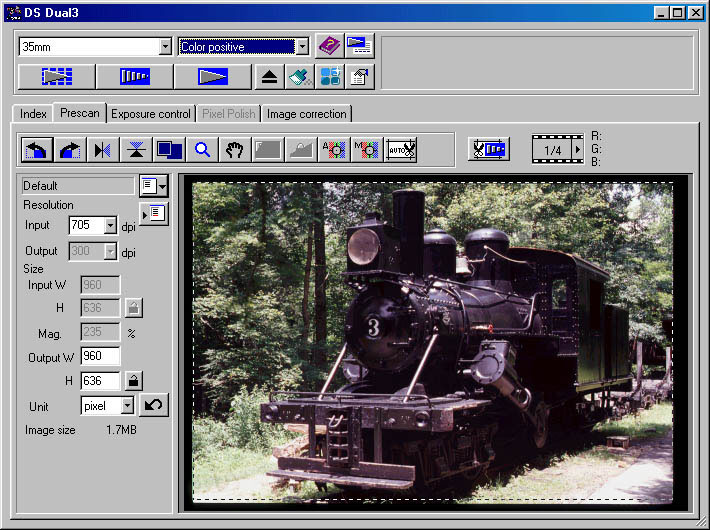
Prescan Tab
Clicking on the Prescan button activates the scanner to create a larger prescan preview of the selected image, and automatically opens the Prescan window. The larger preview image is then displayed in the preview window. The right window of the tab holds the same image resolution and size options, though the buttons that line top of the window change. From left to right, their functions are as follows:
- Rotate Left: Rotates the selected image 90 degrees counterclockwise.
- Rotate Right: Rotates the selected image 90 degrees clockwise.
- Flip Horizontal: Flips the image on a horizontal axis.
- Flip Vertical: Flips the image on a vertical axis.
- Fit to Window: Displays a larger preview image
- Zoom: Enlarges the cropped area of the preview.
- Grab: Lets you "grab" the portion of the image displayed in the preview window, and move it for viewing other areas.
- AE Area Selection: Changes the area of the image from which the automatic exposure is determined.
- AE Lock: Locks the exposure for the preview image shown, allowing you to scan multiple images in the same film strip with the same exposure. (Handy, can save scanning time.)
- Point AF: Since scanners often have trouble focusing on dense and/or low-contrast negatives and slides, this button lets you select a specific portion of the image for the scanner to readjust the focus from. (For example, you might select a high contrast area of the frame which will be easier for the scanner to judge focus from.)
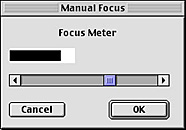
- Manual Focus: Lets you manually adjust the scanner focus. A focus readout window is displayed with a "thermometer bar" display indicating the sharpness of the image in arbitrary units. You adjust the focus until both lines are at their maximum length and are even with each other. (Depending on the subject, this could be tricky or easy - easiest with high-contrast, sharp detail in the image. Overall though, I really like the immediate feedback, and not having to do a full scan to see the results of my focus changes.)
- Auto Cropping: Automatically crops the frame to the edges of the active image area, cropping out any additional black space from the media surrounding the image. (Handy, speeds the workflow.)
- CHP: (APS film only, not shown in the shot above) Crops the image to C, H, or P APS formats.
- Crop Prescan: Performs a new prescan of just the zoomed area of the frame, giving you a larger prescan image to work with.
At the end of this row of buttons is the frame indicator as well as the RGB numerical display, which reports the color value numbers of specific points in the image as you scroll the mouse over the preview.
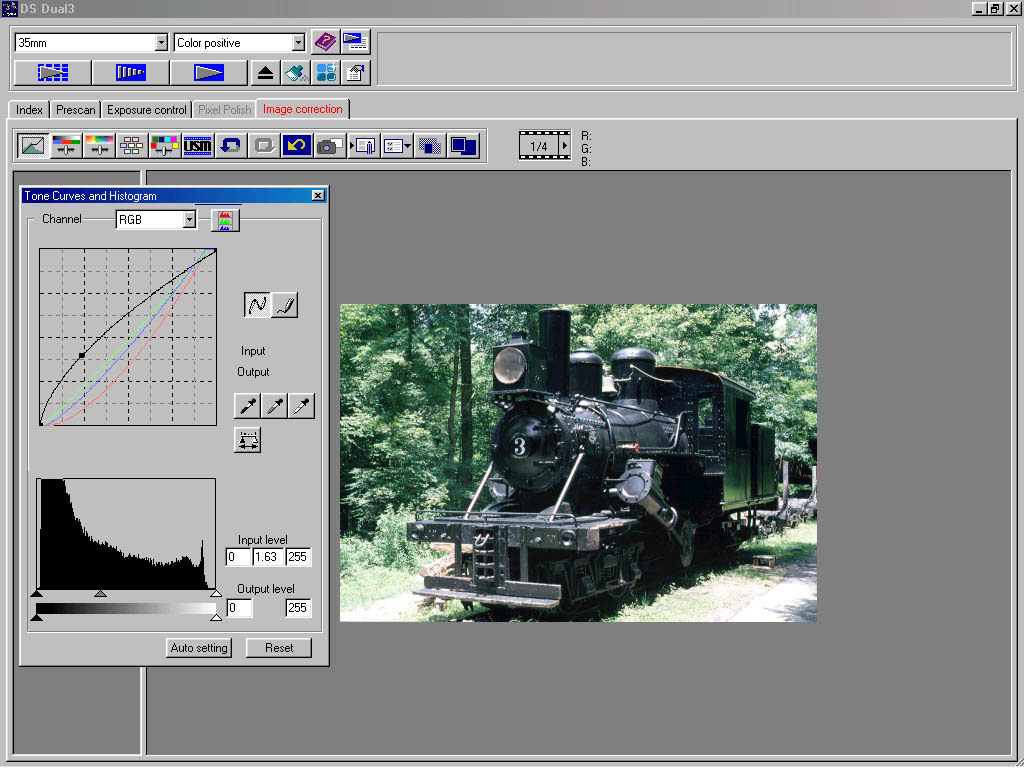
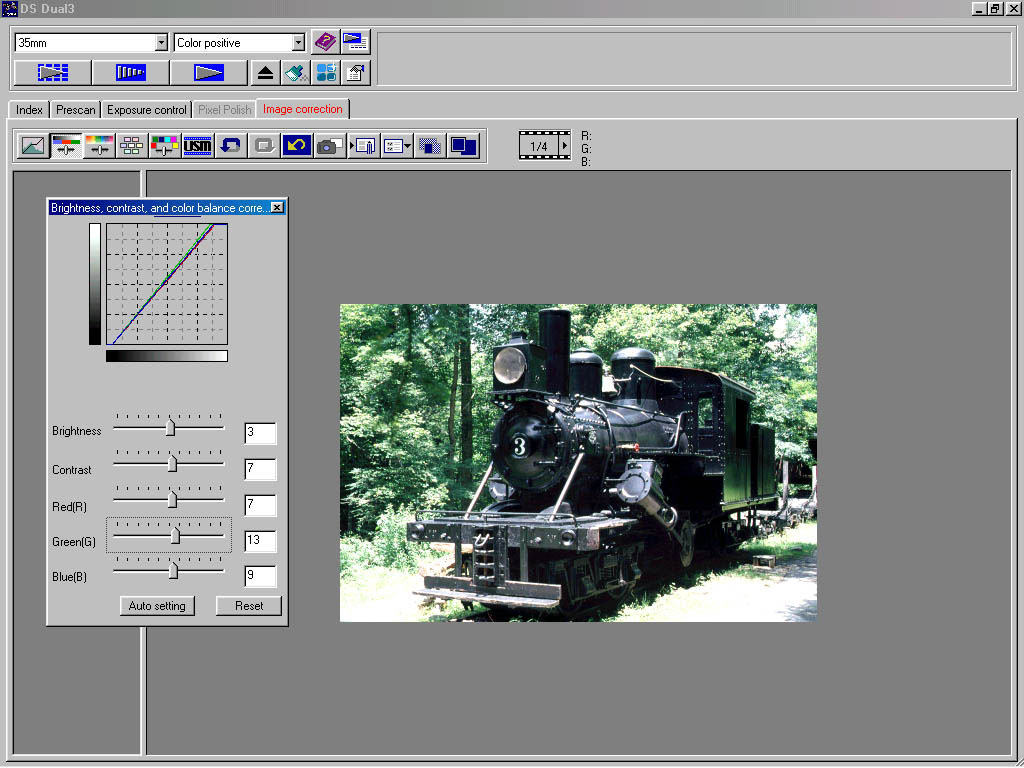
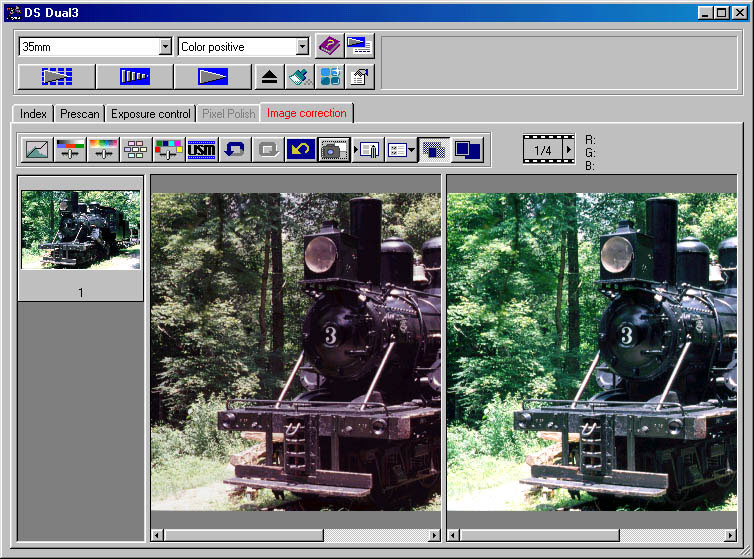
Image Correction Tab
Once you've adjusted the image resolution and size, as well as the orientation
and cropping, clicking on the Image Correction tab lets you perform prescanning
corrections. The buttons across the top of the preview area again change, and
from right to left perform the following functions:
![]()
- Tone Curves / Histogram: Displays the Tone Curves / Histogram window.
- Brightness / Contrast / Color Balance: Displays the Brightness / Contrast / Color adjustment window.
- Hue / Saturation / Lightness: Calls up the Hue / Saturation / Lightness adjustment window.
- Variations: Enables the Variations adjustment window, which displays a handful of variations for each of the available adjustments.
- Selective Color: Activates the Selective Color adjustment window.
- Unsharp Mask: Calls up the Unsharp Mask window.
- Undo: Removes the previous adjustment made.
- Redo: Reapplies the previously undone adjustment.
- Correction Reset: Resets all image corrections to the default settings.
- Snapshot: Creates a thumbnail snapshot of the current preview image and displays it in the snapshot window on the left side of the preview screen.
- Save Image Correction Job: Saves all image correction settings as a "job."
- Load Image Correction Job: Loads a previously saved correction job.
- Pre/Post Correction Comparison Display: Displays a split screen showing the current image correction and the previous image.
- Fit to Window: If the preview image is shown less than full-frame,
this button expands it to fit the full display area.
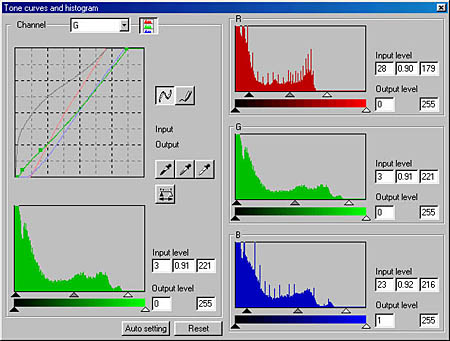
Tone Curves and Histogram
Clicking on the Tone Curves / Histogram button displays the Tone Curves and Histogram window, which provides an easy way to adjust the white and black points of the image, stretching the tonal range as appropriate. You can also use the histogram sliders to control the "gamma" (midtone boost or cut) of all the color channels, either individually or together. This is my favorite way to quickly deal with color casts and poor tonal rendition.
I like the way this control panel combines the tone curve and histogram controls into a single interface, yet keeps them separate so you can see what you're doing. The two graphs are linked so that changes on either graph affect the other one, but you can use both independently. For some tough pieces of film, I found the histogram best for making the gross adjustments, and the curves tool better for fine tweaks in specific tonal ranges. Very slick.
At the top of the window is a pulldown menu which selects which RGB channel is shown, or you can look at the overall RGB (brightness) histogram. To view all four histograms at once, as in the image above, click on the RGB graph icon button just to the right of the pulldown menu, which expands the display. (You'll still need to switch channels for the Tone Curves.) You can adjust the Tone Curves by creating points on the curve and dragging them. You can draw a freehand curve by clicking on the Freehand Curve tool (the pencil button to the right of the Tone Curves graph), which converts the cursor into a pencil draw tool. The Smooth Curves button, on the left side of the pencil button, smoothes out any points on the curve.
Directly below the Tone Curves graph is the Histogram, which plots the tonal distribution of the image, from black point to white point. The input and output values of the image are listed at the bottom right side of the histogram, and a slider bar allows you to adjust the shadow, midtone, and highlight points. Three eyedropper tools let you set black, midtone, and white points by clicking on the eyedropper and then clicking on a specific portion of the image.
At the bottom of the window are the Auto Setting (which tells the software to analyze the histograms and make its best guess as to the proper correction) and Reset buttons.
The Tone Curves and Histogram window "floats" above the preview area, meaning you can move it anywhere on the screen. Thus, you can immediately see the changes as you apply them. The shot above shows an applied histogram correction and a tone curve move.
Brightness, Contrast, and Color Balance Correction
As with the Tone Curves and Histogram display, clicking on the Brightness /
Contrast / Color Balance Correction button displays an adjustment window that
"floats" above the image. The window can be moved anywhere over the
preview image, so you can see the effects of any changes made.
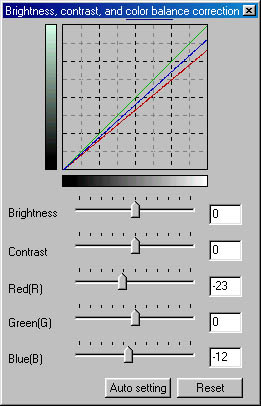
A curve at the top of the Brightness/Contrast window shows the changes made. Below the curve are adjustment sliders for Brightness, Contrast, and Red, Green, and Blue color balance corrections. A text box at the end of each slider bar reports the amount of change numerically, with a minus sign indicating a decrease. You can also type a numeric value into these text boxes. The Auto button at the bottom of the window applies any automatic adjustment, and any change can be undone by pressing the Reset button.
Hue, Saturation, and Lightness Correction
Clicking on the Hue / Saturation / Lightness button displays another adjustment
window, which can likewise be placed anywhere on the preview area.
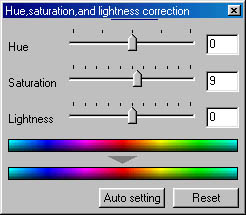
Three slider adjustment bars at the top of the window correct the Hue, Saturation, and Lightness, with the amount of change reported numerically on the right side of each bar. Two color strips below the slider bars report the pre- and post-adjustment color mapping. The Auto and Reset buttons are also at the bottom of the window.
I generally find that overall hue and lightness errors are best corrected with
the histogram/tone curve controls. Often though, making large moves in the tone
curves can adversely affect the color saturation in an image. This control lets
you adjust the saturation without affecting lightness or hue, a useful capability.
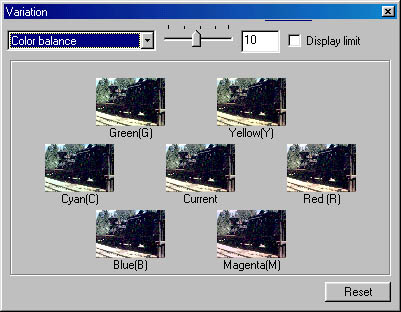
Variations Correction Tool
The Variations button pulls up the Variations correction window. This is perhaps
the most "user friendly" adjustment control, ideal for people who
are novices at image correction. Three separate displays are available, dealing
with color cast, contrast & brightness, and color saturation. In each case,
a number of small thumbnails appear onscreen, with the central image showing
the effect of any currently-selected image adjustments, and the surrounding
thumbnails showing a range of possible adjustments. If you decide you like one
of the surrounding options better than the current selection, you choose that
adjustment by simply clicking on the thumbnail image. It then becomes the central
image, representing the current state of the correction, and you're presented
with a new range of alternative choices. A slider bar next to the pulldown menu
adjusts the amount of difference between each variation. The "Display Limit"
checkbox activates an indicator of the maximum level for each adjustment.
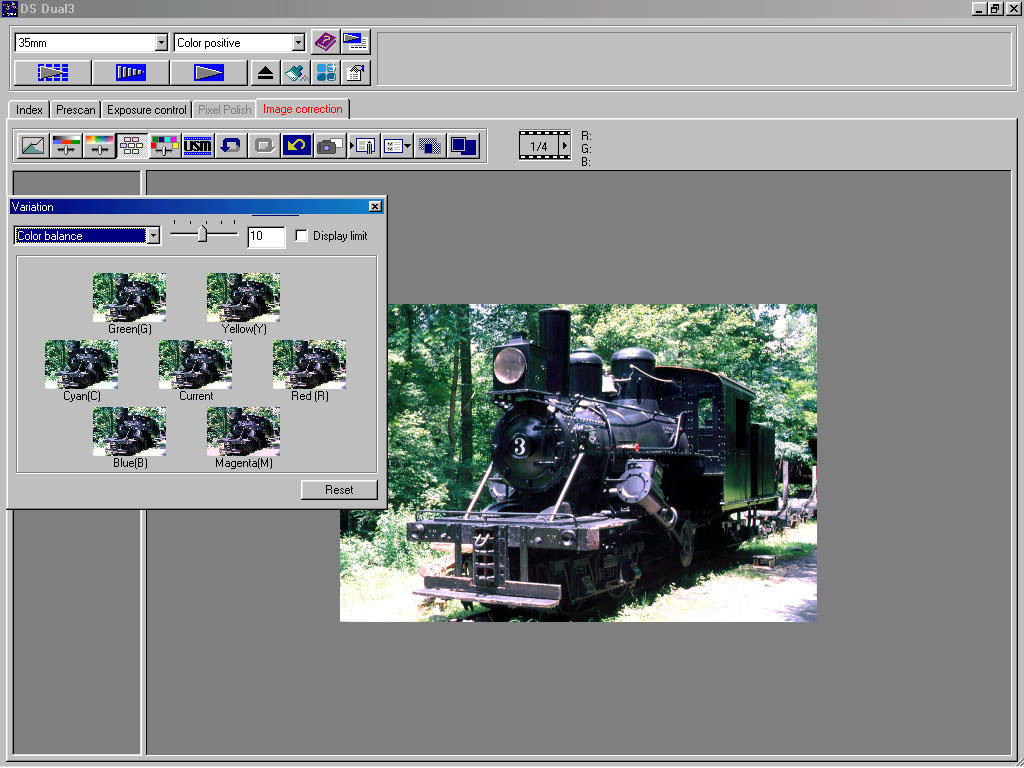
Using this interface, even complete beginners can achieve pleasing results, since most everyone can at least tell whether they like one image more than another. It's still possible to get yourself "lost in the woods" though, since it can be difficult to judge color and tone accurately from small thumbnails like this. Likewise, novices are prone to make the images too contrasty or oversaturated, due to poor color judgement. Nonetheless, this is a very approachable interface that can get you "in the ballpark" quite quickly, with no detailed knowledge of color theory.
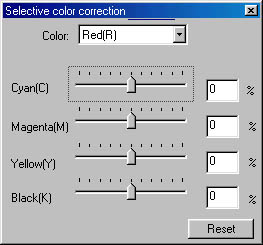
Selective Color Adjustment
This is a very powerful tool, hiding behind a deceptively simple interface. It's also one though, that requires some knowledge of how color works in order to use it successfully. The Selective Color Adjustment tool separates the color region into six groups (Red, Green, Blue, Cyan, Magenta, and Yellow), letting you adjust only the colors in the image that fall within the specified color ranges. As with the other adjustment windows, the control panel can be moved anywhere on the preview screen.
Four slider bars adjust the amount of Cyan, Magenta, Yellow, and Black in each color, with the amount of adjustment reported at the end of the bar. This is the tricky part of this control, in that the adjustments are made in subtractive color space (CMYK), rather than the RGB additive color space most photographers and computer graphics users will be familiar with. The thing to keep in mind is that these colors are inverses of the ones you're familiar with. That is, adding cyan to an image is equivalent to removing red, adding magenta is the same as removing green, and adding yellow is the same as removing blue. Note that adding a subtractive color darkens the image, rather than lightening it as with the additive primary colors.
This tool can be very useful for "cleaning up" colors that the film
and/or scanner reproduced poorly. For instance, this is a great way to brighten
up the weak greens color negative film so often records. As powerful as it is
though, I'd like to see it extended in two ways. First, I'd like the ability
to select specific colors from within the image, so the correction could be
applied to specific hues within the image. (Flesh tones, for example.) Second,
I'd like to see a control that would affect how broadly the effect is applied.
(That is, to a very narrow range of colors around the one selected, or to a
broader range of hues.) Despite my wish-list for the control, it's a very useful
one as it stands, although it will take many users a bit of fiddling to become
familiar with its operation.
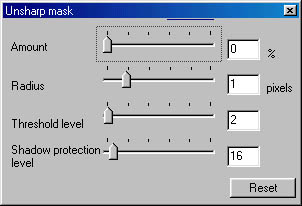
Unsharp Mask Tool
The Dimage Scan Dual III offers an in-depth Unsharp Mask tool, which can be particularly useful for images that will be going directly into printed publications. (If you plan to manipulate the scanned images much on the computer, you're better off leaving the unsharp masking alone until you're done with your retouching.) The structure of the USM controls in the Dimage software is very similar to that of Photoshop. The top slider bar controls the amount of the effect, from zero to 500 percent. The remaining bars control Radius, Threshold Level, and "Dark Part Protection Level." The Radius adjustment controls how large an area the sharpening function is applied to around contrast edges in the image. The Threshold Level control affects how large a contrast difference must be found between adjacent pixels before the sharpening operator will be applied. Finally, the Dark Part Protection Level prevents sharpening from being applied to dark areas of the image. This last is an enhancement beyond the capabilities offered by Photoshop, and is useful for avoiding sharpening noise in shadow areas.
The one thing I'd really like to see added to the Dimage Scan software's
unsharp masking tool is an (optional?) preview window. As it is, short of repeated
trial and error, there's no good way to tell the effect of adjustments you're
making on the final picture. If you do a lot of the same type of scanning (that
is, for the same output medium and reproduction parameters), you could probably
develop a group of settings that could be applied blindly. In my experience
though, USM is such a multivariate function, and frequently so subject-dependent
that a preview option is almost mandatory.
Split-Screen View
Clicking on the Pre/Post Correction Comparison Display button lets you check
the image adjustments made against the original preview image. I've found this
quite beneficial in the past, as it provides a complete perspective on each
change. (I've seen some software packages that only show the changes relative
to the last change you made. This is much less useful in my opinion, I prefer
to see the reference back to the original, as shown here.)
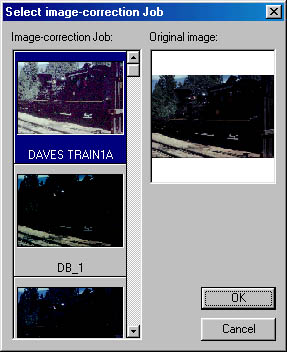
Loading and Saving Correction Jobs
The Minolta Dimage Scan Dual III lets you save image correction settings as a "Job," so that you can apply the same settings to an entire group of images or any other image. Saved job files show up in the far left column of the Correction tab, with a scroll bar so that you can zip through various settings and determine the one you would like to apply.
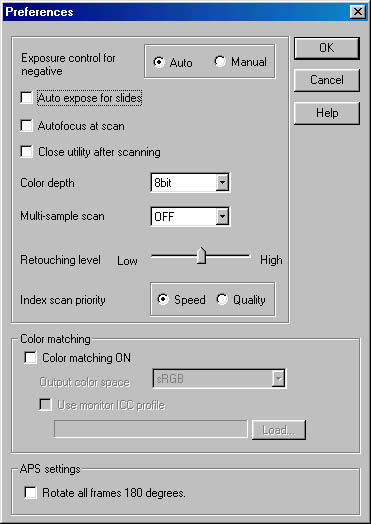
Preferences Menu
Clicking on the Preferences button in the preview window brings up the Preferences window, which lets you set a variety of scanning parameters. The following checkboxes and settings are available:
- Auto Expose for Slides: When activated, this tells the scanner to perform an autoexposure while prescanning color slides. This slows scanning somewhat because the scanner does a prescan to set exposure before the main scan.
- Auto Focus at Scan: Instructs the scanner to perform an autofocus prior to the scan and prescan. As a default, this setting is turned off to reduce scan times. The scanner apparently always focuses prior to the prescan, so a second focusing may not be necessary prior to the scan itself. Note though, that this setting also forces the scanner to focus before each frame of an index scan, which slows index scanning considerably. (I really disagree with this part of Minolta's implementation. Given the extremely low resolution of the index thumbnails, I question whether you'd ever need to worry about prefocusing before scanning them. My strong preference would be to have the "Auto Focus at Scan" setting NOT apply to index scanning.)
- Close Utility After Scanning: Specifies whether the driver software remains active after the final scan.
- Color Depth: Sets the scanning to 8-bit, 16-bit, or 16-bit linear.
- Multi-Sample Scan: Provides the multi-sample scanning option, which reduces image noise by analyzing image information from multiple scan samples. Options are 2, 4, or 8 samples, or Off.
- Retouching Level: Sets the degree of processing applied by the Auto Dust Brush. With the slider set at "Low," very little dust is removed, but image details are left undisturbed. At a setting of "High," much more dust is removed, but tiny details in the images themselves could be lost. (Although in my admittedly limited testing of the Auto Dust Brush, I never noticed any details going missing, even with the control set at "High.")
- Index Scan Priority: Determines the quality of the index prescan. "Speed" reduces the prescan time and compromises quality, while "Quality" emphasizes the prescan quality and thus slows down the prescan time. (I have to admit that I saw very little difference in image quality between the two settings, and the time difference wasn't all that great either. I'd suggest just leaving this control at the "Speed" setting.)
- Color Matching: Activating Color Matching lets you match the output of the scan to a specific device, such as a monitor or printer. You can select a specific color space, such as sRGB or Monitor RGB (several options are available), or specify a monitor ICC profile.
Test Results
I haven't completed my testing of the Dimage Scan Dual III yet, so don't have a full analysis to share with you here. (I wanted to get at least a preliminary review up to coincide with Minolta's US announcement of the product, so elected to post the operating details above, and follow up with all the test images later.) I can say even at this early date though, that the Dimage Scan Dual III's performance and image quality is very impressive, particularly in light of it's very low projected street pricing.
Color and detail in the Dimage Scan Dual III were quite good, as its scans looked almost identical to those of the higher-end Dimage Scan Elite II that Minolta announced earlier this year.(In the Spring of 2002.) As with the Dimage Scan Elite II, I was somewhat surprised by the sharpness of its scans, given that it uses a diffuse, fluorescent light source, which I'd always associated with slightly softer-looking scans. In my tests, the DSD-III delivered about the highest resolution I've yet seen from a scanner in its general resolution category (2700-2800 dpi units). Sharpness was also very good in the corners: In my experience, there's always some falloff of sharpness in scanned images as you move from the center of the frame to the corners. (The scanner after all has to have a lens in it, and lens design is always a juggling act, trying to get the best quality across the entire frame.) The DSD-III showed this corner-softening effect slightly. But that's all it was - slight. Chromatic aberration in the corners of the scans was also very low. The infamous Train slide showed some signs of lens flare, as with most other scanners I've tested but there didn't appear to be any more than with competing models, even those selling for considerably higher prices.
I don't have a quantitative test for maximum "scannable" film density, but the DSD-III did surprisingly well with the ultra-dense "Train" slides. I did see more random image noise than on some scanners with less A/D depth (the DSD-III has a 16-bit A/D in it), but the multi-sample scanning option was very effective in removing this noise. As was also the case with the Dimage Scan Elite II, I found that the multi-sample option didn't remove a background pattern of streaks in the deepest shadow areas, evidently the result of imperfect calibration for the black level of the individual pixel sensors in its CCD array. In fairness to the DSD-III, these only appeared in the face of really extreme tonal adjustments, but they were quite apparent on the original Train slide. (Hardly visible on Train 2 though, which I guess means that that slide is less challenging.) I don't know how much of an issue this streaking would be in any sort of normal usage, particularly given that it didn't appear in Train2, which is probably about as tough a piece of film as any average user would be likely to encounter.
Preview scan accuracy was quite good, and I appreciated the fact that the effects of even fairly major tonal adjustments were pretty faithfully reproduced in the preview window, without necessitating another prescan. - In my experience, this is critical to achieving good scanning throughput. I was less thrilled though, that the view in the prescan window didn't match the final appearance of the images when I opened them in Photoshop. - The scans generally looked a fair bit lighter in Photoshop than they appeared in the prescan window. (Thus far, I've only tested the DSD-III on the PC, under Windows 98: If I have time, I'd like to go back to the Mac, and see how this issue of prescan accuracy plays out there.)
Minolta's Auto Dust Brush was somewhat less effective at removing dust than the Digital ICE technology used on the Dimage Scan Elite II and other, higher-end Minolta scanners. Also, unlike Digital ICE, it had essentially no effect on emulsion scratches. Overall, the Auto Dust Brush feature is useful, and will doubtless save many amateurs countless hours of retouching dust specks from their scans, but for professional use it's no match for Digital ICE.
Likewise, I found the "Pixel Polish" automatic color/tone correction feature to be of only moderate value. It worked quite well if the slide or negative in question had a well-defined white point somewhere in the frame, but lacking that, the results were rather sporadic. Still, for novices, it'll get you in the ballpark more times than not, and the excellent "variations" adjustment tool makes it easy for beginners to get decent-looking scans without having to take a course in color science first.
After working with it a bit, I have to say that I was downright amazed by the image quality and performance that the Dimage Scan Dual III delivers. There's literally nothing currently on the market that can touch it for less than twice the price, and it competes very strongly with scanners selling in the $700-900 range. Do note that this is likely a time-limited evaluation though: Scanner technology continues to advance, so it's impossible to say how it will stack up in the market six months or a year from now. For now though, the DSD-III is a remarkable bargain, bringing high-end scanner performance within the reach of even novice users. For advanced users, about the only significant limitation relative to the more costly Dimage Scan Elite II is the lack of Digital ICE. If you need to do production scanning in a professional environment, the labor saved by Digital ICE would make the Dimage Scan Elite well worth the incremental price difference. For home users with relatively clean film though, the Dimage Scan Dual III is a hands-down winner.
Conclusion
A final conclusion will have to await a complete analysis of my test scans, but the early results are very promising. Minolta's film scanner line is overall marked by good user interface design (IMHO), strong specs, and excellent optics, at generally competitive prices. The Dimage Scan Dual III represents a dramatic leap in the price/performance equation though, really setting a new benchmark for high performance in a low cost film scanner. If you've been holding off on that massive project to digitize all your family slides and negatives, the cost of the scanner needn't hold you up any longer. Just a couple of years ago, this level of performance wasn't available in a "desktop" scanner at any price. Now you can bring a 16-bit, 2820 dpi fast film scanner home for under $400. - And Minolta's software makes it easy to use, to boot. Big kudos to Minolta for this one.