RESOLUTION CONFUSION
HP Scanjet G3010 -- The $100 Film Scanner
 By MIKE PASINI
Editor
The Imaging Resource Digital Photography Newsletter
Review Date: February 2007
Announced at CES 2007, the affordably priced HP Scanjet G3010 Photo Scanner provides photo, document and even film scanning thanks to its very high resolution and 16-bit color channel capture.
Along with optical scan resolution as high as 4800x9600 dpi and 48-bit color, the built-in transparency adapter provides scanning of two-up 35mm slides and negatives as well. Bundled with HP Photosmart software, you can save old or damaged photos, slides and negatives, removing dust and scratches and restoring faded color with an investment of no more than $100. You don't even have to buy a USB cable because, yes, HP has included one.
Of course there are tradeoffs at that price and we spent some time with a G3010 to see just what they are. Let's take a look at the specs and then get down to business.
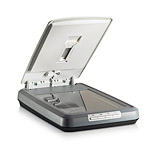
Wide Open. The G3010 shows off its Transparency Media Adapter and front buttons.
KEY FEATURES & BENEFITS | Back to Contents
- Photo, film and document scans with true-to-life color and detail with high-definition scanning at 4800x9600 dpi resolution and 48-bit color
- Scan 35mm film slides or negatives with the built-in transparent materials adapter
- Batch scan up to three 4x6-inch photos, two slides or negatives or even larger photos and portraits, automatically saving them as individual files
- Four one-touch scanning buttons on the front-panel can scan photos and documents, scan film, make a copy or scan to PDF
- Organize, edit, share and save scans in one click with HP Photosmart software
- Preserve memories and restore old or damaged photos, slides and negatives with HP Real Life technologies using features such as dust and scratch removal, faded color and photo restoration, adaptive lighting and automatic red-eye removal
- Produce high-quality scans of various paper sizes and 3D objects with a letter-size, portrait-oriented scanning bed and adjustable lid
- Energy Star '07 compliant
- Support for Windows Vista is forthcoming
- Shipping now at a list price of $99.99
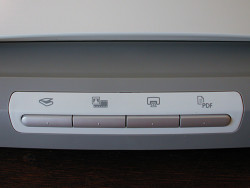
Buttons. Scan reflective, transparent, copy (print) or scan to PDF.
SYSTEM REQUIREMENTS | Back to Contents
Macintosh system requirements are:
- Mac OS X v 10.3.9 and OS X v 10.4.x
- MAC Intel and Power PC 233 MHz PowerPC processor
- 128-MB RAM
- 240-MB available hard disk space
- 800x600, 16-bit color SVGA monitor
- USB port
- CD-ROM drive
- HP Memories Disc Creator software requires CD-Writer and 700-MB additional hard disk space
Windows system requirements are:
- Computer with Intel Pentium II 233 MHz or equivalent Celeron processor
- Windows 98/98SE/ME/2000/XP with Vista support promised
- 64-MB RAM for Windows 98/98SE/ME; 128-MB RAM for Windows 2000/XP
- 500-MB free hard disk space required to install
- Internet Explorer 5.01 Service Pack 2 or later version
- USB port
- CD-ROM drive
- SVGA monitor (800x600 pixels, 16-bit color)
SPECIFICATIONS | Back to Contents
Scanner
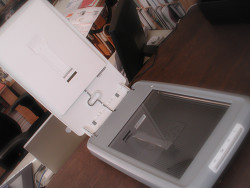
Scanner type: Flatbed with transparent materials adapter
Weight: 3.1 kg (6.6 lbs.)
Dimensions: 296x494x73mm (11.7x19.8x2.9 inches)
Scanning element: Charged-coupled device
Interface: Hi-Speed USB 2.0
Hardware resolution: 4800x9600 ppi hardware resolution
Selectable resolution: 12 to 999,999 dpi at 100 percent scaling
Bit depth: 48-bit
Maximum Scan Size: 8.5x11.7 inches from the flatbed
AC line voltage: 100-120 V 60 Hz in North America, 200-240 V 50 Hz in Continental Europe, United Kingdom, Australia, 100-240 V 50 Hz/60 Hz in Rest of the world
Power consumption: Low power mode is under 3.5 watts, while maximum power mode is under 21 watts maximum.
Energy efficiency: The HP scanner is Energy Star compliant. As an Energy Star partner, the Hewlett-Packard Co. has determined that this product meets the Energy Star guidelines for energy efficiency.
Transparency Media Adapter
Media types: Up to two 35mm slides or two 35mm negative frames
Power requirements: 12 Volts/400 mA max

The Box. So light you can carry it in one hand.
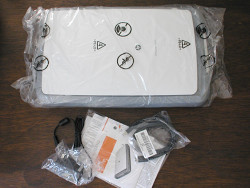
Contents. Scanner, power brick, CDs (etc.) and -- yes! -- a USB cable.
The 22x18x6 shipping box contains:
- The G3010 scanner
- A power brick
- A USB cable
- A Windows CD and a Macintosh CD with HP Scan Pro, HP Device Manager and HP Photosmart software
- A one-page installation guide, registration card and warranty statement
No printed manual ships with the scanner, but an extensive Help system is installed with the software.
INSTALLATION | Back to Contents
Installation is pretty simple, as the one-page installation poster illustrates. Software comes first. Just pop the CD in your computer and in no more than 15 minutes (and probably five) you'll be ready to do the hardware install. Software installation does require you restart your computer.
Hardware installation takes just a heart beat. Remove the tissue protecting the scanner glass. Then attach the Transparency Media Adapter's plug to the scanner body. It's a tight fit and, even when it's in, it doesn't feel seated but just pull it out and plug it in a few times to ensure it's seated. Plug the power brick into the scanner and into an outlet. And finish off by connecting the USB cable to both your computer and the scanner.

Install Poster. No need to flip it over, either.
Interestingly enough, there is no locking mechanism on this scanner. So you don't have to remember to lock it before moving it or unlock it before scanning.
After you restart your computer, turn on the scanner using the Power switch on the back where the cables plug in.
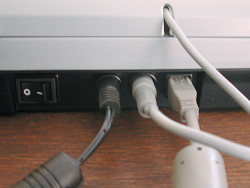
Connections. Power switch, power cord, TMA connection and USB cable. That's it for the hardware.
Around here, we prefer to power our USB devices on or off while the computer they are connected to is on. Usually we put that computer to sleep, rather than power it off. That way the USB device checks in and out with the computer while the computer is paying attention. If your computer only checks for USB devices when it boots, you'll want to turn the scanner on first. But that's less and less common.
HP DEVICE MANAGER | Back to Contents
You can put the scanner to work from either your keyboard or the front panel of the scanner. Either way the first thing you should do is pull up the HP Device Manager. A popup shows you what HP devices are attached (printers and scanners). Select the scanner to see what it can do.
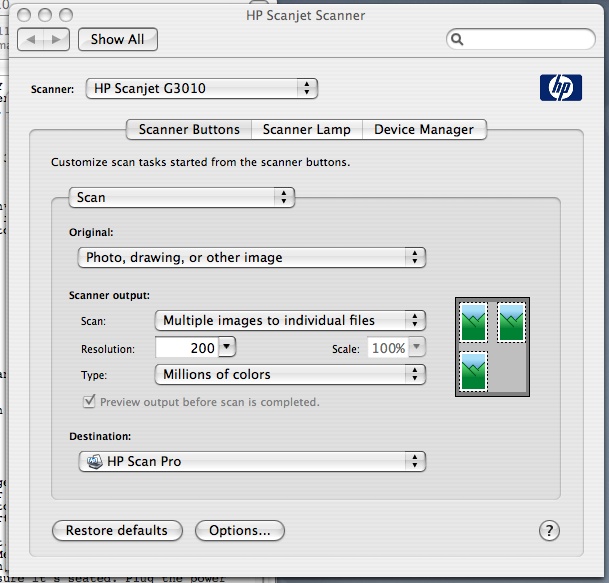
At the bottom of the window is a small tool popup. That's where you can set the scanner's preferences, including how you want its buttons to behave, energy saver behavior (auto off at 15 minutes or forced on for 10 hours) and the Device Manager buttons (much like the scanner's).
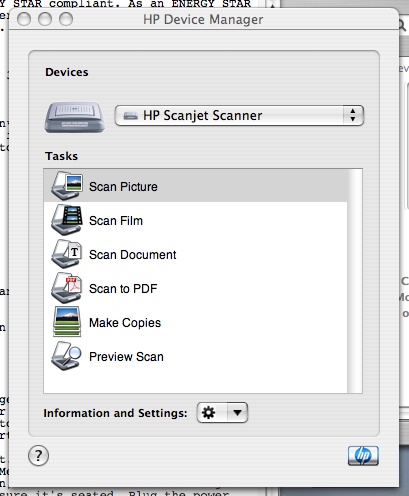
Device Manager. Note the Information and Settings popup under the Tasks.
We left the settings at their default to start. And a good thing, too, because we didn't understand them.
Scan Pro Prefs. Here's how to make Scan Pro remember how you like things.
Our first test was to scan a 4x6 print of Emily. We put the print on the glass and pressed the Scan button. Nothing happened.
Well, nothing happened at the scanner. Back at the computer, HP Scan Pro had launched and before we knew it the G3010 had scanned the image preview and displayed it in Scan Pro's window.
We could also have initiated the scan from Device Manager by selecting Scan.
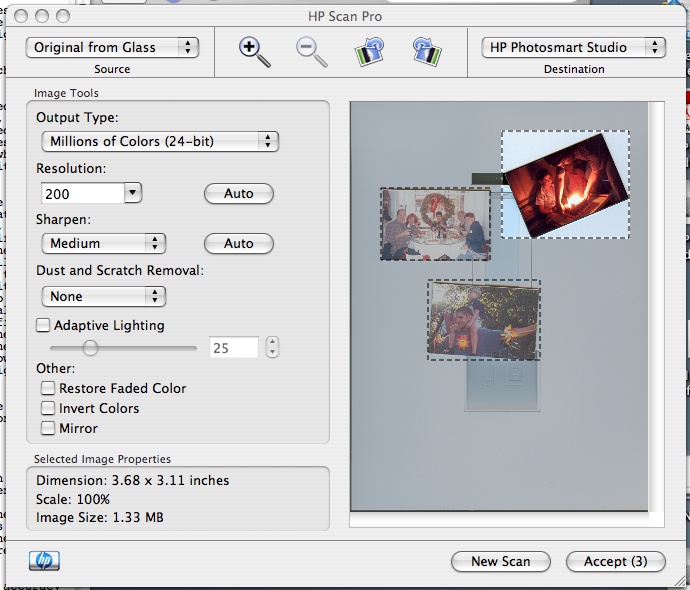
Scan Pro's interface takes some getting used to. There's a lot happening. On the top row you can see the source is identified as "Original from Glass" and the Destination is set for "Image File." But take a look at your destination options. You can send the data directly to an image editing program, if you want. Or email it or print it, too.
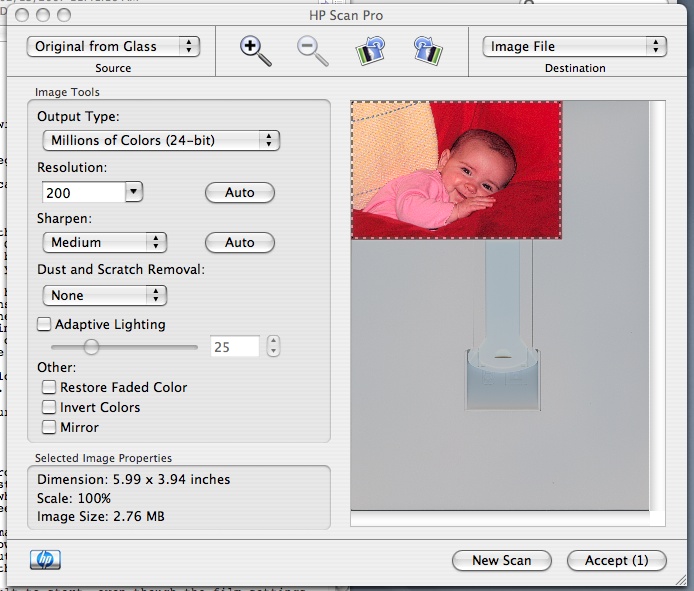
Scan Pro Interface. With a preview of Emily.
Between those two options are some icons designed to make it easy to enlarge or reduce the image and rotate it, as well.
But the heart of the application is in the little pane to the left of the preview window. There you can set the Output Type (24-bit color), Resolution (200 dpi), Sharpen setting (Medium), enable Dust & Scratch Removal, set the Adaptive Lighting (which lightens or darkens the scan area) and enable Restore Faded Color, Invert Colors and Mirror. That's a lot, particularly if you haven't scanned anything before.
And if you have scanned before, beware because those settings are not the equivalent of what you might have used with other scanning software. HP's idea of Resolution and Scaling are particularly confusing to old hands.
If you're scanning an old, faded print, do click on Restore Faded Color for a treat.
And again, if you want Scan Pro to do things your way more than once, you only have to revisit the Preferences to help it remember.
Just below that pane is an information pane that reports the consequences of your settings as the dimensions of the image, scaling and file size.
You can accept the scan or click the New Scan button to try it again with different settings.
You can also sneak up to the Menu bar for more Advanced options. You select Adjust Color, Adjust Black and White and Adjust Exposure to display a palette with more options, including a histogram and sliders to make adjustments. There's a Help button on each palette to provide more information about your options.
When you Accept the scan, you can indicate where to save it and what format to save it in. TIFF was the default, but we changed it to JPEG and selected Highest quality. The scanner then makes the full scan of the image and writes the data to the file, if that's what you selected for the Destination.
Scan Pro works the same whether you're running a G3010 or an All-in-One device, which is a comforting thought. Another is the option under the Help menu called Disable All Smart Friends. Perhaps that thought has occurred to you, too <g>?
SCANNING PRINTS | Back to Contents
Completely misunderstanding the setting, we changed a few for our second scan of Emily. We bumped the resolution up to 300 and turned off Sharpening and enabled Adjust Color to use Original rather than Enhanced (her face was too pink).

Scan Pro Defaults. Resolution 200 and Medium Sharpening.

Scan Pro Custom. Resolution 300 and no Sharpening.
Scan Pro warned us we were scanning at a higher resolution than we needed and so the scan would take longer and our file size would be much larger. It also warned us that a little sharpening would help. All true, we thought, but that's why we get the big bucks. Do it anyway.
Wow, now that was a nice scan. Good skin color (if a little bluer than the original), nice detail (although a little sharpening would help). And pretty easy, too.
Our little misunderstanding involved Resolution. Scanning a print, it didn't really hurt us but we should have paid more attention to Scan Pro's warning, as you'll see in a moment.
You can lay several images on the scanner bed for scanning. Scan Pro will identify each of them, saving them to separate files. Although the preview doesn't show it, Scan Pro will actually rotate any skewed images, too. That's a big time saver.
SCANNING FILM | Back to Contents
Scanning reflective material like prints isn't much of a test for any scanner these days. You don't need very high resolution. But scanning 35mm film is another story. You don't print 35mm slides at the same size, you enlarge them. Quite a bit. And that's where high resolution scanning becomes important.

HP Scan. Enlarging 300 pct. by default.
Epson Scan. We matched the HP settings.
So we could be forgiven for tinkering with Scan Pro's resolution setting. We set it to 4800 dpi and ignored the warning. Only to be told Scan Pro couldn't allocate enough memory to do that. Which, on a 2-MB RAM machine seemed strange. So we went down to 3600.
The resulting scan was strange -- creating a file with 9648x14,544 pixels. It should have been, by our calculations, just 3216x4171 pixels.
We hadn't noticed the HP software was also enlarging the image 300 percent. That Resolution setting is really the output resolution, not what the scanner will sample.
Where's the scaling option? we wondered. Nowhere to be seen.
Instead, HP calls it Resize and tucks it into the Basic option in Scan Pro's menu bar. There you tell Scan Pro what the dimensions of the original are (well, it already knows that) and what the dimensions of the final should be. And you can use a percentage enlargement up to 400 percent to do that.
When you do that, you tell HP to sample at whatever it takes to create an output file of that size with the recommended Resolution of 200 dpi. Disable All Smart Friends indeed.
We had more trouble loading the slide, but again we didn't realize it at first. We thought it was pretty simple. You slip the white plastic cover out and push the slide in, facing you, all the way to the bottom. Then put the white plastic cover back in as far as it will go. It looked good to us so we told Scan Pro to scan.
There's a slight delay while bulb warms up of about half a minute or so. There's a delay even when the bulb is warmed up, though. It isn't a fast scanner, but then you aren't scanning more than two frames or slides at a time.
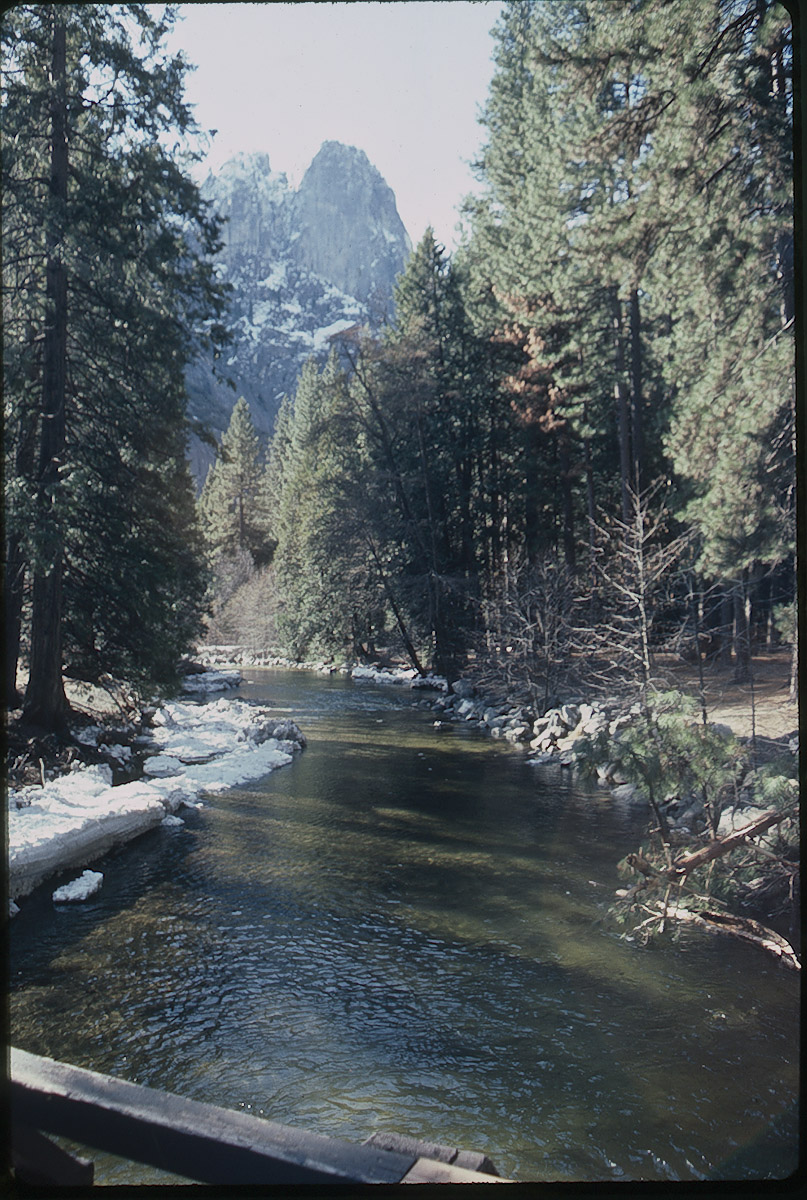
Scan Pro was smart enough to crop our slide without the frame but our first scan of a river and trees in Yosemite was way too blue. So we tried to restore color. That looked better on the preview.
We scanned that at 200 dpi and got a file that was 536x808 pixels, enough for a 3x5 bordered print on an inkjet that wants 180 dpi.
Resolution is one key to a good film scan since all of them have to be enlarged. Bit depth is another. Although you can only display and print 8-bit color, 16-bit color lets you choose which 8-bits to use. The third key to a good film scan is dynamic range, being able to see what's in the shadows while retaining whatever detail there is in the highlights.
The last trick is the hardest to pull off.
Our Yosemite scan was soft and lacked detail in the shadows, as if the scanner had been unable to focus on the slide. We weren't happy with the color either. For comparison, we scanned the image on the high end Epson V700 to see what it might have looked like. Compare the detail in the shadows of the trees, the sharpness, the detail in the snow bank. And note the difference in color.
The Epson had one other advantage going for it. It was profiled. We'd scanned a color target, compared the values scanned against the known values of the target and recorded the difference to apply to any future scans. There's no profile for the G3010 and it wasn't recognized by VueScan (which would have allowed us to make one). So don't expect to use other software with it.
Not having a manual has its downside. And in this case, it bit us. Our suspicion that the slide was not in focus was the clue. In fact, we had not mounted the slide correctly.
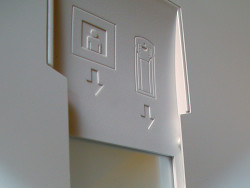
TMA 'Instructions'. They don't quite tell you everything. Note the small nib in the far slot just above the corner of the glass? That holds the slide in.
We discovered our error when we tried to slip a negative strip into the Transparent Media Adapter. We couldn't tell how a six-frame strip would safely be mounted. And then we couldn't even tell how to get a four-frame strip mounted.
Slide Installed. Not quite all the way in, however.
The problem was how we had used the white plastic cover. The slot into which you drop the slide is wider than the cardboard mount. So you have to catch it on a small lip at the bottom of the chute and then, when you slide the cover back in, catch the other end of the mount with the cover. That forces the slide to the outer edge of the cover, although it didn't do it very evenly, despite a few attempts to seat it.
So the result was improved but the comparison with the Epson speaks louder than words.

Film Slot. You have to pull out the plastic slide.
SCANNING A NEGATIVE | Back to Contents
An even tougher job than scanning a slide is scanning a color negative. There's a great deal more exposure latitude in a negative and there's also that orange mask intended for printing. Getting a good scan requires a lot of work behind the scenes.
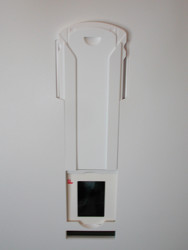
We finally discovered that to mount a film strip, you have to remove a very thin white plastic strip from the cover. It looks like it's part of the cover and resists easy removal (especially the first time you yank on it), but if you get a fingernail under the leading edge, you can grab it and get it out.
Negative Scanning. Only two and no way to handle a strip of six.
Your film strip slides into the vacated spot and when you replace the cover, you have mounted the negatives.
We selected Negatives from TMA as the Source in Scan Pro. Restore Faded Color was not an option. But the image, if a little blue, didn't look too bad in the preview. Both frames showing in the preview were scanned.
Image size at 200 dpi and 300 percent enlargement (the default) was 586x850. On a 180 dpi inkjet that would yield a print of 3.25x4.72 inches -- a 3x5 with a border.
One nice thing about HP's approach is that you don't have to identify the film emulsion of the negative -- whether, that is, it's Kodak Gold II 400 or something else. The Epson comparison scan, using SilverFast software, did expect us to know.
On the other hand, if your film strips have six frames instead of four, you won't be able to scan the middle two unless you cut the strip.

HP Scan. Default settings.
Epson Scan. We matched the HP settings.
Our misunderstood scan settings caused Scan Pro to crash repeatedly, requiring a Force Quit to recover. We run a lot of software on our boxes here, much of it beta software that we expect to cause problems. But we haven't seen an application fail so easily as Scan Pro.
Understand that if you keep your settings reasonable, you can live happily with Scan Pro. But there's no real warning you're going to blow the thing up. And considering how fragile it is, there should be. Actually, it should be impossible to blow it up. Somebody at HP just called in sick that day, apparently.
But we could say the same about the way the plastic slide works or how difficult it is to simply attach the cables. There's no reason for such a lack of engineering these days. When you attach a cable, it should snap into place so you know you've done it right. When you mount a slide, it shouldn't wobble around in the grooves waiting for gravity to save the day.
Yes, even if you only paid $100 for it.
DUST & SCRATCH REMOVAL | Back to Contents
When a photo lab technician handles your film or slides, they use gloves to prevent the oils from their skin from transferring to your film. Before they expose your film, they use compressed air to blow away any dust that might have fallen on the film.
At home, less care is usually observed, let's just say. Dust and scratches from handling are the rule, rather than the exception.
HP, like other scanner manufacturers, combines hardware and software technology to restore slides, negatives and prints that have suffered that damage. For transparencies like slides and negatives, the scanner takes and infrared image of the image, which reveals physical obstructions like dust or scratches. HP software then uses a "bilateral filter capable better removing errors while leaving neighboring pixels unaffected" to reconstruct the lost areas without blurring the neighboring data.
Gang Scanning. Fill the glass, Scan Pro will straighten them out and remove the dust and scratches.
"The strength of the bilateral filter is that it removes Gaussian noise without blurring image details," HP explains. "To remove sensor noise, the bilateral filter computes a weighted average of local neighborhoods in the image, where the weight of each pixel in the neighborhood depends on the contrast difference of that neighbor with the central pixel. If the difference is small, the neighbor has a high weight and if it is large, the neighbor has a small weight. To remove defects, we take advantage of pixel credibility with two new mechanisms. The first mechanism reduces the weight of a neighbor when its credibility is low. This mechanism prevents defects from spreading into other pixels. The second mechanism is that when the credibility of the central pixel is low we increase the relative weight of the neighboring pixels. The filter moves between the following two extreme behaviors in a fuzzy manner. When the credibility of a pixel is high (1), it computes a value identical to the bilateral filter (noise removal). When the credibility of a pixel is low (0), it computes a weighted average of the neighboring pixels where each neighbor is weighted according to its credibility (infilling)."
We don't have any really dirty or scratched film here, of course, so we couldn't test this very rigorously. But it's something that should be on every scanner so we're glad to see HP include it.
Document scanning was a pleasant surprise. When you scan to a PDF, Scan Pro asks after each page if you want to add another pager to the PDF document.
But even more delightful is that you can scan the PDF as text. We scanned an important, top-secret document from a major software company telling us the clandestine Web page we could go to for their promotional materials. The scan, when converted to text, also had created hypertext links for email addresses and URLs. And they worked!
Even more impressive, this wasn't a very high quality printout but the accuracy was nearly perfect. OK, some bold italic was rendered as just italic, but the words (even the underlined words where descenders were obscured by the underlining) were correct. There was a missing space or two, but nothing suggested the document had been scanned as an image, converted to text and reformatted to match the image.
It may not sound like it, but we liked the G3010. It's compact and lightweight. Without a locking mechanism, you could easily put it away between sessions, regaining some desk space.
The document scanning to PDF with OCR text conversion and hypertext links was delicious. Print scanning, particularly since you can do several at a time, was very nicely done. In those two areas, the G3010 takes no back seat.
Slide and negative scanning was disappointing. Our comparisons with the high-end Epson V700 show you what you can get. The G3010 can scan those images, too, but not nearly as well. That might, however, still be good enough. You be the judge.