A NEW PRO WORKFLOW
Aperture Diary
 By MIKE PASINI
Editor
The Imaging Resource Digital Photography Newsletter
DECEMBER 29 | Back to Contents
Our testing schedule took a hit when we picked up a cold from our nephews at Christmas, but we're back on track now. A bit off the bubble even when we aren't sick, our illness only made it harder on Aperture. Still we managed without reviewing any of the documentation or tutorials.
|
|
We thought we'd take it slow, so we imported 92 4-Mp images from our holiday excursion to Santa Barbara. They were all JPEGs taken with a Kodak EasyShare-One. We didn't copied them to our hard disk until we got home, but we did upload them to an EasyShare Gallery and emailed a few from different homes and restaurants.
We took our own advice and copied the card to our hard disk independently of Aperture, so when we imported them into Aperture's library, we were actually duplicating them. Whatever happens to them in Aperture will not affect our usual workflow.
The import took a few minutes but we were able to do other tasks while it went on. We actually looked over the sample Tibet folder.
Copyright. Once our images had been imported, we wanted to tag them all with an IPTC copyright notice. That was pretty easy. Just select them all and use the Metadata menu Batch Change command to enter the data you want in the fields you want. A progress bar filled us in on the state of things.
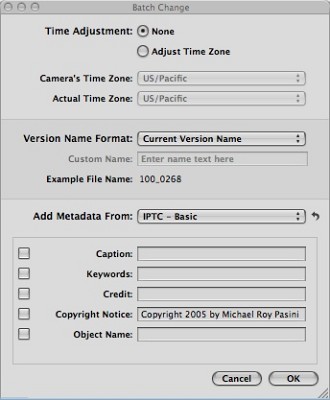 |
| Batch Entering Copyright |
Ranking. Next we wanted to rank our images, culling the good from the bad. We simply clicked on each image and set the number of stars with a click of the Rating buttons. A small transparent gray overlay of stars was instantly displayed in the bottom left hand corner of the images.
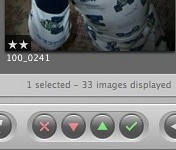 |
| Ranking Buttons Note overlay above |
Sorting. Sorting is flexible but it took us a minute to figure it out. We had ranked our images with one star for possible inclusion and two for definite inclusion. But we found the ranked image had to be the pick image for it to show up in the selection.
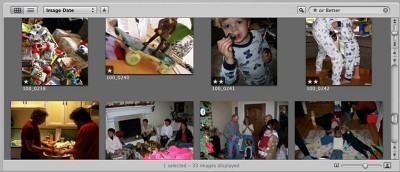 |
| Sorting By date, oldest first and only ranked images |
We were also annoyed at first that our sort order was newest first. We're used to seeing images in chronological order. All it took was finding the Order button and clicking it to reverse the default.
External Editor. A couple images cried out for either a highlight mask or a contrast mask. Well, that's just the way we think about dealing with images whose highlights are too bright or whose contrast is too high.
Aperture doesn't think quite like that, providing instead a Highlight/Shadow tool (which you have to add to the Adjustments palette) to recover detail in the highlights and shadows. And that works well, especially in the 32-bit channel space it edits in.
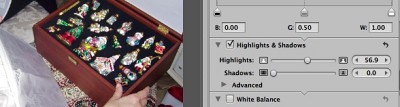 |
| Highlight Shadow Control 32-bit channels |
There's been some disappointment that a tool like Curves is missing in Aperture, but allow us to reserve judgement a bit.
But we wanted use our trusted Photoshop Actions, so we exported the image to Photoshop simply by bringing up the contextual menu and choosing the Open with External Editor command. We made our edits to the 16-bit .PSD file and simply Saved it to return it as a new master in our Aperture library. Not intuitive but painless.
We did have to make it the pick image in the group of versions to get it to show up in our sort, however.
Red Eye. The Red Eye tool works, but again, it gave us some trouble. Unfortunately, it demonstrates the weakness of the documentation, which provides more of an overview of the tools than a how-to.
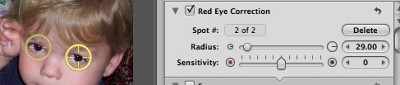 |
| The Red-Eye Fix |
It's fairly simple to click on the tool and pin-point each instance with a click to remove it, adjusting the brush size to cover just the red-eye. Except you are placing targets on your image. Big yellow targets around each eye. Only when you close the tool can you evaluate the results. If you don't like them (the radius was not the right size, say), you can edit each one in the Adjustments palette but how you switch between them was a bit of a mystery.
At first we tried to pop up the label that identifies the currently selected red-eye fix. Nope. Then we tried to select a different red-eye fix with the Selection tool. Nope. Then we zoomed in to a 100 percent view using the Z key and slid the red-eye tool over an existing fix. That selected the fix. From there we could edit it and move it around a bit.
A Slide Show. Until now, we'd been using the two panel view to see the working image in the top half of the screen and the set of images below it. Occasionally we'd click the Zoom tool to view the top image at 100 percent, but mainly we worked at Fit in Screen mode, so to speak.
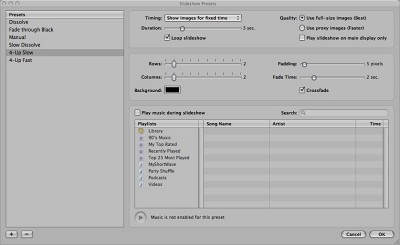 |
| Slide Show Options |
So we wanted to see everything in a slide show at full size. No problem. The File menu provides a Slide Show option and the only thing in the dialog box was Slideshow Preset. We selected 4-Up Slow (Dissolve, Fade Through Black, Manual, Slow Dissolve, Four-Up Fast and Edit were the other choices).
Edit brings up the full set of options. These include timing, duration, looping checkbox, quality, target (main display only or both), rows and columns (two each for 4-up), padding, fade time, crossfade checkbox and music (one of the time options is Fit to Music). And you can save your settings as a Preset.
The slide show played through nicely and we decided to publish our selection.
Web Gallery. From the File menu we chose New Web Gallery. Which got us a blank Web Gallery. So we deleted it from the File menu and selected our edited images and used the File menu option From Selection which let us choose Web Gallery. We could also have just dragged the selection to our blank Web Gallery.
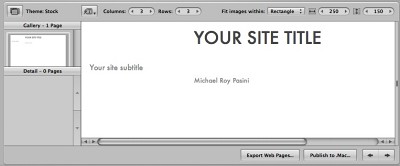 |
| A Web Gallery A blank template |
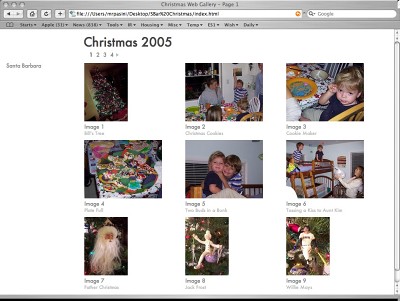
This instantly created a four-page Web site with a three column by three row arrangement under a title with a subtitle and navigation links, all tastefully done on a white background. We only had to the edit the dummy text and export the pages.
That created a folder with 37 HTML pages and 33 thumbnails and larger images in about six minutes. We could also have published the Web Gallery to a .Mac account site. A style sheet and GIF navigation buttons were also produced.
We took a look at the result in Safari and were pleased. The four thumbnail pages identified each image by number and were easily navigated. But we also saw our name at the bottom of each page, presumably from the copyright metadata we created.
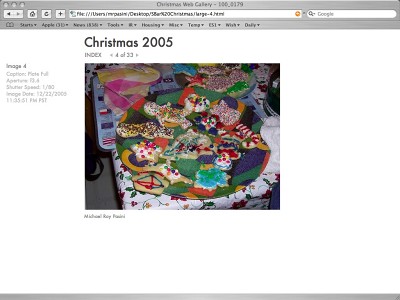
Clicking on an image took us to a full-page view of the image with a link back to the Index along with forward and backward buttons and an image count. To the left of the image was its title and the aperture, shutter speed, image data and time. Our name appeared below the image.
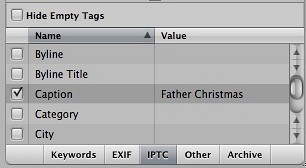
Revision. One thing we didn't do was caption our shots. And when we saw the Web pages, we wish we had. So back to the drawing board.
 |
| Entering a Caption |
We clicked on the Info button to display the IPTC tags and scrolled down to the Caption. As we clicked through each image, the Caption stayed right where we put it, so all we had to do was click and enter the text. Most software prefers to make you scroll back down from the top when you select another image. We really appreciated this little feature.
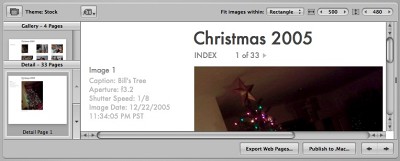 |
| The Revised Theme |
With our HTML already generated without captions, we decided to see what other Themes were available. We tried several on for size, setting the Tag option to Caption. Very nice. The Caption appeared under all the images and on the larger image page as well.
 |
| The Index in Safara |
 |
| A Single Image in Safari |
Test Drive. For a test drive, this was pretty comprehensive. We were able to do everything we wanted from importing copies of our images to building a revised Web gallery with captions and exposure details. Along the way we added a copyright notice to all the images, culled the better from the worst and edited them within Aperture and in Photoshop to remove red-eye and adjust luminance. We easily reviewed our work with a quick and easy Slide show, too.
The biggest problem we had was understanding how the Red-Eye tool works. Everything else fell right into place. Time to try some heavy lifting with Raw images and keywording.