VECTOR-BASED MASKING APPLICATION
Asiva Photo Rethinks Masking
By MIKE PASINIEditor
The Imaging Resource Digital Photography Newsletter
Review Date: October 2002
 They say tomato, you say tomato. But you see green tomatoes while they're seeing red ones. So late at night you're watching some guy sell knives that never need sharpening because, well, you can't sleep. You're worried about some image you have to mask to death tomorrow.
We need a smarter way to mask.
And that smarter way is obvious. We know what part of the picture is a sweater (which should be changed to our alma mater's colors). We know which part of the shot is the faded flower. We can tell which part of the room is painted the wrong color. We know tomatoes from broccoli.
Why isn't software smart enough to figure it out?
Over the years, a number of products have tried to figure it out. And high-end image editors have responded by improving their masking tools. But this is a task where good enough gets you the sound of one hand clapping.
We've tried them. Mask Pro. MagicMask. KnockOut. All worth a second date -- but not the ring. They keep us up at night.
The latest we've tried is the strangest, we'll say from the start. They don't say tomato. They say soup. It takes a while to appreciate that you can digest what they're talking about.
WHO ARE THESE GUYS?
Asiva (http://www.asiva.com) has a track record in image editing -- video imaging (but who hates masking more than video editors who have to mask 24 frames a second). The filters Asiva developed for video (to eliminate mattes) have morphed into tools like Asiva Photo for still image editing.
If you drop by their booth at any of the big trade shows you're bound to meet two of the company's three big shots (two out of three ain't bad).
Watching them work with Asiva Photo is like seeing doves fly out of your egg carton. Wow. They pull up an image, doodle in a color map and change the color of some object right before your disbelieving eyes. Don't blink -- it happens fast.
So you challenge them to step off the paved road. A little dirt-bike image masking. No, uh, magic.
Oh, you want the roses to be yellow instead of red? (Yes, these guys are from Texas.) A click later you have it. You want the beige wall to be green and the flowers on the table untouched? No problem. Just two clicks. Anything else?
Nothing scares these guys.
But you're shaking. What are they actually doing? It looks easy, but you can't quite follow the demo. You can't see how the magic happens.
IT'S THE SOFTWARE, SWEETIE
But isn't that, after all, your fondest dream? To be able to tell the software what to do and let it worry about it so you can sleep through those knife commercials? Sure.
The trick is learning how to use the software. Asiva Photo is built by guys who sleep in color theory. The more you know about color, the easier it will be to use. Do you know what Hue is? What Saturation is? What Luminance is? You're halfway home.
Asiva Photo uses these dimensions of color to describe a selection of pixels. Select the red in a rose by dragging the mouse anywhere within it and Asiva Photo maps the color range for you. And that wall is distinguished from the flowers by nothing but its saturation.
By adjusting curves that represent Hue, Saturation and Luminance, you can mask a great deal more than you might think until you try it. But you can also turn off Full Screen Mode to use ellipse or rectangular marques or a pixel-sensitive paint brush to focus on smaller areas of the image.
Color corrections and changes are just one trick Asiva Photo can perform. It's equally adept at sharpening or softening, enhancing detail and applying some special effects.
SYSTEM REQUIREMENTS
We don't like to review software that isn't cross-platform. But we break the rules for software that breaks the mold. If you don't see it on your platform today, you may next year because it redefines the problem.
That's exactly what happened as we were testing this product. Asiva Photo was originally released for the Macintosh but the Windows NT4/XP version just went into beta testing, with release scheduled for late August.
Asiva Photo 1.2.0 is an application (not a plug-in) that runs on Mac OS 9 or X with 32-MB available RAM (and virtual memory off). Optimized for the G4 processor, Asiva Photo reads and writes TIFF, PICT and JPEG images; uses ColorSync for color matching; and processes operations internally in 16-bit precision.
And -- unlike Replace Color in Photoshop -- the corrections it makes are vector-based, so each is undoable and can be saved to disk. In fact whole sequences of corrections can be saved and are small enough to be emailed to coworkers. Very cool.
Version 1.2.0 (the just-released, second free upgrade Asiva has offered since January) includes the following enhancements:
- Faster on-screen rendering using QuickTime instead of Quickdraw
- Improved color correction algorithm in Color Correction Operation
- Editable regions (move, resize, delete, copy, paste)
- The Eyedroppper tool modified with the Command key samples into Hue, Saturation and Luminance maps
Asiva has also been working on some QuickTime tutorials. "These will be on our Web site when completed and you may also email us for a CD if you are bandwidth challenged," Asiva promised. The manual is excellent but the QuickTime tutorials can actually show you what the manual tells you about. Very nice.
We ran version 1.1 and 1.2.0 on a 200-mHz 7300 running OS 9.1 and an 800-mHz G4 PowerBook under OS X. The interface was not quite Aqua on X but close enough. Performance in OS X was brisk.
The bad news is that it will set you back $378 (but subscribers to our newsletter can take advantage of a terrific Dave's Deal with their first issue).
INSTALLATION
A tutorial, documentation and the program are installed in a folder of your choice. Nothing else is bothered. Very straightforward.
We liked the 81-page manual very much. It suspected we wouldn't have any patience. But it warned us (correctly), we should -- and told us exactly how much.
| Toolbar |
It also provided an in-depth but entertaining discussion of color spaces and models and how they relate to digital images. Those subjects are treated with more than a little respect. These guys know what they're talking about it. And they're generous with their knowledge.
The interface, contrary to the company's claims, is far from intuitive. We got lost immediately after we opened an image (but the program did display helpful dialogs to tell us what we could and couldn't do next). Understanding how the program's three other windows worked together took some study. So consider the tutorial part of the installation.
Even the toolbar (right) is less than obvious. You have to be told what the tools are and what they do. Even, to some extent, how they operate.
Finally, we were very impressed with the User Forum on the Web site (http://www.asiva.com/forums/index.php). There's a section for problem images that are miraculously corrected. So bookmark the Forum as part of the installation, too.
OPERATIONS
The key to using Asiva Photo is understanding Operations. One window is simply a list of the operations you have performed on any particular image (you can only work on one image at a time).
So after opening an image, the next thing you'll do is create a new Operation (or load one). Selecting Create brings up a dialog window with a popup of seven options and a field for naming the Operation.
 |
| The Hue Map The curve in the blue field 'masks' hues in the color bar at bottom |
Once you select the kind of Operation (say, Color Correction), two other windows appear. A little window lets you define the target color or options. And a large window across the bottom of the screen shows a Hue/Saturation/Luminance map. That's where you define what needs to be changed in the image.
CORRECT COLOR
Let's get down to business. We'd like to change a red sweater to our alma mater's blue.
So we create a new operation, naming it "Alumni Revenge." This (when we save it) will be good for sweaters, sweats, T-shirts, the whole student store.
Immediately two new windows appear as our "Alumni Revenge" operation appears in the Operations Window.
The small window (titled, in this case, "Color Correction Operation") lets us set the target color (blue, in case we haven't mentioned it). The window also has a check box for Full Screen mode, which applies the change globally.
Click on the sample color to get to the Color Picker. Then pick your target blue. You're done.
The big window ("Correct Color Operation Maps") along the bottom of the screen is where all the fun happens. The Operation Maps are just line plots of Hue, Saturation and Luminance that can be used individually or in combination to describe the pixels you want to replace (the red ones, in case we didn't mention that either).
The guys at Asiva developed their own algorithms for working with saturation, so that Map is called Asiva Saturation.
You don't have to use all three. One will often do. And you don't even have to fool around with the plots (which are easily editable, if not intuitively so).
In fact, to show you how easy it is to describe a color, we'll just use the eyedropper tool to sample a representative area of the offending color. Drag a small rectangle over an area representing the range of color and watch the Color Map (set by default to Hue) change.
That's your mask, Bubba.
With the target color set and the offending color defined, you just have to render the image. Click the Render Bolt next to your operation and -- presto -- higher education takes on a new meaning.
And while you have that Render Bolt clicked, change any parameter to see a real-time change. No OK buttons.
YEAH BUT
The tutorial shows you how to refine the result by selecting just one area of the image to work on and by changing the slope of the Color Map's Hue plot to minimize odd edges. The degree of slope determines how many colors are transitional. So to have a sharper break, just make the slope steeper.
You can adjust the plot by moving points or by clicking where you wish they were (they'll jump to the spot).
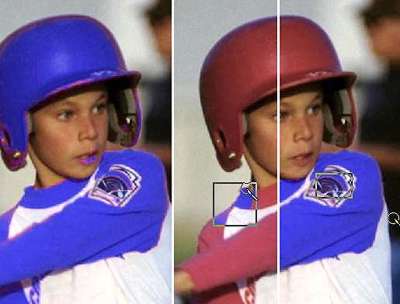 |
| In this example, we applied a quick color change operation (first panel) before painting over the offending red to avoid changing lip color (second panel). No need to stay within the lines, either. To get the shoulder tinge (third panel), we adjusted the slope of the color map where it transitioned from purple into red. |
This fine-tuning is part of the job. Without it, it wouldn't take 10 minutes to completely alter an image.
The tutorial also describes how to isolate the background from the foreground of an image using the Saturation Map. Very sweet.
OTHER OPERATIONS
Correct Color is just one Operation. The available operations are: Correct Color, Apply Color; Shift Component, Gain Component, Remap Component; Matrix or Kernel; Create Matte. Let's take a brief look at each.
Correct Color. Search and replace color.
Apply Color. Adds the target color. Useful for retouching an image. The target color can be blended into the selection at different transparency settings.
Shift Component. Shiftable components include Hue, Saturation, Value; Red, Green or Blue. By shifting Luminance, for example, you can make your image brighter or darker. By shifting Hue you can color balance an image.
Gain Component. Multiplies the component values of the source pixels by a constant you define. Applying Gain to the Luminance Map changes the image's contrast.
Remap Component. Asiva calls this "the most powerful tool" because it "allows you to do several things at one time." One Remap Operation can do what several Shift, Gain and Color Correct Operations can. Like increase Red in blue parts of the image while reducing it in red parts and leaving it alone in other parts.
Matrix or Kernel. Here's where you can Soften, Sharpen or indulge in Special Effects (Prewitt, Sobel, Frei-chen, Laplacian and Chebychev).
Create Matte. How you make dropouts. This Operation simply reads the Maps to build a mask.
CHEESE WHIZ
Like Cheese Whiz, this kind of stuff can be fun for a while. But when the cuteness wears off, you get hungry.
Asiva Photo puts food on the table a couple of ways. Operations can be saved (and loaded) so you can automate global effects. And sequences of operations can also be saved.
Each operation can also be turned on or off with a mouse click. And a drag changes their order -- much like your image editor's layers.
Combined with the editable curve maps that mask your image, Asiva Photo provides a resolution-independent vector-based solution to masking.
CONCLUSION
We were afraid it would take a lot of color theory to use Asiva Photo proficiently. But the tutorial got us up to speed quickly. And the real-time rendering of changes as you change parameters makes it very easy to experiment. The interface could use some polishing but we felt like we were flying without an interface after 15 minutes.
This is a unique approach to masking but a very compelling one. These guys see tomato. Whatever color tomato you want.