CAPTURE NX DIARY
Nikon Delivers Editing For the Rest of Us
 By MIKE PASINI
Editor
The Imaging Resource Digital Photography Newsletter
Review Date: May 2006
Before there was a thing called Photoshop, there was the grease pencil. A photographer would take his film to a lab, get it processed and deliver it to the client who would pick a few to have some enlargements made. Then the fun began.
The client would use a grease pencil to mark up the prints or transparencies. They might, for example, make a little mark in the sky and write a note to go with it like, "Bluer sky!" Or a big circle on a clump of bushes with a less subtle note, "Bring up detail." Or pinpoint a blemish and say, "Remove." And the image would go back to the lab for another print.
When we saw Nik Software's demo of their U Point technology at PMA in February (http://www.imaging-resource.com/EVENTS/PMAS06mrp/PMA4.HTM#upo), we were reminded of our old grease pencil. Both image editing approaches expect you to point at the problem in the picture -- and very little more.
THE TROUBLE WITH SOFTWARE | Back to Contents
If you used a grease pencil, the problem was sent to a technician to solve. But these days, photographers themselves are expected to enhance their images -- often before the client sees them. And to do that, photographers rely on image editing software.
The trouble with image editing software is that it isn't easily mastered.
As a photographer, you know what Brightness is all about as soon as you underexpose a shot. And Contrast is no mystery either when the sun is shining brightly. Why you would use Levels to adjust them is a mystery, though. You may not quite grasp Saturation, but you know skin tones shouldn't glow like sunburn. How you fix that, though, is another question.
And those are global changes, affecting every pixel in your image. The real frustration comes in when you try to select just a part of the image to affect. You try the Magic Wand, you try the Lasso, you try switching to the more detailed Green channel, you give up. You can never be as precise as you'd like.
On the other hand, if you do give up and resort to one of the simpler image editors, you often find yourself gaining a little ease of use by giving up a lot of power. And rarely do you escape the drudgery anyway. Even with Photoshop Elements 4's new Magic selection command, you have to do a lot of touching up.
We have high hopes for Light Craft's LightZone, based on the Zone lighting system, but while we like compressing and expanding tones, we're hitting a wall after that. And that's not Light Craft's fault. That's the nature of the beast.
The trouble with software is, simply, that it has to be learned.
That's what we were thinking, anyway, as we sat down earlier this week in front of an LCD monitor with Nikon's Mike Rubin and Lindsay Silverman. We were there to take a look at the beta of Nikon's Capture NX, which incorporates Nik Software's U Point technology.
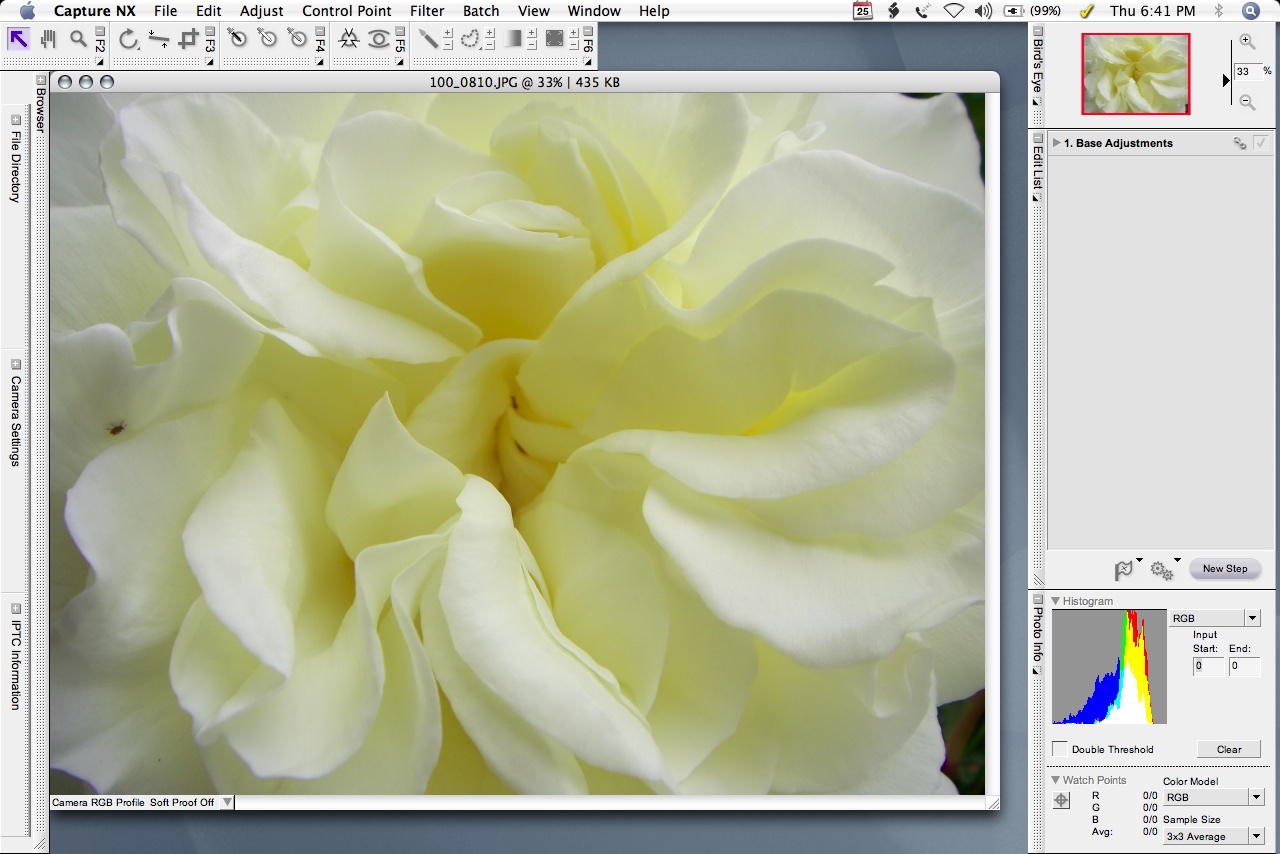 |
| The Capture NX Workspace |
Nikon believes there are a lot of enthusiast-level photographers out there who would like to improve the images they shot but are frustrated by the expense and difficulty of the software available to do it. These are people who get excited about shifting off Auto mode to get a better picture. And they'd love to tweak their images in software, too -- if the learning curve wasn't such a steep slope.
Nikon also realizes not every one of these people owns a Nikon. So this version of Capture is not just for Nikon images. You can open any JPEG or TIFF in Capture NX and even save them as Nikon Raw images in the company's proprietary NEF format.
Now why would you want to do that, we wondered?
To use Nik's U Point technology, that's why. Remember the grease pencil? U Point turns your mouse into a grease pencil. Just click on that flat sky, go ahead. But instead of writing a note, just adjust the Brightness slider that instantly appears where you clicked. How? Just slide it to the darker end. You've got a bluer sky more quickly than you could write, "Bluer sky!"
| Control Point Tools | ||
| Black, White, Neutral |
Color, Red-Eye | |
That's your learning curve.
In most image editing software, you'd have to build a highlight mask to avoid darkening the whole image and then get to the dialog box with the Gamma slider that lets you darken the sky. That's fun if you know how to do it, but even though we know, for some reason, we never look forward to actually doing it. Even with an Action defined.
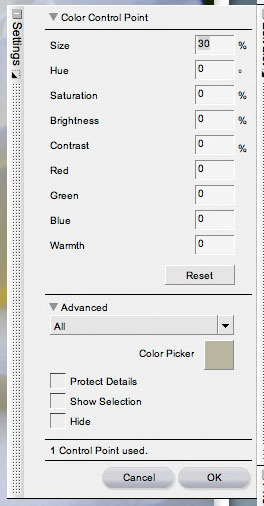
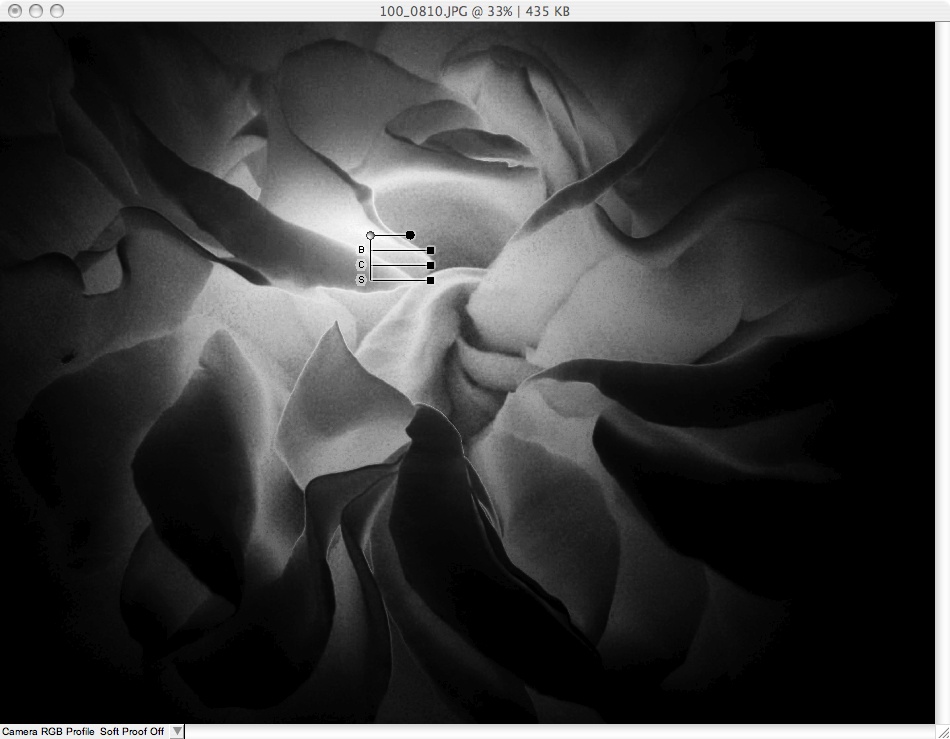
Adding a U Point control point to the sky is a blast, we found out when we tried the reviewer's beta Nikon provided. A small graphic similar to a capital E with one more horizontal bar appears right where you click. The bars of the E are actually sliders.
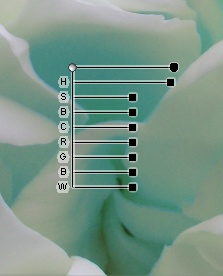 |
| A Control Point. Showing all the options, with Size adjusted to cover the whole image and Hue changing yellow to turquoise |
The top slider controls the Size of the control point's sphere of influence. It tapers off at the edges much like a light source, Lindsay explained, but you can make it any size you want.
 |
| Control Point Settings |
Under that are three commonly used sliders: Brightness, Contrast and Saturation. When you click on any of them, the full slider appears. As you make your adjustment, the image updates immediately (well, nearly), so you can see exactly what the effect is.
This gets even more fun when you realize the control point isn't glued in place. You can drag it around. And as you do, the image changes. It's a lot like waving a flashlight around your image, except this flashlight doesn't throw a dull yellow beam but a Brightness, Contrast and/or Saturation adjustment.
Actually, it can adjust more than that. Sliders for Hue, Red, Green, Blue and Warmth (or White Balance) can also be displayed. And you can use U Points to set the Black point, White point or Neutral, too. Just click on anything that should be neutral with the Neutral control point and instantly the image is color corrected.
In fact, just as you can have more than one control point in an image, you can have more than one Neutral control point. So if, as Lindsay pointed out, you have fluorescent and incandescent light sources in your shot, you can set a U Point to neutralize each. We're not aware of any other program that let's you set two neutrals, mixing color balance that easily.
SIZE MATTERS | Back to Contents
How many pixels each control point affects is determined by the Size slider. But this is a very soft-edged sphere of influence. You don't control how hard edged it is, just the size. The control point relies primarily on hue, apparently, to draw its mask. It's not just an indiscriminate beam.
The spheres of influence around each control point were beginning to bother us during the demo because not everything in an image fits in a circle. At one point Mike was correcting the brightness of a river that flowed diagonally through the image. One circle wasn't going to do it.
No problem. He simply set up one U Point control point to his liking and duplicated it a couple of times to affect the whole river without bothering the banks of the river. Very nice.
 |
| View Selection Shows the mask a control point builds |
And if you wanted a finer edge, he said, all you have to do is paint the effect out. View Selection shows you the mask the control point has built. But you can add or detract from it with the Paint Brush tool.
LEGACY CONTROLS | Back to Contents
Nikon has long claimed that no other image editor can produce better results from a NEF file than Capture. So everything that was in prior versions of Capture is in NX, we should point out. You can have your Levels and Curves, too.
All that's in the Edit List palette on the right side of the screen. Click on a function to enable it. A dialog box will appear and you can make adjustments.
BEYOND THE LEARNING CURVE | Back to Contents
Mike claimed that learning how to use a U Point wouldn't take much time. And we found it instantly accessible.
In fact, as Mike pointed out, the pleasure of using NX is not just being able to easily do what you want but being able to do a lot more than you ever could in any other image editor. Without giving up any power, we'd add.
Adjustment layers, masking, opacity, forget it. Just use a control point and save the image as NEF so you can go right back to the original any time.
THREE TEST IMAGES | Back to Contents
Readers familiar with our other software reviews know we use the products on real projects. Even though NX is a beta, we had a pile of things to get done and thought we'd try some of them in NX first.
The White Rose. Our first job was to print a 4x5 image of a white rose we'd shot for a greeting card. We'd shot the rose testing Kodak's EasyShare V610 10x compact digicam under an overcast sky. There were yellow shadows that confused the EasyShare printer dock series 3 printer when we printed a 4x6 straight from the card. Printing a 4x6 inkjet from the card reader of the Canon MP950 did a lot better. But we really wanted to neutralize the yellows. It was a white rose, after all.
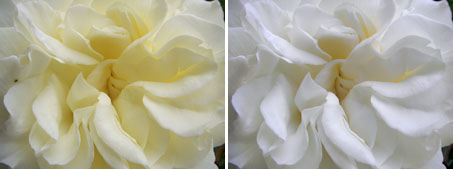 |
| Original & Neutralized JPEG from a Kodak EasyShare V610 |
We opened the image in NX and set a Neutral control point in the midtone where the yellow was too pronounced. Oops! Everything turned blue. But we weren't worried. We slide the control point around. As we moved toward the highlights, the yellow returned to the deepest shadows and the highlights and midtones neutralized. We only had to drag our control point around until we saw what we were looking for.
Unfortunately, we weren't able to use NX to remove a small insect napping on one of the petals. We tried with a control point and did manage to turn it yellow, but we wanted the texture of the petal, too.
So it was back to Photoshop to finish the job. Which printed gorgeously on the MP950, by the way.
The Holiday Shot. Here's a couple of guys working a convention in front of Diamond Head in Honolulu. Taken with a film point-and-shoot, they were just a backlit silhouette with the sky almost completely burned out.
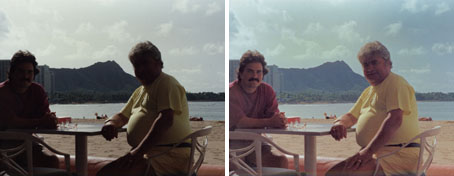 |
| Original & Retouched TIFF scanned from an old print |
In NX, we started with the D-Lighting control to bring up some detail in the shadows. And it recovered quite nicely. But it also showed some noise using the Faster but more effective option. So we adjusted the Noise Adjustment command to suppress the noise a little bit and it looked very good. Except for the sky.
For that, we resorted to a control point. A little brighter, a little more contrast. We tried changing the hue, too, but that didn't help. Resetting to zero is not easy (it would be nice to have a detent there) but doable, which is more than we can say for a lot of sliders.
One control point wasn't quite enough, though, since the sky was in the upper third of the image. So we duplicated the control point and slid it over. Both faces were in the control points' spheres of influence but were masked out by their hue. Very nice.
The Paint Job. We'd already tried this in Photoshop CS2 using the Replace Color command. The job was to change the trim color on a house whose main color wasn't going to change, matching a paint chip. Unfortunately, the contrast between the house color and trim color wasn't much and Replace Color had trouble separating them, particularly as the light moved from direct sun to shade. It managed to select about 70 percent of the trim, good enough for an artist's conception.
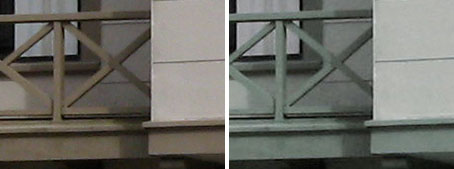 |
| Original & 'Repainted' JPEG from a Canon PowerShot A430 |
Could NX do a better job of masking the trim?
Yes. We put our control point on the full color in shade, changed the hue and expanded the size to encompass the house. It not only found all the trim but also changed the color very nicely without dramatically affecting the house color.
We spent about 20 minutes doing this in Photoshop, trying to optimize the selection. But using NX, it took us about 20 seconds. There was nothing to adjust but the Hue change.
NX gets high marks for U Point from us. If you know how to point, you won't have to learn it. If you know what Brightness, Contrast, Saturation, Warmth, Hue, Red, Green and Blue mean, you won't have to expand your vocabulary. If you can move a slider, all you need is the software.
Nikon expects to ship NX sometime in July. The beta is pretty rough for a beta, we thought, but accomplished for a proof of concept. Capture has always required a lot of memory and Lindsay told us one or two gigabytes of RAM wouldn't hurt. That's pretty much true of any image editing software working on today's 6-Mp images.
There's a good deal more to NX than our first look might suggest, however. The built-in browser has some interesting labeling and sorting options. Edits can be applied in Batch mode and copied to selected thumbnails in the browser. There's support for Wacom pressure sensitive tablets. And a great deal more you can do with NEF files.
Which is why we've structured this ongoing review as a diary. Stay tuned for the next installment.