CAMERA RAW & JPEG 2000
Adobe Plug-Ins Foretell the Future
By MIKE PASINIEditor
The Imaging Resource Digital Photography Newsletter
Review Date: April 2003
The breakneck race to the megapixel CCD that has continued unabated now to the 14-megapixel digicam might make you wonder what the future of digital imaging can possibly hold. Adobe's recent release of two plug-ins suggests a different direction.
|
C O N T E N T S |
In fact, the company admits that while the new Camera Raw and JPEG 2000 plug-ins have been released for $99 now, they'll be bundled in a future version of Photoshop. That's ruffled some feathers, but we aren't bird watchers. As Adobe said, this stuff is too important to wait.
And it's a lot of work to implement. Ask any of the number of third-party developers who have written software to display and manipulate these proprietary image formats.
WHAT'S RAW? | Back to Contents
There's no little confusion about RAW. First, RAW doesn't stand for anything. JPEG does (Joint Photographic Experts Group). TIFF does (Tagged Image File Format). RAW really just stands for unprocessed or raw data. Its buddies are all acronyms, so it plays along.
Not every camera saves an image as raw CCD data. That's uninterpolated color (just eight bits per sensor, rather than the interpolated 24). And uncompressed data, although much less than stored in an uncompressed TIFF (if a bit larger than a JPEG). And saving raw CCD data also circumvents the post-processing tricks your camera can perform like sharpening and color correcting. Finally, the raw data isn't quite edible; you need smart software to convert it into a viewable image.
So what good is it?
Well, it's the original uncontaminated information captured by the camera. Which has caused it to be compared (oft, as the poet says) to a film negative. There are, in fact, many photographers who save only the raw data. No JPEG, no TIFF, just RAW.
They aren't shooting snapshots, of course. They're shooting images they want to manipulate later. And because RAW formats generally tend to include more than 8-bits per channel (12-bits, for example), they can manipulate both color and tone without suffering the inevitable banding or posterization of corrected 8-bit channels.
This has often been compared to recovering underexposed and overexposed images. But before we get too carried away, let's just say it postpones much of what we typically do in the camera to the comfort of a seat in front of a computer monitor.
WHAT CAMERAS SAVE RAW DATA? | Back to Contents
More and more digicams now offer the option of saving raw sensor data to the memory card.
Among the more prominent are Canon's EOS-1D/1Ds/D60 and PowerShots 600/A5/A50/G1/G2/G3/S30/S40/S45/Pro70/Pro90IS; Kodak's 14n; Fujifilm's FinePix S2 Pro; Minolta's DiMAGE 5/7/7i/7Hi; Nikon's D1/DH/D1x/D100 and Coolpix 5000/5700; and Olympus' E-10/E-20N and C-5050 Zoom.
Canon calls its raw data a CRW file while Nikon has named its raw data files NEF files.
HANDLING RAW | Back to Contents
Once you've captured raw data to your storage card, what do you do with it? You transfer it to your hard disk, like any other image data, but then you have to use your camera's proprietary software to open the RAW files, manipulate them and save them in a format the rest of the world can enjoy. That workflow, notice, leaves the original untouched.
The manipulation (at the photographer's leisure, rather than on the spot) is what the game is all about. Typical manipulations include changing the white balance; shifting the apparent exposure; altering tone and color; and sharping or smoothing.
The manufacturer of your camera knows what the CCD is capturing, so their software can read and display that data. Some enterprising souls have divined the various proprietary RAW formats (each manufacturer's is different, with Canon's perhaps the most different of all). And they've written software to streamline processing of several RAW formats.
Bibble Labs (http://www.bibblelabs.com), for example, offers Eric Hyman's Bibble [W] and MacBibble [M] to handle raw files from the Nikon D1/X/H/100, the Fuji S2 Pro, the Kodak 720 and 760 and the Olympus E Series.
Pictureflow (http://www.pictureflow.com) offers YarcPlus [W] by Bruce Henderson and Michael Tapes to handle Canon CRW files. Similarly, Breeze Systems (http://www.breezesys.com/BreezeBrowser) offers BreezeBrowser [W] to convert CRW files and Canon EOS 10D and Powershot S50 files.
And now Adobe (http://www.adobe.com) has joined the party with its Photoshop Camera Raw plug-in [MW] that handles all of the prominent cameras listed above in either Photoshop or Elements.
CAMERA RAW | Back to Contents
The Adobe Camera Raw plug-in installs simply in the File Formats folder of the Adobe Photoshop Only folder of the Plug-Ins folder. That enables Photoshop to Browse (with thumbnails) or Open raw image files just like any JPEG or TIFF. File access is transparent to the user.
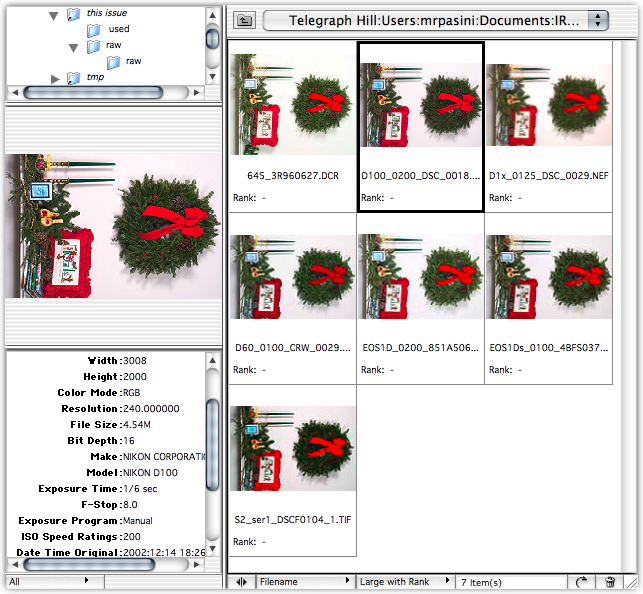 |
| Thumbnails in Browser |
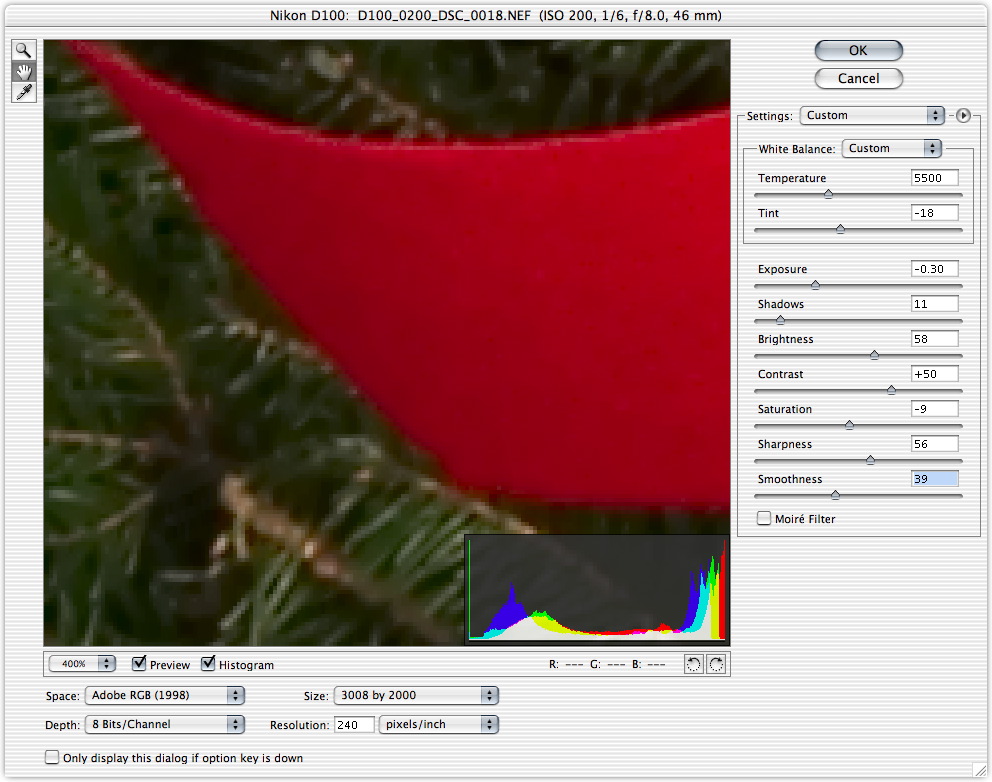
Once an image has been selected, however, the plug-in steps in, displaying a dialog window offering a number of image adjustments with live preview.
 |
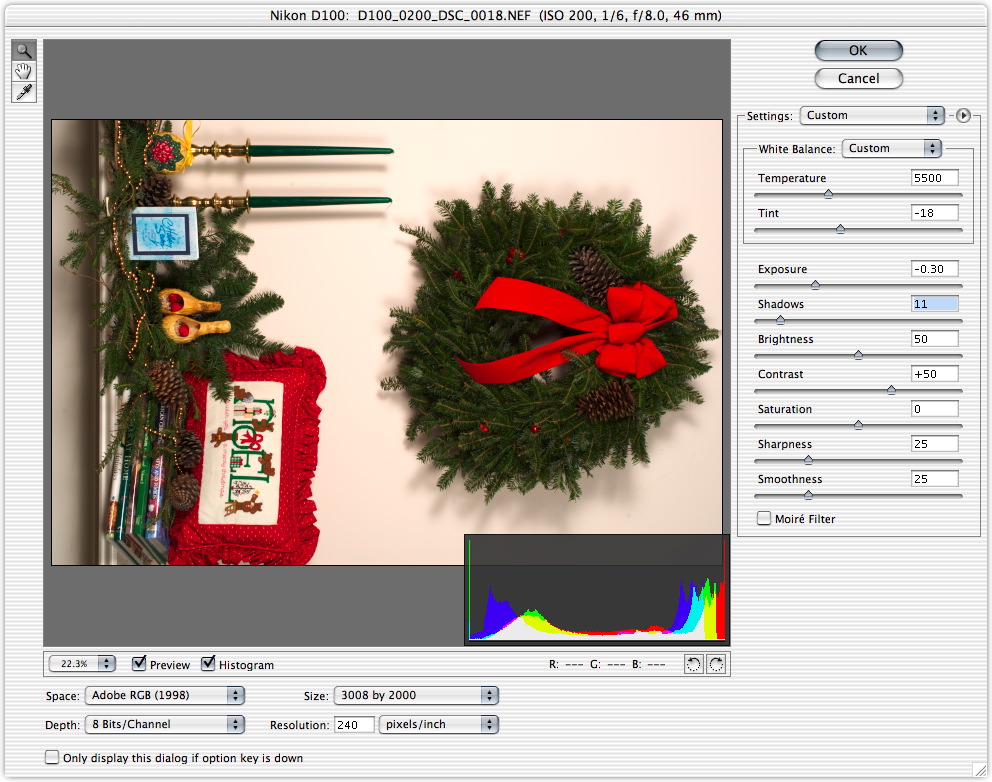
| Camera Raw Plug-In |
The window's title bar includes the image name and basic exposure data (aperture and shutter speed, for example). A large preview window with a transparent histogram overlay takes up most of the window with buttons for the zoom, grabber and white balance tools to its left. Below the preview are an image magnification popup, checkboxes for the preview and the histogram display, RGB data for any pixel and two buttons to rotate the preview.
Below that are popups for:
- Color Space (which should be set to your Photoshop working color space), Size (which permits resampling the image -- with an improved algorithm for upsampling),
- Depth (to open the image in Photoshop with 8 or 16 bits per channel; in Elements there's no 16-bit option), and
- Resolution (with a text field for the value of the printing resolution).
To the right of the preview is where you'll spend most of your time.
Below the OK and Cancel buttons is a panel of nine sliders. A popup above them determines if they are set to the default settings, the previous settings or a custom setting. You can load and save the settings, as well as apply them as a default to any image from that camera.
Your first settings control the white balance. A popup lets you quick choose between As Shot, Auto, Daylight, Cloudy, Shade, Tungsten, Fluorescent, Flash and Custom. You can further refine your choice with a temperature slider that reports degrees Kelvin as you move it and a Tint slider (to handle green or magenta casts).
 |
| White Balance Adjusted |
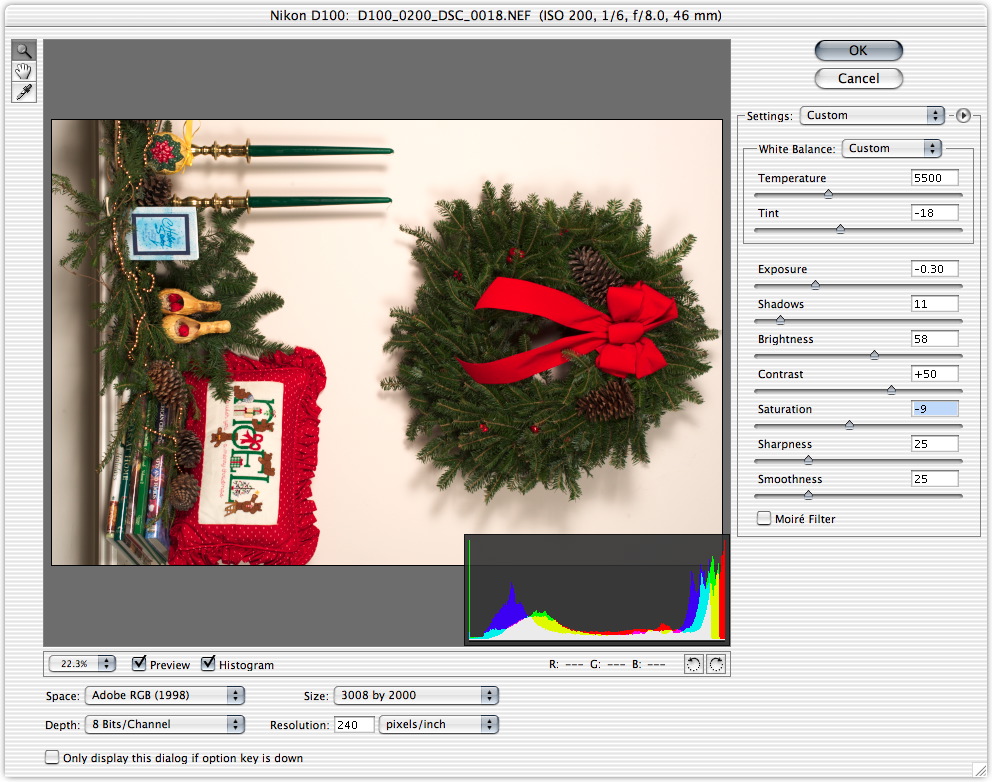
To manage tonal adjustments, a set of five sliders are arrayed in the order you should adjust them:
- Exposure (-2 to +4 f-stops; hold down the option/alt key to preview where the highlights are clipped),
- Shadows (0 to 100 to increase the values that map to black, clipping the shadows; hold down the option/alt key to preview what's clipped),
- Brightness (0 to 100 to compress rather than clip the highlights after setting the white and black points above),
- Contrast (-50 to +100 to adjust midtone values from less to more contrast), and
- Saturation (-100 to +100, ranging from monochrome to double the saturation).
 |
| Exposure Adjusted |
 |
| Shadows Adjusted |
 |
| Brightness Adjusted |
 |
| Contrast Adjusted |
 |
| Saturation Adjusted |
 |
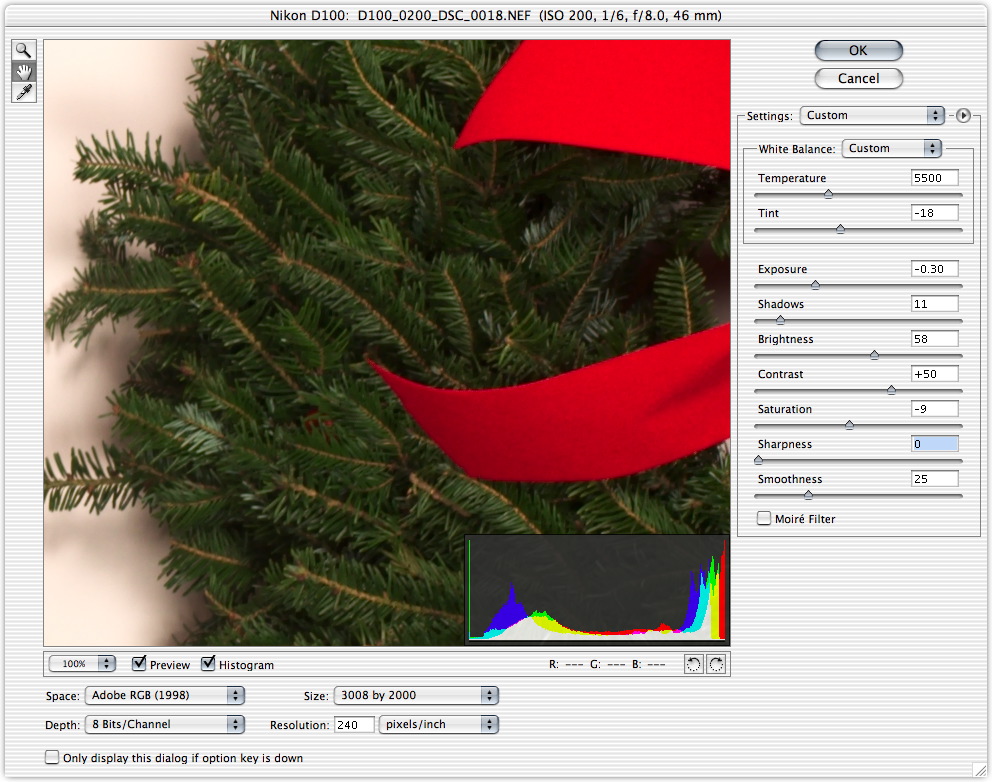
| Sharpness Adjusted |
To reduce noise and moire patterns a Smoothness slider (0 to 100) handles both chroma and luminance noise -- and quite nicely. There's also a Moire Filter checkbox to enable the plug-in's color moire pattern reduction filter. Like those herringbone jackets.
 |
| Noise Reduced |
Because we're in Photoshop, applying settings to a folder of images can be scripted as an Action that can also save the images in TIFF, PSD, JPEG or PDF formats.
However you alter the raw image, the original data remains untouched. You are actually converting the raw image data into a Photoshop working image according to the settings you apply in the dialog window.
JPEG 2000 | Back to Contents
The Camera Raw plug-in provides comprehensive adjustments. But they're all global. You may want to work with Curves or Levels either globally or on a selection to further refine the image before saving it as either a TIFF or JPEG.
But here's where JPEG 2000 comes in. You can tap into JPEG 2000's lossless wavelet compression to save your image as either a standard JPEG 2000 file (JP2) or an extended JPEG 2000 file (JPF) with a JP2 compatible option if you add an ICC profile.
When you Save As and select JPEG 2000 from the formats popup, Photoshop opens the JPEG 2000 dialog window. A large preview is flanked on the left by a zoom tool and grabber. A magnification popup below it includes a text field reporting the approximate download time. You can select what device it uses (cell phone, modem, etc.) from the Download Rate popup on the Download Preview pane of the three panes of options to the right of the preview.
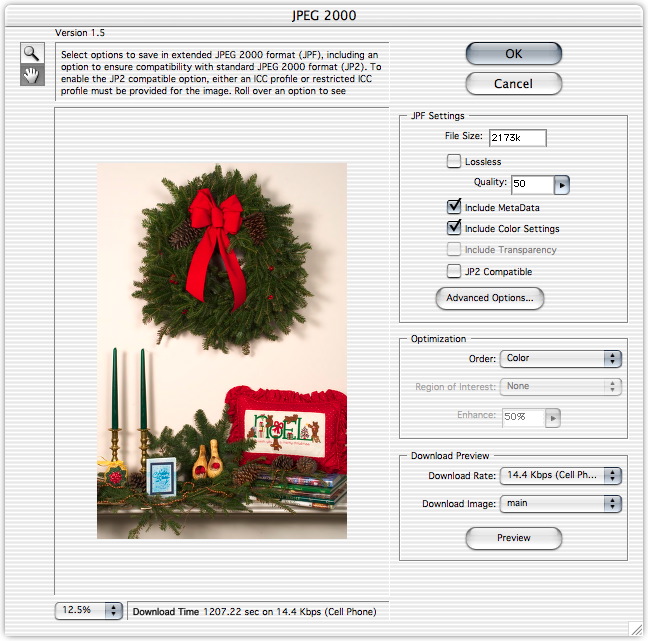 |
| JPEG 2000 |
Under the OK and Cancel buttons the first of those three panes, JPF Settings, offers the main settings:
- Target file size;
- A Lossless compression checkbox with a numeric Quality popup adjustable with a slider; and
- Checkboxes for Include MetaData, Include Color Settings, Include Transparency (when appropriate) and JP2 Compatible.
Below them is a button for Advanced Options.
 |
| Advanced Options |
Advanced Options displays a window with popup menus for Compliance, Wavelet Filter and Tile Size. Those are followed by a Metadata Format pane with three checkboxes for JPEG 2000 XML, XMP and Exif. Below that is a Color Settings Format pane with checkboxes for Include ICC Profile, Enumerated Profile and MAT/LUT Profile. Cancel and OK buttons follow that.
An Optimization pane sits below JPF Settings, offering three popups: Order, Region of Interest and Enhance. Your image must have an alpha channel for the latter two to be active.
TEST DRIVE | Back to Contents
We tapped into Imaging Resource raw data images from Canon, Kodak, Fuji, Nikon and Olympus cameras.
Two things struck us right away.
Opening images with the plug-in wasn't fast. A lot more processing goes on than merely reading 24-bit image data from, say, a JPEG file. While MacBibble seemed a bit quicker, that was merely our impression. We wouldn't call anything fast.
Similarly, adjustments were far from fluid. Sliders tended to stumble more than slip along their range even on spry hardware.
The histogram overlays the image but is transparent. It displays overlapping bar graphs for the red, green and blue channels as well as luminance in white.
We didn't find either the rollover help messages or the slider tags particularly, uh, illuminating. But we did find the tools fairly comprehensive. We were able to set the white point, black point and shift the midtones of these images. We particularly liked being able to preview the content, not just the tonal values, of the highlights (Exposure) and shadows (Shadows) that were about to be clipped.
Our main disappointment was the JPEG 2000 plug-in, because many of its options were dimmed for no discernible reason. With no documentation, we weren't able to test all the options.
CONCLUSION | Back to Contents
But that's the trouble with peering into the future. It hasn't happened yet.
Which is why we're uncomfortable predicting it. It tends to surpass our wildest imagination.
Still, much as we may marvel over true color sensors, the future of digital imaging would seem better served by increased dynamic range in the sensors themselves, increased channel bit depth and lossless compression algorithms like JPEG 2000. These are developments that can be realized in tomorrow's tools.
And we can hardly wait.