 |
ArcSoft PhotoMontage 2000 Software Review: Create High Quality Mosaics From Your Home PC or Mac Reviewer: Stephanie Boozer (Review posted: July 14, 2000) |
We've all seen those really cool posters in bookstores and movie
theaters, the ones that appear to be one large image but are actually
made up of thousands of tiny, color-coordinated images. Remember
the poster for The Truman Show? Well, what was once a very
effective and expensive marketing tool is now an affordable software
package for your PC or Mac. PhotoMontage 2000, produced by ArcSoft,
allows you to create those intriguing photo mosaics without spending
thousands of dollars. Forget about all those hours of scanning.
With PhotoMontage 2000, you can point, click and watch your very
own photo mosaic appear in just minutes. Don't worry about where
you're going to get all those thousands of images either. The folks
at ArcSoft have taken care of everything and included a Mega Library
of over 20,000 images on the software CD. There are also plenty
of sample main images to play around with and get your feet wet.
Just remember that PhotoMontage is only for noncommercial use and
a big copyright keeps anyone outside of ArcSoft from selling these
images.
Surprisingly, the software package itself is extremely minimal.
When we opened up our evaluation package, all we found was a CD
and a flyer about ArcSoft's photo sharing web site, PhotoIsland.com
. By purchasing the software, you receive a free membership to PhotoIsland
and an extra 10 MB of storage space. PhotoIsland allows members
to create their own photo albums online and set up a guestbook where
friends and family can check in to view the albums. ArcSoft has
setup the software so that you can even upload your montage images
directly to the website and have them printed poster size--we'll
tell you more about that later.
Everything about this software is uncomplicated and easy to understand,
but there's a tiny manual included in the CD case if you have any
questions. Likewise, it's simple to install. PC users just find
the setup file and double click (or follow the Windows install wizard).
Mac users just double click the CD icon and begin setup. After only
few minutes, you're ready to go.
System Requirements
Windows system requirements:
- Windows 95, 98 or NT
- 486 based PC (Pentium recommended)
- 16 MB RAM (32 MB recommended)
- CD-ROM drive
- VGA monitor with 16 bit color (or better) display
- 20 MB hard disk space (100 MB recommended for rendering montage)
- Mouse
Macintosh system requirements:
- Power PC
- Mac OS 7.5 or higher
- 64 MB RAM (minimum)
- High-color 16 bit monitor
Getting Started
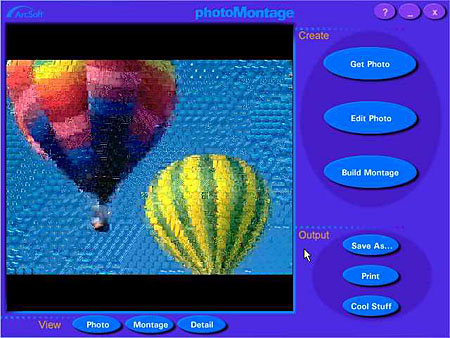
Once you've installed the software, it takes no time at all to get going and produce some truly unique images. After launching the software, the main screen pops up with a few options and a main image display area.
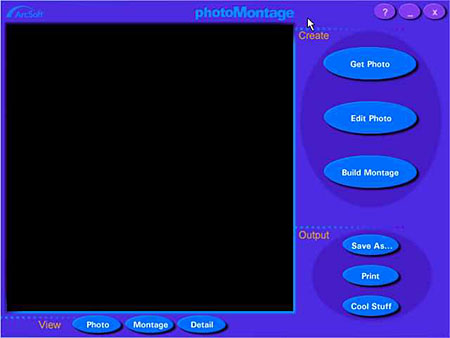
The Get Photo button takes you to the Get Photo screen, where you can select your main image from the ArcSoft CD or pull up one of your own images. Just beneath that is the Edit Photo button, which allows you to crop images and adjust the brightness and contrast. The Build Montage button takes you to the Build screen and allows you to set up how the montage will be done. The bottom three buttons on the main screen are the Output options, which allow you to Save As, Print or go to Cool Stuff. Cool Stuff opens the Special Montage Services screen which shows you some program add-ons such as the poster printing service, a library of micro-image collections and various other digital imaging tricks (we'll go into these a little later). All of the Cool Stuff services utilize your online web browser to contact PhotoIsland.com. The remaining buttons on the main screen are the View options, located directly beneath the main image display area. The Photo button allows you to view the original photo after the montage has been performed. The Montage button goes back to the montage image and the Detail button allows you to scroll around within the image and look at details of certain areas.
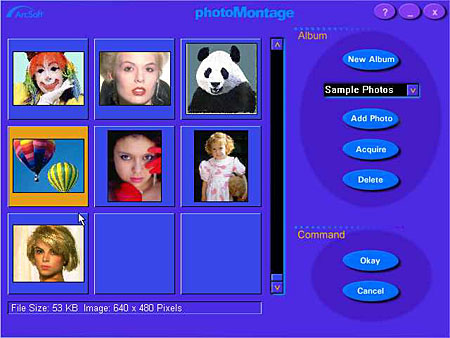
Once you've clicked the Get Photo button on the main screen, the Get Photo screen comes up. Here, a selection of ArcSoft's demo photos is displayed on the left side of the screen in an Album. Under the Create section, you have the option of creating a new album with your own images by clicking the New Album button. These photo albums can contain up to 200 thumbnail images each. The album title window holds the list of available albums to choose from. Clicking on the down arrow expands the list to full view. The Add Photo button pulls up a Windows dialog box where you can select images to put into your customized album. The Acquire button lets you acquire images from a digital camera or any other TWAIN compatible source. Just beneath that is the Delete button, which allows you to delete unwanted images from the photo album. Finally, at the very bottom left of the screen are the Okay and Cancel buttons. Click Okay once you've selected an image and you will be returned to the main screen with the selected image in the main image display area. Clicking Cancel also returns you to the main screen but without a main image.

Once you've selected an image and returned to the main screen, you can
either perform some minor image editing or start building your montage
straight away. If you need to edit a little, clicking the Edit button
pulls up the Edit screen where you can adjust the brightness and contrast
or crop the image. The top box is the Crop Aspect Ratio and lets you choose
either Freehand (where you can manually crop the image) or select from
a list of predetermined aspect ratios. Clicking the arrow button cycles
through all the available options. Both the Brightness and Contrast scales
have clickable plus and minus buttons that alter their values. Once you've
completed your editing, you can save the image with the Save As button
or click Okay or Cancel to return to the main screen. Remember that you
might want to save your edited photo under a different name so that you
always have a clean copy of the original.
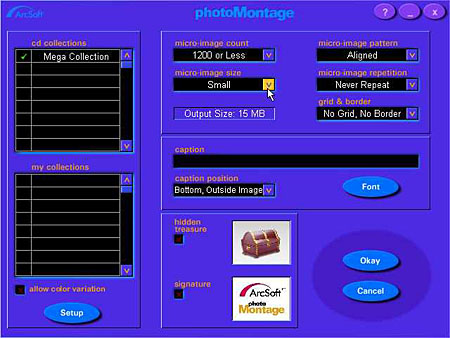
Now you're ready to create the photo mosaic. Clicking on the Build Montage button from the main screen takes you to the Build screen, which is the most complicated that this program ever gets. The hardest part is making the decisions. On the left side of the screen is the CD Collections menu, which displays the available image collections to create your masterpiece. You can select an unlimited number of collections for the program to use in creating the mosaic. The number of pictures pulled from each collection is dependent on how you rate them. (Ratings are from one to three checkmarks - one check mark has the lowest priority and three checkmarks are the highest priority.) Below that is the My Collection menu, which displays any available collections you may have created with your own images. You can include up to five selections from this menu and the same checkmark priority rating system applies. The Setup button directly beneath the My Collection menu lets you set up your personal micro image collections (this actually pulls up another screen where you can add or delete albums). Beneath the My Collection menu is the Allow Color Variation box, which, if checked, tells PhotoMontage to automatically adjust the color of each micro-image to perfectly match the original color of the main photo, which produces really nice, accurate results.
Next, select the Micro Image Count, which allows you to set how many micro images will be used. Choices range from 600 to 2,000. The higher the number of images, the more detailed the final mosaic will be. The Micro Image Size lets you select the overall size of the micro images. The larger the size, the larger the final print can be (and the better the image clarity). Remember that larger size means longer download times and overall file sizes. The Output Size information box lets you know what the final image size will be, depending on the Micro Image Count and the Micro Image Size selections you've made.
Also on the Build screen, you have the option of selecting the micro image pattern. The Aligned choice sets up images in columns while the Offset choice stacks them like bricks. The Micro Image Repetition box lets you select whether or not the images repeat and how they do it. In addition to Never Repeat, you can set them to Limited Repeat, where images can be used more than once but only if they are the best matches, or you can choose Unlimited Repeat, where a micro image can be used as many times as needed. The Grid & Border menu lets you add gridlines or place a border around the image (gridlines make little black dividing lines between the micro images and the border is a simple black one). Once you've set the micro image options, you can designate a caption in the Caption box and then set the placement of it in the Caption Position box. You can also select the desired font.
At the very bottom of the Build screen, you can add a little fun to your final image by including a Hidden Treasure or a Signature. The Hidden Treasure puts a selected image at a random location in the mosaic and the Signature puts a selected image at the bottom right corner of the mosaic. To set specific images as Hidden Treasures or Signatures, simply click on the treasure chest or on the ArcSoft signature box and take it from there. PC users can also set images from the main screen by right clicking on the desired thumbnail in the album and choosing Set Image as Treasure or Set Image as Signature. Once you've made all these selections, click Okay to set them into motion. Or, if you've changed your mind, click Cancel.
Now for the fun part. Clicking Okay in the Build screen brings you back off in the main screen. You'll see the main image turned to what looks like a color film negative and then the tiny micro images will appear one by one until the entire mosaic is complete.
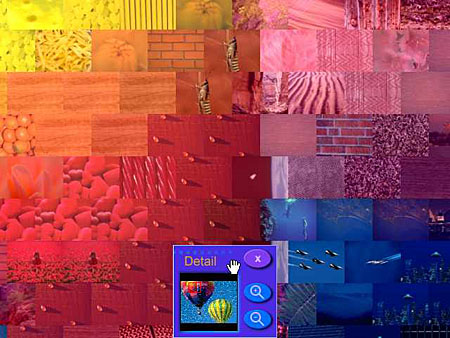
The Detail button lets you zoom in for a close up look at various details in your image. You can also switch back and forth between the actual image and the completed montage for comparisons. Be sure to save the image and click the Print button to print out a copy. A nice feature of this software is that you can save files as BMP, TIF, JPG, GIF, PCX, TGA and FlashPix files.
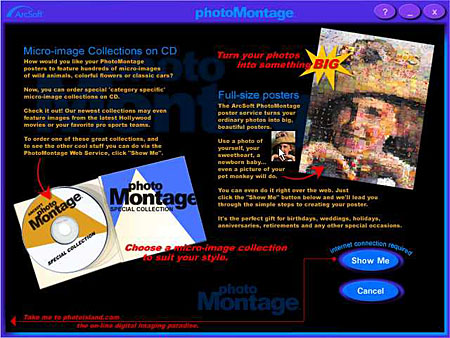
As we mentioned earlier, you can send your image off to ArcSoft and have a large poster printed (just click the Cool Stuff button from the main screen). At the time of this review (February 2000), the large, 36 inch poster costs only $49.95 and the standard, 20 inch poster costs $24.95. One of the newest features on PhotoIsland.com is an offer to have your own picture or image made up of micro images from your favorite movies. The web site just says "coming soon" on this one, so you'll have to keep checking back. You can also purchase additional micro image CD collections from the website with different themes like sports, animals, nature, etc.
So what does this fancy software cost? Earlier versions of PhotoMontage sold for about $99.95, but now you can pick up the full 2000 version for just $39.95. Not too bad when you think of the millions of uses for these mosaics. They're perfect for all those photos that you just don't know what to do with and they make great greeting cards, calendars, etc. We had a lot of fun with this product and we think you will too.
EZ Print Page
If you'd like to print a copy of this review to read off-line, click here
for a version minus the navigation bar, tables, etc. - This should let
you resize the page as needed in your browser window, to fit the width
of your printer.
For More Info:
Visit
ArcSoft's site for more information on PhotoMontage 2000.
![]()