ProJPEG -- Flight Simulation for File CompressionReview by Mike Pasini |
Saving As JPEG can be a lot like a crash landing. You may have a destination in mind but set your controls a little off and there's no recovery.
If only you had a flight simulator -- something, that is, to show you what's going to happen without actually crashing if you make a mistake. Well, we've got the perfect solution: Boxtop Software's ProJPEG.
ProJPEG 4.0 is an Adobe Photoshop file format plug-in. A limited function demo of either the Macintosh or Windows version is available at http://www.boxtopsoft.com. The shareware plug-in is $50 but readers of this newsletter can get it for $39.95 until May 5. We know of nothing else like it at any price.
Its key features are an interactive preview of the effects of your compression settings, an optional progressive display, variable compression and targeted image size. But it also outperforms Adobe's built-in JPEG compression.
INSTALLATION
As a file format plug-in, installation is simple. Just copy ProJPEG to the File Formats folder of your Photoshop Plug-Ins folder.
You don't necessarily need Photoshop to enjoy what ProJPEG does. But while many applications are able to run Photoshop plug-ins themselves, few are able to run file format plug-ins. Just try the demo to see if your preferred application can take advantage of ProJPEG.
ProJPEG does require its own RAM, though. While it can use up to a third of the RAM allocated to Photoshop, in actual use it takes about 75 percent of that. So if you allocate 25MB to Photoshop, ProJPEG will use about 6MB, rather than 8MB. ProJPEG's interactive previews require twice the size of the original RGB image plus about 1MB of overhead for a baseline JPEG. Using the progressive option requires even more memory.
To maximize the amount of RAM available to ProJPEG, you can clear undo information, the clipboard and snapshots and close any other open documents.
But RAM will probably not be an issue if you are optimizing images for use on the Web.
DOCUMENTATION
The downloaded ProJPEG package includes excellent documentation.
Two text documents (besides the Read Me) can get you started right away. The Quick Start is enough to make you an instant expert. Its short but thorough tour hits the high points of typical use. And the accompanying FAQ makes interesting reading whether you've got a question or not.
In addition to that, though, the download includes a complete 140K manual in PDF format which takes you through the whole product from installation to troubleshooting. In fact, if you want to avoid watching us torture this flight simulator metaphor, you can go straight to the manual now to get the picture.
USAGE
When you Save As, just select ProJPEG from the list of optional file formats. It will remain your default.
ProJPEG only works with RGB mode images. This may sound like a serious limitation, but in fact it isn't much of a problem since both your scanner and camera create images in RGB color space to begin with. So using any other mode would require a conversion anyway. But it's worth noting that CMYK mode, while technically possible, is not supported.
Typically, you should only save your image as a JPEG when you are done editing it. Reopening an image saved as a JPEG and saving it again after editing will degrade it. Use your application's native format for intermediate saves. That also lets you use all of the application's features (like layers).
ProJPEG, however, won't degrade quality with multiple saves as long as the original RGB image is open. You'll only get into trouble opening the document saved by ProJPEG and recompressing it.
When you're ready to JPEG the image, Save As and make sure ProJPEG is selected. You'll soon see a large dialog box with lots of options. Think of it as your JPEG Flight Simulator.
The game here is to keep quality airborne while maximizing size efficiency. Using any other JPEG format, you'd only be guessing (and crash landing), but in ProJPEG you can actually see the effects of your settings in real time.
Which means you can actually determine the smallest file size for the highest quality you need.
THE DIALOG BOX
First look at the original's preview box (at 100 percent magnification it usually doesn't display much of the original image.) Grab it and slide it around to an important detail.
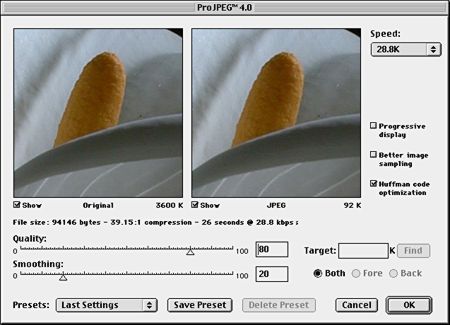
Compare the quality of that detail (its sharpness at the edges, its smoothness in solid areas) to the JPEG preview to the right. They're linked so moving one around moves the other.
Adjust the quality of the JPEG image by moving the two large sliders below the previews.
Even though ProJPEG's default settings typically outperform Adobe's JPEG, you're missing a lot of the fun if you don't adjust the settings.
The top slider determines compression. It makes the biggest difference in both size and quality by how finely it reads or samples the original. Stay within the 10-90 range on the scale of 0-100.
The smoothing slider under the quality slider reduces noise (that sort of grainy effect in solid colors like sky areas). While higher settings can further reduce file size, they can also make your image seem out of focus. As the image preview will demonstrate.
Play with both sliders, observing the effects in the JPEG preview, until you get acceptable quality at the smallest file size. Then you're ready to land. Save it.
INSTRUMENTATION
ProJPEG offers some very useful compression gauges.
The Speed menu lets you target a typical dialup connection speed, calculating and displaying the estimated download time for any set of options. So you can actually see the difference in download time a different quality setting will cause. Real world download times vary considerably, of course, but this is a welcome benchmark. You'll wish every Webmaster used it.
The File Size line shows both the file size of the data fork and the download time at the speed set in the Speed Menu. On the Macintosh, the file size of the image in the Finder will be larger because it includes the resource fork where any preview (and icons, among other things) is stored. But what gets sent through the Internet is (or should be) just the data fork. Boxtop Software provides GIF Prep with the ProJPEG package (or as a free download) to strip the resource fork from GIFs or JPEGs.
The Presets menu lets you save (and manage) various ProJPEG settings. If you have settings that work well for thumbnails, you can save them as, say, "Thumbnails." Another for "High Quality," say, or "EBay Product" shots. In addition to any you save, ProJPEG always keeps track of the Last Used settings. Like any competent navigator, it knows where it's been.
CONTROLS
The quality and smoothing sliders are the big guns, but ProJPEG offers a few other controls that are worth playing with.
The Target text box lets you predetermine the size of your JPEG. This is a wonderful thing if you are creating a banner ad, for example, for a site with maximum size restrictions. Just enter the maximum size and hit the Find button. Then watch as ProJPEG calculates the compression settings to meet your target.
The Better Image Sampling check box controls the sampling rate ProJPEG employs to read the original image. If image quality is critical, checking this box will preserve quality at the expense of file size. Like a flotation device, it's rarely required but it sure is nice to know it's there.
The Huffman Code Optimization check box creates a custom code table for final Huffman compression (cf. our JPEG Revealed feature in the March 24 issue). While it takes a wink longer to create previews and save files, it makes smaller, more efficient files. Which is always useful.
SECRET WEAPONS
Even without the live preview and all the other features we've just noted, ProJPEG would be worth the price for the two special JPEG options it provides: progressive display and variable compression.
Enabling the Progressive Display check box writes a file that will display itself quickly but crudely at first and in successive waves improves resolution until the full file is downloaded. You've seen this commonly in GIFs on the Web, but it's long been an option for JPEGs too. Unfortunately, it isn't always supported in applications other than browsers. So your HTML editor may not know how to display it. The big advantage of this format is quickly displaying a rough of your image to visitors of your site. It's more appreciated by visitors the larger your images are.
JPEG has a little-employed option that permits compressing an image with different settings for different areas. Called Variable Compression, few JPEG programs actually enable you to take advantage of this killer option. ProJPEG does, however.
To use the option, first save a selection of your image in Photoshop. The saved selection tells ProJPEG you have a foreground and a background in your image. The area inside your selection (which you can swap using the Invert Selection option) is the foreground. The area outside the selection is the background.
Once you have an alpha channel (anything besides Red, Green and Blue channels) for your selection, you'll find three active radio buttons: Both, Fore and Back. If your file has only Red, Green and Blue channels, just Both is active.
The variable compression varies the amount ProJPEG's smoothing filters improve the compression.
Selecting Both applies smoothing settings to both the foreground and the background. Selecting either Fore or Back allows you to make individual smoothing settings for either the foreground or background areas respectively.
So if you've got Don Johnson's 'Cuda in your sights against the swirling fog on the Bay (how come it's always sunny in San Francisco on Nash Bridges?), you can select the car (and with that Lemon Twist yellow, it's easy) and set variable compression to really compress the background fog while respecting the '71 detailing of that '70 'Cuda. By using different settings for the background and foreground you get an even smaller file with better quality than you could using a single setting for both. (You may think that has nothing to do with flight simulation, unless you've see how the man drives.)
TEST FLIGHT
We've been using ProJPEG for a few weeks, but a test image serves to illustrate what it can do.
(Please note that the links to our test images download unretouched images, some as large as 570K. That can take a while with a modem connection. Also note that the images are copyrighted.)
Our test image was a 570K JPEG of a calla lily against a dark background straight out of the camera (expanding to 3.52M). Saved at a setting of 7 (the lowest 'high' quality setting) as an Adobe baseline optimized JPEG, it was 207K. As just an Adobe baseline at 7, it was 219K.
| Image | Expanded | Native | Photoshop Baseline |
Photoshop Optimized |
ProJPEG 80/20 |
ProJPEG Better |
ProJPEG Variable |
|---|---|---|---|---|---|---|---|
| Lily | 3,520K | 570K | 219K | 207K | 92K | ||
| Case | 3,520K | 283K | 264K | 253K | 107K | 141K | |
| Case | 1,610K | 109K | 52K | 31K |
Using just the 80 percent quality and 20 percent smoothing settings of ProJPEG the same original 570K native JPEG became a 92K file -- with no apparent loss of quality in the original. In fact, the smoothing seems to have enhanced it a bit.
We chose a second test image about 283K of a small round case with a lot of type against a maroon counter top, expanding to 3.52M also. The baseline Adobe JPEG at 7 was 264K and the baseline optimized was 253K. ProJPEG at 80/20 needed just 107K. Even hedging with Better Image Sampling checked it needed just 141K.
Finally, to get an idea of what Variable Compression could do, we downsampled the image of the small case to a 1.61M image. Allocating 40M to Photoshop wasn't enough to try Variable Compression on a 3.52M image. We would have needed about 60M (roughly 20M for 4 channels at 3.5M each).
The Adobe JPEG 109K image became a ProJPEG 80/20 of 52K. But we were able to achieve a 31K image size using Variable Compression setting the foreground at 80/20 and the background at 60/50. And yet there was no noticeable difference in quality among the images.
CONCLUSION
To get the most out of JPEG compression you have to be able to see how it affects the particular image you're editing. General settings can never be efficient. And to optimize the JPEG compression of any particular image, you need all the compression options that JPEG provides.
We know of no other product with as much command of JPEG compression as ProJPEG.
Up to Imaging Resource Articles Page
Or, Return to the Imaging Resource home page.