| |
A side note: The techniques we’ll be discussing here are only available in professional-level image-manipulation software, such as Adobe Photoshop™ or Corel PhotoPaint™. If you have only consumer-level software, you probably won’t find the key "channel" or "layer" tools we talk about below. On the other hand, some of the fixit tips will be useful, regardless of the program you use.
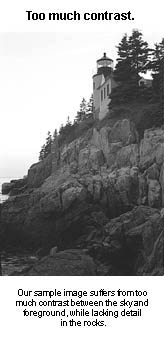 The problem image
The first illustration shows the file we’re starting with: A photo of a Maine lighthouse, taken at dusk. While not world-class photography, the original scene was quite picturesque (particularly in color), with subtle pastels washing the sky behind the dark foreground. The big problem was that the contrast range between the sky and foreground was simply too great: If I exposed for the sky, the foreground would completely plug up, and if I exposed for the foreground, the sky washed out to white, as shown here. The best digital solution would be to somehow separate the sky and foreground, so the two can be manipulated separately.
With a silhouetted subject, this foreground/background separation is often quite easy to accomplish, just by tracing the subject’s outline with a selection tool. In this particular case though, the separation is complicated by the the subject’s transparency in several places, with the sky showing through the glass of the lighthouse, and through gaps in the foliage. What to do?
Mask Basics: Channels and Layers
The solution involves creating "masks" to separate different portions of the image for special handling. Most importantly, we need the masks available in their own image "channels" or "layers," so we can manipulate them separately, and possibly combine or apply several different masks at once. Both Photoshop version 4.0 and PhotoPaint version 8 provide this capability.
A mask of the sort we’re discussing here is rather different from the simple all-or-nothing selection tools available in basic image editors: Here, a mask is a separate plane or layer of the image, containing digital values ranging from 0 to 255. The mask values determine how much of the original image will show through when it is pasted onto a different background, or how strongly various effects will be applied. Generally, a value of 255 in a mask channel means the underlying source image will be copied or affected 100%, while a mask value of 0 means the underlying image will be left behind or ignored. Intermediate values vary the percentage of any effect or the transparency of the image when it is copied. A mask can be created automatically or semi-automatically by the program, and then touched-up by hand, or can even be built from scratch by painting on the mask layer itself.
Different programs handle channels and/or layers differently, and a full treatment is far beyond the scope of this article. These tools are extremely powerful though, so I encourage you to study your software’s documentation.
Creating a Mask
If your software supports masks at all, it probably will allow you to view the mask and your image at the same time, with the mask appearing as a partially-transparent overlay. Working in this mode, it’s often a fairly simple matter to trace the outlines of your object with a paintbrush tool, and then just fill-in the interior to complete the mask.
As mentioned earlier though, our sample image doesn’t lend itself well to such simple handling, thanks to a number of places where the background sky peeks through the foreground subject. Fortunately, there are some automated tools that can greatly ease our task.
 Both Photoshop and PhotoPaint have powerful color-selection tools for defining ranges of colors you want to include or exclude from the masked region. While both applications let you select specific colors to include in the masked area, PhotoPaint goes one better by allowing individual control over the range of hue, saturation (color intensity), and brightness included for each specific color you select. (This can be very handy, allowing you to say for instance: "Include all the bluish-colored pixels, regardless of how saturated the color is, but only those brighter than a certain value.") For its part, Photoshop provides greater flexibility in manipulating separate "layers" of images and masks independently.
Industrial-strength masking

Masking is such a critical ability that third-party vendors have stepped up to the table, offering tools that go beyond even the most sophisticated utilities included in the applications themselves. One such is Mask Pro, from Extensis, available as a plug-in for Photoshop. MaskPro lets you define multiple sets of colors to include/exclude in the masked area, and then paint with a "magic brush," building up the mask in the brushed area based on the currently-active include/exclude color set. The power of this technique is that you can use different sets of include/exclude colors for various portions of the image: Lighting changes across an image often mean that an "include" color in one area is actually an "exclude" color in another. At nearly $300, MaskPro and similar tools aren’t cheap, but if you need to do a lot of critical masking, they’re easy to justify.
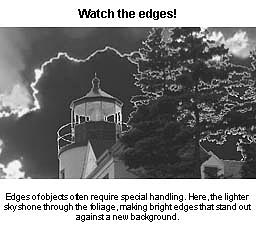 Watch
the edges! A common problem in digital collage work occurs when an object
photographed over a light background is composited into a darker scene or vice
versa. In these situations, it can be very difficult to avoid light or dark
fringes around the pasted-in object. The easy fix is to just cut your mask a
bit tighter, to trim the edges. This may not always be feasible though, as the
off-color fringes may include important subject detail. This is the case in
our sampe image, where background light filtered through the edges of the foliage.
Eliminating the backlit foliage would leave unacceptable gaps in the subject,
but including it would lead to even greater problems when pasting into a dark
or differently-colored background.
Watch
the edges! A common problem in digital collage work occurs when an object
photographed over a light background is composited into a darker scene or vice
versa. In these situations, it can be very difficult to avoid light or dark
fringes around the pasted-in object. The easy fix is to just cut your mask a
bit tighter, to trim the edges. This may not always be feasible though, as the
off-color fringes may include important subject detail. This is the case in
our sampe image, where background light filtered through the edges of the foliage.
Eliminating the backlit foliage would leave unacceptable gaps in the subject,
but including it would lead to even greater problems when pasting into a dark
or differently-colored background.![]()
There are several ways to deal with this, depending on the particulars of the
subject and background involved. Time and space prevent a full discussion, but
the key technique is to create a special mask layer, selecting only the problem
"fringe" areas. Once these have been separated from the rest of the
image through the mask, they can be adjusted independently, to match the tone
and/or color of the new background.![]()
Can’t make it? Fake it!
Often times, the key to life lies in knowing when to put down the screwdriver
and grab a hammer, and image editing is no different. Especially with complex
subjects like foliage or a model’s hair, you could spend all day working
with complicated masks, when a few minutes of cloning would achieve the same
net effect. Faced with such complexity, the best approach often is to create
only an approximate mask, then "paint" in the missing detail with
a cloning tool. Given reasonable source material, cloning-in fine details is
often much faster than than trying to preserve them in the first place through
picky mask work.![]()
Summary
Using masks to separate image objects is a powerful compositing technique. The
latest releases of major software packages and third-party add-ons provide automated
tools that greatly reduce the labor involved. In our "Stock Photography"
article, we show how to use what we've learned about masking to "improve"
your photos!