DxO PhotoLab 2 Review: Fast & easy-to-use raw converter & editor brings out the best in your photos
posted Wednesday, October 24, 2018 at 9:00 AM EDT
Introduction
French company DxO has long been known for their superb and highly advanced photo software, specifically their OpticsPro lens corrections and Prime noise reduction technology. The company has always been at the cutting-edge of getting the most from your photographic equipment, and last year set out on a mission to deliver their advanced software algorithms in a more versatile and user-friendly package. This came in the form of DxO PhotoLab, which combined the tech of DxO’s prior software endeavors plus the U Point technology from Nik Software. DxO purchased Nik Software and all of its technology from Google and implemented it in a fresh, refined way as part of PhotoLab, which is a full-fledged raw photo editor.
The first version of PhotoLab proved to be powerful, allowing for advanced global and precise local adjustments, but it did leave some users wanting for improved workflow and asset management tools, both of which are focused on with the newly-announced DxO PhotoLab 2. I have gone hands-on with DxO PhotoLab 2 ahead of its announcement today, so let’s take a closer look at the software and see how it performs.
Key Features
- U Point local adjustment editing utilizing Nik Software technology
- Brush and graduated filter options are also available for local adjustments
- DxO Smart Lighting to optimize dynamic range
- DxO FilmPack to recreate style, colors and grain of over 80 types of film
- Perform distortion correction via DxO ViewPoint
- DxO Prime noise reduction technology is available
- Lab-built optical corrections for softness, distortion, chromatic aberration and vignette
- Non-destructive workflow compatibility with Adobe Lightroom
- Multiple exports with a single click
- ICC profile management
- NEW: better asset management and search functionality via DxO PhotoLibrary
- NEW: DxO ClearView Plus allows for better dehaze/demist/defog technology
- NEW: DCD color profile support
User Interface and Workflow
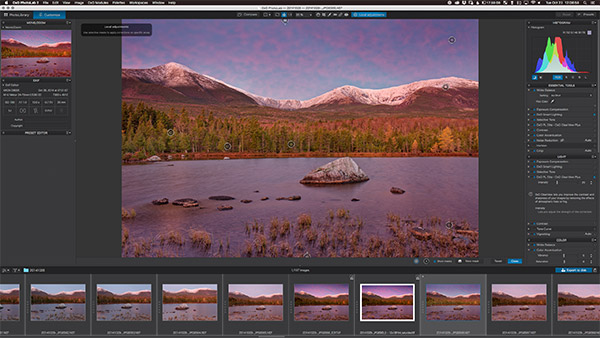
The user interface of DxO PhotoLab 2 is straightforward and easy to navigate. The software is also easily customizable, which allows you to tailor the workspace to your own preferences and you can even save separate workspaces if you want a different arrangement depending upon what type of work you are doing at any given time. Personally, I like the default arrangement pretty well, with the library information on the left side of the screen and all editing tools along the right side.
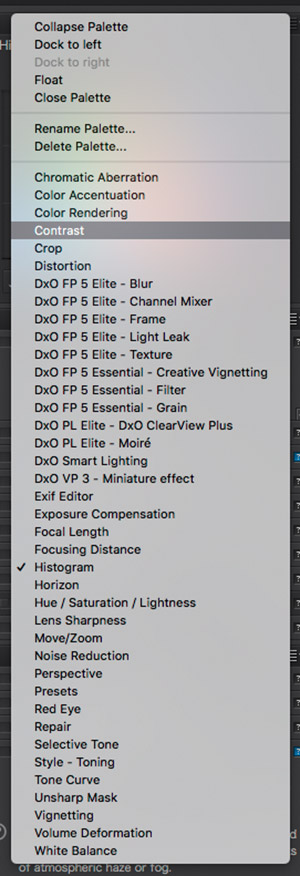
You can create palettes of editing tools, allowing you to group certain tools together as you see fit and then rearrange their ordering. This is a nice feature. On a side note, I really like the histogram in PhotoLab 2, as it is large and easy to read while offering black and white level warning options. Further, you can access individual channels in the histogram.
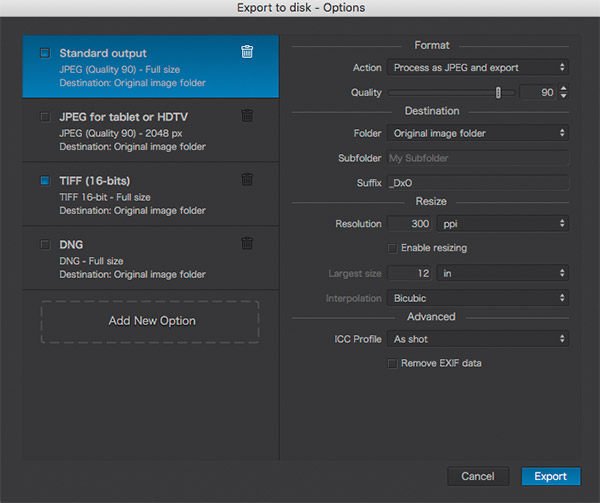
Regarding workflow, there are two specific features of PhotoLab 2 I’d like to discuss. First, you can export multiple types of files at one time. Suppose you have edited an image or multiple images and you would like to export them as multiple types of files. Rather than export them separately, you can perform a one-click export with multiple file types and parameters, including image size, resolution, color profile and more. After you have established your settings, you can export a small JPEG, large JPEG, TIFF and DNG all at the same time, for example. For users with the desire to use the same image in multiple places, this is really convenient. Further, DxO PhotoLab 2 now has DCP color profile support in addition to its existing ICC profile management.
Secondly, there’s a new search engine in PhotoLab 2. This allows you to search for images based on certain parameters, including ISO, shutter speed, focal length, camera type, file name, rating and more. Suppose you type in “100” in the search bar in the top left-hand corner of the application, the software will ask you if you mean ISO 100, 100mm, 100s or 1/100s. It’s pretty handy and you can stack multiple search queries to further fine-tune your search. DxO is aiming to continually improve the search functionality as early as later this year and is researching how to integrate artificial intelligence. Hopefully we will be able to search based on subject someday, with the software using AI to identify different subjects in all your images. Nonetheless, as it stands now, it works well. The company is also looking for feedback on all features, but searching in particular, so if you try the software and have some suggestions, do let them know how you want to see it changed and improved.

Corrections and Editing: Be creative and bring out the best in your raw photos
While organization and workflow features and improvements are very important, the heart of DxO PhotoLab 2 is processing your raw files and getting the most out of your camera and lens. The company is well-known for their highly-technical, refined image correction tools and those work well, but there are also many ways to make nice creative edits to your photos, so let’s look at some of the tools offered and how well they work.
The first thing you’ll notice when you import a raw file into PhotoLab 2 is that there are some automatic corrections being applied, including automatic lens corrections and noise reduction. Generally, this is fine, but you may be surprised that your files might look different than they do when you open them in different photo editing software. If you'd like to change the default handling of new files, simply go into Preferences and adjust the Presets.

DxO Smart Lighting is another edit which is enabled by default, and it generally does a good job of giving images a quick bit of pop and overall improvement, specifically with respect to dynamic range. However, I think that it removes a bit too much contrast in certain types of images. I think it's worth leaving on so you can see if you like what it does to your photos, but if you want a more hands-on image editing experience, consider turning it off or tweaking the intensity and settings. It can work globally or through a spot metering mode, which is neat because it allows you to pick a section of the image you want Smart Lighting to use for its corrections. It does a good job in scenes with a wide range of tonal values, but a heavy hand will often lead to flat results.
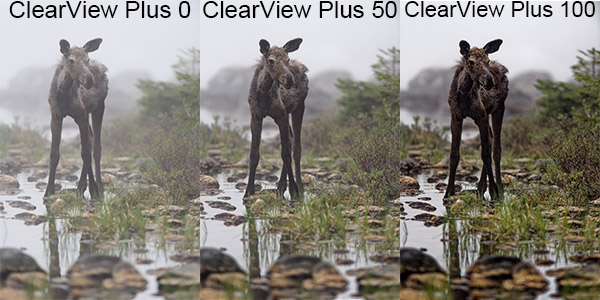

In PhotoLab 2, a lot of emphasis has been placed on the new ClearView Plus technology, which is considerably improved over the previous iteration. Basically, ClearView Plus is designed to evaluate your image and then precisely reduce the effects of atmospheric conditions, such as haze, fog and mist, to add contrast, color and clarity to your image. What makes the implementation in DxO PhotoLab 2 special is that the software does a very good job of assessing areas of your image so that it applies the effect only where it is needed while simultaneously not introducing artifacts and halos around high-contrast images. In the different situations I presented to it, including ones without much by way of haze, it did a really nice job of enhancing details while maintaining file quality and overall natural results. The default intensity of 50, which might be a bit heavy-handed in some cases, but you can push it even further and still retain a high-quality file, which impressed me a lot.

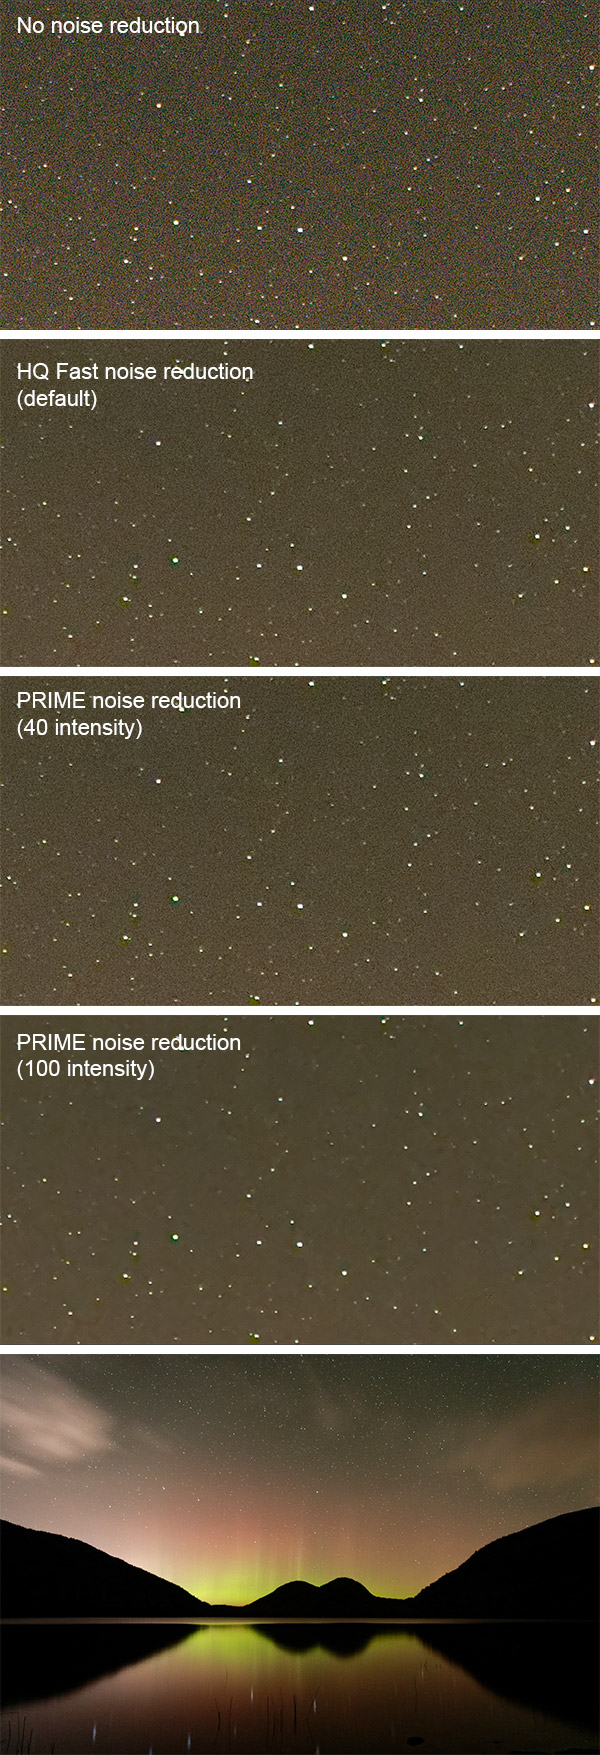
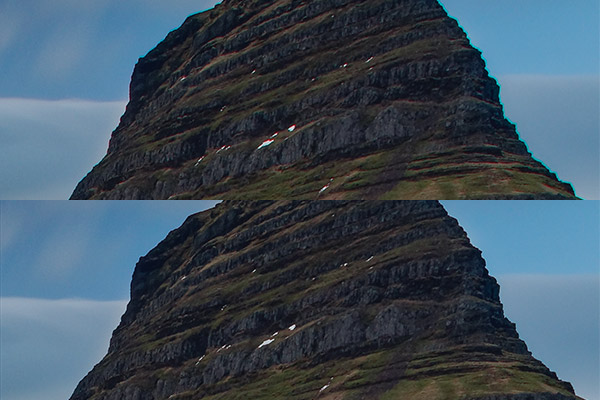
DxO is known for their PRIME noise reduction technology. In PhotoLab 2, the noise reduction is very good. By default, it is set to HQ (Fast), which is, as its name suggests, fast, taking a fraction of a second to work its magic. The company's flagship noise reduction, PRIME, takes longer – still only a few seconds -- but it does a better job in some cases. With that said, the difference between PRIME at its default intensity of 40 and the HQ (Fast) default noise reduction setting is not always discernable. In both cases, the noise reduction in PhotoLab 2 does a good job of smoothing out noise, both color and luminance, while retaining fine details. The software does not eliminate all the grain, but instead makes it much finer and less blotchy, which is a good way to approach noise reduction, in my opinion, because it doesn’t compromise the overall look and “feel” of an image while still retaining good detail. Ultimately, the noise reduction produces natural-looking results.
Local adjustments are excellent in DxO PhotoLab 2, including somewhat standard local adjustment tools like graduated filters and adjustment brushes. Where the software really shines, in my opinion, is through the implementation of Nik's U Point technology, which DxO acquired from Google. The U Point technology is better than ever, offering excellent and intuitive control over many image parameters. Specifically, there are three distinct groups which each offer their own settings, which are laid out in an equalizer format. In “Light,” you can adjust: Exposure, Contrast, Micro contrast, ClearView Plus, Highlights, Midtones, Shadows and Blacks. In “Color,” the options are: Vibrancy, Saturation, Temperature, Tint and Hue. Finally, there’s a “Detail” group, which includes Sharpness and Blur.
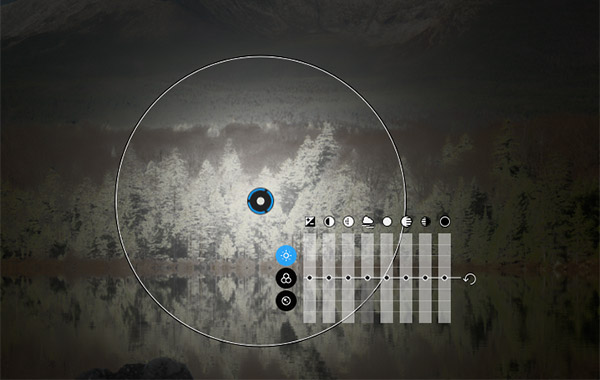
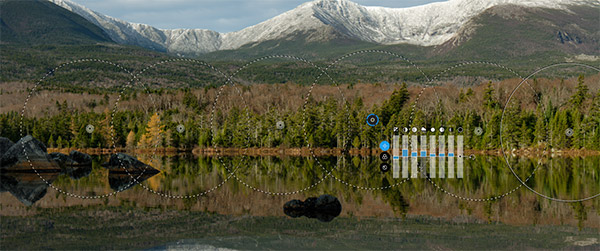
U Point’s Control Points are simple, efficient and effective. When working with Control Points, you can just click to add additional points to the group you are working within, allowing you to quickly and easily adjust larger areas at any given time. You can also change the size of new points, which adds further control. It works remarkably well by assessing the area within your Control Point to determine how much intensity to apply at the individual pixel level. This allows for precise and natural-looking results as there is a really soft levelling out of your adjustment from the center toward the edge of the circle. There are many times I can utilize only control points for local adjustments rather than have to worry about painting masks onto an image manually.
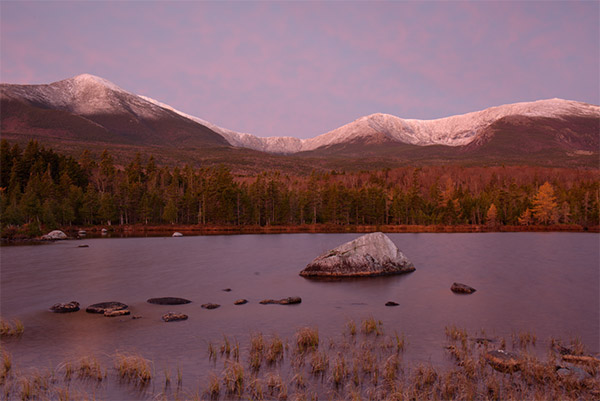
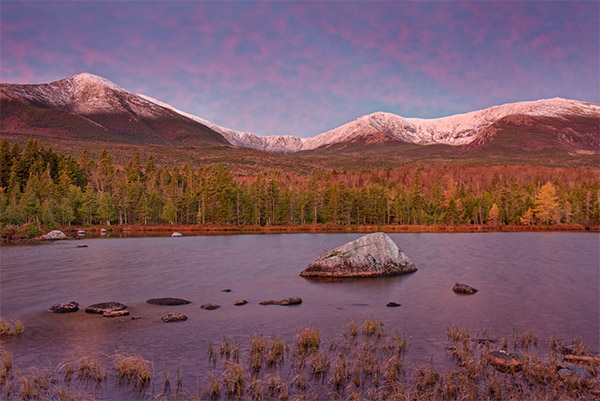
By combining multiple local adjustments plus the many global adjustments available in DxO PhotoLab 2, it is a very powerful raw editor. You can see a few before and after examples below. While I do have some prior experience with PhotoLab and U Point technology, I tried to make it a point to edit an entire image in as little time as possible while maintaining quality results to test how fast and easy the software performed. These edits were made in less than ten minutes and involve global and local adjustments.
The software, while excellent, is not perfect. For example, some competing software offers control over additional color channels, such as orange or purple, which I appreciate. Further, some other software delivers better black and white conversions. In the case of PhotoLab 2, black and white conversions are handled via Style – Toning Adjustment, which is a palette on the right side of the workspace. If you combine this with local adjustments and global adjustments, you can get a nice final look, but it’s not as easy as it is in Lightroom. Of course, you can use DxO PhotoLab 2 in conjunction with Lightroom to get the best of both worlds. Further, you can purchase the Nik Collection by DxO to access Silver Efex Pro, which is one of the best black and white conversion tools available. It’s a minor quibble, but my point is that there’s no perfect tool that handles all photo editing needs, and DxO PhotoLab 2 doesn’t change that fact. However, it’s very good at a lot of tasks, from import, editing and exporting and beyond.

DxO PhotoLab Elite versus Essentials
When you go to purchase DxO PhotoLab 2, there are two versions available. There is the “Essential” edition and the more expensive and fully-featured “Elite” edition. In the Essential Edition, you have two activations, local adjustments, repair tool, DxO Lens Sharpness, raw conversions, high-quality noise reduction, optical corrections, DxO Smart Lighting, spot weighted mode, selective tone, image editing tools, red eye correction, batch processing, a customizable workspace, full screen mode, integrated export, interaction with Adobe Lightroom and more. With the Elite edition, you have access to everything in the Essentials edition plus an additional activation, DxO PRIME noise reduction, DxO ClearView, anti-moiré tools, ICC profiles, DCP profiles, color rendering profiles, multiple exports, preset editing, partial preset creation and customized palettes.
Pricing and Availability
For a limited time, DxO PhotoLab 2 Essentials costs $99 and the Elite edition costs $149. After this introductory pricing, the software will cost $129 and $199 respectively. You can purchase the software here.
Summary: DxO PhotoLab 2 builds upon a strong tradition and offers improved organization and image editing
As I said, no software is perfect. However, DxO PhotoLab 2 is very good for a number of reasons. It is fast, whether you are importing, organizing, editing or exporting. The local and global adjustment tools are effective and easy to use while maintaining very good image quality. Its automatic editing tools, including SmartLighting and lens corrections are excellent. The PRIME noise reduction technology is very good as well.
There were some cases where certain cameras I have used weren’t supported, including all Fujifilm X Series cameras, so you should check on DxO’s site to ensure your camera and lenses are supported, but if the software will offer you the support you need, you will be rewarded with an enjoyable to use and powerful raw organizer and editor.
What I liked best:
- Fast and well-organized
- Excellent U Point local adjustment technology
- Fantastic noise reduction
- Improved and effective ClearView Plus technology for removing haze, fog and other atmospheric conditions from images
- Nice workflow features
What I disliked most:
- Incomplete camera and lens support, including no support for modern Fujifilm cameras
- Default settings include too many automatic adjustments for my liking
- Not quite as much control over black and white conversions as other editors
DxO provided me a trial of DxO PhotoLab 2 ahead of its announcement for the purposes of this review. No other compensation has been received for this review.