How to Get Great Photos with a Cool Tabletop Home Studio
posted Monday, May 7, 2012 at 7:14 PM EDT
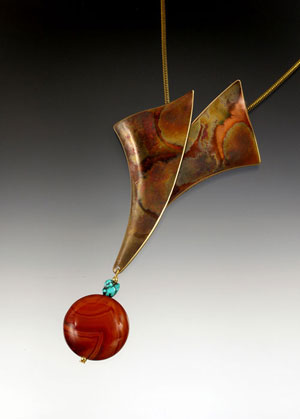
![]() I’m a tabletop studio fan. They are easy to use and despite their small size, these tiny “studios” are a great way to get very high quality photographs of coins, stamps, flowers, jewelry, collectibles or water drops like Martin Waugh’s amazing liquids frozen in motion photos. Simple to make, I’ve constructed them out of everything imaginable -- my favorite was my studio in a shoebox -- and they are naturally small enough to be quickly broken down and stored when not in use.
I’m a tabletop studio fan. They are easy to use and despite their small size, these tiny “studios” are a great way to get very high quality photographs of coins, stamps, flowers, jewelry, collectibles or water drops like Martin Waugh’s amazing liquids frozen in motion photos. Simple to make, I’ve constructed them out of everything imaginable -- my favorite was my studio in a shoebox -- and they are naturally small enough to be quickly broken down and stored when not in use.
In Italian, the word studio means “a room for study.” I like that notion that it is a space away from the hustle-bustle of the outside world, where the photographer can study and contemplate their work. Whether shooting objects for fun, for an auction site, for documentation or for insurance purposes, using the tabletop studio is an opportunity for a photographer to slow down and think about lighting and image making.
There are two basic components to any studio; the background and the lighting.
The Background
The key to a tabletop studio is the background paper. The background paper defines an empty space and allows the viewer to see an object without distraction. The background’s emptiness focuses our attention on the object photographed. To emphasize this effect, the background is hung to create a horizonless 3-dimensional space, not a flat one.
 The simplest background is a large piece of white or colored paper hung from a wall and draped onto a tabletop. For example, tape a 20 x 30-inch piece of poster paper to the wall about 15 inches above a table. Then lay the bottom of the paper on the table with a gentle curve where table and wall meet.
My tabletop studio set-up is on a table in one corner of my office and to make changing backgrounds easier, I have attached clips to the wall above the table. For a more professional look -- as in the photos with this post -- you can get small 11x15 or 15x22-inch vinyl graduated (black to gray to white) backgrounds from any number of online suppliers including www.tabletopstudios.com, www.adorama.com or www.bhphotovideo.com.
The Lighting
The lighting for a tabletop studio need not be elaborate. It is even possible to use a tabletop studio without any lighting devices. Just place the setup by a large north-facing window and use that natural light. While this works, I prefer to use artificial lighting so I can both control of the lighting and shoot at night.
Because of the small working distances involve in using a tabletop studio, the lighting need not be large. Hardware store work light reflector housings with 50 watt daylight coiled fluorescent lamps (CFL) work surprisingly well with small objects. Because the CFLs don’t generate a lot of heat (like tungsten lights) they can be ganged together for more powerful lights. Many of our online advertisers sell four, nine and sixteen bulb CFL monsters that produce more light than big tungsten floodlights while using far less electric power.
Electronic strobes work very well with tabletop studios too, but not the ones built into a digital camera. Their frontal light is  downright ugly and using the camera flash allows you no way to control shadows or contrast. Use accessory strobes rather than the popup on your camera.
Several of our advertisers sell kits of pairs of “slaved” flashes for under $100. These low power units work very well for most photography. Another option is to do what Martin Waugh did and opt for bigger strobes; he uses a pair of Vivitar 285HV flashes.
Whatever lighting you choose, it is handy to have the lights mount on stands. Initially, set the lights so they are two or three feet above the tabletop surface, on each side of the background and place the stands a few feet in front of the background.
Shooting with a tabletop studio it is best to use a moderate 100-135mm (equivalent) telephoto lens or a zoom lens set to an equivalent focal length. Using a telephoto has two advantages. First, it produces a compaction of perspective, which makes objects look more the way we “see” them than a wide angle lens would. The telephoto’s somewhat narrow depth of field also helps to keep the background out of focus, even at lens apertures like f/11 or f/16. Perhaps of greatest importance is that using a telephoto lens allows for a larger working distance between the camera lens and the subject, which makes lighting easier.
Use a tripod when shooting with a tabletop studio not just for its stability, but to have the ability to retain the framing of the subject image to image. After reviewing a picture on the monitor, I may want to reposition the subject or the lights or try a different exposure. Shooting handheld there would be no way to replicate the previous frame, with the camera on a tripod, it’s a cinch.
With background and lights in place, next position the subject on the background. Start with the objects about two-thirds of the way from the wall on the flat part of the background. Watching the camera’s LCD monitor or viewing through its viewfinder, move the camera until the subject, surrounded by the background, fills the frame.
With a two light setup, controlling contrast range is a matter of repositioning the lights. The left hand light is usually my main light and the one on the right my fill. To darken shadows, all I have to do is move the fill light farther back, to lighten them I move it closer. After making an adjustment, I take a shot and reviewing it can instantly see any change.
Many commercially available tabletop studios kits come with light tents. Light tents are nice for photographing difficult to light shiny objects. They reduce contrast by somewhat eliminating the hot spots (glare) on the shiny surfaces. However, they aren’t meant for general photography. The low contrast lighting environment inside a tent can take the snap and crispness out of a subject and leave it shapeless. Buying a tabletop studio kit, consider the light tent an optional piece of equipment to use for that occasional high contrast object.
A word of caution too, using a tabletop studio is addictive. As happened to Martin Waugh, you might start taking photos and before you know it, it is ten years later and you’ve made over 100,000 frames, and you are having so much fun you just can’t stop.