Understanding Bokeh: The fine line between sharpness and blur (part 2 of 2 in a series)
posted Friday, September 20, 2013 at 4:24 PM EDT

In the first part of my two-part look at understanding bokeh, I discussed some of the basic science and art behind out-of-focus photographic blur. But to fully understand bokeh, it's also important to look at its relative opposite -- sharpness.
As you might expect, there will be differing views on exactly what constitutes sharpness in a digital image. A portion within a photo that is sharp enough for you may strike me as a bit soft, or vice-versa. So, how do viewers of images decide exactly where something comes into (or goes out of) focus? Can we quantify it? (Warning ahead -- there will be math!)
Circles of confusion and sharpness
We start with the fact that with human vision, very small circles eventually become indistinguishable from sharp points as diameter is decreased. Resolving power is a measure of the ability to distinguish between points (details) very close together. Those who started their photography with film and prints will be aware of line pairs (very close together) used as a way of defining resolution, and of looking to see when they seemed to be separated. Unfortunately, it was never absolutely clear.
In this digital age, to start with points when talking about digital camera sensors, we have to deal with sensor sites that are extremely small and control resolution. Someone with normal vision cannot resolve objects -- a pair of stars in the night sky, for example -- separated by less than one minute of arc (one 60th of a degree), so very small spots (blur circles) are perceived as sharp points. The smallest a circle can be and still seem a point is called the circle of confusion, or circle of least confusion.
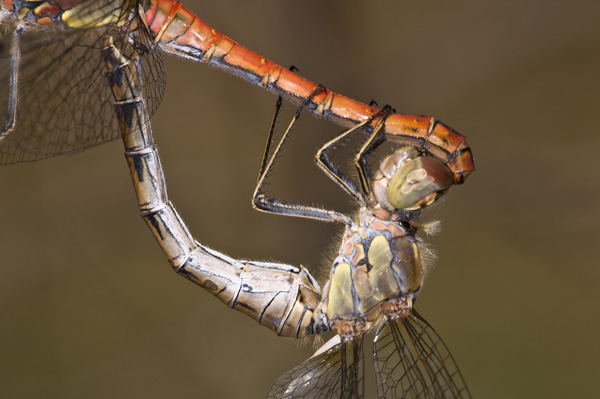
Photo by Paul Harcourt Davies
In practical terms, for someone with "normal" vision, a circle of 0.20mm is indistinguishable from a point on a 8x10-inch print viewed from about 10 inches (25cm) away. In fact, you could not separate details closer together than this, since they would merge.
So what has this 0.20mm figure have to do with that figure of 1/30mm often associated with circles of confusion? That 1/30mm figure, which we met earlier, is the circle of least confusion on a 35mm film frame (or an FX sensor), and what used to be the standard 8x10-inch print, which itself owes its origins to historic full plate camera's plate size.

Image courtesy of Paul Harcourt Davies
Now let's do some math. Again, the comfortable viewing distance from an 8x10-inch print is 25cm; it's also sometimes called the least distance of distinct vision. The angle of view (taking in the whole print) is 60 degrees measured along the diagonal (let's hear it for Pythagoras), which is 32.5 cm (12.8 inches) for this print. However, to produce a print like this from a 35mm film frame (FX sensor has a 42.4mm diagonal) takes an enlargement of more than 7.5x. So the original circles of least confusion (those on the sensor), would have had to be 0.2 divided by 7.5 which is nearly 0.03mm -- the figure we came across before.
This has importance when we look closely at two things fundamental to macro photography: depth of field and lens resolution. This value of 0.03mm is traditionally used by lens designers when optimizing designs for 35mm-equivalent, full-frame sensors. However, in the past, they have used circles ranging from 0.025mm to 0.033mm (and more for larger format lenses) where a negative does not need to be enlarged many times. However, with smaller sensors they have to use even lesser values, bearing in mind the final print or screen image is produced by enlarging the image on the sensor (with its imperfections) many times, so the circle of least confusion must be that much smaller.
Depth of field and sharpness
When sharply focused on a point, a lens images it as a point but moves the focus slightly to either side and the point then becomes a tiny circle. The depth of field is the distance between the limits of either side of this sharp focus where the circle does not exceed 0.03mm.

Photo by Paul Harcourt Davies
Within that range the subject appears sharp; the depth of field increases as the lens aperture gets smaller. This value of 0.03mm is used to calculate the entries in depth-of-field tables that, of course, change when smaller sensors are used with a circle of confusion less than 0.03mm. (Old-school photographers who might have looked at depth-of-field tables for Hasselblad lenses would have seen different values for depth of field for a particular magnification and aperture when compared with a table for 35mm format lenses because they used a larger circle of confusion of 0.05mm.)
Resolution and sharpness
We can think about what happens to the circle of confusion as sensors get smaller when, to make that 8x10-inch print, the image from the sensor has to become enlarged more. The value of 0.03mm is accepted as the value of the circle of least confusion on an 35mm-equivalent sensor that has a diagonal of 43.4mm. Relatively speaking, the circle of confusion is 1/1447th the size of the sensor.
With a smaller sensor, this diagonal value changes proportionally. For example, consider the APS-C sensor used by Nikon, Sony and Pentax. Dimensions are 23.6 mm x 15.6mm with a diagonal of 28.3mm. That same 1/1447th fraction of the diagonal (the circle of confusion to use) is 0.02mm, and on the same basis, for a Canon APS-C sensor (22.2mm x 14.8mm: diagonal 26.7mm) the circle of confusion would be 0.019mm and for the Micro Four Thirds system (17.3mm x 13mm: diagonal 21.6mm) it is 0.015mm.
In other words, the smaller the sensor, the smaller the circle of confusion has to be. Small sensors make greater demands on lens design and the correction of defects and, as sensor sites get smaller, lenses need to have higher resolution to cope with them and get the best out of them in terms of image quality. However, there are limits to how small sensor sites can be and offer higher resolution -- not just the limits of manufacture, but also the limits of optics.
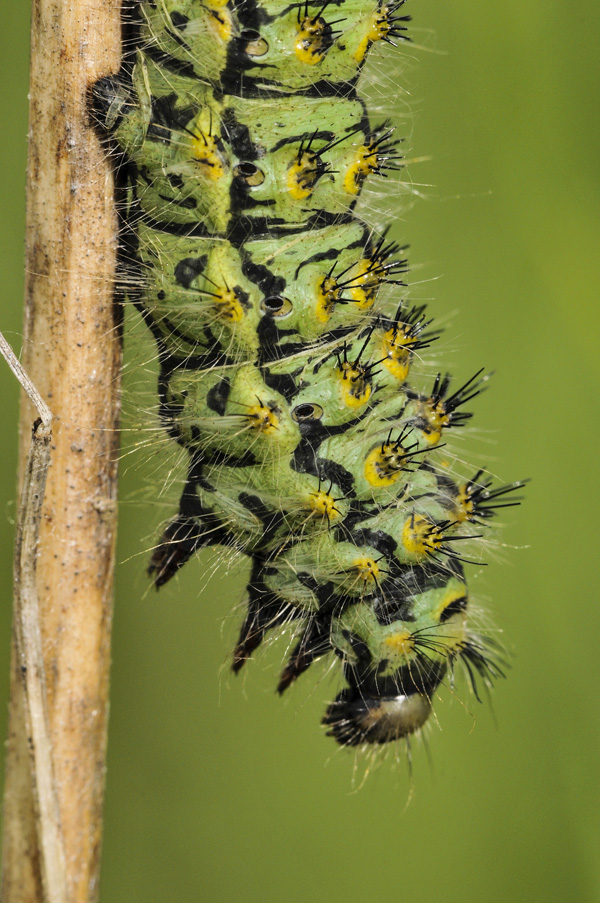
Photo by Paul Harcourt Davies
Back to bokeh
There are two photographic questions, often asked, whose answers lie in an examination of the differences between formats -- usually full-frame (derived from 35mm film) and something smaller (e.g., APS-C sensors).
1. How is depth of field affected by Sensor size?
2. How does Sensor Size affect Bokeh?
You will often read that you cannot get good bokeh from small sensors in the same way that you can from larger sensors. To make comparisons we need to be comparing like with like, and not oranges with apples as the saying goes. First we need to compare an image from each format where the subject occupies the same proportion of the frame.
The larger the sensor, the closer you need to be to fill the frame with a particular lens -- or alternatively, you need a longer focal length lens at the same distance to fill the frame. And, to maintain the depth of field you need to use smaller aperture sizes with the larger sensor.
For example, a 100mm lens set at f/8 with a sensor of crop factor of 1.5x would have nearly the same depth of field as a 150mm lens at f/11. And, from the same position, both would share the same perspective -- that all important link between elements in the frame.
You can start the comparison the other way around by looking at a typical print made from files taken with both sensors: To get the comparison prints of the same size (let's go for the 8x10-inch size again), the image from the smaller sensor requires a greater magnification (1.5x more) than from the full-frame sensor. So, the smaller sensor at f/8 would give us the same depth of field in that full-frame print made at f/11. When you use small sensors, they produce the same depth of field at wider apertures compared with full-frame cameras. Thus, small sensors can be a boon for macro photographers.

Photo by Paul Harcourt Davies
I have written a great deal on macro photography, and I often discuss my preference for the DX (crop) format because of the way I can use depth of field to my advantage, as seen in the above photograph. The insect was emerging from an over-ripe fig and I used a flash. (The highlights remind me of how juicy and moist the environment was; I could have taken them out but did not.)
It all comes down to the magnification on the sensor: A subject has to be magnified less to fill a small sensor than a large one. Particularly in the close-up range for a given aperture, it depends only on magnification -- not the focal length of the lens used. Of course the images look different because of the way the background will be treated.
This is where we can begin to talk about bokeh. I mentioned lenses of 150mm and 100mm focal length because I often use macro lenses of these focal lengths or something similar. The 150mm f/2.8 macro lens has a lovely bokeh wide open on full frame,and to achieve the same perspective and depth of field on an APS-C sensor (1.5x crop), the 150mm would require an aperture of approximately f/1.8. Sadly, it's an f/2.8 lens, so it will not give the same bokeh.
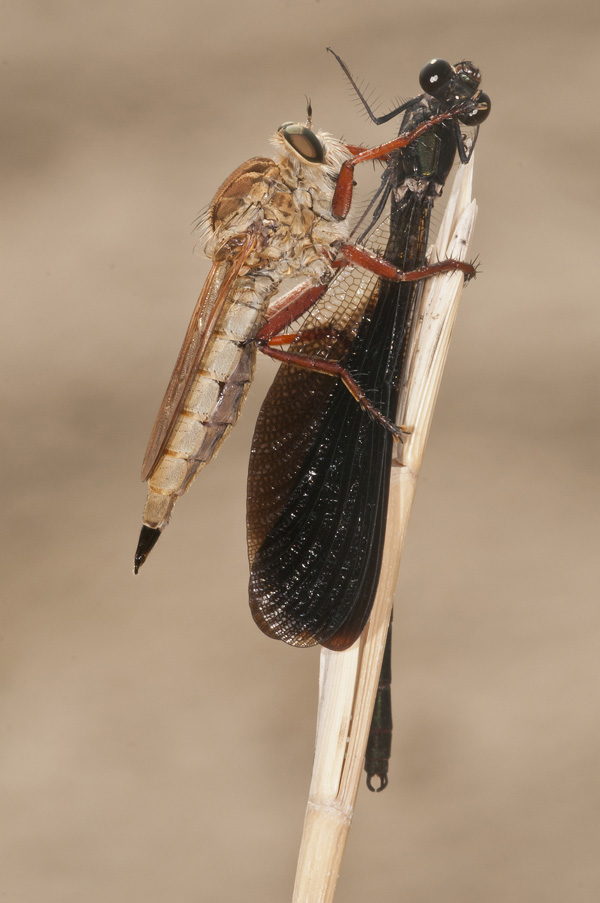
Photo by Paul Harcourt Davies
When you use lenses on small sensors you cannot get wide enough apertures to simulate the bokeh from a lens on a full frame camera that would give you the same perspective. So, if I want macro shots with a nice, soft bokeh to the background, I use full-frame. The root of all the questions when comparing sensor sizes arises from the degree of enlargement of the original subject on the sensor.
Of course, larger sensors permit lower degree of enlargement (and hence image imperfections do not become obvious), when making prints and this has always been the larger format advantage since film days. However, that apparent depth of field increase from the smaller sensors generally outweighs that for most people who do not need large prints.
Image stacking and bokeh
By taking a series of images, each one with focus slightly shifted from the previous one, you can create an image stack. This is then processed in Helicon Focus, Zerene Stacker or Photoshop to combine the sharpest bits of each image and give it an amazing depth of field.

Photo by Paul Harcourt Davies
I often work at apertures of f/5.6 to f/8, where my preferred lenses perform best and, when combined, the depth of field is great and the background focus has shallow depth of field, delivering the kind of bokeh that emphasises the subject sharpness.
Analog versus digital bokeh
In this post I have dealt entirely with the "analog" approach. A camera lens is, after all, an analog device that through its construction produces an effect that is a result of diaphragm shape, out of focus elements and forms of aberration (spherical, in particular). Through this combination of effects, the lens creates a background whose characteristics we describe as its bokeh. Simple!
But in this day and age, there is naturally another approach -- digital bokeh -- whereby the sensor reduces the optical image projected upon it to a series of zeros and ones (tens of millions of them) that can be subtly rearranged and changed, via ingenious algorithms, to create an effect that is visually inseparable from the lens bokeh.
I'm not going to head down the road of digital filters -- wondrous though they may be. I've loved analog lenses since the day I looked through my grandmother's Victorian reading glass. As a kid, I built telescopes and spectroscopes, and I still have a passion for microscopes -- unchanged even after the hours spent plodding through turgid lens equations and practicals in a university physics lab.
Photography will always be secondary for me in that I use it as tool to portray the natural world as best I can, using as little digital manipulation as possible, enough to restore the scene as I think I saw it. It is my photographic mission statement, if you like. Just once in a while I think it is no bad thing to reflect upon various aspects of the image-making process to get a better idea of what we do, how we're able to do it and why.
It's too easy to listen to what others tell you with apparent confidence about subjective qualities such as sharpness and bokeh. Remember that what matters in your photography is what you like -- whether it's good, bad, creamy, latté, macchiato or whatever. It's your taste, so enjoy it!
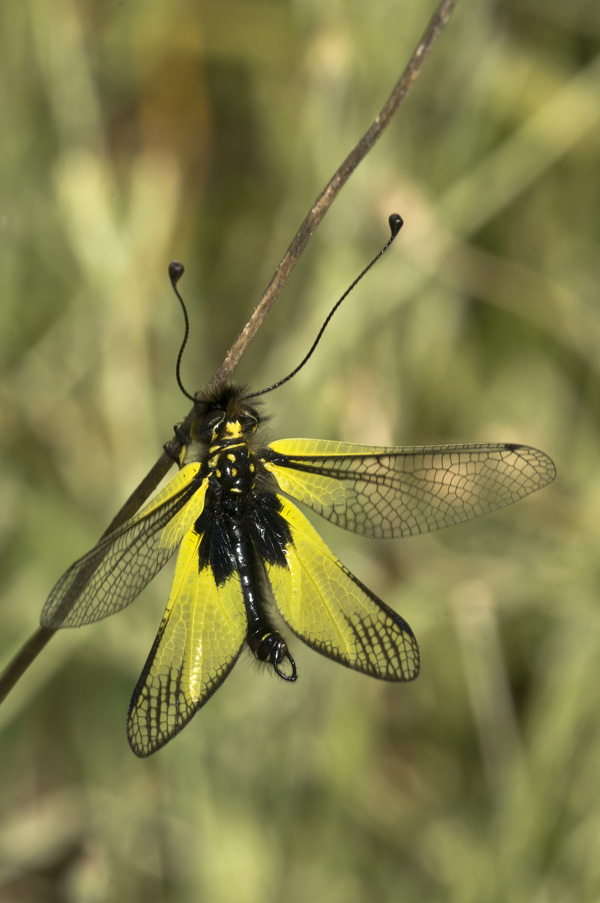
Photo by Paul Harcourt Davies
Paul Harcourt Davies is a long-time professional photographer, and an author of 19 books with a background that fuses technical and artistic elements to his life-long passion for photography of the natural world. We reviewed his e-book (that he co-wrote with frequent collaborator Clay Bolt): Wide-Angle Macro: The Essential Guide a few months ago, and we knew we wanted to share more of his insights and amazing images with our readers. (You can order a copy of the book here.) An experimenter and innovator by nature, he has long been on a mission through his writing and lectures to bring the techniques of macro photography to others. For the last 10 years he has been based in Umbria, central Italy, renovating an old farmhouse with a wild garden from where he organizes tours, workshops and much else.
Read Part 1 of Understanding Bokeh: The art and science behind the beauty of blur.