Getting started in underwater photography: Go close and wide
posted Wednesday, June 25, 2014 at 11:43 AM EDT
In my first piece on underwater photography, I offered some quick tips to improve your underwater photos. Here I go into greater depth on a particular style of photography: “Close-focus wide angle” (CFWA). I find this style to be an especially appealing and straightforward form of photography that serves as a great entry point to underwater shooting.
Why? It is quickly picked up by aspiring photographers with just a handful of useful pointers, and the images produced using this method are visually striking. They also take optimal advantage of the great depth-of-field provided by fisheye and ultra-wide lenses (which makes the style very friendly to new photographers).
Keys
Successful CWFA photography revolves around the cohesive selection, composition, focus and lighting of foreground and background subject material. The emphasis, as suggested by the name, is on the foreground subject, with complementary interest placed on the supporting background material. Take a look at our earlier article on dry-land close focus wide-angle photography here... many of the same principles apply.
It is critical to properly balance ambient and strobe light exposure for different subjects. Similarly, it's critical to maintain ample depth-of-field across the desired subjects by using smaller apertures, which feeds back into diver positioning and light sourcing, both topics we'll cover in a future post.
The subject choice is up to you, but for the sake of example in this article, I've used human subjects as points of interest.
Subject Selection and Composition
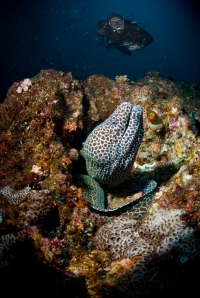
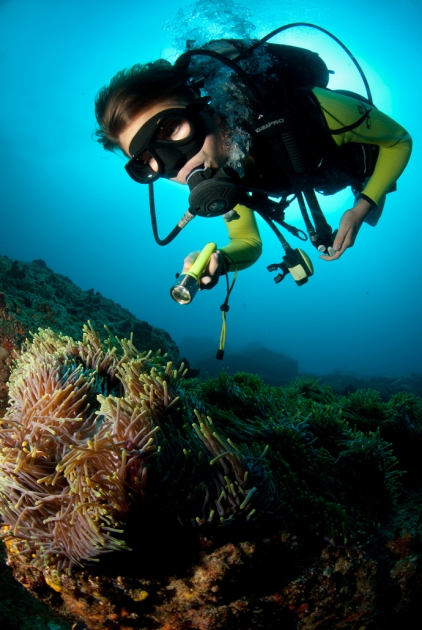
For tutorial purposes, it may be desirable to find a bit of anemone-covered coral (with supporting cast of local inhabitants) positioned so that you can shoot upwards (see forthcoming article on “Shooting UP!”). Not only does an upward perspective benefit the aesthetic and compositional appeal of the image, but it also aids in gathering sufficient ambient light for the background subject(s). Foreground material might also simply be a marine denizen or other underwater feature of interest.
In general, the human subject of the shot should be finning towards you (shots in which a diver is swimming away from you often prove compositionally weaker), approaching in a streamlined fashion with no loose hoses or gear, avoiding physical contact with the reef, and wearing a predominantly translucent mask for better facial visibility and appeal to the audience (see forthcoming article on “Underwater Modeling”).
Standard rules of engagement for land-based composition apply in the underwater arena all the same: the rule of thirds, strength in diagonals, avoiding subject amputations, using appropriate focal points, and finding the peak of the action.
Focus and Lighting
As mentioned above, composing a shot to provide sufficient light is critical. By shooting upwards and capturing more of the downward-filtering ambient light, you'll be able to maintain a smaller shutter (f/8 to f/16), which is essential for achieving the desired depth of field for the shot. And of course, being able to maintain a specific aperture also requires the diver to carefully balance the exposure of foreground and background subject material.
This is where human subjects have a distinct advantage to the native denizens of the aquatic world. Ask your model diver to swim out, then snap a shot, and recompose to get the exposure right. However, keep in mind that if it is a cloudy day, your ambient light may continue to shift (see forthcoming article on “Underwater Lighting Techniques”)!
Surface sunbursts can introduce a powerful “wow”-factor, but can ruin an image if used incorrectly. If the aperture is too wide and the sun itself is an overpowering focal point of the image, your original focal intent may prove moot.
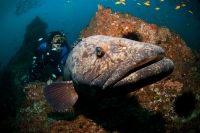
Remember also that wide-angle lenses, for better or worse, distort the distance of in-frame subjects. Use this perspective distortion effect to your advantage! Selectively increase the apparent scale of foreground objects. Emphasize a subject of interest in front of a distant or approaching diver.

Taking the Shot
1. Select a foreground subject or terrain with which to work. This will ideally include one to several focal points of interest and hopefully allow you to shoot in an upward orientation.
2. Rather than initially exposing for a dark reef, begin by setting your shutter to a speed between 1/125th and 1/160th of a second. Correctly positioning and powering your strobes and angling up should allow you to maintain appropriately small apertures as well. If including filtering sunbeams or a surface sunburst into the frame, consider faster shutter speeds to improve the aesthetic appeal of the sunlight.
3. Work with your dive model to compose for peak action, snap the shot, and review.
4. If the foreground subject is incorrectly exposed, consider adjusting your strobe power settings. If the background subject is incorrectly exposed, adjust the aperture accordingly.
In my next tutorial, to be posted tomorrow, I'll critique some good and not-so-good underwater photos I've taken over the years. Stay tuned!
Want to learn more about wide-angle shooting on land? Check out our 2-part tutorial on wide-angle macro photography!
How wide-angle macro photography can help you capture close-ups with impact
Wide-angle macro photography: Positioning, depth of field and other tips and tricks
... because aside from some technical aspects specific to the actual underwater shot, much of this theory may be applied on land!

Instructor Credit: Fiona Ayerst