How to find the optimal ISO for astrophotography: Understanding ISO, noise and dynamic range
posted Friday, March 17, 2017 at 10:00 AM EDT
As part of their free “Astrophotography 101” series focused on photographing the Milky Way, Lonely Speck has written an incredibly in-depth article about finding the best ISO for astrophotography.
Finding the best exposure settings – shutter speed, aperture and ISO – for astrophotography can be tricky, especially for beginners. Lonely Speck has a useful tool to help called the Milky Way Exposure Calculator, but this is recommended only as a starting point and you need to know more about how your digital camera operates to optimize your ISO setting. Ian Norman, (https://500px.com/lonelyspeck) the founder of Lonely Speck and author of the article, says that ISO is often misunderstood. In his glossary of terms, he says “It’s a (very) common misconception that increasing ISO increases the sensitivity of a camera sensor. ISO doesn’t change sensitivity. Increasing ISO simply increases the brightness of a photo by amplifying the sensor signal. In the electronics world, amplification is sometimes called “gain.”
You might have known that, but did you know that “higher ISOs won’t increase the visible noise in a photo?” Norman notes that all else equal, increasing ISO increases the brightness of an image, decreases total dynamic range and “in many cases (like astrophotography), a higher ISO will actually decrease the visible noise.” So how come so often when we increase ISO, images are noisier? Norman says that it’s because in many cases, people are using some sort of automatic exposure mode and aperture or shutter speed is changing in response to the increased ISO, thereby less light is reaching the sensor than before ISO was increased, which results in a lower signal-to-noise ratio.
So it is not just ISO affecting noise in your image, it’s shutter speed and aperture as well. Consider the images below, captured by Ian Norman with a Sony A7S.
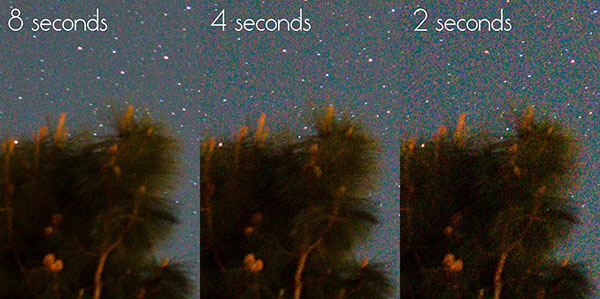
Unsurprisingly, the same thing happens when you change the aperture while keeping shutter speed and ISO constant. But what if you don’t keep ISO constant?
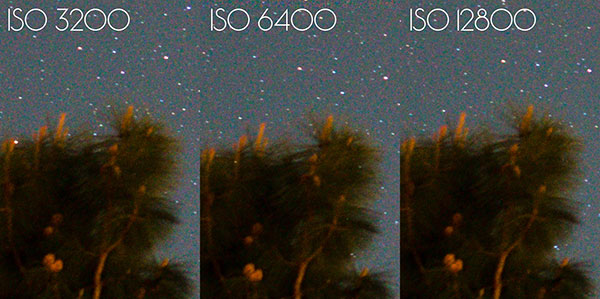
As we can see in the 100% crops above, ISO setting doesn’t actually affect the amount of visible noise. However, shutter speed and aperture certainly do when normalizing an exposure. The main takeaway then is that you should not be afraid to increase your ISO if it means getting the correct exposure in the field. However, these results do depend on whether or not your camera uses an ISO-variant (analog ISO) or ISO-invariant (digital ISO) sensor. To learn more about these two kinds of sensors and learn how ISO affects dynamic range, head over to Lonely Speck.
Be sure to read the article until the very end, where Norman explains a test that you can do with your own camera to find its optimal ISO setting for astrophotography. Every camera is a little different, but the test is short and simple to perform. “Contrary to popular belief, higher ISOs don’t create more noise and using a higher ISO can actually be beneficial when shooting in low-light scenarios, especially on cameras with ISO-variant sensors. Run an ISO-invariance test on your camera to determine the best ISO setting to use when shooting astrophotography.”
(Via Lonely Speck)